Dreamy Room Level 638
Dreamy Room Level 638 guide - Dreamy Room 638 Walkthrough & Solution.

Important Notice Regarding Level Numbering
Due to frequent changes in Dreamy Room's level numbering and differences between platforms (Android/iOS) – for example, level 638 on Android might not be the same as level 638 on iOS – the text guide below may not always match the images and video above. Please prioritize the image and video guides. If you find that the guide content doesn't match your current level, please visit the All Level Walkthroughs page to find the correct guide based on level images. Thank you for your understanding.
Dreamy Room Level 638 Walkthroughs & Guide
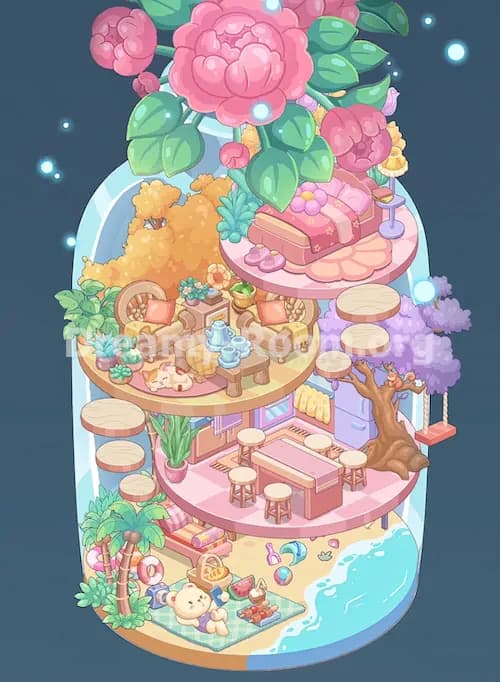
Dreamy Room Level 638 is a grand fairy-tale hall built around flowers, stairs, royal seating, music, and a delicate tea-party atmosphere. The heart of Dreamy Room Level 638 is not speed, but correct placement. The game is designed around carefully finding the perfect spot for every keepsake and decorative object, with a calm, pressure-free rhythm. In Dreamy Room Level 638, every wrong placement breaks the visual balance, so the safest approach is to build the room from the structure outward, then fill in the character scenes and the tiny finishing props.
Step 1. Place the main walls, rear door, and large architectural pieces in the correct positions.
Start Dreamy Room Level 638 by building the empty shell into a royal indoor hall. The tallest wall belongs across the back-left side, while the shorter wall segment stands on the upper-right side. Behind them, place the giant arched golden door in the top-center background so it rises above the walls and sits between clusters of large pink roses. On the far left outer wall, install the oversized arched mirror or glass panel with its gold trim. Then add the two tall gold lattice windows on the inner left wall, spacing them evenly from left to right. At the top edge near the door, place the two cream half-arch pediments, one to the left of the door and one to the right, both topped with golden star finials. Dreamy Room Level 638 immediately looks more complete once these major shapes are locked in, because every later object depends on these reference points.
Step 2. Place the stairs, balcony, railings, columns, and floor boundaries before adding furniture.
The next priority in Dreamy Room Level 638 is the layered floor plan. Put the curved balcony platform across the upper-middle area, bridging the left and right staircases. The left staircase begins near the center-left wall and climbs upward toward the balcony, while the right staircase descends from the upper-right platform toward the lower-right floor. Make sure the pink railings run along both staircases and continue around the balcony edge in a smooth curve. Under the balcony, add the two pale columns that support the upper platform, leaving the center alcove visible. Along the front-left edge, install the short gold-trimmed boundary wall that frames the entrance zone. Also place the soft blue carpeted flooring in the lower middle and the patterned aqua wall panel beneath the left stairs. In Dreamy Room Level 638, if these structural pieces are even slightly off, the rest of the room will look crowded or crooked, so align them first.
Step 3. Place the wall decorations, lights, and framed art across the left and upper walls.
Once the architecture of Dreamy Room Level 638 is stable, decorate the walls. On the left wall below the big arched mirror, hang three small framed pieces: a horizontal blue frame, a taller green floral frame in the center, and a small pink frame to the right. Farther left, mount the ornate portrait-style frame showing a tiny animal figure. On the upper back wall near the balcony, add the landscape painting in its gold frame just right of the left staircase. On the upper-right wall, place the moonlit blue painting inside its gold frame. Add the two wall sconces with hanging lamp shapes near the upper paintings, one on the left side of the royal lounge and one on the right side. Above the doorway, drape the green vine with lavender blossoms across the left top pediment. Dreamy Room Level 638 becomes much easier once the wall art is placed, because these pieces tell you exactly where the seating clusters and flower stands belong.
Step 4. Place all flower arrangements and rose borders to outline the room’s symmetry.
Dreamy Room Level 638 uses flowers as visual guides, so handle them carefully. Begin with the two gold flower urns on the shelf inside the large left mirror alcove. Then place the many pink and purple flower arrangements around the room: one trailing planter on the upper-left balcony corner near the landscape painting, one purple vase on a pedestal near the central mirror stand, one trailing planter on the upper-right platform below the moon painting, and several rounded flower bushes outside along the right edge and front-right corner. Add the large rose border along the entire front edge and continue it around the outer right side. Finally, make sure the giant pink rose clusters remain behind the rear door and along the upper outside wall. Dreamy Room Level 638 feels regal only when the floral pieces are balanced; if one cluster is misplaced, the whole level loses its palace-garden mood and the room will seem uneven.
Step 5. Place the tea lounge furniture and cozy sitting scene in the lower-left corner.
Now build the lower-left tea corner of Dreamy Room Level 638. Set the pink cushioned sofa against the left wall beneath the three small frames, with the blue pillow on its right side. Seat the plush guest on the sofa so it faces slightly toward the room while holding a dessert. In front of the sofa, place the small tea table with the white teapot, cup, and dishes. Beside it, add the dessert stand loaded with pastries. To the left of the sofa, position the blue vase on its tiny round stand. Just to the right of the sofa, under the staircase, place the side table stacked with books, a flower-shaped ornament, and the gold candelabra. Under the left staircase, tuck the pink-and-gold treasure chest into the nook. Dreamy Room Level 638 depends on this corner looking intimate and lived in, so keep every object close together without leaving empty gaps between the sofa, table, and stair base.
Step 6. Place the royal balcony seating, throne guests, guards, and upper ceremonial decorations.
The upper balcony is the centerpiece of Dreamy Room Level 638, so place it with care. Put the two ornate gold-and-orange chairs on the balcony platform, one at upper-left and one at upper-right, both facing inward toward the small round table. Seat the crowned plush princess-like figure on the left chair with the pink cushion in its lap, and place the crowned royal cat or bear-like figure in purple on the right chair. Between them, set the round table with the pink drink vessel. Behind them, place the central tall mirror or decorative stand dressed with flowers, and flank the space with pink flower urns. Add a knight statue behind the left throne and another on the right platform near the moon painting; both should hold shields, and the right-side guards also stand near the golden spears. Dreamy Room Level 638 looks wrong if the balcony scene is not symmetrical, so always judge spacing from the curved railing and the back doorway.
Step 7. Place the music corner, dancers, and center-floor characters beneath the balcony.
Under the balcony, Dreamy Room Level 638 turns into a performance room. Position the lavender grand piano slightly right of center, with the seated animal musician facing the keyboard and the open sheet music resting above the keys. Lean the brown string instrument against the piano on the left side, on top of the pale rug. In the alcove behind the columns, keep the soft pink rabbit figure visible in the background. On the blue carpet in front of the piano, place the two dressed-up girl figures: the orange-haired one in purple on the left side of the carpet and the brown-haired one in blue near the middle. Add the small purple-haired child closer to the front-left of the carpet, facing inward toward the others. Dreamy Room Level 638 is all about storytelling through arrangement, so this cluster should feel like a live palace gathering, with the music corner naturally connected to the tea corner and the royal balcony above.
Step 8. Place the front serving table, entrance guards, small props, and final finishing objects.
Finish Dreamy Room Level 638 by filling the front edge with the smallest but most important props. At the lower-right front area, place the rectangular serving table holding fruit, macarons, and the large gold-domed lamp or cloche. Let the jeweled gold key rest along the table’s lower edge. In front of that, place the small tray or basket with the teapot, cup, and flowers. Set the smiling elder host figure in blue just behind this serving area, facing the room. At the front-left entrance, place the two knight statues side by side with their spears and shields, then add the pink flower urns on the short posts beside the carpeted walkway. Keep the right-side outer flower bushes directly above the rose border and beneath the small right window. Dreamy Room Level 638 often trips players up at this stage because the tiny props look interchangeable, but their exact positions are what make the final room feel polished and complete.
Notes and Precautions
Dreamy Room Level 638 rewards order. The safest method is to place large architecture first, mid-sized furniture second, characters third, and tiny props last. If you try to complete Dreamy Room Level 638 from the front decorations backward, you will usually lose track of where the staircases, balcony pieces, and wall objects are supposed to anchor. Watch the vertical spacing on the left wall especially, because the mirror alcove, windows, frames, sofa, and stair rail all stack tightly together.
Another important precaution in Dreamy Room Level 638 is not to confuse similar flower items. Several pink flower pieces look alike, but some belong in urns, some hang over edges, and some form the outside border. The knight statues are also easy to mix up. Two belong at the entrance, while the others support the upper ceremonial area. The main challenge in Dreamy Room Level 638 is always correct placement, not object recognition alone.
Tips and Tricks from top player
In Dreamy Room Level 638, top players usually read the room in layers. First they locate all permanent background anchors: giant rear door, big left mirror, tall gold windows, balcony, and stairs. Then they use symmetry. If Dreamy Room Level 638 looks royal and formal, chances are the upper objects should balance left and right, even when the lower floor is busier and more playful.
A second useful trick for Dreamy Room Level 638 is to group objects by function. Tea items go left and front-right. Music items go beneath the balcony. Royal figures and ceremonial props belong upstairs. Flowers fill gaps and soften edges. Guards sit at thresholds and important platforms. A final expert shortcut is to compare railings and corners before placing any tiny item. In Dreamy Room Level 638, shadows, ledges, and wall spacing quietly reveal the intended spot for nearly everything.
Final Scene Description
When Dreamy Room Level 638 is completed, the once-empty shell becomes a dreamy palace salon overflowing with pastel elegance. A huge golden door rises at the back, wrapped in roses and topped with star-crowned trim, while gold lattice windows and framed art warm the blue walls. The upper balcony hosts two crowned plush royals seated beside a pink drink table, guarded by little knight statues and surrounded by flowers. Below, the room opens into a lively gathering space with a lavender grand piano, dancers on a blue carpet, a cozy tea sofa tucked into the left corner, and a gracious host beside a dessert-and-fruit service table. Rose borders wrap the entire front edge like a garden ribbon. Dreamy Room Level 638 feels like a fairytale reception frozen in a single peaceful moment, and every object proves that the beauty of the level comes from finding exactly the right place for every single piece.