Dreamy Room Level 646
Dreamy Room Level 646 guide - Dreamy Room 646 Walkthrough & Solution.
Important Notice Regarding Level Numbering
Due to frequent changes in Dreamy Room's level numbering and differences between platforms (Android/iOS) – for example, level 646 on Android might not be the same as level 646 on iOS – the text guide below may not always match the images and video above. Please prioritize the image and video guides. If you find that the guide content doesn't match your current level, please visit the All Level Walkthroughs page to find the correct guide based on level images. Thank you for your understanding.
Dreamy Room Level 646 Walkthroughs & Guide
Step 1. Place the mushroom cottage shell in the upper center of Dreamy Room Level 646
Begin Dreamy Room Level 646 by focusing on the largest object: the mushroom house itself. Set the cream-colored house body on the upper island, slightly left of center, leaving enough open space on the right for the outdoor baking station. The rounded wall should sit near the back edge of the grass, while the front of the cottage faces slightly toward the lower-right side of the map. After that, place the oversized mushroom cap roof on top. In Dreamy Room Level 646, the roof is the most dominant visual feature, so its alignment matters a lot. The cap is dusty red with large cream spots and should overhang the walls generously on all sides. Make sure the roof sits low enough to look snug but high enough that the circular windows can still be seen beneath it. If the cottage feels too far left or too far forward, later decorations will stop lining up correctly.
Step 2. Add the windows and door to complete the house in Dreamy Room Level 646
Once the main cottage is standing, complete the front details of the house. Dreamy Room Level 646 uses three important façade pieces: a large round window on the upper-left area of the roof wall, a smaller circular window low on the middle front wall, and a red door on the right front side. Place the larger golden-framed round window high on the left side of the mushroom cap section so it looks embedded into the roof. Then place the smaller round window under the roofline, closer to the center-bottom of the cottage wall. Finally, set the slim red door on the right side of the front wall, just to the left of the future oven area. In Dreamy Room Level 646, these pieces create the proper visual rhythm of the cottage, so avoid crowding them together. The door should not touch the stepping stones yet, and the lower window should sit centered enough to balance the heavier roof window above.
Step 3. Build the outdoor oven and counter on the upper-right side in Dreamy Room Level 646
The next priority in Dreamy Room Level 646 is the bakery workspace on the right side of the upper island. Place the long cream counter parallel to the island’s right edge, leaving a narrow strip of grass behind it for plants and a little room in front for the rabbit character. The brick oven rises from the back-left portion of this counter. Its arched opening should face left-front toward the center of the island, and the tall chimney should extend upward with a pale puff of cloud-like smoke on top. Then add the food and storage details: a loaf or rolls inside the oven opening, a purple baking peel or tray handle at the front, pink rolled fuel or cloth-like bundles in the lower shelf, stacked blue plates on the lower-right shelf, two green sacks behind the oven on the right, and a mound of dough or flour on the far-right countertop. Dreamy Room Level 646 looks wrong immediately if this station is too close to the house, so keep a clean gap between cottage and counter.
Step 4. Lay the paths and bridge that connect both islands in Dreamy Room Level 646
Now organize movement routes in Dreamy Room Level 646. Start by placing the wooden bridge between the upper and lower islands, centered slightly left of the overall middle. The bridge should stretch over the small water gap with its rails on both sides and its opening aligned toward the lower-right lawn. After that, add the stepping stones. One set belongs near the red door and curves gently toward the center-right of the upper island. Another stone trail continues on the lower island, beginning just below the bridge and extending diagonally to the right side. In Dreamy Room Level 646, these stones guide the eye, so they should feel like a natural walking path rather than scattered rocks. Keep the bridge centered enough that the route from the door to the lower picnic area makes sense. Do not place the stones too symmetrically; they look best when slightly irregular, just like the completed image.
Step 5. Fill the garden, flowers, and mushroom decorations around the cottage in Dreamy Room Level 646
With the major furniture in place, decorate the upper island’s borders. Dreamy Room Level 646 has a surprisingly dense set of plants, and their placement is what makes the level feel alive. On the far left side of the upper island, place two tall whimsical mushrooms, one yellow and one pink-purple, near the cottage wall. In front of them sits a small carrot patch with several orange carrots and leafy green tops growing from dark soil. Across the front of the cottage, add clusters of yellow flowers, pink blossoms, rounded stones, and several purple mushroom caps. Tuck leafy green shrubs along the left border, in front of the house, and behind the oven area. Also set larger gray rocks at the outer edges near the surrounding water. Dreamy Room Level 646 depends on this soft border work to hide empty grass. Every plant should feel tucked into the island edge, not randomly dropped in open space.
Step 6. Place the rabbit worker and the right-edge details in Dreamy Room Level 646
Next, add the character and small environmental accents that animate the right side of Dreamy Room Level 646. The blue rabbit worker stands on the upper-right lawn in front of the baking counter and slightly to the right of the bridge. Position the rabbit facing downward-left, wearing a pale yellow wide-brim hat, matching boots, and work clothes. A small shovel should be planted in a dirt mound just beside the rabbit, indicating a gardening or building task. At the right waterline, place three tiny red-and-white mushrooms near the corner edge, and keep the larger gray rocks at the far-right border. Add another purple mushroom cluster and pink flowers at the lower-right end of the upper island near the path descending toward the lower section. In Dreamy Room Level 646, the rabbit cannot drift too close to the oven or the bridge. It needs a little pocket of empty grass around it so the pose remains readable and the scene does not feel cluttered.
Step 7. Create the chopping and wood area on the lower-left island in Dreamy Room Level 646
Shift attention to the lower island and start from the left side. Dreamy Room Level 646 includes a rustic work corner anchored by a wide tree stump table. Place the stump near the lower-left quadrant, but not at the very edge, leaving room for bushes and rocks around it. Lay a blue axe on top of the stump so it angles across the wood surface. To the right of the stump, stack a few rolled logs neatly on the grass. Around this corner, add pale flowers with yellow centers, dense green shrubs, and a pair of bluish rocks. This small section balances the bakery on the upper-right side, so it should feel compact but intentional. In Dreamy Room Level 646, players often misplace the stump too centrally, which crowds the picnic area. Keep it clearly left of the bridge exit so the lower island still has an open center for the blanket, food basket, and decorative items.
Step 8. Arrange the picnic blanket and food display on the lower center in Dreamy Room Level 646
Finish Dreamy Room Level 646 by building the picnic scene on the lower-center grass. Spread the pink rectangular picnic blanket slightly right of center on the lower island, directly below the bridge but leaving a path of stepping stones visible on the right. On the left side of the blanket, place a woven basket filled with bread or pastries. Behind it, add the rolled blue picnic mat or blanket. Toward the back-center of the blanket, place a slice of watermelon. Near the front-center, add a frosted pink dessert on a small plate, a tiny green cup, and a tall pastel bottle. On the right side of the blanket, place a fruit basket filled with colorful produce. Finally, set a red apple on a small round wooden stand just to the right of the blanket. In Dreamy Room Level 646, this final arrangement must look cozy but tidy, with each object separated enough to be recognizable.
Notes and Precautions for Dreamy Room Level 646
Dreamy Room Level 646 is easy to read at first glance, but the true difficulty comes from spacing. The mushroom cottage takes up most of the upper island, so if it sits too far forward, the flower border, stepping stones, and bridge area will all feel cramped. If the baking counter is too far right or too low, the rabbit loses its standing space. On the lower island, the stump and picnic blanket must not overlap visually, or the whole scene starts to look compressed.
Another important precaution in Dreamy Room Level 646 is to treat edge decorations as framing devices. The shrubs, rocks, mushrooms, and flowers mostly belong along the borders, where they soften the outline of the floating islands. Do not place these filler pieces in the middle of the lawn. Also remember that the stepping stones should suggest movement from the door to the bridge and from the bridge to the picnic area. If that route looks broken, the layout will feel off even if every item is technically present.
Tips and Tricks from top player for Dreamy Room Level 646
In Dreamy Room Level 646, top players usually solve the layout by working from largest to smallest. First lock the mushroom house, then the oven counter, then the bridge, and only after that place decorative plants and food props. This reduces guesswork because the biggest objects define all remaining empty zones. Another strong strategy for Dreamy Room Level 646 is to think in clusters: house cluster on the upper-left, bakery cluster on the upper-right, work cluster on the lower-left, and picnic cluster on the lower-center-right.
A second useful trick is to watch the negative space. Dreamy Room Level 646 is not supposed to be filled edge to edge with objects; some clean grass must remain visible around the rabbit, between the bridge and blanket, and in front of the cottage. When a level feels wrong, the issue is often not the item itself but the empty space around it. Finally, use the stepping stones as anchors. If the paths look natural, the rest of Dreamy Room Level 646 usually falls into place much faster.
Final scene description of Dreamy Room Level 646
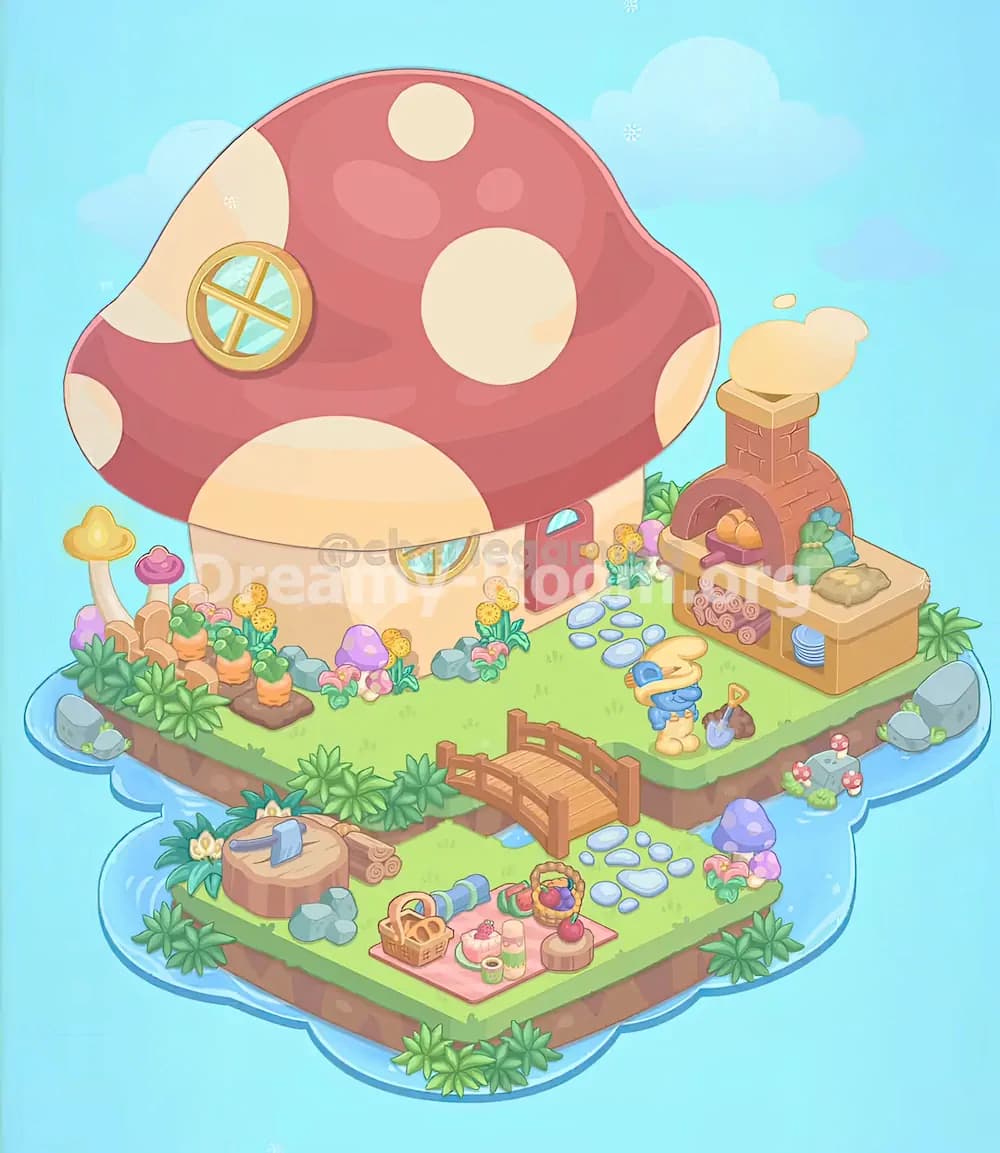
The completed Dreamy Room Level 646 becomes a charming floating mushroom homestead surrounded by calm blue water. A large red-and-cream spotted mushroom cottage dominates the upper island, with a round roof window, a small front window, and a red door nestled among flowers, stones, shrubs, and whimsical mushrooms. To the right, a brick outdoor oven and long counter create a cozy bakery corner, complete with bread, stacked plates, sacks, and dough. A tiny blue rabbit worker stands nearby with a shovel, bringing the scene to life. A wooden bridge links the upper island to the lower lawn, where a stump chopping station sits on the left and a soft pink picnic setup fills the center. Bread, fruit, dessert, a bottle, a cup, and an apple make the lower area feel warm and inviting. Dreamy Room Level 646 is all about perfect placement, and every object contributes to that peaceful storybook atmosphere.