Dreamy Room Level 763
Dreamy Room Level 763 guide - Dreamy Room 763 Walkthrough & Solution.
Important Notice Regarding Level Numbering
Due to frequent changes in Dreamy Room's level numbering and differences between platforms (Android/iOS) – for example, level 763 on Android might not be the same as level 763 on iOS – the text guide below may not always match the images and video above. Please prioritize the image and video guides. If you find that the guide content doesn't match your current level, please visit the All Level Walkthroughs page to find the correct guide based on level images. Thank you for your understanding.
Dreamy Room Level 763 Walkthroughs & Guide
Step 1. Place the rooftop borders, lamps, and string lights around Dreamy Room Level 763.
Begin Dreamy Room Level 763 by treating the empty building as a stacked rooftop café. The main challenge in Dreamy Room Level 763 is not speed, but figuring out the correct placement for each object, so start with the biggest boundary pieces first. Place the blue rooftop railings around the lower-left terrace, then continue the same railing style around the upper-right terrace. Add the black-green streetlamps at the terrace corners and along the middle walkway, making sure each lamp rises just inside the railing instead of floating outside the roof edge. After that, stretch the golden bulb string lights from lamp to lamp. In Dreamy Room Level 763, these lights frame the café area, connect the party terrace to the lounge terrace, and help show where smaller decorations should sit later.
Step 2. Place the lower-left garden dining area in Dreamy Room Level 763.
On the lower-left rooftop of Dreamy Room Level 763, build the outdoor dining garden. Place the tan wooden floor section inside the blue railing, then arrange the round green café tables across the terrace. One table sits near the back-left corner, one is closer to the center, and another is near the front-right side of this small roof. Add the curly-backed wooden chairs around the tables, facing inward so they look ready for guests. Put the pastel table decorations on top: small blue vases, pink flowers, dessert plates, fruit, and tiny tea items. Add the green shrubs and yellow flower beds along the inside edge of the railing. Dreamy Room Level 763 depends on these cozy details to turn the flat roof into a lively rooftop café garden.
Step 3. Add the balloon party corner on the middle-left roof in Dreamy Room Level 763.
Next, decorate the upper part of the left rooftop in Dreamy Room Level 763 with the playful party corner. Place the cluster of colorful balloons just above the lower-left garden area, slightly left of the central stairs. The pink cat-face balloon belongs at the front of the balloon group, while the rabbit and heart-shaped balloons sit behind it with the blue, green, yellow, and red balloons filling the space. Put the small animal guests near the balloons: the cute yellow character should face the party decorations, and the brown bear-like guest with a red bow belongs near the back counter area. Add the blue storage crates on the rear-left side, tucked behind the guest area. This part of Dreamy Room Level 763 can feel crowded, so keep the balloons high and the characters lower.
Step 4. Place the central stairway, flower pots, and walkway details in Dreamy Room Level 763.
The stairway is a key placement clue in Dreamy Room Level 763 because it connects the two roof heights. Put the blue-and-cream stairs in the center, rising from the lower-left dining terrace toward the upper-right café lounge. The stairs should sit just right of the balloon cluster and just left of the green sofa area. Around the stair landing, place the small potted plants, yellow flowers, and green bushes. Add the sunflower planter near the middle railing, where the walkway meets the right terrace. Place the small yellow animal character with the curled tail near the central walkway, facing toward the café truck and lounge. In Dreamy Room Level 763, this connector zone prevents the two rooftops from feeling separate, so align every plant and lamp carefully.
Step 5. Place the café truck body on the upper-center roof in Dreamy Room Level 763.
Now place the main café truck in Dreamy Room Level 763 on the upper-center roof. The truck is cream-colored with green accents, and it should sit behind the central walkway, facing toward the right side of the building. Its serving side opens toward the front-left, where guests can approach the counter. Place the red-and-cream striped awning along the left side of the truck, just above the display case. Under the awning, add the glass display filled with pastel sweets or flowers, the hanging menu sign, the small counter, and the cute cat cashier. The blue cash register or screen belongs on the counter in front of the cashier. Dreamy Room Level 763 uses this truck as the main anchor object, so do not place it too far left or too far forward.
Step 6. Decorate the café truck roof with the CAFE letters and plants in Dreamy Room Level 763.
The roof of the café truck is one of the most important visual areas in Dreamy Room Level 763. Place the large yellow CAFE letters across the green truck roof, angled so they sit above the truck and overlap the rooftop plants. The letters should stretch from left to right across the top, with the “C” on the left and the “E” on the right. Add the big leafy potted plants behind and between the letters. The brown pot with wide green leaves belongs toward the left, while the terracotta pot with leaves and fruit belongs closer to the right. Add the small red fruit clusters and pineapple-like yellow fruit decorations around the letters. In Dreamy Room Level 763, these roof decorations make the truck instantly recognizable as the café centerpiece.
Step 7. Add the truck front, logo, rose pot, and side details in Dreamy Room Level 763.
After the roof is finished, complete the truck’s right-facing front section in Dreamy Room Level 763. Place the bright blue windshield panels along the upper front of the truck, then add the yellow pretzel-heart logo on the cream side panel below the windows. The green lower bumper and curved front shape should align with the upper-right terrace floor. Add the small side mirror on the right edge of the truck. Place the tiny red rose in a pot near the front lower corner of the truck, just above the green couch area. The café truck also has soft decorative swirls near the logo, so make sure this side panel remains visible. Dreamy Room Level 763 becomes much easier once the truck’s front, counter side, and roof decorations all point in the correct direction.
Step 8. Place the right rooftop lounge area in Dreamy Room Level 763.
Move to the upper-right terrace of Dreamy Room Level 763 and place the green lounge sofa near the front railing, slightly right of the central stairway. The sofa should face the wooden coffee table. Put the coffee table in front of it with the small plates, cups, desserts, and tea items arranged neatly on top. Add the seated cat character on or beside the sofa area, positioned near the right side of the table. Behind the lounge, place the flower arrangement with purple, yellow, and orange blossoms. The flowers should stand near the right wall of the truck and slightly in front of the vending machine. Dreamy Room Level 763 rewards exact placement here because the sofa, table, cat, bouquet, and railing lights must fit in a narrow rooftop strip.
Step 9. Place the vending fridge and back-right greenery in Dreamy Room Level 763.
On the far-right side of Dreamy Room Level 763, place the turquoise vending fridge or display cooler against the rooftop edge. Its glass door faces front-left, showing colorful drinks or treats inside. Just behind it, place the tall green decorative wall panels. These panels rise vertically above the roof and sit at the back-right corner, creating a leafy backdrop for the café. Add the long trailing vine so it drapes down from the top of the panel and curls along the right side. Place the lamppost near the fridge and connect it to the string lights along the railing. In Dreamy Room Level 763, this corner balances the large café truck on the opposite side, so the fridge, green signs, vines, and lamp must stay tightly grouped.
Step 10. Add the exterior wall decorations on the left tower in Dreamy Room Level 763.
The lower building walls also need decoration in Dreamy Room Level 763. On the front-left tower, keep the large blue window grid at the bottom-left face visible, then place the slim purple-blue light panels along the upper edge of the wall. On the center-front face, add the large round green logo with the smiling cat face and peace-sign pose. This logo sits high on the cream wall, below the rooftop edge and above the two small blue windows. Place the small blue windows below the logo, aligned diagonally with the building perspective. These wall decorations are easy to miss because most objects are on the roof, but Dreamy Room Level 763 requires the outside façade to match the completed scene, not just the terrace.
Step 11. Place the air conditioners and right-side building façade in Dreamy Room Level 763.
On the vertical blue column between the two buildings in Dreamy Room Level 763, place the stacked air-conditioner units. Two units sit near the upper middle, close to the rooftop line, and another stacked pair sits lower down on the same central wall. Each unit should face outward, with the fan circles visible on the front. Then move to the right building wall. Add the small square windows with golden frames across the upper side wall. Below them, place the large teal billboard showing the cheerful cat and the whipped dessert or ice-cream cup. Under the billboard, keep the tall blue glass windows aligned along the lower façade, each with a small tan planter box beneath it. Dreamy Room Level 763 looks complete only when these exterior pieces are positioned correctly.
Step 12. Finalize all small props and character placements in Dreamy Room Level 763.
Finish Dreamy Room Level 763 by checking every small item against the completed image. The cat cashier must stand inside the café truck serving window, the animal guests must sit or stand around the left party area, and the curled-tail character should remain near the center walkway. The lower-left terrace needs all chairs facing the round tables, not turned into the railing. The small flower pots should fill the gaps beside the stairs, near the café counter, and along the front dining corner. The string lights must sit over the railings rather than across the characters’ faces. Dreamy Room Level 763 is mainly a placement puzzle, so the final review matters: if one object refuses to lock in, compare its height, roof level, and direction with the nearby lamps, railings, and stairs.
Notes and Precautions
In Dreamy Room Level 763, the most important point is roof height. The lower-left dining terrace, the middle stair area, and the upper-right café terrace are close together, so objects can appear correct while actually belonging to a different level. Do not place the vending fridge near the dining tables; it belongs on the far-right upper terrace. Do not place the café truck too low; it sits on the upper-center roof behind the stairway. The CAFE letters and big potted plants go on top of the truck, not directly on the building roof. Also watch the string lights: they should connect the lamps and follow the railings. Dreamy Room Level 763 rewards patience because the challenge is identifying each object’s exact location, not simply filling empty space.
Tips and Tricks from top player
For Dreamy Room Level 763, place large anchor objects first: the railings, café truck, right-side greenery panels, lower-left dining deck, and billboard. After those are correct, smaller items become easier because they naturally fit around the anchors. A top player approach is to divide Dreamy Room Level 763 into four zones: lower-left garden dining, upper-left party counter, upper-center café truck, and upper-right lounge. Work zone by zone instead of dragging every item randomly. Use the lamps as vertical markers and the string lights as boundary guides. If an object looks close but will not settle, check whether it belongs behind a railing, in front of a railing, or on a higher roof. Dreamy Room Level 763 is solved fastest when you treat every prop as part of a layered rooftop scene.
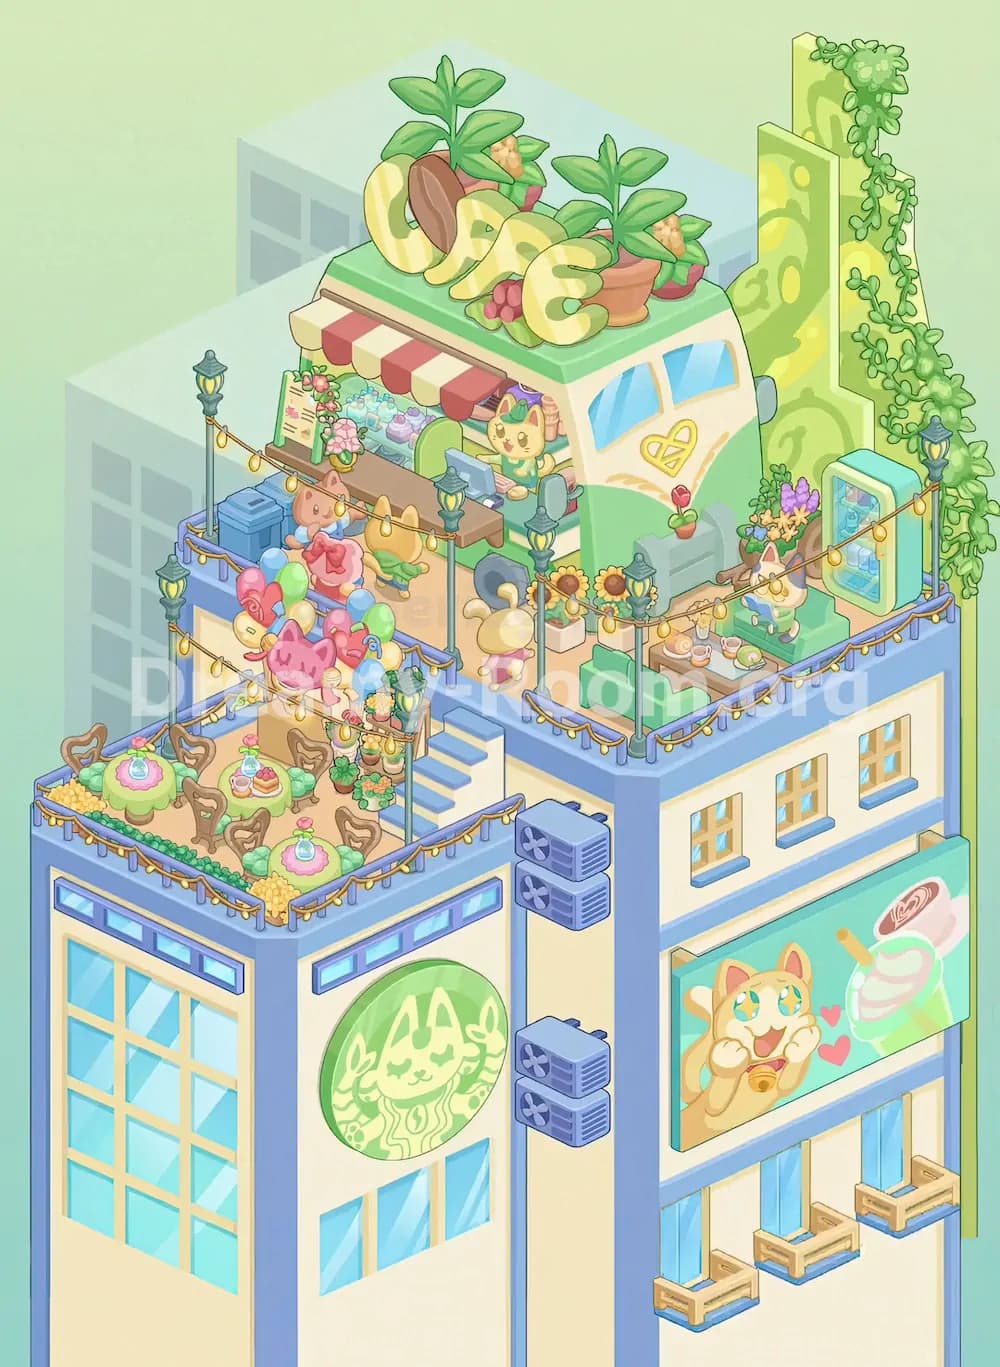
Final Scene Description for Dreamy Room Level 763
The completed Dreamy Room Level 763 shows a cheerful rooftop café built across a pastel city building. The lower-left roof becomes a garden dining terrace with green round tables, curly wooden chairs, flower vases, desserts, shrubs, and warm string lights. Above it, a playful party corner holds colorful balloons, cute animal guests, blue crates, and flower pots. The upper-center roof features a cream-and-green café truck with a striped awning, cat cashier, pastry display, pretzel logo, rose pot, huge CAFE letters, and leafy potted plants on top. The upper-right terrace becomes a cozy lounge with a green sofa, wooden table, tea snacks, flower bouquet, vending fridge, tall green sign panels, and trailing vines. The exterior walls complete Dreamy Room Level 763 with cat logos, AC units, golden windows, balcony planters, and a bright dessert billboard.