Dreamy Room Level 217
Dreamy Room Level 217 guide - Dreamy Room 217 Walkthrough & Solution.

Important Notice Regarding Level Numbering
Due to frequent changes in Dreamy Room's level numbering and differences between platforms (Android/iOS) – for example, level 217 on Android might not be the same as level 217 on iOS – the text guide below may not always match the images and video above. Please prioritize the image and video guides. If you find that the guide content doesn't match your current level, please visit the All Level Walkthroughs page to find the correct guide based on level images. Thank you for your understanding.
Dreamy Room Level 217 Walkthroughs & Guide
Step 1. Place the Decorative Fences, Bridges, Lanterns, and Lampposts around the Main Platform in Dreamy Room Level 217
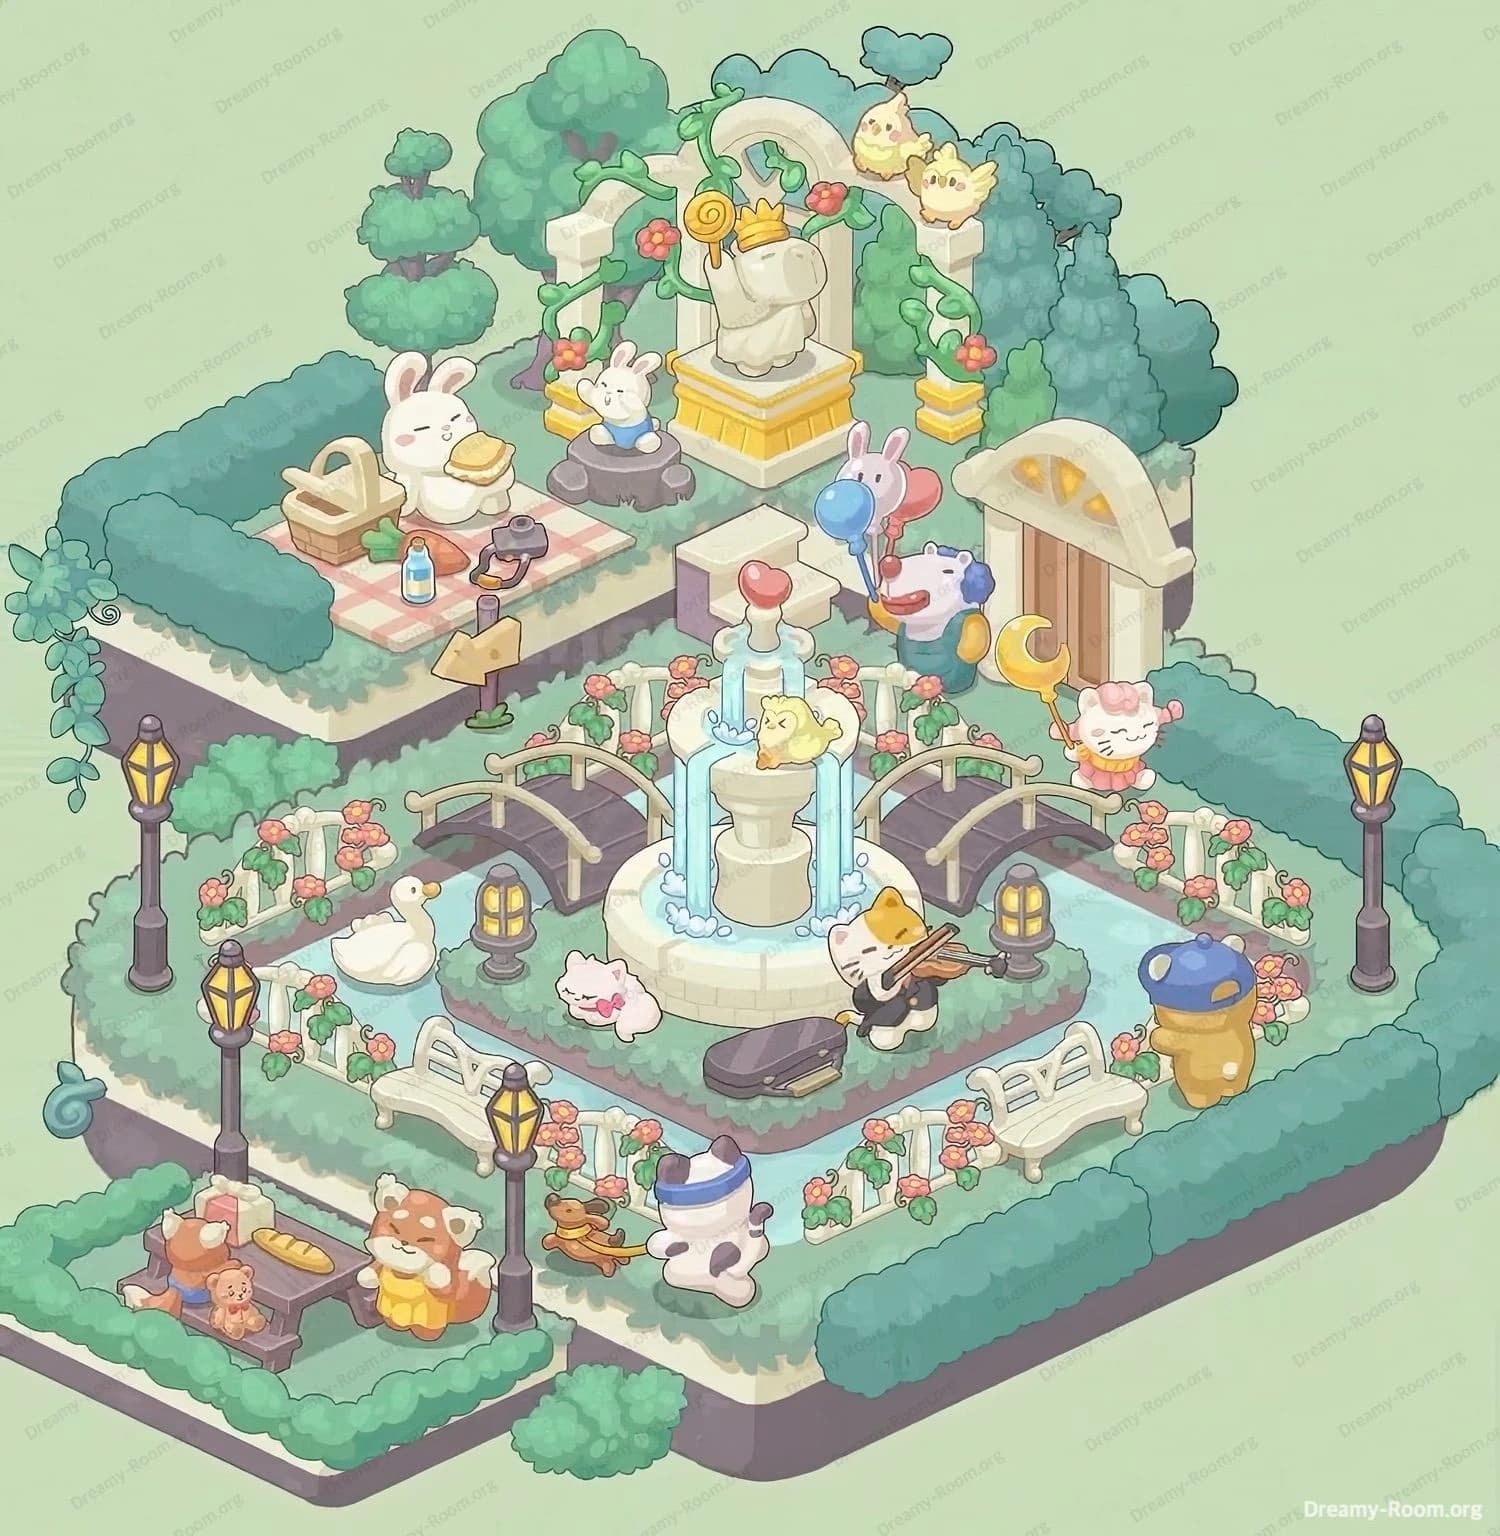
Dreamy Room Level 217 begins with a blank central grass platform framed by low hedges, and the first task in Dreamy Room Level 217 is to outline the core area with fencing and lighting. In Dreamy Room Level 217, select the ornate white fence pieces and snap six segments along the edge of the raised water moat, making sure each fence panel aligns flush against its neighbor. Next, in Dreamy Room Level 217, place the two gently curved wooden garden bridges opposite each other, allowing foot traffic over the moat. After that, add the four small golden lantern posts at the base of each bridge—these give a soft glow in Dreamy Room Level 217. Finally, position the four tall black-and-gold lampposts at the outer corners of the main platform; when playing Dreamy Room Level 217, you’ll hear a satisfying sound as each lamppost clicks into its correct spot.
Step 2. Place the Central Fountain in the Water Moat on the Main Platform in Dreamy Room Level 217
In Dreamy Room Level 217, the watery moat in the center of the main platform is waiting for a focal point. The second critical placement in Dreamy Room Level 217 is the multi-tiered stone fountain. Carefully drag the circular fountain base into the exact center of the moat in Dreamy Room Level 217; if positioned correctly, the fountain’s water spouts will hover perfectly above the moat’s surface. Next, gently adjust the upper tiers so that the water cascades match the drawn streams on the platform during Dreamy Room Level 217. When you finish this placement in Dreamy Room Level 217, the fountain should sit neatly in the center, its flowing water matching the outline of the preexisting moat. Remember, Dreamy Room Level 217 rewards precision—small nudges can make the water alignment perfect and avoid any overlap with the fence posts.
Step 3. Place the Benches and Rocking Horse Toddler on the Outer Edges of the Main Platform in Dreamy Room Level 217
Once the fountain is set in Dreamy Room Level 217, it’s time to populate the surrounding green space. In Dreamy Room Level 217, select the two white park benches and place one bench on the west side of the fountain, just outside the fence but inside the hedged boundary. Then, in Dreamy Room Level 217, place the second bench on the south side, mirroring the first. After benches are positioned, find the little cow-toddler riding the wooden rocking horse. In Dreamy Room Level 217, drag that playful figurine onto the southwest corner of the main platform, just between the lamppost and the bench. If done correctly in Dreamy Room Level 217, the toddler’s hat will peek over the foliage and the rocking horse’s runners will rest flush against the grass edge. Placing these items precisely in Dreamy Room Level 217 ensures that the scene feels lively and balanced.
Step 4. Place the White Goose and Sleeping Pink Bunny near the Fountain in Dreamy Room Level 217
The fourth decorative challenge in Dreamy Room Level 217 involves the smaller critters that bring life to the scene. First, select the graceful white goose and place it on the west side of the fountain moat, standing atop the water surface at the corner where the fence meets the bridge in Dreamy Room Level 217. Next, in Dreamy Room Level 217, pick up the tiny pink sleeping bunny and tuck it into the grassy ledge just inside the fence, slightly north of the goose. When you position the bunny correctly in Dreamy Room Level 217, it will nestle against the fence, giving a cozy, lived-in feel. Remember that Dreamy Room Level 217 will snap these animal pieces into place only when they are exactly aligned with the fence posts and the moat’s border, so take care to nudge them gently until you hear the click.
Step 5. Place the Cat Musician Playing the Violin with its Open Case on the Main Platform in Dreamy Room Level 217
Now it’s time to bring music to Dreamy Room Level 217 by placing the violin-playing cat. In Dreamy Room Level 217, select the cat musician figure—complete with black suit, bright bow tie, and open violin case. Position this charming character on the southeast edge of the fountain platform, nestled right by the fence and adjacent to the southern bench. As you drag the violin case, align it so that the case lid faces the bench and the cat stands upright in front of it. When correctly placed in Dreamy Room Level 217, the cat’s bow will hover just above the violin strings, and the case will rest flush on the grass. Precise placement here in Dreamy Room Level 217 ensures that the violin cat becomes a captivating centerpiece against the cascading fountain backdrop.
Step 6. Place the Picnic Blanket, Basket, Food Items, and Bunnies on the Upper Left Platform in Dreamy Room Level 217
Switch to the upper-left secondary platform for a quaint picnic scene in Dreamy Room Level 217. First, place the red-and-white checkered picnic blanket flush against the northwest hedge in Dreamy Room Level 217, making sure its corners align with the hedge tips. Next, in Dreamy Room Level 217, add the wicker picnic basket just above the blanket’s top-left corner. Then position the sandwich piece on the lap of the large white bunny—this bunny should sit in the center of the blanket in Dreamy Room Level 217. Drag the small blue flower bunny onto the adjacent tree-stump seat, and arrange the milk bottle and carrot alongside the blanket’s edge in Dreamy Room Level 217. When you finish these placements in Dreamy Room Level 217, the picnic tableau will look perfectly organized, with each item snapping to the intended grid points on the upper platform.
Step 7. Place the Wooden Signpost Arrow near the Picnic Area on the Upper Platform in Dreamy Room Level 217
The seventh step in Dreamy Room Level 217 is to guide visitors to the picnic spot. Select the wooden arrow signpost and place it just south of the upper-left platform’s hedge, pointing left toward the picnic in Dreamy Room Level 217. In Dreamy Room Level 217, you’ll notice a subtle grid alignment that ensures the arrow faces precisely 90 degrees east; rotate the signpost until it clicks into that orientation. Drag the sign just outside the blanket area, making sure its base sits on the bare grass patch in Dreamy Room Level 217 so it doesn’t overlap the picnic items. When correctly aligned in Dreamy Room Level 217, the post will stand upright, and the arrow head will point directly at the blanket bunny duo, creating a charming directional cue within the scene.
Step 8. Place the Stone Arch, Vines, Snail Statue, and Yellow Chicks on the Top-Center Platform in Dreamy Room Level 217
For a grand focal point in Dreamy Room Level 217, begin by placing the white stone archway on the center of the highest platform tier. In Dreamy Room Level 217, select and align the arch so that its base flanks the back hedge perfectly. Next, drag the twisting green vine clusters and snap them onto the arch columns—each vine in Dreamy Room Level 217 has a pre-set groove that will only match one orientation. Then place the crowned snail statue on its golden pedestal in front of the arch in Dreamy Room Level 217, making sure the snail holds the swirl lollipop above its head. Finally, add the two yellow chicks atop the arch’s horizontal beam; in Dreamy Room Level 217, they will sit at slightly different heights, so rotate each until they settle snugly on the stone. This assembly in Dreamy Room Level 217 creates a regal garden centerpiece that frames the picnic and fountain below.
Step 9. Place the Doorway, Balloon Vendor, Pink Cat, and Blue Bear on the Upper Right Platform in Dreamy Room Level 217
The ninth decorative grouping in Dreamy Room Level 217 populates the upper-right region. First, select the arched wooden doorway and insert it flush into the hedge opening on the east side of the top platform—Dreamy Room Level 217 requires precise placement so the door frame’s curvature matches the drawn arch cutout. Next, in Dreamy Room Level 217, place the hippo-like balloon vendor holding red and blue balloons just south of the archway on the same tier. Then add the pink cat in a frilly dress holding the crescent-moon wand to the vendor’s right; in Dreamy Room Level 217, you’ll feel the figure snap when it’s aligned with the adjacent hedge. Finally, position the blue bear guard wearing a cap and vest at the far east edge of the mid-tier, just outside the hedge in Dreamy Room Level 217, to watch over the scene. Each of these placements in Dreamy Room Level 217 brings life and personality to your garden.
Step 10. Place the Picnic Table, Bread, Teddy Bear Toy, Brown Bunny, and Red Panda on the Bottom Left Mini Platform in Dreamy Room Level 217
Switch attention to the smallest platform to recreate the cute picnic nook in Dreamy Room Level 217. First, place the dark wooden picnic table flush against the mini-hedge rim in the southwest corner of Dreamy Room Level 217’s tiny platform. Next, position the freshly baked loaf of bread on the table’s left end, followed by the small teddy bear toy on the right. Then, in Dreamy Room Level 217, place the little brown bunny sitting on the bench beside the table, making sure its ears don’t clip through the hedge. Finally, drag the red panda character hugging a larger teddy bear and place it in front of the table—it should rest against the grass edge in Dreamy Room Level 217. When correctly placed, this charming vignette in Dreamy Room Level 217 will mirror the detail and warmth of the full scene.
Step 11. Place the Decorative Vines and Shrubs to Fill Borders on Dreamy Room Level 217
The final step in Dreamy Room Level 217 is to fill any gaps along hedges with trailing greenery. In Dreamy Room Level 217, select the small hanging vine cluster and attach it to the west side of the upper platform’s outer hedge, letting leaves drape over the edge. Next, choose the lone rounded shrub and place it at the south-central edge of the main platform outside the hedges; Dreamy Room Level 217 will lock it into place once it matches the clearing in the foliage. Finally, scan Dreamy Room Level 217’s entire map for any tiny overlaps or empty spots—use the game’s “nudge” control to adjust any piece by a single grid unit. Completing these last placements in Dreamy Room Level 217 ensures every corner of your dreamy garden is lush and seamless.
Notes and Precautions
- Grid Alignment Matters: In Dreamy Room Level 217, every object must align to the hidden grid. Misaligned rotations or placements can prevent snapping.
- Overlap Warnings: Watch for overlap warnings in Dreamy Room Level 217, especially when placing the arch next to hedges and when positioning the bunny and vendor figures.
- Rotations: Many items in Dreamy Room Level 217 have only one correct orientation. Rotate each piece slowly until you hear the click confirming the correct angle.
- Undo Function: If a piece refuses to snap in Dreamy Room Level 217, use the undo button and retry placement gently—sometimes a slight offset helps the object lock in.
- No Time Pressure: Remember Dreamy Room Level 217 is untimed. Take breaks if you get stuck on a tricky snap; stepping away often makes the correct placement clearer.
- Visual Cues: Pay attention to subtle shading and underlays in Dreamy Room Level 217; the game’s visuals hint at where each object belongs, from lantern base circles to faint hedge outlines.
Tips and Tricks from Top Player
- Snap Guides: Turn on the “snap preview” in Dreamy Room Level 217’s settings to see ghost outlines before committing—this shortcut saves repositioning time.
- Layer Order: When obstacles block your view, cycle through layers in Dreamy Room Level 217 to select hidden items and avoid accidentally moving the grass background.
- Group Placement: Use the multi-select tool in Dreamy Room Level 217 to position similar items (like lampposts or benches) simultaneously—just ensure they’re perfectly aligned afterward.
- Zoom & Pan: Zoom in for precision when placing small figures in Dreamy Room Level 217, then zoom out to verify overall balance.
- Save Presets: After nailing tricky rotations in Dreamy Room Level 217, save a screenshot or note the exact orientation angle to replicate in future levels with similar pieces.
- Color Contrast: Adjust the game’s brightness in Dreamy Room Level 217 if you struggle to see pastel outlines—slightly higher contrast helps spot the faint placement guides.
- Community Layouts: Check online forums for user-shared grid coordinates for Dreamy Room Level 217—sometimes squads of players map out exact XY positions for every piece.
Final Scene Description
In Dreamy Room Level 217, you end up with a serene, tiered garden oasis that marries whimsical charm and precise layout. The central moat cradles a three-tiered stone fountain whose gentle cascades glisten under golden lamplight. Around the fountain, elegant white fences, rose-adorned railings, and curved wooden bridges frame a playful tableau of a violinist cat, a relaxed goose, and a sleepy pink bunny. Upon the second tier, a checkered picnic blanket hosts a happy bunny family, signposted by a rustic arrow, while a crowned snail statue presides beneath a blooming vine-wrapped arch, watched over by two yellow chicks. To the right, a friendly hippo vendor offers balloons beside a crescent-wand–wielding pink cat and a steadfast blue bear guard. The lowest nook holds a cozy wooden picnic table with bread, a teddy toy, and a brown bunny, flanked by a cheerful red panda. Trailing vines and shrubs soften every hedge line, completing the tranquil, storybook perfection of Dreamy Room Level 217.


