Dreamy Room Level 276
Dreamy Room Level 276 guide - Dreamy Room 276 Walkthrough & Solution.
Important Notice Regarding Level Numbering
Due to frequent changes in Dreamy Room's level numbering and differences between platforms (Android/iOS) – for example, level 276 on Android might not be the same as level 276 on iOS – the text guide below may not always match the images and video above. Please prioritize the image and video guides. If you find that the guide content doesn't match your current level, please visit the All Level Walkthroughs page to find the correct guide based on level images. Thank you for your understanding.
Dreamy Room Level 276 Walkthroughs & Guide
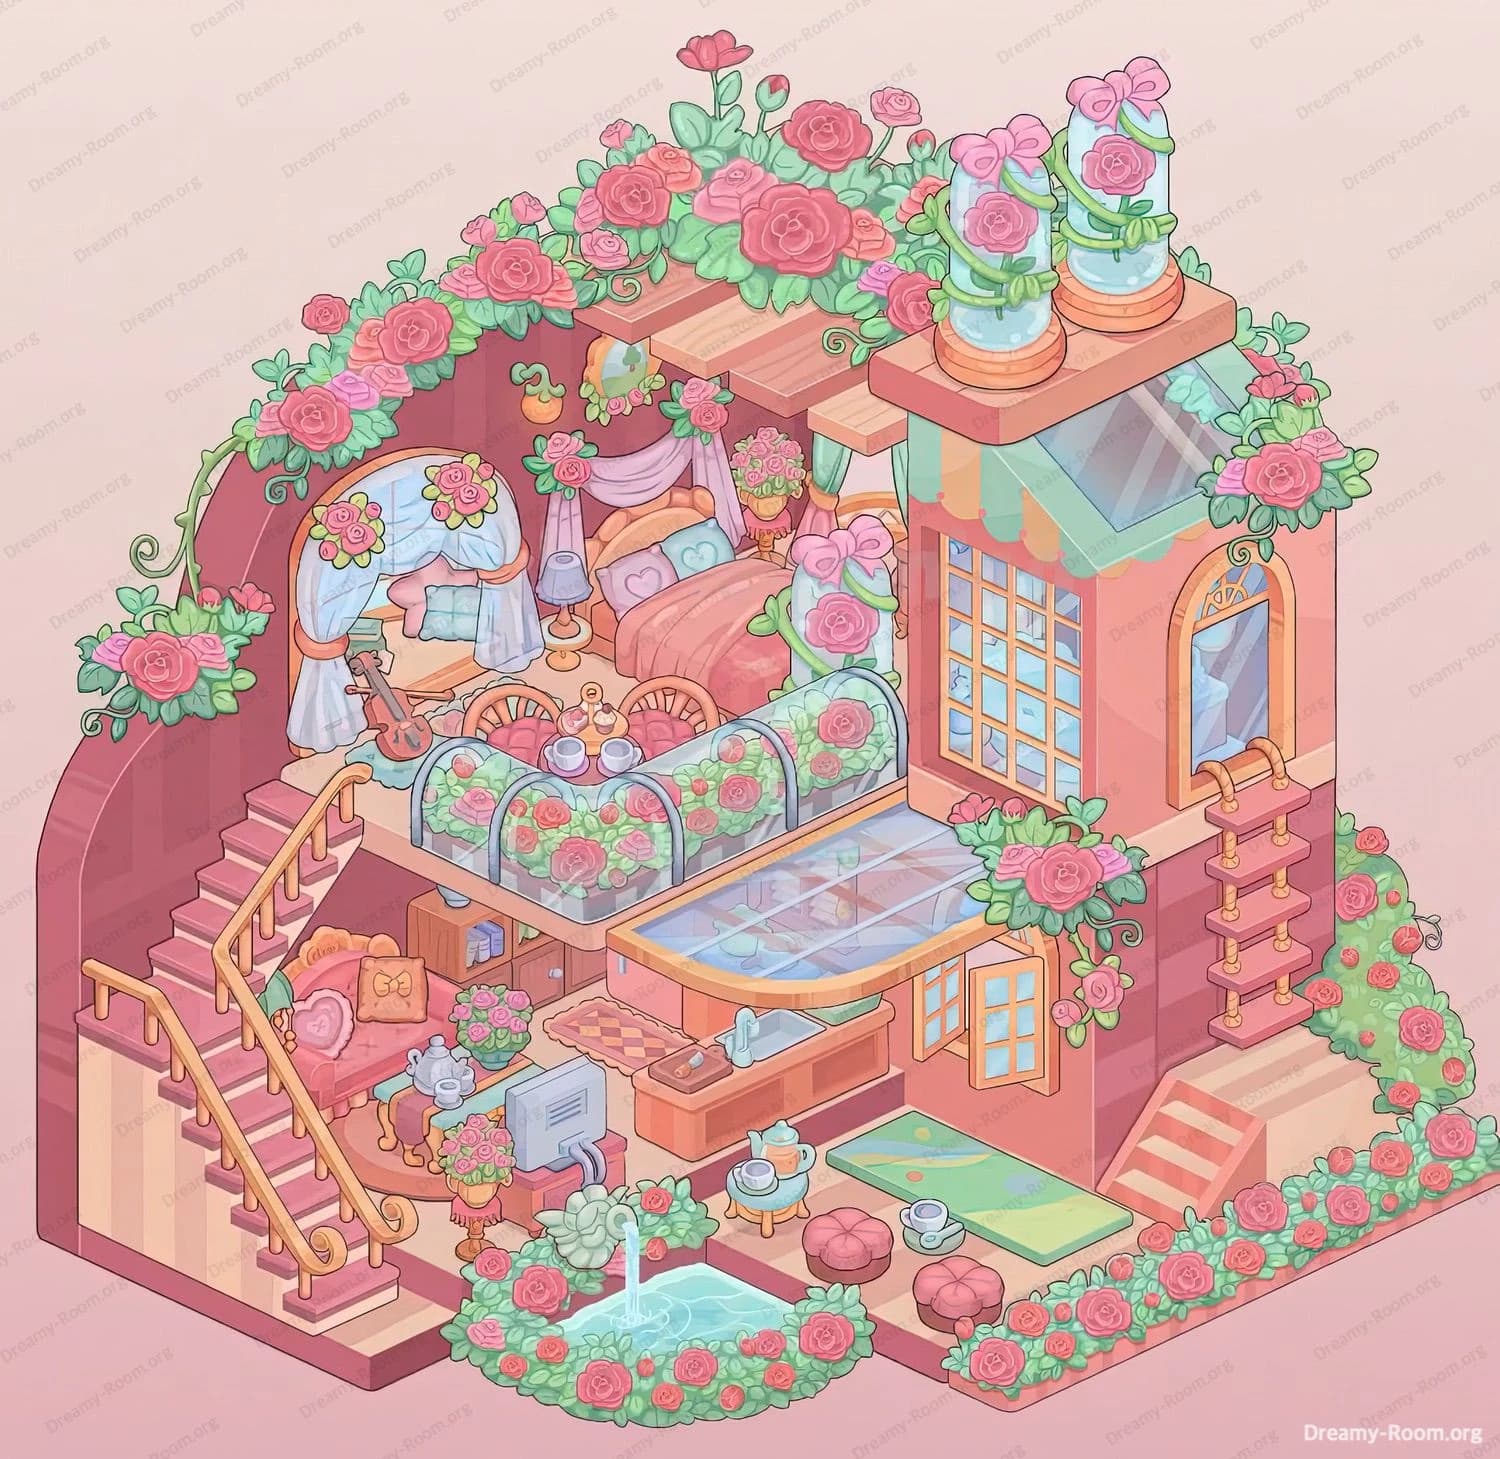
Step 1. Place the staircase and floor layout
Begin Dreamy Room Level 276 by positioning the staircase on the left-hand side. This staircase will serve as the main connector between the lower living area and the upper bedroom. Ensure the wooden railings match the soft pink palette of the walls. On the right side, align a small step ladder leading to the balcony, which will later hold flower accents. Take note of the striped flooring and align rugs accordingly so that the design flows naturally. Correct placement here ensures that later furniture, such as the tea table and bed, fit perfectly without overlapping.
Step 2. Set the central living room with furniture and fountain
In Dreamy Room Level 276, move to the lower floor and arrange the living room. Place a cozy pink sofa with plush pillows near the staircase. A small round coffee table should sit in front, ready for a teapot and cups. Position a television unit directly across, ensuring the pastel monitor rests neatly on its cabinet. The highlight here is the garden fountain at the very bottom, decorated with rose bushes. Align the fountain in the center to balance the scene. Accuracy is key—if the fountain is too close to the wall, later objects will not align correctly.
Step 3. Decorate the kitchen and dining area
Next, focus on the compact kitchen area of Dreamy Room Level 276. Place the counter with a built-in sink against the right wall, under the glass sunroof. A patterned countertop rests beside it, with pink-and-gold trimming. Place cups, plates, and a teapot on the surface for authenticity. Add the mini dining area next to the kitchen: a small round table with two cushioned stools covered in rosy fabric. This area must sit beneath the glass extension, giving it a greenhouse-like charm. If items are misplaced, the sunroof shadows won’t match, making the scene appear incomplete.
Step 4. Furnish the upper bedroom area
Head upstairs in Dreamy Room Level 276 and set the main bed under the canopy. The bed should have pink blankets, heart-shaped pillows, and flowing curtains tied with floral decorations. Add a small bedside lamp on the right and a guitar leaning against the left side to enhance the cozy atmosphere. At the foot of the bed, place a golden dining set with two chairs and a table, enclosed in a glass garden dome filled with roses. The dome is crucial—it’s the centerpiece of the bedroom level and must align perfectly over the floor tiles.
Step 5. Add the exterior and final decorative details
For the finishing touches in Dreamy Room Level 276, work on the room’s exterior and floral accents. Place the tall arched window structure on the right wall with golden framing. Above it, add the rooftop chimney adorned with two blue vases, each tied with pink bows and filled with blooming roses. Ensure vines and rose bushes wrap around the walls, staircase, and balcony. Flowers also decorate the corners of the roof and fountain, bringing symmetry. Misplacing even one floral cluster makes the entire room look unbalanced, so check that every vine curls naturally around railings and walls.
Notes and Precautions
- Alignment matters: In Dreamy Room Level 276, objects snap into place only when the layout is precise. Forcing placements can cause overlaps.
- Work bottom to top: Always start decorating the lower floor before the upper. Skipping ahead risks blocking staircase access.
- Symmetry is essential: Rose bushes, curtains, and rugs are mirrored for balance. Uneven placement breaks the aesthetic harmony.
- Check the sunroof area: Place glass items carefully; if misaligned, the kitchen scene won’t light correctly.
Tips and Tricks from Top Player
- Prioritize anchors first: Place large furniture such as the bed, sofa, and kitchen counters before small decorative items.
- Use floral clusters as guides: In Dreamy Room Level 276, vines naturally outline where windows, railings, and rooftop features belong. Follow their flow.
- Zoom in for precision: The guitar, tea set, and computer monitor require micro-adjustments.
- Group items by function: Complete the kitchen fully before moving to the bedroom. This prevents confusion when managing smaller items like pillows or cups.
- Balance indoor and outdoor: Don’t overload one side with roses; spread them evenly so the scene feels harmonious.
Final Scene Description
When completed, Dreamy Room Level 276 transforms into a breathtaking rose-filled haven. The bottom floor glows with warmth, featuring a pastel sofa, tea set, and television. A fountain framed with lush roses completes the welcoming atmosphere. The kitchen sparkles under a glass sunroof, where a counter and cozy tea nook invite relaxation. Upstairs, the dreamy canopy bed, heart-shaped pillows, and golden dining set rest beneath a floral dome, creating a romantic sanctuary. Vines crawl along stair railings, rooftops, and window frames, bursting with blossoms. Twin rooftop vases tied with pink bows stand proudly above, completing the picturesque charm. The final result is a vibrant, balanced, and harmonious floral paradise that embodies the essence of Dreamy Room Level 276—serene, romantic, and perfectly arranged.