Dreamy Room Level 177
Dreamy Room Level 177 guide - Dreamy Room 177 Walkthrough & Solution.
Important Notice Regarding Level Numbering
Due to frequent changes in Dreamy Room's level numbering and differences between platforms (Android/iOS) – for example, level 177 on Android might not be the same as level 177 on iOS – the text guide below may not always match the images and video above. Please prioritize the image and video guides. If you find that the guide content doesn't match your current level, please visit the All Level Walkthroughs page to find the correct guide based on level images. Thank you for your understanding.
Dreamy Room Level 177 Walkthroughs & Guide
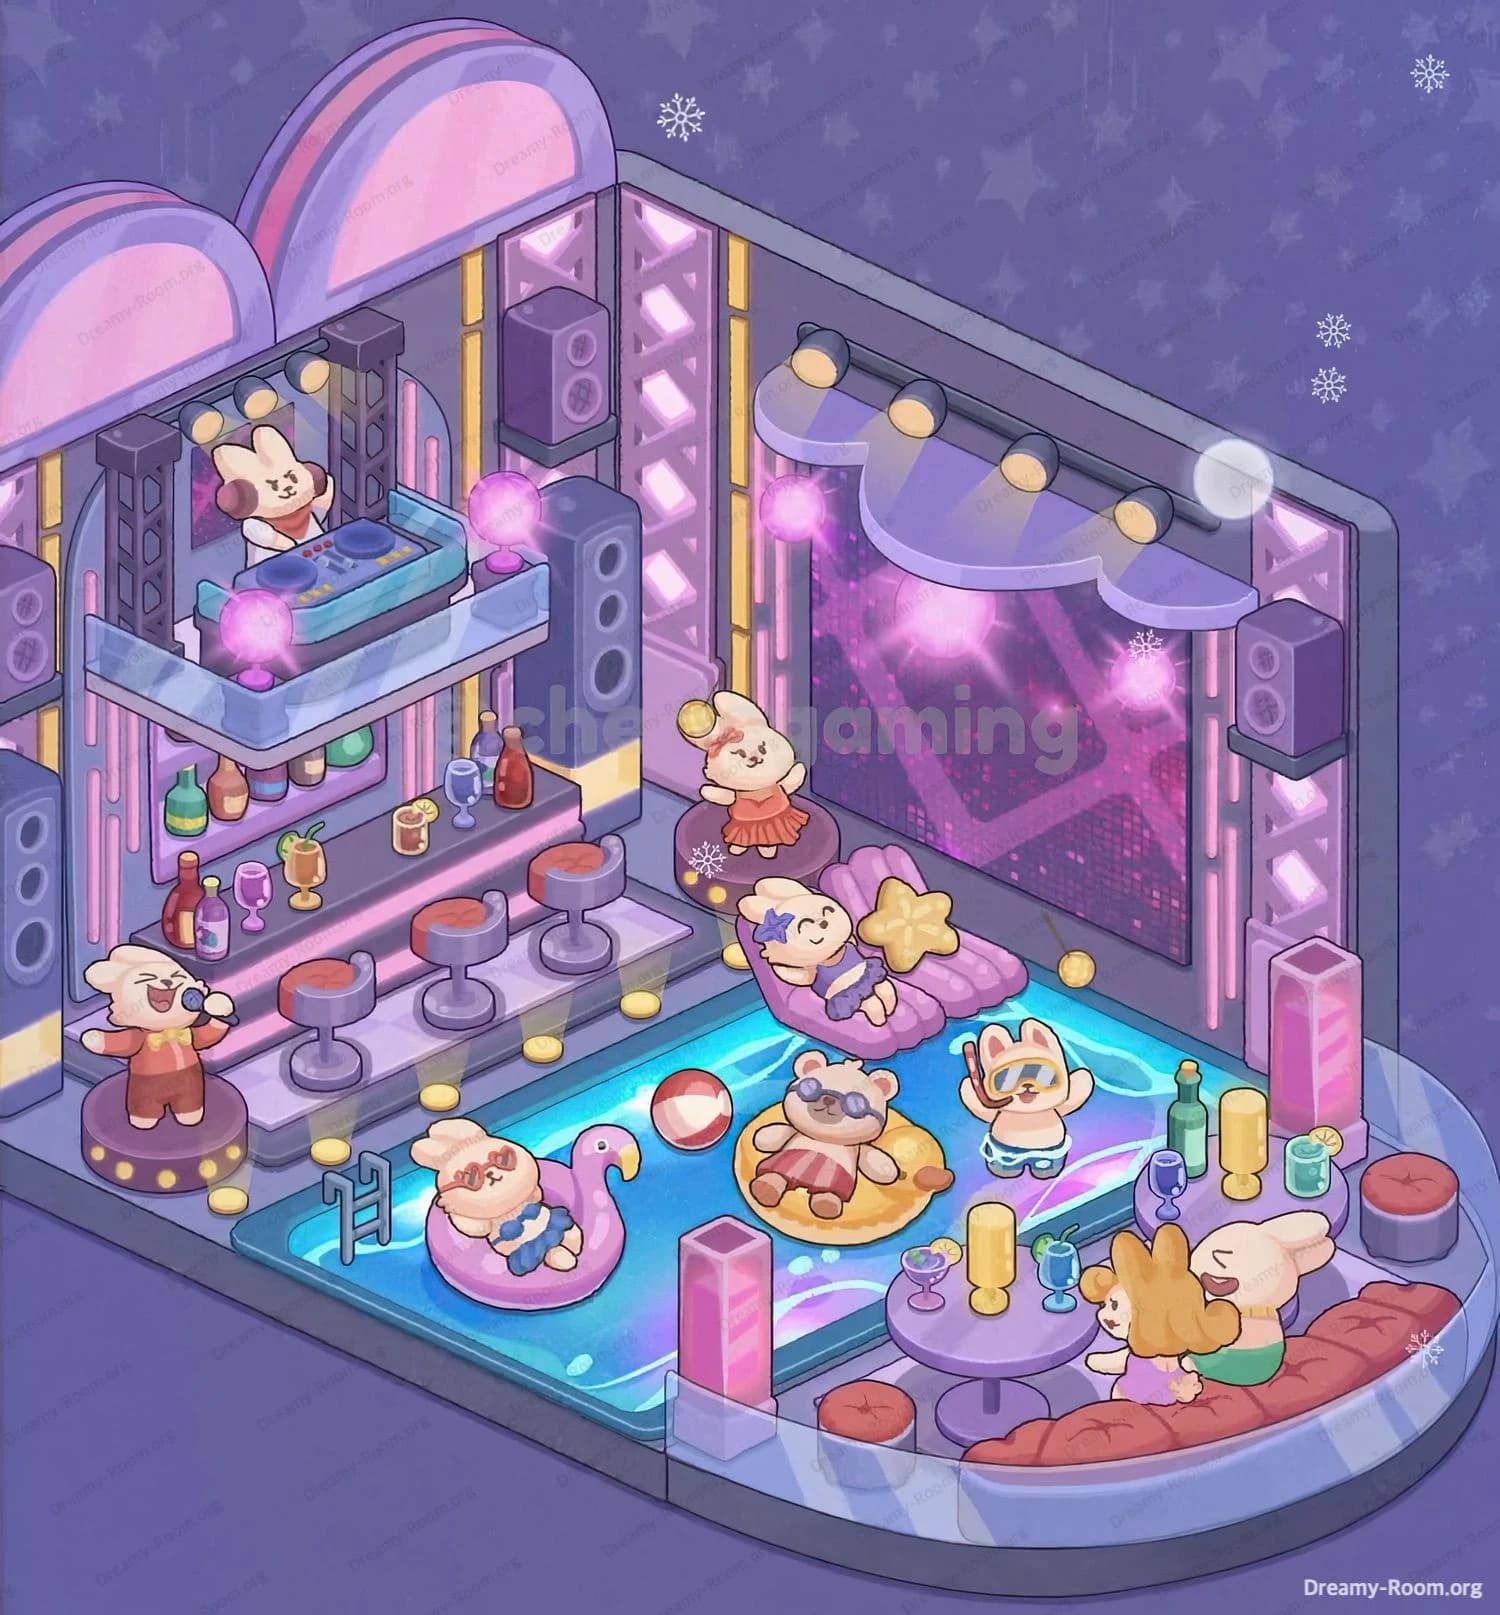
Welcome to the comprehensive walkthrough for Dreamy Room Level 177. In this guide, you’ll learn how to turn the empty hexagonal corner space into the vibrant party pool scene you see in the completed image. Every placement matters in Dreamy Room Level 177, as the main challenge is finding the perfect spot for each object. This walkthrough references the official Dreamy Room design instructions .
Step 1. Place the hexagonal floor frame in the corner
In Dreamy Room Level 177, the first thing you need to do is lay down the distinctive light-gray border frame that defines the entire space. Carefully select the hexagon-shaped frame piece and align it so that it touches both walls and the floor seam exactly at the corner. Make sure each edge of the frame lines up evenly with the room’s base—this creates the structural boundary for every subsequent piece you’ll add in Dreamy Room Level 177. Take your time rotating the frame by 60-degree increments until the beveled edges sit flush against the junction of the floor and walls. Achieving perfect alignment here is crucial: if the frame is even slightly off-center, later elements like the pool or seating areas won’t snap into place properly in Dreamy Room Level 177. This foundational step sets the stage for the entire decoration process in Dreamy Room Level 177.
Step 2. Position the back corner walls
Once the floor frame is anchored, it’s time to erect the two matching side walls in Dreamy Room Level 177. Choose the pale mauve-colored wall panels with subtle star-patterned wallpaper and attach them to the corresponding frame edges. Slide each wall panel gently into the notch on the frame until it clicks—this confirms the wall is secure. In Dreamy Room Level 177, these walls not only provide background but also bear the weight of large speakers and lighting fixtures later on, so verify that they’re perfectly vertical. You may need to use the small alignment tool in the corner to ensure the walls meet at exactly 90 degrees. If these panels are misaligned, overhead elements in Dreamy Room Level 177 may float awkwardly or fail to lock in properly, disrupting the room’s symmetry and causing frustration when you try to place your truss towers, LED screen, or arches.
Step 3. Install the twin pastel arches and DJ booth platform
Now that the walls are up, it’s time to add the playful arches and raised platform that define the DJ area in Dreamy Room Level 177. Select the two half-circle arch pieces—each trimmed in lavender and pink—and mount them on the back-left wall, spacing them evenly so that they frame the DJ booth. Next, grab the transparent acrylic DJ platform and snap it onto the brackets at mid-wall height. In Dreamy Room Level 177, this platform must be level horizontally; use the built-in leveling guide to avoid a tilted dance floor. These arches and platform are critical anchor points: they visually balance the entire scene and provide a clear focal point for your bunny DJ. Double-check that the arches’ curved edges align flush with the top of the platform, and that the platform’s support beams are fully inserted into the wall sockets—any gaps here will prevent you from adding speakers or lights in subsequent steps of Dreamy Room Level 177.
Step 4. Set up the bar counter and display bottles
With the DJ area defined, shift your attention to the bar zone in Dreamy Room Level 177. Select the two-tiered bar counter piece and attach it directly below the DJ platform, ensuring its back edge is snug against the left wall panel. Once the bar is stable, arrange the colorful glass bottles on both the shelf and the countertop: place a green bottle on the left shelf, a brown bottle next to it, then a red bottle toward the center. On the lower shelf, intersperse two stemmed wine glasses and a highball glass with an orange slice garnish. In Dreamy Room Level 177, bottle placement is more than aesthetic—it unlocks an achievement for “Perfectly Stocked Bar.” Make sure the bottles stand upright (you should hear a soft click when correctly seated). If any bottle tips or refuses to lock, remove it and retry at a slightly different angle: Dreamy Room Level 177 demands precision for both function and visual harmony.
Step 5. Arrange the bar stools along the counter
Next, add seating by placing the three round bar stools in front of the counter. In Dreamy Room Level 177, each stool features a circular gray base, cylindrical stem, and burnt-orange cushioned seat. Position them evenly spaced so that guests can slide in and enjoy their drinks. Use the on-screen grid to measure equal distances—roughly two grid units apart. Each stool should face inward toward the counter at a 45-degree angle, creating an inviting semi-circle. In Dreamy Room Level 177, correct stool spacing prevents collision glitches when the bunny NPCs move around. If you notice one stool clipping through the counter’s underside, remove and reposition it slightly inward. Once all three stools are perfectly aligned, rotate each by 5 degrees to ensure they appear organically placed. Taking the extra time here ensures no unwelcome visual or collision bugs disrupt your Dreamy Room Level 177 layout.
Step 6. Position the DJ bunny and singer on pedestals
Now, bring your characters to life. In Dreamy Room Level 177, select the bunny DJ figure wearing headphones and place it on the transparent DJ platform. Center the figure so its feet align with the platform’s control panel. Next, place the singer bunny (holding a microphone) on the circular pedestal at the front-left corner of the bar area. Ensure the singer bunny faces toward the room’s center, slightly turned toward the audience. Dreamy Room Level 177 rewards you for natural character orientation: if the bunny doesn’t face the main performance area, the “Crowd Pleaser” bonus won’t trigger. Adjust height levels so that both figures are fully visible—no floating ears or half-buried paws. Proper positioning here is crucial for immersion and for triggering the special “Stage Presence” animation in Dreamy Room Level 177.
Step 7. Mount the LED screen, truss towers, canopy lights, and speakers
With characters in place, it’s time to install the audiovisual rig—one of Dreamy Room Level 177’s most complex tasks. Start by affixing the large rectangular LED screen to the back-right wall. Use the wall sockets directly opposite the DJ platform for perfect symmetry. Then attach the two vertical truss towers: one to the left of the screen, one to the right, ensuring each connects to both the floor frame and wall panel for stability. Clip the four pink orb lights into the truss’s circular connectors, and mount the cloud-shaped canopy piece with its four yellow spotlights just above the screen. Finally, snap the two tall gray speakers onto the wall mounts flanking the truss. In Dreamy Room Level 177, this assembly must be rigid: any loose connection will cause your lights or screen to jitter when the music plays. Double-check each clip and brace to earn the “Sound Engineer” badge in Dreamy Room Level 177.
Step 8. Place the shell chaise lounge, dancer bunny, and star pillow
Next, create a cozy lounge nook in Dreamy Room Level 177. Select the purple seashell-shaped chaise lounge and position it against the right wall, just in front of the LED screen assembly. Ensure the chaise’s curved back hugs the wall’s contour. Then place the dancing bunny in a red skirt on the small round pedestal beside the chaise. Finally, add the yellow star-shaped pillow on the chaise’s seat, aligning it just behind the reclined bunny’s head. Dreamy Room Level 177 is all about small details: the pillow must overlap the chaise seat edge by exactly one grid unit to unlock the “Cozy Corner” achievement. If the pillow appears flat or clipped, nudge it upward by 0.2 grid units. Confirm your dancer bunny’s toes touch the pedestal’s edge for perfect balance in Dreamy Room Level 177.
Step 9. Fill the pool with water, ladder, and floaties with bunny guests
The centerpiece of Dreamy Room Level 177 is the shimmering pool. Click to add water to the recessed floor area until it reaches the ripple line. Insert the spiral ladder on the left side of the pool by rotating it 90 degrees and snapping it into the floor frame. Next, choose the inflatable flamingo and doughnut floats: place one near the front of the pool and the other slightly toward the center. Then seat the two bunnies wearing sunglasses on each float—make sure their legs dangle into the water. In Dreamy Room Level 177, float placement is sensitive: if a float overlaps the water boundary by more than one grid square, it will pop and reset. Position the floats no closer than 0.5 grid units from the pool edges to avoid glitches. Finally, drop the red-and-white beach ball into the water’s center for the “Playful Splash” bonus in Dreamy Room Level 177.
Step 10. Set up the seating area by the curved bench and round table
On the right side of Dreamy Room Level 177, you’ll create a social lounge. Place the curved red cushioned bench so that it follows the floor frame’s edge, directly opposite the bar stools. Then add the round purple table in front of the bench, centering it on the bench’s midline. Finally, place two seated bunnies on the bench—one with long ears hugging a teddy bear, the other leaning in for a chat. On the table, arrange a purple wine glass and a green cocktail glass. In Dreamy Room Level 177, the conversation icon will appear only if the bunnies’ faces are at a 30-degree angle toward each other—rotate each figure accordingly. Proper alignment here activates the “Friendly Hangout” animation for extra points in Dreamy Room Level 177.
Step 11. Scatter snowflakes and floating orbs for the finishing touch
To complete Dreamy Room Level 177, add ambient accents: six white snowflake icons and five pink glowing orbs. Begin by placing the snowflakes at varying heights on each wall—two near the ceiling line, two mid-wall, and two near the floor frame. Then position the orbs so they hover around the DJ booth, bar, and pool areas. Use the on-screen depth slider to ensure some orbs appear in front of objects and others behind, creating a layered effect. In Dreamy Room Level 177, these decorative items trigger the “Ambient Glow” effect when placed correctly. If the orbs fail to light up, adjust their z-index until they overlap at least one light source. Once every element snaps into place, you’re ready to enjoy your masterpiece in Dreamy Room Level 177!
Notes and Precautions
- Avoid Overlapping Big Pieces: In Dreamy Room Level 177, large items like the LED screen, truss towers, and arches must not overlap. Overlap causes clipping glitches and can lock up your scene.
- Use the Alignment Grid: Always refer to the grid overlay in Dreamy Room Level 177 when positioning small accents like bottles, pillows, or snowflakes. Precise placement unlocks bonus achievements and prevents objects from resetting.
- Check Snap Indicators: Each object in Dreamy Room Level 177 shows a green snap indicator when correctly aligned. If you don’t see it, the piece isn’t fully seated. Don’t force objects into place.
- Save Frequently: Dreamy Room Level 177 can be prone to occasional freezes when handling multiple lights. Save your progress after completing each major section to avoid losing work.
- Rotate Incrementally: Many items require exact angles—rotate by fixed increments (e.g., 5°, 15°, or 90°) rather than freeform. This helps ensure consistency across Dreamy Room Level 177 placements.
Tips and Tricks from top player
- Pre-Arrange Floating Items Off-Screen: Top players in Dreamy Room Level 177 gather snowflakes and orbs off to the side before starting the main setup. This saves back-and-forth and reduces UI clutter.
- Batch-Place Identical Items: When placing multiple bottles or stools in Dreamy Room Level 177, select and place one first, then use the “duplicate” feature to position the rest. This guarantees perfect spacing.
- Use Invisible Guides: Enable the room’s hidden guide lines in Dreamy Room Level 177 to align your DJ booth, bar, and lounge sections along the same axes. This tip ensures visual harmony.
- Trigger Achievements Early: Certain achievements in Dreamy Room Level 177—like “Perfectly Stocked Bar” and “Cozy Corner”—unlock only when linked objects are placed consecutively. Aim to finish related groups at once.
- Adjust Depth via Hotkeys: Quickly move decorative orbs and floats forward or backward using the keyboard shortcut (Ctrl + Arrow Up/Down) in Dreamy Room Level 177. This prevents unwanted clipping and keeps your scene glitch-free.
Final Scene Description
In the presentation of Dreamy Room Level 177, you’re greeted by a party pool scene set within a hexagonal corner room. The floor is covered by pastel purple tiles, bordered by a light-gray frame that extends into the two adjoining walls. Against the back wall, twin pastel arches hover above an elevated DJ booth, where a bunny spins music on glowing turntables. Flanking the booth, two speakers and a tubular truss support pulsing pink lights and a large LED screen. Below, a bar counter displays colorful bottles and cocktails, lined with three cushioned stools. The central pool shimmers with aqua-blue water, hosting floats and bunnies lounging on a flamingo and doughnut ring. A spiral ladder grants access to the water. To the right, a curved banquette wraps around a round table with two bunnies sharing drinks. Scattered snowflakes and floating orbs lend a magical touch to Dreamy Room Level 177.