Dreamy Room Level 701
Dreamy Room Level 701 guide - Dreamy Room 701 Walkthrough & Solution.
Important Notice Regarding Level Numbering
Due to frequent changes in Dreamy Room's level numbering and differences between platforms (Android/iOS) – for example, level 701 on Android might not be the same as level 701 on iOS – the text guide below may not always match the images and video above. Please prioritize the image and video guides. If you find that the guide content doesn't match your current level, please visit the All Level Walkthroughs page to find the correct guide based on level images. Thank you for your understanding.
Dreamy Room Level 701 Walkthroughs & Guide
Step 1. Place the island foundation, water-edge decorations, bridge, stones, and outdoor post items.
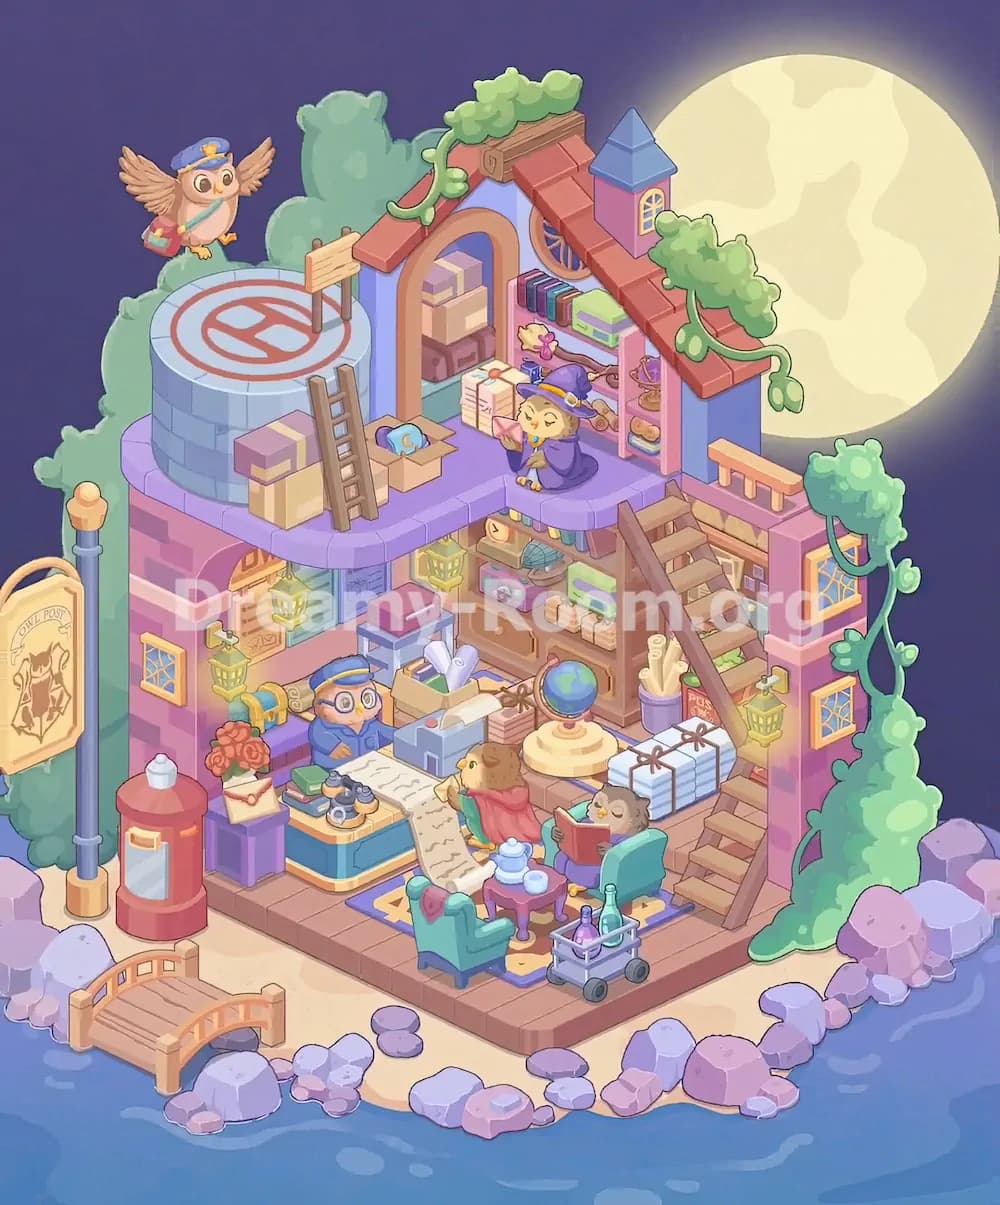
Begin Dreamy Room Level 701 by treating the wooden floor platform as the anchor for every later object. The decorated room sits on a sandy island surrounded by blue water, so first make sure the bottom wooden floor stays centered on the sand. Around the lower edge of Dreamy Room Level 701, add the purple and pink stones in clusters, especially along the front-right shoreline and near the lower-left bridge area. Place the small curved wooden bridge at the lower-left edge, partly over the rocks and water. On the far-left side, position the tall “Owl Post” signpost with its cream hanging board, then put the red cylindrical postbox just to the right of it. These outdoor pieces frame Dreamy Room Level 701 before the house becomes crowded.
Step 2. Build the lower pink post-office walls and install the exterior windows and lanterns.
Next in Dreamy Room Level 701, place the lower building structure over the wooden base. The walls are pink and brick-patterned, with the left wall wrapping behind the service desk and the right wall forming the staircase side. Add the small golden-trimmed window on the left exterior wall near the lower-left corner. On the right exterior wall, place two yellow-framed windows: one near the middle-right and one lower on the front-right side. Dreamy Room Level 701 also needs its hanging lanterns placed carefully. Put one lantern on the left side near the post-office counter area, another near the middle wall, and another on the right exterior beside the staircase. These lanterns help define the cozy postal atmosphere and prevent the room from looking flat.
Step 3. Set the main post-office counter, clerk owl, mail tools, flowers, and desk objects.
The lower-left interior is the service area of Dreamy Room Level 701. Place the blue-and-yellow counter slightly left of center, facing toward the front. Behind or at the counter, position the elderly owl clerk wearing a blue postal uniform, blue cap, and round glasses. On the counter, arrange the open papers, the long letter sheet, the small red book, the green book, and the dark telephone-like object. To the left of the counter, set the purple side stand with the flower vase holding orange-red flowers and the envelope or letter on top. Dreamy Room Level 701 depends on these tiny objects being aligned with the counter, because they show that this is not just a living room but a working owl post office.
Step 4. Arrange the central reading area with the scroll, rug, armchairs, tea table, and customer owls.
Now focus on the lower-center floor of Dreamy Room Level 701. Place the long open scroll or map so it runs from the counter area toward the middle of the rug. Set the patterned rectangular rug beneath the seating area, with its purple border and warm yellow diamond details visible. Put the turquoise armchair near the front center, angled toward the small purple tea table. The tea table belongs slightly right of center, with the white teapot and cups on top. Place the tan owl customer in the middle, leaning over the scroll with a red scarf or cape. Then place the gray owl customer in the right turquoise chair, holding a red book. Dreamy Room Level 701 uses this central grouping to make the room feel alive and story-driven.
Step 5. Place the bottle cart and front-right floor objects.
In Dreamy Room Level 701, the lower-right corner should not be empty. Place the small gray rolling cart at the front-right edge of the wooden floor, just in front of the seated gray owl. Put the green and purple bottles inside the cart, with the handle facing upward. This cart sits near the rug but does not cover the tea table or chair. It should look like a mobile refreshment or potion trolley parked beside the reading nook. Keep it close to the front edge so the wooden floor remains visible behind it. This small item is easy to misplace in Dreamy Room Level 701 because it looks decorative, but it is part of the finished layout and helps balance the lower-right side.
Step 6. Add the back storage shelves, globe, parcels, rolled papers, and staircase base.
Move to the back half of the lower room in Dreamy Room Level 701. Place the wooden storage cabinet against the rear wall below the upper platform. Fill it with drawers, stacked books, small packages, and boxes. On top of the cabinet, place the round globe on its cream stand, slightly right of center. To the right of the cabinet, set the bucket or container filled with rolled scrolls. In front of that area, place the large pale-blue tied parcels with brown ribbon. Then install the wooden staircase on the right side, rising diagonally from the lower floor to the upper level. The stairs in Dreamy Room Level 701 must lean upward to the purple second floor, with the steps clearly visible and aligned with the right wall.
Step 7. Place the purple upper platform, rooftop cylinder, helipad marking, ladder, boxes, and warning sign.
The upper-left portion of Dreamy Room Level 701 has a very distinctive postal rooftop section. Place the purple platform above the lower-left office, forming the second level. On the far-left of this platform, set the round light-blue cylindrical tower with the red “no landing” or marked helipad symbol on top. Put the wooden ladder leaning against the front of this cylinder, angled upward from the purple platform. Add the tall wooden signboard near the back of the platform, slightly right of the helipad. Place the stacked cardboard boxes beside the ladder and near the arched upper doorway, and put the open cardboard box with the blue object near the center of the platform. These items make Dreamy Room Level 701 feel like a busy mail-sorting rooftop.
Step 8. Build the upper shop room with the arched doorway, shelves, books, packages, and witch owl.
The upper-right room is one of the most detailed areas in Dreamy Room Level 701. Place the blue upper wall and arched orange doorway at the back-left of this level. Inside the doorway, stack the tan and purple parcels neatly. To the right, add the pink shelving unit filled with colorful books on the top shelf, green and blue boxes, rolled goods, and small bundled items on the lower shelves. Place the small owl wearing a purple witch hat and purple outfit on the front edge of the upper platform, holding a pink letter or snack. Nearby, add the broom, wand, purple stand, or magical-looking small objects beside the shelves. Dreamy Room Level 701 rewards close placement here because the upper shop area is packed but still readable.
Step 9. Install the red roof, round window, tower, roof plants, vines, and leafy decorations.
After the upper room is filled, finish the roofline of Dreamy Room Level 701. Place the red tiled sloping roof across the top of the upper structure, running downward from left to right. Under the roof near the center-right, add the round decorative window or fan-like circular feature. On the top-right roof, place the small purple tower with the blue pointed roof and yellow window. Add leafy green shrubs along the roof edges, especially on the left roof ridge and the right roof slope. Then attach the curling green vines that hang over the roof and trail down the right side of the house. Dreamy Room Level 701 uses these vines to connect the house with the moonlit forest background, so do not leave them floating or detached.
Step 10. Add the flying owl courier and background-facing decorative elements.
The final upper-left detail in Dreamy Room Level 701 is the flying owl courier. Place this owl in the sky area above the left rooftop, slightly to the left of the helipad cylinder. It wears a blue postal cap, spreads both wings, and carries a small red-and-green mail satchel. The courier should appear outside the building, not standing on the platform. Keep it aligned with the leafy background so it looks like it is approaching the Owl Post. Also make sure the large moon remains visible behind the upper-right roof and tower. Dreamy Room Level 701 has a strong night-delivery theme, and the flying owl, moon, trees, and rooftop post area work together to communicate that story clearly.
Step 11. Complete the right exterior with vines, railings, staircase wall, and side decorations.
The right side of Dreamy Room Level 701 needs careful layering. Place the peach railing on the small upper balcony area near the right side of the second level. Keep it behind the staircase but in front of the moonlit background. Add the large green vine mass running down the right outer wall, wrapping near the upper window and continuing toward the lower rocks. Place smaller leafy clusters near the windows and roof edge so the exterior does not look bare. Confirm that the staircase does not hide the right wall lantern or the lower-right window. Dreamy Room Level 701 becomes visually crowded here, so the main challenge is depth: the vines belong outside, the stairs belong inside, and the railing belongs on the upper platform.
Step 12. Review every object placement and correct overlaps.
Before finishing Dreamy Room Level 701, do a full placement check from left to right and bottom to top. Outside, confirm the bridge, postbox, Owl Post sign, rocks, and shoreline decorations are all visible. On the lower floor, confirm the clerk owl, counter, desk items, flowers, scroll, customer owls, rug, tea set, chairs, cart, cabinet, parcels, globe, rolled papers, and staircase all match the completed scene. On the upper floor, verify the cylinder roof with helipad symbol, ladder, cardboard boxes, open box, signboard, arched doorway, shelves, witch owl, red roof, tower, round window, roof plants, vines, and flying courier owl. Dreamy Room Level 701 is solved by recognizing exact placement, not by speed, so correct small overlaps before submitting.
Notes and Precautions
Dreamy Room Level 701 has many layered objects, so place large structural pieces before tiny decorations. Start with the building, platforms, staircase, shelves, and roof before adding books, parcels, cups, bottles, flowers, and scrolls. The most common mistake in Dreamy Room Level 701 is putting the upstairs items on the wrong level: the helipad cylinder, ladder, signboard, and cardboard boxes belong on the purple upper-left platform, while the bookshelves, witch owl, arched doorway, and tower belong on the upper-right shop area. Another important precaution is keeping exterior objects outside the house. The Owl Post sign, red postbox, curved bridge, shoreline stones, flying owl, and climbing vines should not be mixed into the interior. Dreamy Room Level 701 also contains many similar parcels, so use their color and position as clues.
Tips and Tricks from top player
For Dreamy Room Level 701, top players usually solve the room in layers rather than randomly placing objects. First, place all immovable architecture: floor, walls, upper platform, roof, stairs, windows, and tower. Second, place large furniture: counter, shelving cabinet, upper shelf, chairs, tea table, cart, and storage boxes. Third, place characters: the clerk owl at the counter, the tan owl at the scroll, the gray reader in the chair, the purple witch owl upstairs, and the flying courier outside. Finally, place small details such as lanterns, letters, books, bottles, flowers, globe, scrolls, and vines. In Dreamy Room Level 701, use object shadows and object size to judge depth. If an item covers a character’s face or blocks a staircase step, it is probably in the wrong layer.
Final Scene Description
The completed Dreamy Room Level 701 scene becomes a magical moonlit owl post office on a tiny island. Water surrounds the sandy shore, where rocks, a curved bridge, a red postbox, and an Owl Post sign welcome visitors. Inside, the lower room glows with lanterns, a blue-uniformed owl clerk works at the counter, and two customers relax around a scroll, tea table, books, chairs, and a bottle cart. Behind them, shelves, parcels, a globe, and rolled papers create a busy delivery archive. Upstairs, Dreamy Room Level 701 expands into a charming rooftop shop with boxes, a ladder, helipad cylinder, shelves, books, a witch owl, red roof tiles, a small tower, curling vines, and leafy roof plants. A flying owl courier approaches from the left while the huge moon shines behind the house, completing the cozy postal fantasy.