Dreamy Room Level 932
Dreamy Room Level 932 guide - Dreamy Room 932 Walkthrough & Solution.
Important Notice Regarding Level Numbering
Due to frequent changes in Dreamy Room's level numbering and differences between platforms (Android/iOS) – for example, level 932 on Android might not be the same as level 932 on iOS – the text guide below may not always match the images and video above. Please prioritize the image and video guides. If you find that the guide content doesn't match your current level, please visit the All Level Walkthroughs page to find the correct guide based on level images. Thank you for your understanding.
Dreamy Room Level 932 Walkthroughs & Guide
Step 1. Build the Cabin Roof, Wooden Beams, and Festive Decorations
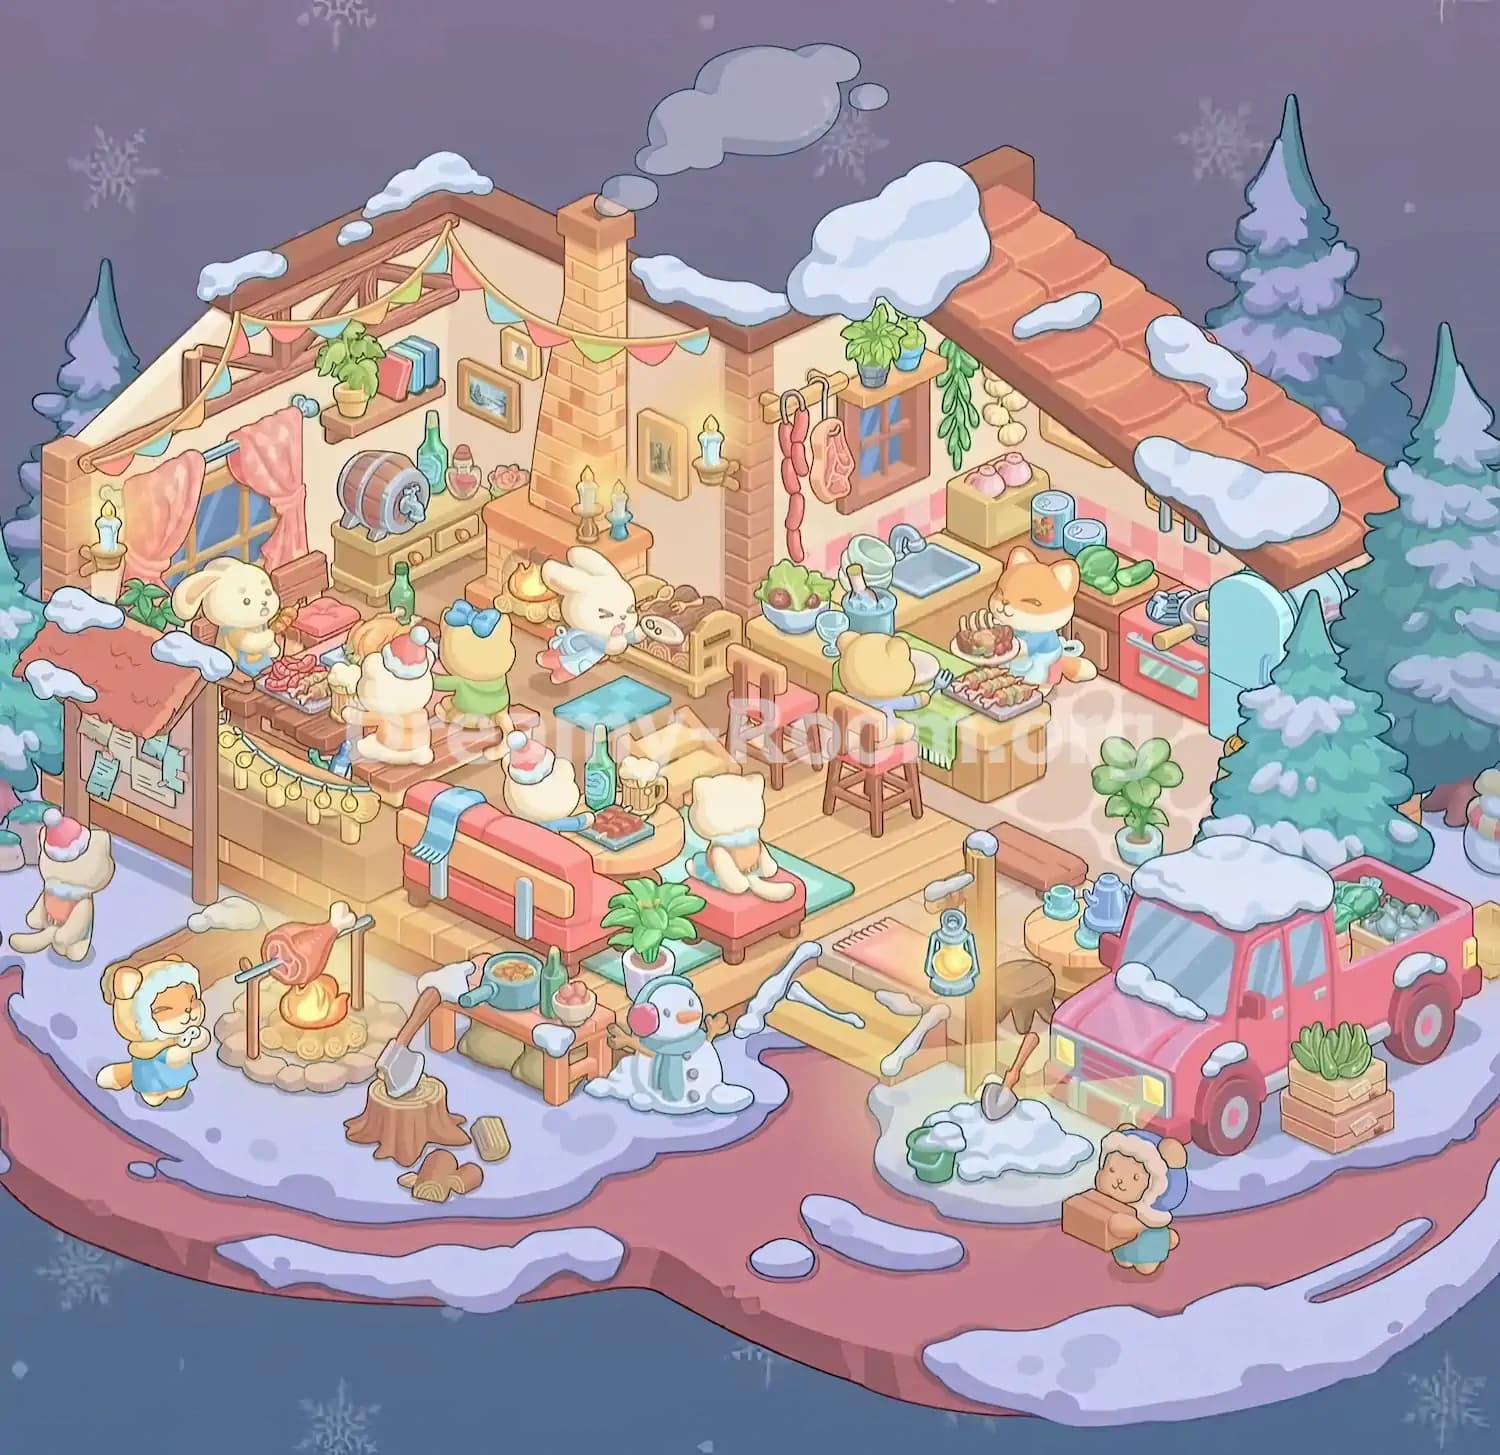
Begin Dreamy Room Level 932 by identifying the two main sections of the empty cabin. The left side features a large wooden floor and tall cream-colored walls, while the right side has a smaller kitchen area with pink checkered wall decorations. The surrounding snowy landscape provides the foundation for this winter-themed scene.
Start decorating the upper portion of the cabin. Position the exposed brown wooden support beams along the upper-left triangular wall, creating a rustic roof framework. Next, install the reddish-orange tiled roof over the right kitchen section, making sure its sloping edge extends toward the right side of the scene.
Place the tall brick chimney near the center where the two cabin sections meet. Its upper portion should extend above the walls, with a soft gray smoke cloud floating from the top.
In Dreamy Room Level 932, the roof is decorated with several patches of thick white snow. Arrange these snow-covered details along the wooden roof edges and across the reddish tiles.
Finally, hang the colorful triangular bunting across the upper-left beams and toward the central chimney. These pastel pink, yellow, green, and blue flags establish the festive atmosphere.
Step 2. Decorate the Left Wall with Windows, Curtains, Shelves, and Accessories
The next stage of Dreamy Room Level 932 focuses on the large cream-colored wall at the back of the living and dining area.
Position the wooden-framed window along the lower-left section of this wall. Add two soft pink curtains, one on each side of the window, allowing the blue winter sky to remain visible through the glass.
Install a small wooden wall shelf above and slightly to the right of the window. Place a leafy green potted plant on the shelf, alongside several colorful books arranged upright.
Below the shelf, position a light-brown storage cabinet topped with a round wooden beverage barrel. The barrel should face forward, showing its silver tap. Decorate the surrounding countertop with a tall green bottle, a small pink jar, and a flower-shaped ornament.
In Dreamy Room Level 932, several framed pictures add warmth to the upper wall. Arrange the small landscape painting and other framed artwork near the chimney, keeping them above the cabinet.
Finish by placing the wall-mounted candleholders near the window and chimney. These tiny glowing details help transform the unfinished room into a welcoming holiday cabin.
Step 3. Assemble the Central Fireplace and Cozy Hearth Area
The fireplace is one of the most important focal points in Dreamy Room Level 932. It sits directly beneath the tall central brick chimney, dividing the dining area on the left from the kitchen on the right.
Position the brick fireplace against the central wall, with its opening facing diagonally toward the lower-left portion of the room. Arrange the burning logs inside so that bright yellow-orange flames are clearly visible.
Place two decorative candles on the upper fireplace ledge. Their warm glow should complement the fire and illuminate the nearby furniture.
To the right of the fireplace, position a small wooden firewood holder filled with neatly stacked logs. Include the small pale circular decorative detail visible on the front of the woodpile.
Next, place the white rabbit character wearing a pale blue winter outfit directly in front of the fireplace. The rabbit should appear to be warming itself beside the flames.
For Dreamy Room Level 932, position a rectangular turquoise floor mat just below and slightly to the right of the hearth. Keep the surrounding space open so that the fireplace, rabbit, and wood storage remain visible.
This arrangement creates the cozy central gathering point around which the remaining furnishings are organized.
Step 4. Arrange the Raised Dining Platform and Holiday Feast
Move to the raised wooden dining platform occupying the left-middle section of Dreamy Room Level 932. This area contains several adorable characters gathered around a holiday meal.
Place the long, dark-brown wooden dining table across the platform, extending from the left-back area toward the front-center. Cover its surface with trays of roasted meat, sausages, bread, and other festive dishes.
Position a cream-colored rabbit with long ears at the back-left side of the dining area, near the pink-cushioned seat beneath the window.
Add the small yellow character wearing a green outfit and a large blue bow near the middle-right side of the table. Place the cream-colored character wearing a red-and-white winter hat at the front edge of the dining platform, facing the food.
Arrange the remaining food platters, drinks, and small serving accessories between the characters.
One particularly important detail in Dreamy Room Level 932 is the string of hanging yellow lights. Attach this decorative light strand across the outer front edge of the raised dining platform.
Finally, keep the wooden steps and platform edges visible beneath the dining setup. The completed arrangement should resemble a lively indoor winter banquet.
Step 5. Position the Pink Sofa, Coffee Table, and Living Room Decorations
The front-center portion of Dreamy Room Level 932 becomes a comfortable lounge where the animal characters can relax after their winter activities.
Place the large pink-and-coral sofa across the front of the wooden floor, with its back facing the viewer. Drape a pale blue scarf or blanket over the left side of the sofa's backrest.
Directly behind the sofa, position a small round cream-colored coffee table. Arrange a green glass bottle, a frothy drink mug, and a rectangular tray of roasted food on top.
Seat the small white character wearing a red Santa hat behind the sofa, facing the coffee table and its snacks.
To the right, place a low pink chaise or cushioned bench on top of a turquoise rectangular rug. Position the white cat character with its back toward the viewer, sitting comfortably on this bench.
In Dreamy Room Level 932, a leafy green houseplant in a white pot stands near the front-right corner of the sofa area. Add the small rectangular boxes or parcels on the floor between the lounge and the kitchen stools.
Keep enough separation between the sofa, coffee table, and chaise so their outlines remain easy to recognize.
Step 6. Complete the Right Kitchen with Windows, Hanging Food, and Wall Decorations
Now focus on the right-hand kitchen in Dreamy Room Level 932. This cooking space sits beneath the snow-covered tiled roof and against the cream walls with pink checkerboard trim.
Start with the square wooden-framed window on the back wall, just to the right of the chimney. Install a narrow wooden shelf above it and decorate the shelf with two leafy green potted plants.
Hang the long strand of reddish sausages and the large piece of cured meat from hooks on the left side of the window.
To the right of the window, arrange a hanging bundle of green herbs and a cluster of pale garlic bulbs. These decorative ingredients should hang beneath the sloping roof.
Place the small wall decoration behind these kitchen accessories, keeping it partially visible beneath the roofline.
In Dreamy Room Level 932, the kitchen's soft pink wall pattern provides an important visual reference. Keep the hanging decorations above this checkered border rather than covering the lower wall.
Complete this section by checking the snowy roof edges, upper shelf plants, and food hooks. These items create the appearance of a rustic kitchen stocked for a winter feast.
Step 7. Install the Kitchen Sink, Storage Cabinets, Stove, and Refrigerator
With the upper kitchen decorations finished, Dreamy Room Level 932 continues with the appliances and preparation counters.
Position the light-wood kitchen counter directly beneath the back window. Install the rectangular blue-gray sink and its curved silver faucet in the center of the counter.
To the left of the sink, arrange a bowl containing leafy vegetables, a pale cooking bowl, a blue cooking pot with a spoon, and a small drinking glass.
On the rear-right countertop, position a light-colored storage box holding several pink items. Add two blue food cans beside it.
Place the green cabbage and cucumber-like vegetables on the wooden preparation surface near the right wall.
Install the red stove and oven along the far-right side of the kitchen. Its blue-tinted oven door should face forward, with cooking utensils or cookware resting on the stovetop.
Next, position the tall, rounded light-blue refrigerator immediately to the right of the stove, beneath the sloping roof edge.
Correct placement is especially important in Dreamy Room Level 932 because the sink, refrigerator, and oven occupy a compact area. Avoid placing smaller ingredients where the larger appliances need to fit.
Step 8. Set Up the Kitchen Island, Dining Stools, and Cooking Characters
The central kitchen island is another major feature of Dreamy Room Level 932. Position the rectangular light-wood island in the middle-right area, immediately in front of the kitchen counter and to the right of the fireplace.
Drape a green table runner across the island, allowing its fringed edge to hang over the front.
Arrange the large rectangular platter filled with colorful grilled skewers near the front-right edge of the countertop. Place the round plate of roasted meat farther back, closer to the cooking character.
Position the orange-and-cream cat wearing a blue outfit behind the island on its right side, facing toward the food. This character should appear to be preparing or serving the holiday meal.
Add the tan bear character on the near side of the island, seated on a wooden stool with a pink cushion. Give the bear its eating utensil, directed toward the platter of skewers.
Place a second matching wooden stool along the island's left side, leaving it empty.
In Dreamy Room Level 932, the island should remain visually separate from the sink counter behind it and the living room furniture to its left. This spacing helps preserve the intended layout of the busy kitchen.
Step 9. Create the Outdoor Bonfire, Woodcutting Station, and Snowman
After completing the cabin interior, move to the snowy outdoor space at the front-left of Dreamy Room Level 932.
Position the circular stone firepit on the snow below the wooden dining platform. Add glowing flames in its center, then place the horizontal roasting spit above the fire. A large piece of roasted meat should hang from the spit between two supporting poles.
Stand the small orange animal character wearing a blue winter outfit and a cream-colored hood to the left of the firepit.
To the right of the firepit, place a wooden chopping stump with an axe embedded in its top. Scatter several small split logs around the stump.
Next, install the low wooden outdoor food table behind the chopping area. Decorate it with a blue cooking pot, a green bottle, and a small bowl of pink food.
In Dreamy Room Level 932, a cheerful snowman stands immediately to the right of this table. Give it pink earmuffs, a blue scarf, an orange carrot nose, and raised twig arms.
Finally, position the wooden noticeboard along the front-left side of the raised dining platform. It has a snow-covered reddish roof and several posted notes. Place another small winter-hat-wearing animal near the left side of this board.
Step 10. Decorate the Front Steps, Tea Station, Delivery Truck, and Snowy Path
The final major placement stage in Dreamy Room Level 932 involves the outdoor area in front of the kitchen and along the right side of the cabin.
Begin with the short yellow wooden staircase leading down from the central-right deck. Its steps have patches of snow along their edges.
Position the tall wooden lantern post on the right side of the stairs. Hang the glowing yellow lantern from the post so that it illuminates the entrance.
Place a small round wooden tea table farther to the right, near the driveway. Arrange a blue teapot and matching cups on top, with a soft pink floor mat nearby.
Next, position the pink-red pickup truck on the lower-right snowy ground. Its front should face diagonally toward the lower-left corner, while the open truck bed points toward the upper-right.
Fill the truck bed with green vegetables and other produce. Add snow patches across the roof, windshield edge, hood, and wheel arches.
Place stacked wooden vegetable crates near the truck's front-right wheel, with a green potted plant between the truck and kitchen.
In Dreamy Room Level 932, the final outdoor details include a snowy mound with a shovel and green bucket in front of the truck, plus a little bundled bear carrying a brown parcel along the lower-right path.
Finish by checking the surrounding snow-covered evergreen trees and curved reddish walking path. The complete scene should feel like a busy winter holiday gathering.
Notes and Precautions
Dreamy Room Level 932 contains many overlapping decorations, so careful object placement is essential. The biggest challenge is identifying which objects belong to the interior and which belong to the snowy outdoor area.
- Place large objects first. The roof, chimney, fireplace, kitchen counters, sofa, dining table, and pickup truck establish the layout for smaller objects.
- Pay attention to overlapping objects. The kitchen island sits in front of the sink, while the animal characters and food platters overlap parts of the dining furniture.
- Use the correct wall for hanging decorations. The colorful bunting belongs along the upper-left beams, while the hanging meat, herbs, and garlic belong in the right kitchen.
- Keep the two cooking areas separate. The fireplace is indoors beside the rabbit, whereas the roasting spit and stone firepit belong outside in the snowy foreground.
- Watch the orientation of the characters. Several animals face away from the viewer, especially the bear at the kitchen island and the white cat on the pink bench.
- Do not overlook tiny accessories. Small bottles, candles, food cans, teacups, ornaments, and snow-covered details can be easy to miss.
If an object in Dreamy Room Level 932 does not fit, compare its silhouette with the completed image and check whether another item is blocking its intended position.
Tips and Tricks from top player
The most efficient way to complete Dreamy Room Level 932 is to divide the scene into smaller placement zones rather than attempting to decorate the entire room at once.
-
Work from back to front. Begin with the roof and upper walls, continue to the furniture, and finish with characters and foreground accessories. This reduces visual obstruction.
-
Complete one zone before moving to another. Treat the left dining platform, central fireplace, right kitchen, front lounge, and outdoor winter area as separate sections.
-
Use distinctive colors as placement clues. Pink furniture belongs mainly in the lounge, blue appliances appear in the kitchen, and the bright pink pickup truck is located outside on the right.
-
Match character positions to nearby objects. The rabbit belongs beside the fire, the orange cat works behind the kitchen island, and the winter-clothed animal stands near the outdoor roasting pit.
-
Check objects at the boundaries between zones. The fireplace, kitchen stools, sofa, and stairs are especially useful alignment references because they define where one area ends and another begins.
-
Save the smallest decorations for last. Add bottles, mugs, candles, hanging ornaments, snow patches, and food accessories after the larger structures are correctly positioned.
The best strategy for Dreamy Room Level 932 is to prioritize accuracy over speed. The correct placement of every object matters more than how quickly the scene is decorated.
Final Scene: A Cozy Winter Holiday Celebration
Once Dreamy Room Level 932 is complete, the once-empty cabin has transformed into a delightful winter retreat overflowing with warmth, food, and festive activity.
The left side features a cozy dining room decorated with colorful bunting, warm yellow lights, pink curtains, and a table full of delicious holiday dishes. Adorable animal friends gather to enjoy their meal, while a cheerful rabbit relaxes beside the glowing brick fireplace.
On the right, a fully furnished kitchen includes a sink, wooden cabinets, a red stove, a blue refrigerator, hanging herbs, and a dining island covered with freshly prepared food.
Outside, a roasting fire, chopping station, cheerful snowman, and snowy staircase extend the celebration into the winter landscape. A pink delivery truck loaded with vegetables waits nearby, while bundled characters explore the snow.
Dreamy Room Level 932 concludes with a beautifully decorated winter cabin that captures the joy of sharing food, warmth, and companionship on a snowy holiday evening.