Dreamy Room Level 854
Dreamy Room Level 854 guide - Dreamy Room 854 Walkthrough & Solution.
Important Notice Regarding Level Numbering
Due to frequent changes in Dreamy Room's level numbering and differences between platforms (Android/iOS) – for example, level 854 on Android might not be the same as level 854 on iOS – the text guide below may not always match the images and video above. Please prioritize the image and video guides. If you find that the guide content doesn't match your current level, please visit the All Level Walkthroughs page to find the correct guide based on level images. Thank you for your understanding.
Dreamy Room Level 854 Walkthroughs & Guide
Step 1. Build the hospital entrance and upper-left exterior in Dreamy Room Level 854
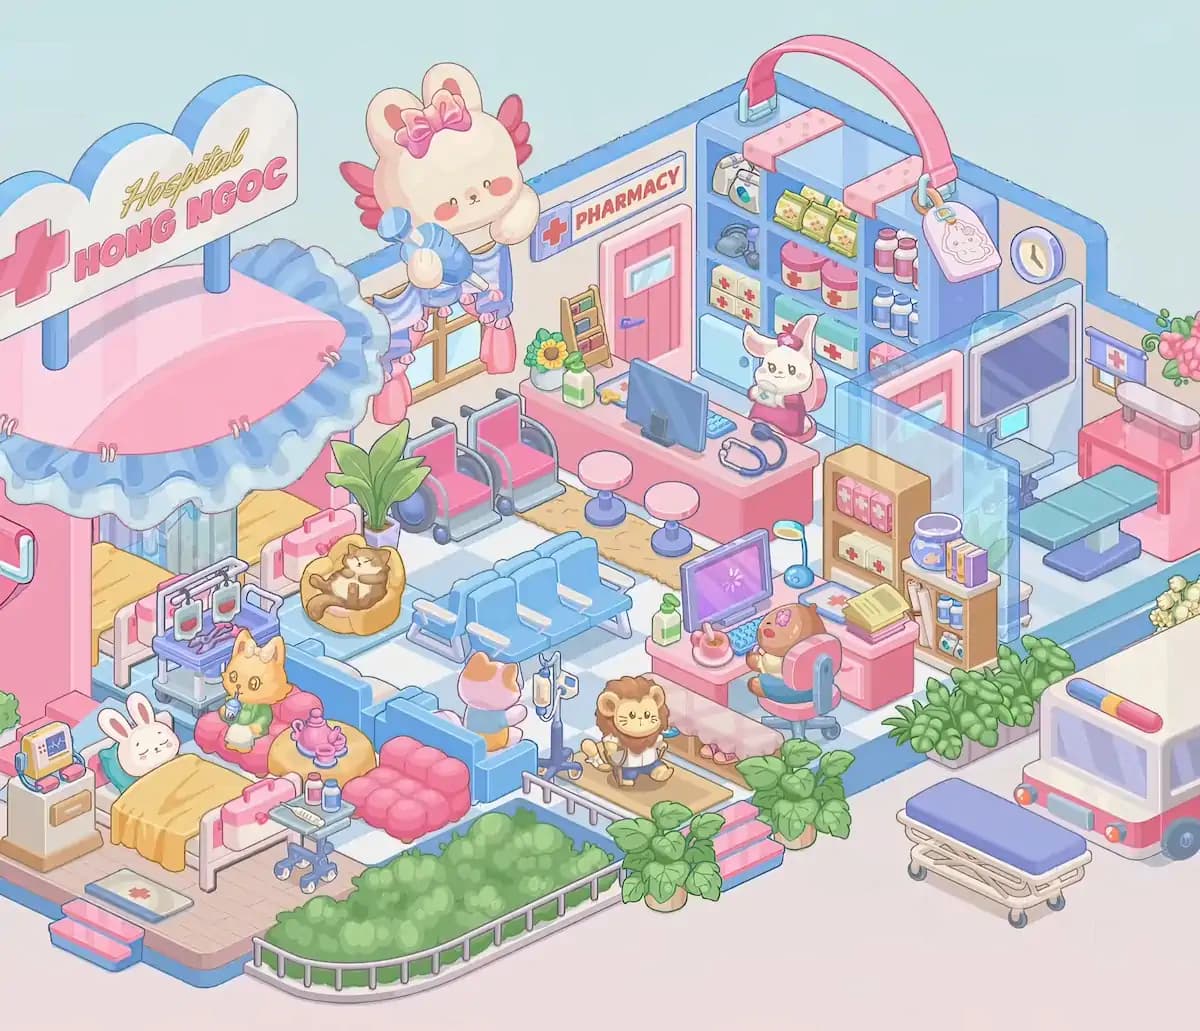
Start Dreamy Room Level 854 with the large decorative pieces at the upper-left side. Place the big cloud-shaped “Hospital HONG NGOC” sign above the left entrance, with the red medical cross extending from its left side and two blue supports underneath. Directly below it, position the enormous pink curved hospital canopy. Its outer edge should be surrounded by the frilly pale-blue ruffle, creating the distinctive scalloped entrance roof. Under the canopy, fit the glass entrance panels and blue-tinted curtains against the left wall. Along the back wall near the middle-left window, place the oversized cream-colored bunny hospital mascot with its pink bow, pink wing-like decorations, blue outfit, and the blue medical object held in its paws. Finish this section by fitting the window and pink curtains directly behind the mascot. These large pieces establish the scale of the entire hospital and provide useful landmarks for the smaller objects you will place later.
Step 2. Assemble the patient bed area in Dreamy Room Level 854
Move to the lower-left corner of Dreamy Room Level 854 and create the main patient space. Place the white-and-pink hospital bed horizontally along the left portion of the wooden floor section. Add the bright yellow blanket across the mattress, then position the green pillow and the large white bunny-face pillow at the head of the bed. The small cream bedside cabinet goes immediately to the bed's left. Put the compact medical monitor with its colored display on top, together with the small accessories beside it. At the foot of the bed, place the flat rectangular medical mat or board marked with a red cross. The little blue-and-pink steps belong just outside the wooden platform at the bottom-left edge. Finally, place the wheeled medical tray beside the bed near the footboard, with the small medicine bottles and medical tools resting on top. This arrangement should feel like a compact but fully equipped inpatient corner.
Step 3. Complete the cozy patient lounge in Dreamy Room Level 854
The area immediately above and to the right of the bed becomes one of the cutest parts of Dreamy Room Level 854. Seat the orange cat patient on the rounded reddish-pink cushion, facing slightly toward the middle of the hospital. The cat holds a small drink or medicine container and wears a green top. In front of it, place the low mustard-yellow round table and arrange the pink teapot and matching cup on top. Put the two tufted raspberry-pink floor cushions to the table's right. Behind the cat, position the small wheeled stand holding three hanging medical or fluid bags. Farther back, place the pale-blue couch platform and set the golden-yellow beanbag chair on it, with the curled sleeping animal tucked inside. The pink medical suitcase belongs nearby against the rear side, while the tall broad-leaf plant in the purple pot stands behind the lounge furniture. Keeping these pieces tightly grouped is important because several objects in this corner look as though they could fit elsewhere.
Step 4. Arrange the wheelchairs and waiting seats in Dreamy Room Level 854
Next, fill the central waiting area of Dreamy Room Level 854. Two pink-and-gray wheelchairs stand side by side near the upper-middle-left section, just in front of the reception counter and beside the tall plant. Their backs face the rear wall while their seats point toward the lower-right. Below them, construct the blue waiting area using the connected pale-blue seats with white armrests. One group sits through the center of the room, while another blue sofa section runs across the lower-middle-left. Place the orange-and-white cat character sitting on the lower blue seat, facing toward the hospital staff rather than toward the bed. The seating should create a loose corridor through the middle instead of blocking the path. Dreamy Room Level 854 becomes much easier to read once these larger blue seats are correctly placed, since they separate the patient bedroom, reception zone, doctor's area, and front walkway.
Step 5. Build the reception desk in Dreamy Room Level 854
The long pink reception counter belongs against the upper-middle section of Dreamy Room Level 854. Place the two round pink-and-blue stools in front of it on the narrow mustard-colored rug. On the desk, position the large dark-blue computer monitor roughly in the center and place the small blue keyboard beside it. The white-and-green bottle sits toward the left portion of the counter, near the potted sunflower, while the smaller medical card or accessory belongs nearby. Lay the blue stethoscope on the right side of the desk. Behind the counter, seat the white bunny receptionist in the red uniform and matching medical cap, holding the small object in its paws. The bunny should sit directly in front of the pharmacy shelving. Correct desk placement matters because this long counter serves as a boundary between the public waiting area and the medicine-storage section behind it.
Step 6. Fill the pharmacy shelves and doorway in Dreamy Room Level 854
Behind reception, complete the pharmacy portion of Dreamy Room Level 854. First place the PHARMACY sign with its red cross above the pink pharmacy door on the rear wall. Beside the door, set the narrow multicolored organizer or rack upright. The large blue shelving unit fills most of the upper-right rear corner. Stock it with the green medicine packets, pink-and-white jars, blue-and-white bottles, red-cross boxes, round medical containers, and the other small pharmacy supplies exactly as shown. The larger cross-marked storage boxes belong mainly on the lower shelves, while smaller bottles and packages fill the higher compartments. Across the top is the oversized pink curved fixture, with two pink horizontal supports and a hanging pale tag-shaped accessory on the right. A small round clock should be attached to the wall just beyond the shelving. Because the pharmacy contains many tiny pieces, finish the shelf frame first and then work shelf by shelf rather than trying to place individual medicine containers randomly.
Step 7. Set up the doctor's workstation in Dreamy Room Level 854
Now concentrate on the lower-right interior workstation of Dreamy Room Level 854. Position the pink desk facing toward the lower-left, then put the purple-screen computer monitor on its rear-left corner with the blue keyboard directly in front. Add the curved blue desk lamp toward the right side and the green-and-white medicine bottle near the opposite edge. The small plate or cup with the pink drink or medical item goes in front of the monitor. Seat the brown animal doctor in the coral-and-blue rolling office chair, facing the computer. To the doctor's right, place the pink drawer cabinet and stack the red-cross medical book, yellow open notebook, and additional papers or books on top. Behind this desk area, fit the two wooden storage units. The taller one holds pink and cream first-aid boxes, while the narrower unit carries the round blue decorative container, upright books, rolled papers, small blue bottles, and additional medical supplies.
Step 8. Construct the examination room in Dreamy Room Level 854
The far-right side of Dreamy Room Level 854 is a separate examination or treatment room. Begin with the transparent blue glass partition, positioning it vertically between the doctor's office and the examination equipment. Fit the pink-framed doorway inside the partition. Against the rear wall, place the tall blue-gray medical scanner or display unit with its large dark screen. Attach the small turquoise secondary monitor and gray tray beneath it. In front, place the teal examination bed on the dark-blue pedestal, oriented horizontally toward the right side. Behind the bed goes the pink instrument table with its white oval top or cushion. On the wall above it, install the small blue-and-white medical sign with the red cross. The pink flower arrangement sits at the upper-right edge behind this area. These pieces should form a clearly separated clinical room while still remaining visible through the transparent divider.
Step 9. Add the central doctor, IV equipment, and remaining medical details in Dreamy Room Level 854
Return to the center foreground of Dreamy Room Level 854 for the remaining clinical pieces. Place the dark-blue IV stand immediately beside the seated orange-and-white cat, with the pale fluid bag hanging from its upper hook and the small attached component positioned on the opposite side. On the tan rectangular mat near the front-center, stand the lion doctor character wearing a white medical coat and stethoscope. The lion faces outward toward the viewer, creating the main character focal point of this area. Arrange the small medical accessories near its feet as shown rather than placing them on nearby furniture. Check the spaces around the IV pole carefully: it should sit between the blue seating and the doctor's walkway without overlapping either. Dreamy Room Level 854 uses several freestanding hospital objects with very small placement zones, so the IV stand and character are especially useful for confirming that the central seating has not been positioned one tile too far in either direction.
Step 10. Add the plants, railings, hedge, and entrance steps in Dreamy Room Level 854
The greenery forms an important visual border around Dreamy Room Level 854. At the bottom-left and center-front, install the long curved planter filled with dense rounded green shrubs, then attach the pale metal railing along its outer side. Near the pink entrance stairs, place several large leafy potted plants so that they cluster around both sides of the walkway. More rectangular planters packed with green foliage continue along the right edge beside the doctor's office and treatment room. Place the pink-and-blue staircase at the front-center, lining it up with the tan walkway where the lion doctor stands. Additional leafy plants sit immediately beside these stairs and along the glass treatment partition. The combination of plants, railings, and steps should create a clear landscaped hospital entrance rather than scattered decoration. These pieces are easy to underestimate, but they occupy a significant amount of floor space and help define the outer boundary of the completed hospital.
Step 11. Place the ambulance and stretcher outside Dreamy Room Level 854
The final large objects sit outside the hospital on the lower-right side of Dreamy Room Level 854. Position the white ambulance at the far-right edge, facing toward the left-front direction. Its lower body has the pink stripe, blue wheels, orange-red front lights, pale-blue bumper panel, and the long red-yellow-blue emergency light bar mounted across its roof. Do not try to squeeze the ambulance inside the tiled hospital floor; it belongs entirely outside the main building. In front and slightly to the left of the vehicle, place the wheeled hospital stretcher. It has a dark periwinkle-blue mattress, cream scissor-style metal frame, and four small caster wheels. Leave visible space between the stretcher and the front plants so both objects remain distinct. A small patch of pale flowers near the hospital edge completes this exterior corner and visually connects the ambulance area with the landscaped entrance.
Step 12. Perform the final placement check for Dreamy Room Level 854
Before considering Dreamy Room Level 854 complete, scan the room from upper-left to lower-right and confirm that every decorative and functional object belongs to the correct zone. The left side should contain the hospital sign, canopy, inpatient bed, bedside monitor, medical cart, lounge furniture, sleeping animal, teapot set, blood or fluid-bag trolley, plant, and wheelchairs. The middle should contain the waiting seats, IV pole, lion doctor, reception counter, stools, computer, receptionist bunny, sunflower, stethoscope, and pharmacy entrance. The rear-right needs the fully stocked pharmacy shelves and clock, while the lower-right must include the doctor's computer desk, chair, books, cabinets, medicines, partition, scanner, examination bed, instrument table, plants, ambulance, and stretcher. The main challenge of this level is determining the intended location for each object; several items appear interchangeable until the surrounding furniture is in place. Use the completed layout's clear functional zones as your final reference.
Notes and Precautions for Dreamy Room Level 854
Dreamy Room Level 854 is particularly dense, so avoid placing small objects before their parent furniture has been positioned. Medicine bottles, books, the stethoscope, keyboard, flowerpot, teapot set, IV accessories, and pharmacy packages all have precise locations that become much easier to identify after their desks, carts, shelves, or tables are installed.
Pay special attention to the two different clinical work areas. The reception counter is at the upper-middle and has the bunny employee, two stools, sunflower, computer, and stethoscope. The separate doctor's workstation is lower-right and contains the purple monitor, blue lamp, paperwork, storage cabinets, and rolling chair. Mixing accessories from these two areas is an easy mistake.
Also distinguish the seating types carefully: there are pink wheelchairs near reception, connected blue waiting chairs in the center, the blue sofa around the patient lounge, a red cushion for the orange cat, raspberry-pink ottomans, and the yellow beanbag containing the sleeping animal. The transparent treatment-room divider can also make objects behind it look as though they belong in front of it.
Finally, don't overlook the exterior pieces. The ambulance, stretcher, railings, shrubs, potted plants, stairs, flowers, sign, and huge canopy are all part of the finished Dreamy Room Level 854 scene.
Tips and Tricks from top player — Dreamy Room Level 854
The fastest approach is to solve Dreamy Room Level 854 by zones rather than by item type. Start with architecture and oversized pieces: sign, canopy, pharmacy shelving, counters, beds, partitions, examination equipment, desks, and seating. These objects divide the checkered floor into recognizable areas and dramatically reduce the number of possible positions for everything else.
Next, complete one zone entirely before moving on. For example, after placing the hospital bed, immediately add its blanket, pillow, monitor, bedside cabinet, rolling tray, medicines, and nearby floor board. Then move to the lounge, reception, pharmacy, doctor's office, and treatment room. This prevents tiny objects from becoming visually lost among dozens of unpacked pieces.
Use characters as location clues. The receptionist bunny belongs behind reception, the lion stands on the entrance-side mat, the orange cat patient sits in the lounge, another cat sits near the IV stand, and the brown doctor occupies the computer chair. Once those characters are correct, many surrounding props become obvious. Save tiny bottles, books, packages, and tabletop accessories for last.
Final Scene — Dreamy Room Level 854
The finished Dreamy Room Level 854 becomes a cheerful pastel animal hospital overflowing with detail. The cloud-shaped Hospital HONG NGOC sign and enormous ruffled pink canopy introduce the building from the left, while the inpatient room below feels warm and comforting with its yellow-covered bed, bunny pillow, medical monitor, tea table, cat patient, and cozy sleeping nook. Blue waiting seats lead toward the pink reception desk, where the bunny receptionist sits beneath the fully stocked pharmacy. Nearby, the lion doctor, IV equipment, wheelchairs, and numerous medical supplies make the hospital feel busy but welcoming. On the right, a separate doctor's workstation and glass-walled examination room contain computers, books, cabinets, medicine, a scanner, and examination bed. Dense plants and railings soften the front entrance, while the ambulance and wheeled stretcher complete the emergency-care theme. The result is a charming, highly detailed hospital where every object has a deliberate place.