Dreamy Room Level 842
Dreamy Room Level 842 guide - Dreamy Room 842 Walkthrough & Solution.
Important Notice Regarding Level Numbering
Due to frequent changes in Dreamy Room's level numbering and differences between platforms (Android/iOS) – for example, level 842 on Android might not be the same as level 842 on iOS – the text guide below may not always match the images and video above. Please prioritize the image and video guides. If you find that the guide content doesn't match your current level, please visit the All Level Walkthroughs page to find the correct guide based on level images. Thank you for your understanding.
Dreamy Room Level 842 Walkthroughs & Guide
Step 1. Build the two-level room and place the staircase in the center-left
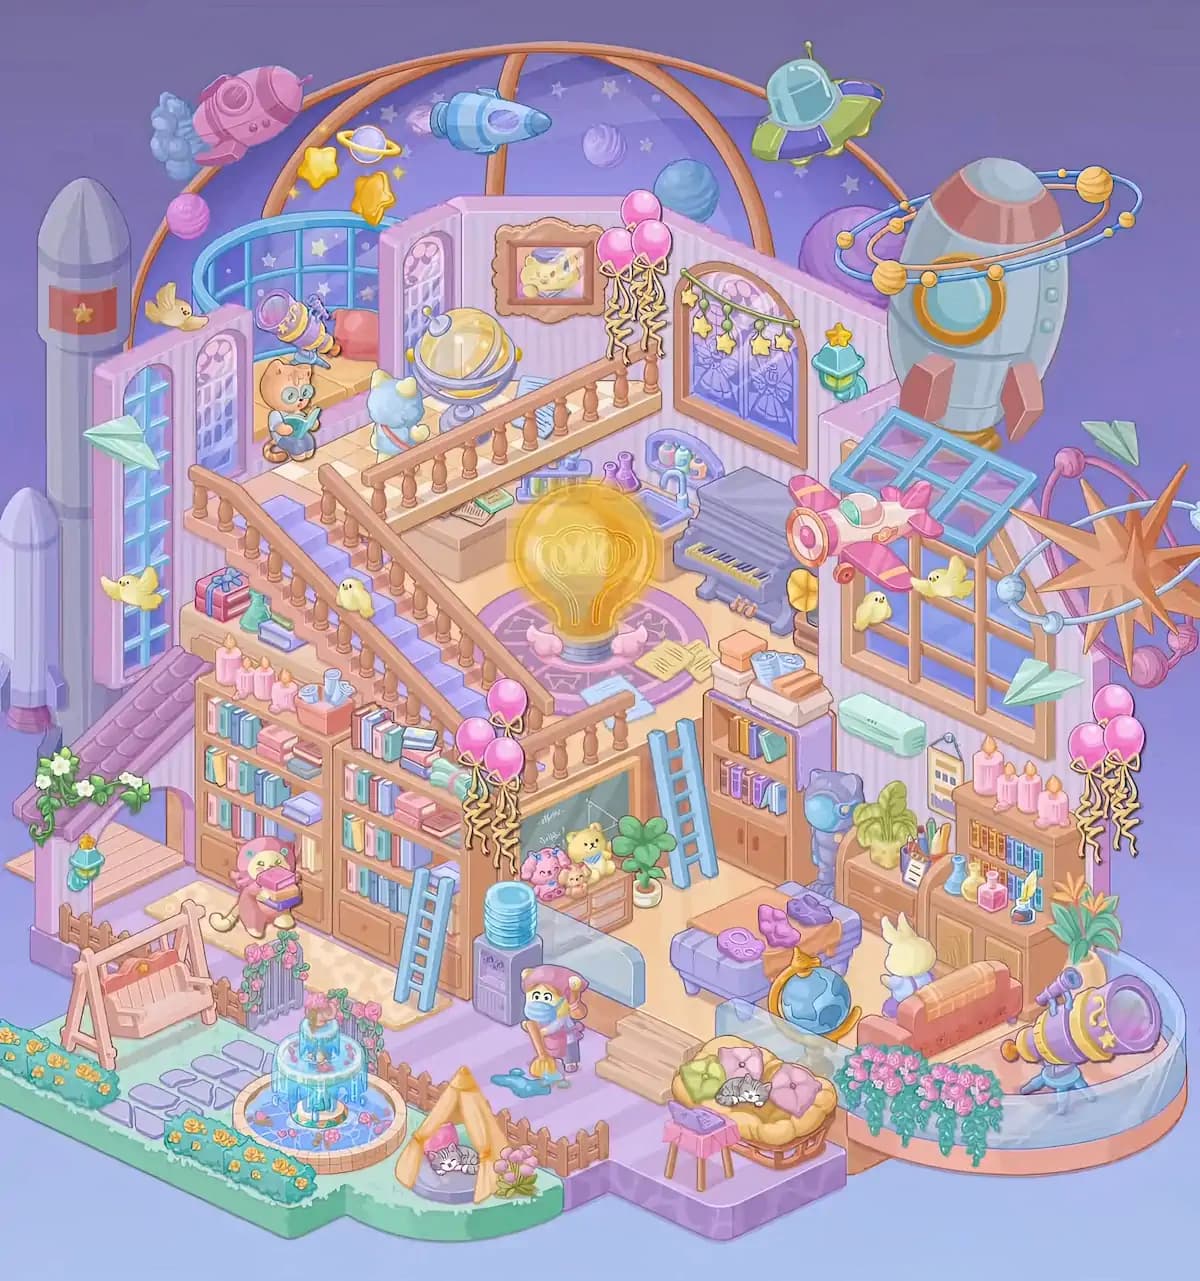
Begin Dreamy Room Level 842 by establishing the main interior structure. The finished room has a large upper level across the back and a lower level occupying most of the foreground. Place the pink interior walls around the upper floor and keep the open side facing the player. The most important structural object is the broad staircase beginning near the center-left of the lower room and climbing diagonally toward the upper-left floor. It has pale purple steps and warm wooden handrails with many turned balusters. Continue the wooden railing along the entire exposed edge of the upper floor and around the landing. In Dreamy Room Level 842, getting this staircase correct early is extremely useful because nearly every later object can be positioned relative to it. The upper floor should feel like a raised observatory loft, while the lower floor becomes a library and living area. Do not fill small gaps yet; Dreamy Room Level 842 contains many tiny decorations that are easier to position after the major furniture is locked into place.
Step 2. Complete the upper-left loft and the giant rockets outside
Next, work on the far-left side of Dreamy Room Level 842. Install the large curved blue window along the back-left wall of the upper loft, with narrow arched openings immediately beside it. A cushioned bench or sleeping platform sits beneath this window, and a small seated character belongs near its front edge. Position the purple-and-yellow telescope-like device nearby, angled toward the upper-left sky. Another pale, fluffy-headed figure stands closer to the railing, facing into the room. Outside this part of Dreamy Room Level 842, place the two enormous vertical rocket structures along the left edge: the taller rear rocket has a red band with a yellow star, while another silver-purple rocket rises from the lower-left foreground. Add the paper-airplane decoration beside the tall window and the small yellow flying creatures near the openings. Above the room, the pink spacecraft travels along the orange orbital framework. These large pieces make the left side of Dreamy Room Level 842 immediately recognizable and should be placed before the smaller stars and planets.
Step 3. Decorate the upper back wall with the globe, picture, balloons, and star window
Move across the upper level of Dreamy Room Level 842 and fill the central back wall. Place the large golden-and-lavender planetary globe on its pedestal near the railing, slightly left of center. Above it, hang the framed picture featuring the pale yellow catlike subject. To the right of the picture, attach the cluster of three glossy pink balloons with long curling gold ribbons. The large framed window belongs farther right and contains purple patterned curtains or panels; stretch the green garland with dangling yellow stars across its upper section. A turquoise wall lantern topped with a yellow star sits just beyond the window. The arrangement in Dreamy Room Level 842 is intentionally crowded, so use the window frame and railing posts to judge the correct spacing. Add the small planets and stars visible behind the wall, including the blue and lavender spheres. The orange curved orbital framework should arch across the entire background. Correctly anchoring this wall is important because Dreamy Room Level 842 has numerous celestial pieces that can otherwise look as though they belong elsewhere.
Step 4. Assemble the glowing science area in the middle of the upper floor
The centerpiece of Dreamy Room Level 842 is the enormous glowing yellow light bulb on the upper floor. Set it on the round purple rug close to the center of the loft, with its pink base visible underneath. Behind the bulb, place the low laboratory counter beneath the back wall. Arrange the colorful bottles, tubes, books, and small science equipment across this counter. To the right of the bulb, place the chunky gray-purple keyboard or miniature piano, keeping its yellow keys facing forward. Scatter the open yellow notebook, loose blue papers, pink stationery, and small books around the rug exactly as shown. Dreamy Room Level 842 uses these tiny floor objects to fill otherwise empty patches, so do not assume they belong on a shelf. The giant bulb should remain the visual focus and must not be pushed against the wall. When correctly arranged, this part of Dreamy Room Level 842 resembles a whimsical inventor's laboratory surrounded by an astronomy classroom.
Step 5. Finish the upper-right window, airplane, orbital star, and giant rocket
The upper-right side contains some of the largest objects in Dreamy Room Level 842. Install the wide wooden-framed window on the right wall, then place the tilted blue glass canopy directly above it. Mount the pink-and-cream toy spacecraft in front of the canopy and window, pointing toward the left side of the room. Several small yellow birds float around the window. Attach a pale green paper airplane to the right side. Outside the room, position the enormous blue-gray rocket vertically behind the wall. Its orange opening faces forward, and multiple blue orbital rings with small yellow planets circle its upper section. Farther right, assemble the dramatic orange starburst with curved blue orbit lines and pink planetary pieces. A green spacecraft hovers above the rocket. These pieces are easy to confuse in Dreamy Room Level 842 because they sit partially outside the architectural shell. Use the final image as a depth guide: the rocket and orbital decorations belong behind the room, while the toy plane belongs directly in front of the upper window.
Step 6. Fill the lower-left wall with the large library and its ladders
Now shift to the lower level of Dreamy Room Level 842 and construct the large library wall beneath the staircase. Place the tall wooden bookcases across the left and center portions of the lower room, filling each shelf with tightly packed pastel books. The tops of the shelves hold additional book stacks, storage boxes, candles, cups, and other small study objects. A cluster of pink candles sits prominently near the upper-left side of the shelving. Lean the first light-blue ladder against the front of the central-left bookcase and place another blue ladder farther right near the smaller cabinet and chalkboard area. A small pink-and-yellow character carrying books stands at the base of the shelves. In Dreamy Room Level 842, the bookcases form another major alignment landmark, so make sure they sit directly beneath the stair railing rather than floating farther into the room. The huge quantity of books makes this section look intimidating, but Dreamy Room Level 842 becomes much simpler if you place entire furniture pieces first and treat the individual books as finishing details.
Step 7. Arrange the chalkboard nook, plush toys, plant, water cooler, and cleaner character
Continue Dreamy Room Level 842 beneath the upper floor, immediately to the right of the main bookshelves. Place the dark green chalkboard against the wall and position the low wooden chest or bench directly in front of it. Several small plush animals sit together on this bench, including a yellow catlike plush and pink companions. Place the round green potted plant at the right end of the bench. A tall blue water cooler belongs in front and slightly left of this nook, with a pale gray-blue unit extending beside it. In the open floor area below, position the bundled-up birdlike character holding a mop or cleaning tool; the blue puddle belongs at its feet. Stack several pale wooden boards or steps just to its right. These character-scale clues are especially helpful in Dreamy Room Level 842 because they show which side of the furniture should face forward. Keep the second blue ladder leaning vertically between this nook and the right-side storage furniture. Once complete, the center of Dreamy Room Level 842 should form a clear transition from library to lounge.
Step 8. Build the lower-right study, laboratory cabinet, sofa, globe, and rabbit area
The lower-right interior of Dreamy Room Level 842 combines a classroom, lounge, and miniature laboratory. Against the back wall, place the smaller brown bookcase with books inside and several stacks of books across its top. Install the mint-green wall unit above the central workspace and hang the small rectangular chart beneath it. Farther right, place the larger wooden cabinet. Decorate its upper surface with the leafy plant, stationery container, glass bottles, flasks, and laboratory equipment. Set several tall pink candles across the top-right shelf and fill the shelves below with colorful books. In front of this furniture, place the purple cushioned bench with three space-themed cushions and an orange blanket. The blue-and-gold globe sits on the floor beside it. A pale rabbit character belongs facing the brown-orange sofa to the right. Dreamy Room Level 842 requires these pieces to overlap visually without blocking one another, so preserve the narrow walking space between the seating. This dense arrangement is one of the trickiest areas of Dreamy Room Level 842.
Step 9. Create the flower garden, fountain, swing, and tent along the front-left edge
The outdoor garden dramatically changes the foreground of Dreamy Room Level 842. Extend the green lawn along the lower-left edge and place the wooden swing frame toward the far left. Behind it, add the short fence and the small covered porch section with white flowers and curling green vines. Lay the lavender stepping stones through the grass toward the circular fountain. The fountain belongs close to the center-front of the garden and has a brick-colored circular border, bright blue cascading water, flowers, and a small decorative figure in the middle. Surround it with pink flowering plants, a short trellis or fence, and a line of tiny yellow flowers along the grass border. On the right side of the garden, erect the small yellow-orange triangular tent. A gray-and-white cat rests inside on a purple cushion, with a flower basket nearby. Dreamy Room Level 842 also uses tiny lanterns and fence posts throughout this garden. Because the shapes are small, finish the main garden structures first, then add the flowers so Dreamy Room Level 842 does not become visually confusing.
Step 10. Complete the foreground pet bed and the curved right-side observatory terrace
Finish Dreamy Room Level 842 by decorating the open foreground and far-right platform. Place the large round golden pet bed on the raised purple section near the bottom center-right. Fill it with green, pink, and purple cushions, then place the small gray-and-white sleeping cat in the middle. The tiny pink stool with the purple book belongs directly in front-left of this bed. Along the curved right edge of Dreamy Room Level 842, install the pale blue observatory terrace with its peach border. Cover the front rail with cascading pink flowers and green leaves. Set the purple-and-yellow telescope on the far-right end, pointing diagonally upward. Behind the flowers, keep the orange-brown sofa and the seated rabbit visible. Finally, attach the second cluster of three pink balloons with gold curling ribbons to the extreme right wall. Add the remaining paper airplane, plants, orbital pieces, and tiny accessories wherever their matching silhouettes appear. At this point, Dreamy Room Level 842 should match the completed scene from the garden at the bottom all the way to the spacecraft above.
Notes and Precautions
The greatest difficulty in Dreamy Room Level 842 is that many objects appear to float outside the room rather than sitting on conventional furniture. The giant rockets, planets, orbit rings, spacecraft, paper airplanes, and starburst decorations belong around the exterior background, so do not repeatedly try to force them onto the floors. Likewise, the loose papers around the glowing bulb, the globe beside the purple seat, the small characters, and the garden decorations have highly specific positions.
Watch the depth carefully in Dreamy Room Level 842. The large exterior rockets should sit behind the walls, while balloons, ladders, plants, books, bottles, and characters sit in front. If a small item refuses to register, first confirm that the larger furniture underneath it is already correctly placed. Since Dreamy Room Level 842 is focused on discovering the intended position for every object, working systematically is much faster than randomly testing crowded areas.
Tips and Tricks from top player
For Dreamy Room Level 842, place objects from largest to smallest. Start with walls, staircases, railings, windows, shelves, rockets, the garden, and the curved terrace. Next handle medium objects such as the giant light bulb, telescope, sofas, bookcases, water cooler, fountain, pet bed, globe, ladders, and characters. Leave the books, bottles, candles, papers, flowers, birds, stars, and other tiny decorations until the end.
Another useful Dreamy Room Level 842 strategy is to divide the image into zones: upper-left observatory, upper-center laboratory, upper-right window, lower-left library, lower-center reading nook, lower-right study, garden, and curved telescope terrace. Finish one zone before moving to the next. When a tiny piece seems impossible to identify, compare its dominant color with unfinished gaps. Dreamy Room Level 842 uses strong color grouping: blue ladders sit beside brown shelving, pink candles sit on cabinets, green foliage occupies the garden and study area, and celestial decorations belong around the purple sky.
Final Scene: Dreamy Room Level 842 Completed
When Dreamy Room Level 842 is complete, the original empty peach shell has become a spectacular two-story fantasy observatory. A wooden staircase winds through a packed library into an upper science room dominated by a glowing golden light bulb, planetary globe, laboratory equipment, star-covered windows, balloons, and whimsical spacecraft. Giant rockets and orbiting planets surround the building, making the entire room appear suspended in a dreamy outer-space setting. Downstairs, overflowing bookshelves, ladders, plush toys, candles, chemistry bottles, a globe, sofas, plants, and charming characters create a cozy academic retreat. The front of Dreamy Room Level 842 opens into a miniature flower garden with a swing, stepping stones, fountain, tent, sleeping cat, and abundant blossoms. Another cat rests in a cushioned bed beside the curved observatory terrace, while a colorful telescope points toward the stars, completing the wonderfully crowded and imaginative final scene.