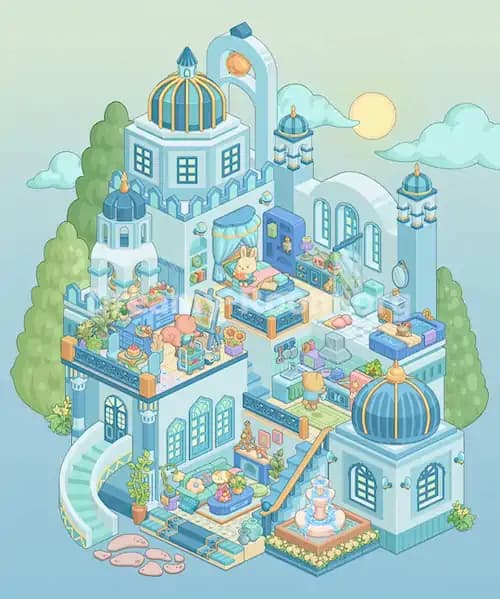
Dreamy Room Level 910
Dreamy Room Level 910 guide - Dreamy Room 910 Walkthrough & Solution.
Share this Guide with your friends:
Important Notice Regarding Level Numbering
Due to frequent changes in Dreamy Room's level numbering and differences between platforms (Android/iOS) – for example, level 910 on Android might not be the same as level 910 on iOS – the text guide below may not always match the images and video above. Please prioritize the image and video guides. If you find that the guide content doesn't match your current level, please visit the All Level Walkthroughs page to find the correct guide based on level images. Thank you for your understanding.
Dreamy Room Level 910 Walkthroughs & Guide
Step 1. Establish the Multi-Level Villa Structure and Main Platforms
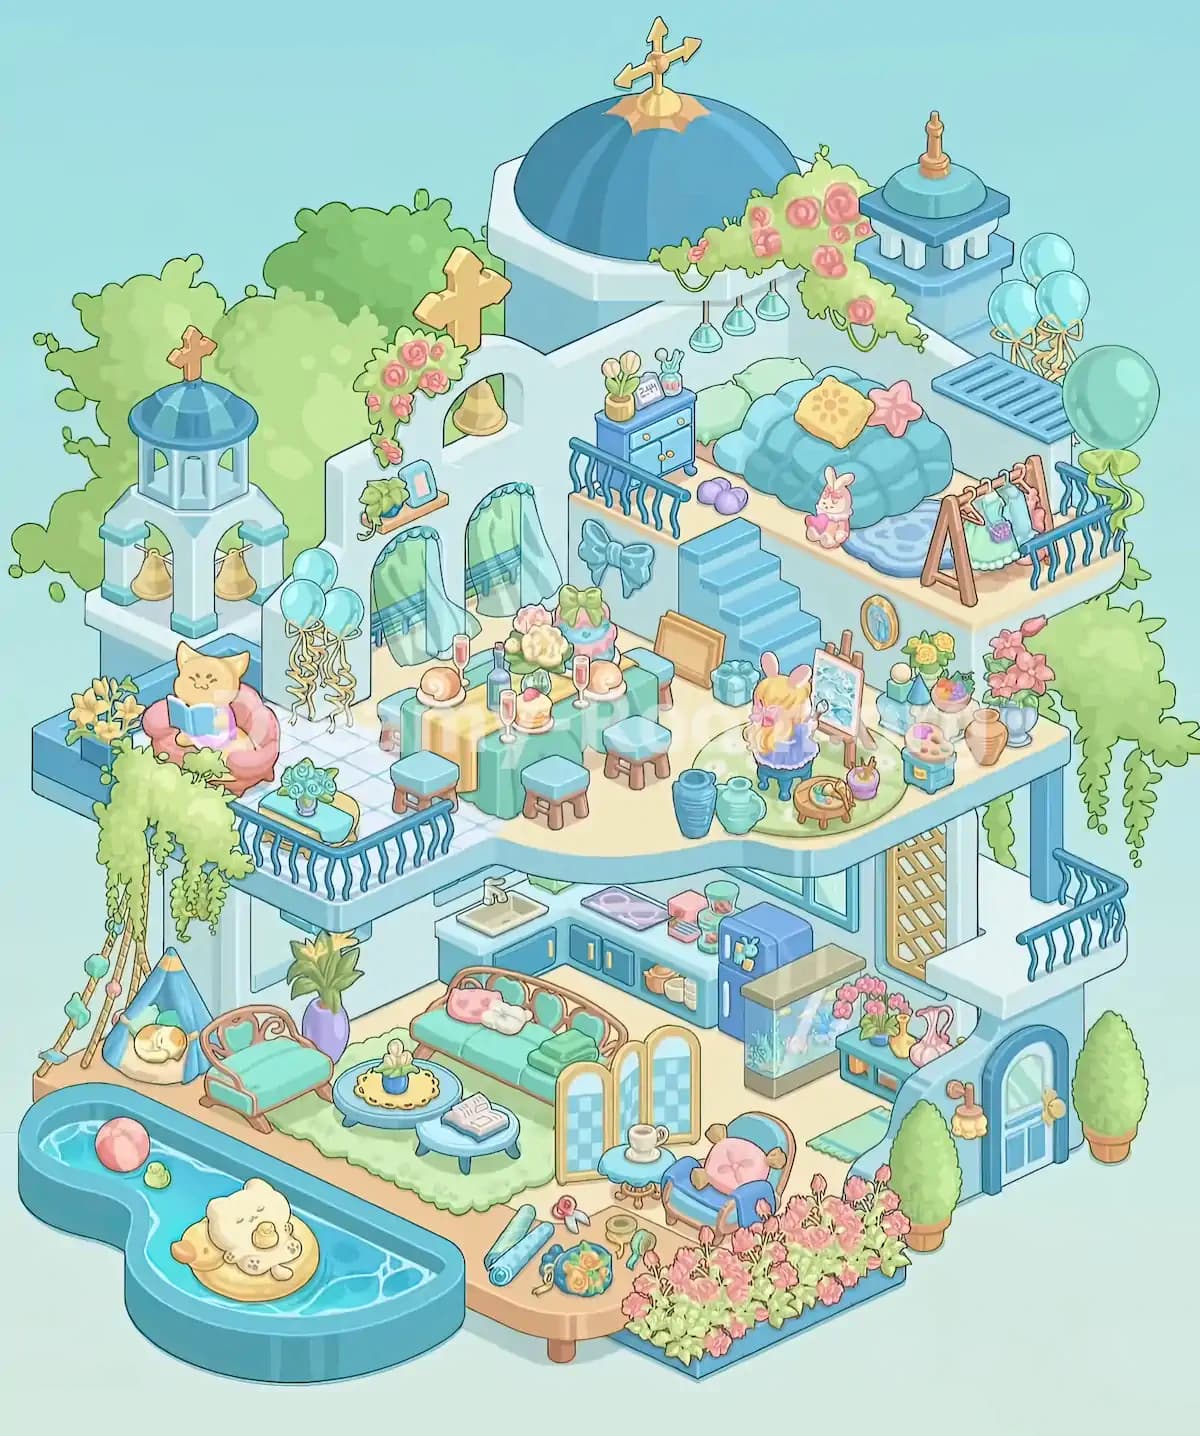
Begin Dreamy Room Level 910 by identifying the basic structure of the empty room. The starting scene contains a pale-yellow floor platform, light-blue walls forming a corner, and a blue foundation underneath. These simple elements will eventually support a beautiful villa with several distinct living areas.
Focus on arranging the major architectural components before adding smaller decorations. The completed Dreamy Room Level 910 layout features a ground-floor living area, a spacious middle terrace, and an elevated rooftop bedroom positioned toward the upper-right corner. The central terrace extends outward across the front, creating an open space for dining, relaxing, and painting.
Pay special attention to the villa's overlapping floor sections. The middle terrace should project forward above the kitchen and living room, while the upper bedroom platform sits farther back and higher on the right.
Make sure the light-blue exterior walls, white architectural borders, and supporting columns align correctly. Establishing these proportions early in Dreamy Room Level 910 makes placing furniture and decorative objects considerably easier.
Step 2. Position the Blue Domed Roofs, Bell Tower, and Decorative Arches
The architectural centerpiece of Dreamy Room Level 910 is the collection of blue domed rooftops and small decorative towers.
Place the largest rounded blue dome above the upper central section of the villa. This dome rests on a pale-blue structure and features a golden three-directional ornament at its peak. Its prominent position makes it one of the easiest reference points when organizing the upper floor.
Next, position the smaller blue-roofed bell tower on the far-left side. This tower has a golden cross on top, open arched sections, and two hanging golden bells. The tower should rise above the left side of the middle terrace, beside the surrounding greenery.
Add the small blue-roofed turret at the upper-right rear corner, complete with its miniature golden finial. Install the white curved architectural arch near the upper-left side of the rooftop terrace. A large golden cross sits above this arch, while a small golden bell hangs inside its opening.
In Dreamy Room Level 910, these architectural features should form a balanced skyline, with the large dome in the center, the bell tower on the left, and the smaller turret on the right.
Step 3. Furnish the Rooftop Bedroom with the Blue Bed and Pastel Accessories
The upper-right rooftop terrace contains the most relaxing bedroom arrangement in Dreamy Room Level 910.
Place the large, rounded blue bed near the center of this elevated platform. Its plush quilted surface should face the open front of the terrace. Arrange the pale-green pillows along the back, followed by the yellow square cushion decorated with a flower pattern and the pink star-shaped cushion.
Position the small purple heart-shaped cushions on the floor toward the front-left side of the bed. A blue patterned rug belongs directly in front of the sleeping area, with a little pink rabbit plush toy sitting near the rug's edge.
On the left side of the bed, install the small blue bedside cabinet. Decorate its top with a tiny vase of pale-yellow tulips, a framed item, and a small accessory container.
Complete this Dreamy Room Level 910 sleeping space by placing the wooden clothing rack on the right-front side of the terrace. Hang the pastel garments neatly on its rail.
The correct rooftop arrangement should feel cozy without blocking the surrounding balcony railing.
Step 4. Decorate the Rooftop with Flowers, Hanging Lights, and Balloons
Continue Dreamy Room Level 910 by adding the floating decorations and floral details surrounding the rooftop bedroom.
Arrange the pink rose garland across the upper-right edge of the bedroom area. The garland should extend from the central roof toward the small rear turret, with soft-green leaves and clusters of pink flowers hanging over the white wall.
Beneath this floral decoration, position the three delicate turquoise hanging lights in a descending arrangement. Their placement creates a gentle visual transition between the large dome and the blue bed.
At the rear-right corner of the rooftop terrace, add the rectangular blue slatted floor feature. Behind it, place the group of pale-blue balloons with curling golden ribbons. A larger green balloon belongs near the front-right balcony railing, with a decorative ribbon trailing downward.
In Dreamy Room Level 910, these balloons should remain along the terrace edges rather than covering the bed or clothing rack.
Finally, inspect the blue railing around the rooftop's exposed sides. The floral garland, hanging lights, balloons, and rooftop furniture should all remain visible when the Dreamy Room Level 910 upper level is viewed as a whole.
Step 5. Install the Central Staircase, Curtains, and Balcony Railings
The next important part of Dreamy Room Level 910 is the transition between the upper bedroom and the middle entertainment terrace.
Place the wide blue staircase in the central-right section, descending from the rooftop sleeping area toward the middle floor. The staircase should face forward, with the upper landing connecting directly to the bed platform. Add the oversized blue decorative bow to the vertical wall just left of the stairs.
Move to the left wall and arrange two tall, arched window openings with flowing mint-green curtains. Each curtain has a blue-green decorative border and should hang naturally toward the middle terrace floor. Above the left window, position a small wooden wall shelf holding a plant and a blue-framed picture.
Next, position the blue balcony railings along the exposed front-left terrace edge and the left side of the staircase's upper landing. Their curved vertical bars should match the railings around the rooftop bedroom.
Dreamy Room Level 910 also includes pale-blue balloons with long golden curling ribbons near the left window area. Place this balloon cluster beside the bell tower and above the reading corner.
These elements help connect the different floors visually while keeping the Dreamy Room Level 910 layout organized.
Step 6. Create the Cozy Cat Reading Corner on the Left Terrace
One of the most adorable areas in Dreamy Room Level 910 is the little reading corner on the far-left side of the middle terrace.
Begin with the rounded pink armchair, positioning it near the left edge below the bell tower. The chair should face slightly forward toward the center of the villa. Place the yellow cat character on the seat, holding its open blue book. Its relaxed expression creates a peaceful reading atmosphere.
Add the cluster of yellow flowers behind and to the left of the armchair. These flowers soften the transition between the terrace and the outside greenery.
Near the front-left balcony railing, place the small, low turquoise bench or display surface with a light wooden base. Set the miniature blue-green succulent arrangement on top, keeping it between the reading chair and the central dining area.
The pale-blue balloon cluster should rise behind the cat, with its golden ribbons hanging between the chair and the nearby window.
In Dreamy Room Level 910, keep the reading corner compact so the chair, flowers, and decorative bench do not interfere with the central table.
This arrangement gives Dreamy Room Level 910 a distinct quiet space beside the busier dining terrace.
Step 7. Arrange the Dining Table, Stools, Desserts, and Floral Centerpieces
The middle terrace features a beautifully decorated dining area that occupies the center of Dreamy Room Level 910.
Place the rectangular dining table in front of the two mint-green curtained windows. Its surface should run from the back-left toward the front-right, following the villa's isometric perspective. Cover it with the turquoise tablecloth and the long pale-yellow table runner.
Surround the table with the small wooden stools featuring light-blue cushioned seats. Position the stools along the visible front and right sides, while leaving enough clearance for the nearby staircase and reading corner.
Arrange the dining accessories carefully. The completed Dreamy Room Level 910 table includes tall pink drinks in slender glasses, rolled cakes, small pastries, and round desserts. Place the largest floral centerpiece near the middle, combining cream-colored flowers, pink blossoms, and soft-green decorative leaves.
Add the pastel dessert display toward the rear section of the table, using the remaining serving items to create a balanced arrangement.
Behind the dining area, lean the small wooden-framed panel near the stairs and position the little turquoise gift box nearby.
Correct placement in Dreamy Room Level 910 depends on keeping the tabletop decorations visible without overcrowding the stools or blocking the passage toward the painting corner.
Step 8. Set Up the Painting Corner and Flower Display on the Right Terrace
The middle-right side of Dreamy Room Level 910 is dedicated to a charming outdoor art studio.
Start by laying down the soft-green oval rug near the right terrace edge. Place the small blue stool on this rug, with the blonde rabbit-eared girl sitting on it and facing the painting easel. Her pink hair bow and blue outfit should remain visible from the front.
Position the wooden easel directly in front of the character. The canvas displays a delicate pastel painting and should face toward her rather than toward the balcony railing.
Next, add the round wooden accessory stand containing painting supplies near the character's feet. Place the little purple container nearby, along with the two large blue-green ceramic vases closer to the terrace's front edge.
Behind the easel, install the small oval wall decoration. Arrange the flower displays along the right perimeter, including yellow blossoms, pink flowers, potted plants, and a blue tiered display holding several miniature arrangements. Add the terracotta vase and smaller decorative containers between them.
Dreamy Room Level 910 also includes a small pastel stool or container near the edge of this art area.
The key to completing this section of Dreamy Room Level 910 is keeping the painting character, easel, and flower displays in their correct relative positions.
Step 9. Assemble the Ground-Floor Kitchen, Cabinets, and Entrance
Move down to the ground floor of Dreamy Room Level 910 and begin creating the compact kitchen against the rear wall.
Install the L-shaped blue kitchen cabinets beneath the middle terrace. Place the sink and pale faucet on the left counter, with the stovetop positioned farther right. The lower cabinets feature golden handles, while the countertops hold small containers, dishes, food accessories, and other kitchen utensils.
Next, place the rounded blue refrigerator to the right of the stove. Decorate its upper door with the small colorful magnets. Beside it, position the taller blue glass-front cabinet or display unit, with its lighter upper counter and floral decorations.
The entrance occupies the far-right end of the ground floor. Install the arched blue door with its pale window panels and golden hardware. Place the small hanging golden lamp beside it and arrange the mint-green doormat in front.
Near the entrance, add the narrow blue console displaying pink flowers and a pink decorative ornament. Set the small potted trees around the outdoor entrance area.
In Dreamy Room Level 910, the tan lattice-style wall panel belongs behind the right-side exterior platform, while the projecting balcony above the entrance has a matching blue railing.
Check that these objects do not overlap the lounge furniture. The completed Dreamy Room Level 910 kitchen should remain visible beneath the upper terrace.
Step 10. Furnish the Lower Living Room and Children's Play Corner
The lower living area is another major attraction in Dreamy Room Level 910, combining pastel furniture with playful decorations.
Begin by placing the large green rug across the center of the ground floor. Position the long wicker-framed sofa against the rear section of the rug, facing forward. Its turquoise cushions should be complemented by pink and cream pillows, with a folded green blanket resting on the right side.
Add the matching wicker armchair to the left, angled toward the middle of the room. Between the seating pieces, arrange the rounded blue coffee tables. One holds a flower arrangement on a yellow decorative mat, while the other displays an open book or magazine.
Position the three-panel folding screen with blue checkered inserts near the right side of the sofa. In front of the screen, add the smaller blue armchair with a pink flower-shaped cushion and a little round side table holding a white teacup.
The left side of Dreamy Room Level 910 contains a tiny play and resting corner. Place the blue-and-yellow tent near the outer-left edge, with a sleeping animal curled inside on a cushion. Add the tall green houseplant in a purple vase nearby.
Finally, hang the decorative strings with colorful geometric ornaments along the left exterior edge.
These details make the Dreamy Room Level 910 ground floor feel both comfortable and imaginative.
Step 11. Complete the Swimming Pool, Flower Garden, and Outdoor Decorations
The final major decorating task in Dreamy Room Level 910 is creating the outdoor pool and garden across the front of the villa.
Start with the large irregularly shaped turquoise swimming pool on the lower-left side. Its rounded outline should extend outward from the front of the living area. Inside the pool, place the large cream-colored animal resting on its yellow float near the front-right section of the water.
Add the pink-and-white beach ball toward the back-left portion of the pool, along with the tiny green floating toy nearby. These items should remain separated so that the pool looks playful rather than overcrowded.
Next, decorate the front-right terrace with the small gardening accessories. Arrange the rolled turquoise mats or towels, little flower-shaped accessories, and the decorative flower-filled container along the wooden floor.
Create a thick border of pink flowering plants along the front-right edge. The garden should extend from the outdoor seating area toward the entrance, surrounding the lower-right corner with soft pink blossoms and pale-green leaves.
Place the two cone-shaped green potted shrubs near the right entrance, and add the hanging vines cascading from the left terrace and the upper-right side of the building.
Complete Dreamy Room Level 910 by checking the large leafy trees behind the villa. One prominent green canopy fills the upper-left background, while additional hanging foliage frames the right side.
With these final decorations correctly placed, Dreamy Room Level 910 becomes a complete pastel garden villa.
Notes and Precautions
Dreamy Room Level 910 contains many layered decorations, so precision matters more than speed. Keep these important points in mind while completing the level:
- Prioritize large objects. Position the platforms, architectural components, furniture, and pool before placing flowers, cushions, or smaller accessories.
- Pay attention to floor height. Dreamy Room Level 910 has several elevated surfaces. Objects that appear close together may belong to completely different levels.
- Watch for overlapping decorations. Balloon ribbons, trailing plants, railings, and flowers can partially cover the correct placement areas.
- Check the upper bedroom carefully. The bed, clothing rack, bedside cabinet, and decorative cushions have distinct positions and should not be swapped.
- Separate the dining and painting areas. The dining table belongs in the middle-left section, while the easel and rabbit-eared artist belong on the right.
- Inspect small objects before finishing. Miniature cups, flowers, vases, framed decorations, and gardening supplies are easy to overlook.
The biggest challenge in Dreamy Room Level 910 is finding each object's exact intended location rather than simply making the villa look attractive.
If an item does not settle into place, compare its shape, orientation, and surrounding furniture with the completed Dreamy Room Level 910 scene before trying another position.
Tips and Tricks from top player
Experienced players can approach Dreamy Room Level 910 more efficiently by dividing the large scene into smaller, manageable areas.
- Work from top to bottom. Complete the rooftop architecture and bedroom first, move to the central terrace, and finish with the kitchen, living room, and pool.
- Use fixed landmarks. The large dome, left bell tower, central staircase, and right entrance provide excellent reference points for placing nearby items.
- Group objects by function. Keep bedroom accessories, dining decorations, painting supplies, kitchen equipment, and pool toys organized mentally before positioning them.
- Place edge decorations last. Flowers, vines, balloons, and other ornaments along the villa's perimeter are easier to position after the main furniture is settled.
- Use the completed picture to compare proportions. In Dreamy Room Level 910, an item might look correct but still occupy the wrong location by a small distance.
- Check partially hidden surfaces. Pay particular attention to the spaces behind chairs, beside cabinets, and beneath decorative arches.
A useful strategy for Dreamy Room Level 910 is to treat each floor as a separate miniature puzzle. Finish one functional area before moving to the next instead of switching constantly between unrelated objects.
This approach reduces confusion and makes the final small-object placements in Dreamy Room Level 910 much easier.
Final Scene in Dreamy Room Level 910
The completed Dreamy Room Level 910 reveals a breathtaking pastel villa that combines comfortable living spaces with whimsical outdoor decorations.
At the top, an elegant blue dome overlooks a peaceful rooftop bedroom decorated with plush cushions, pink roses, hanging lights, and floating balloons. The miniature bell towers and golden ornaments give the building a fairytale appearance.
The middle terrace features a delightful combination of activities. A yellow cat enjoys reading in its pink armchair, a dining table displays beautiful flowers and desserts, and a rabbit-eared artist paints beside a colorful collection of potted plants.
Below, the cozy living room offers wicker furniture, soft cushions, and cheerful decorations. A compact kitchen and blue arched entrance complete the interior.
Outside, a turquoise swimming pool, adorable floating toys, flowering gardens, and lush green foliage surround the home.
Dreamy Room Level 910 concludes with a harmonious villa where every carefully positioned object contributes to its dreamy, relaxing atmosphere.