Dreamy Room Level 817
Dreamy Room Level 817 guide - Dreamy Room 817 Walkthrough & Solution.
Important Notice Regarding Level Numbering
Due to frequent changes in Dreamy Room's level numbering and differences between platforms (Android/iOS) – for example, level 817 on Android might not be the same as level 817 on iOS – the text guide below may not always match the images and video above. Please prioritize the image and video guides. If you find that the guide content doesn't match your current level, please visit the All Level Walkthroughs page to find the correct guide based on level images. Thank you for your understanding.
Dreamy Room Level 817 Walkthroughs & Guide
Step 1. Build the main wooden lodge in Dreamy Room Level 817
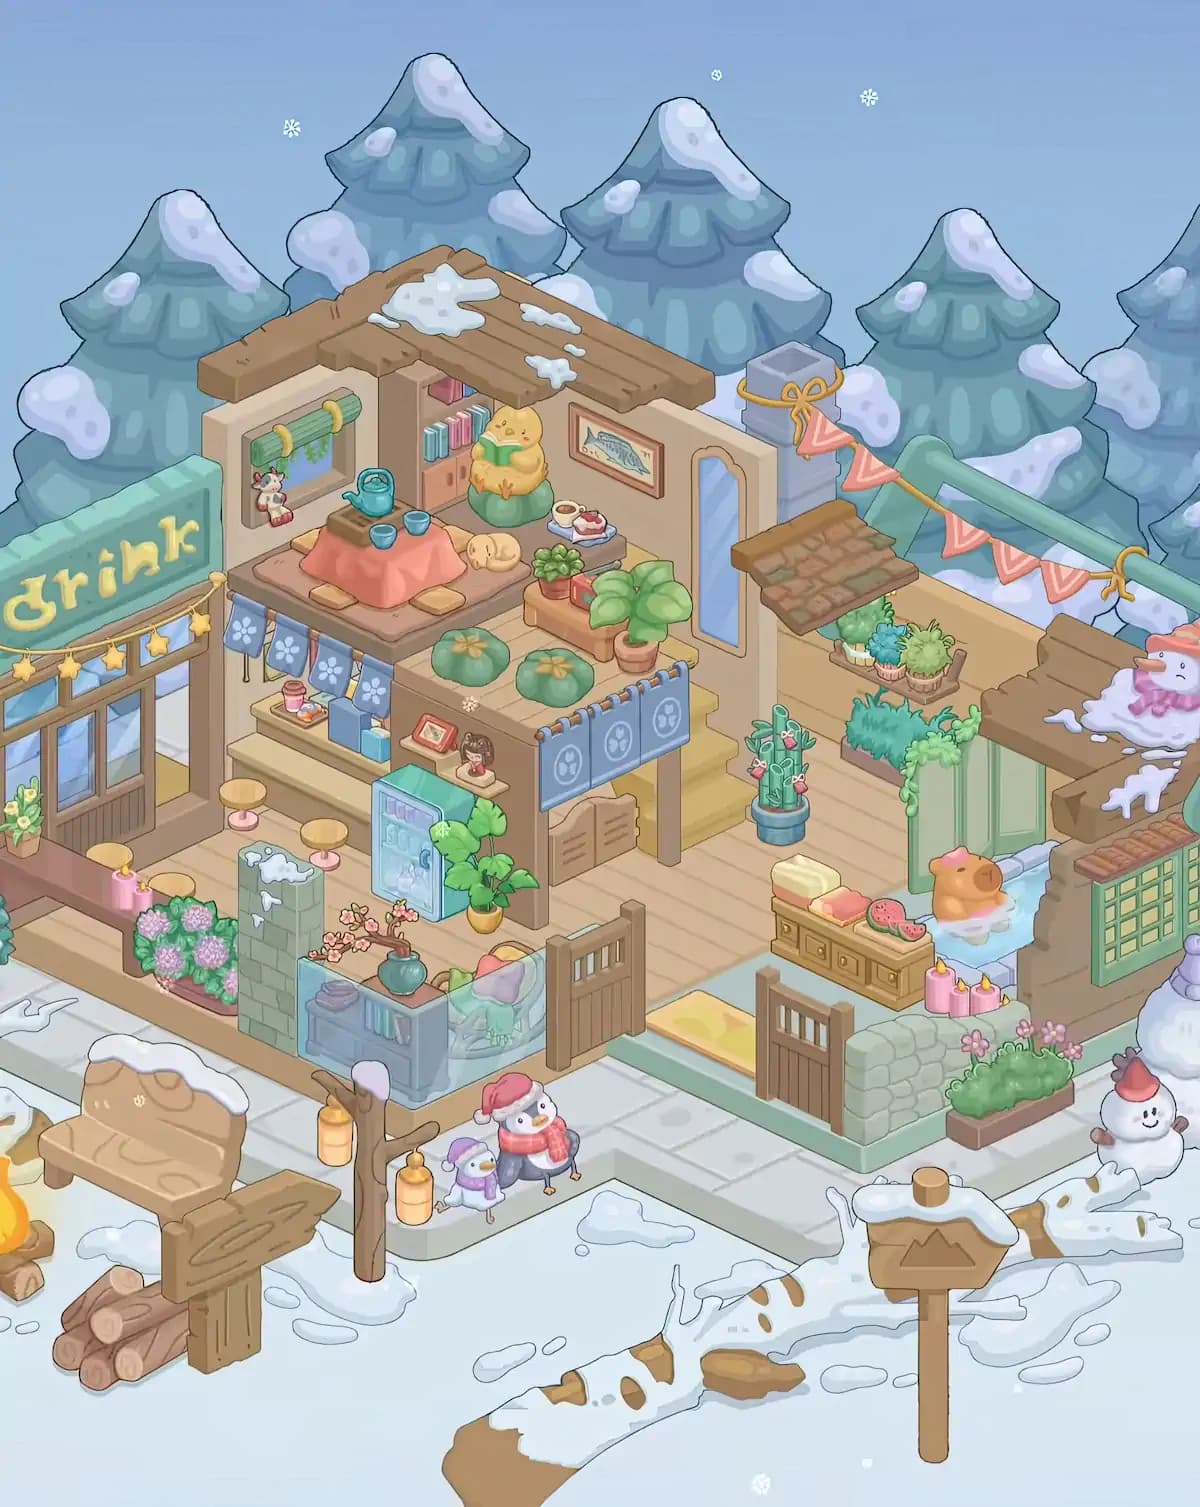
Begin Dreamy Room Level 817 by using the large wooden section of the empty platform for the main lodge. The building occupies most of the left and center portions of the foundation, while the pale green floor section remains available for the right-side entrance and bathing area. Place the tall tan walls toward the rear and build the elevated upper floor over the center-left portion. The upper structure should remain open at the front so that the tea area is visible.
Add the thick brown roof beams across the top, forming an uneven rustic roof with several white snow patches resting on it. The rear wall receives a narrow blue window on the right and the interior shelving on the left. A yellow staircase descends from this upper section toward the middle-right floor. In Dreamy Room Level 817, getting these large pieces correct is essential because nearly every later item aligns with the walls, loft edges, stairs, or support posts. Finish this stage by placing the vertical wooden supports beneath the loft and the storage-style wooden panel under its right side.
Step 2. Assemble the left drink-shop entrance and counter
The left side of Dreamy Room Level 817 becomes a tiny winter drink shop. Place the large mint-green “drink” sign above the front-left doorway. Directly underneath, install the wooden-framed glass entrance with several tall blue-tinted windowpanes. Stretch the golden cord with hanging yellow stars horizontally beneath the sign. A small planter of yellow flowers sits on the far-left ledge beside the entrance.
Inside, build the long cream-colored service counter against the center wall. Place several small round stools with pale wooden tops and pink pedestal bases in front of it. Above the counter hangs a row of blue cloth panels decorated with white flower patterns. Put the pink drink jar and small snack tray on the left shelf, followed by the upright blue packages toward the center. The tiny red-framed picture and small girl figurine sit on the narrow ledges farther right. Dreamy Room Level 817 is particularly strict around this counter because many similarly sized objects look as though they could belong on the same shelf, so match their left-to-right order carefully.
Step 3. Create the upstairs tea table and cozy seating area
The upper-left loft is the coziest part of Dreamy Room Level 817. Place the large square floor mat first, then center the low table covered by the salmon-pink cloth. A wooden heater or raised base is visible underneath the cloth. Put the teal kettle toward the rear-left corner of the table and arrange the two small blue cups in front of it. Four small beige floor cushions sit around the edges of the table.
On the rear wall, position the window with the rolled green blind. Hang the tiny rabbit doll from the lower-left side of that window. The shelf beside it holds colorful books and storage compartments. In front of the shelving, place the plump yellow chick character reading a green book while sitting on a large green cushion. A sleeping tan cat curls up to the right of the tea table. On the raised tray farther right, add the white cup of tea or coffee and the small strawberry-topped dessert. These miniature objects make Dreamy Room Level 817 challenging, so use the large table as the anchor before trying to place the cups, kettle, pet, and food.
Step 4. Complete the upper room with wall art, cushions, and plants
Continue decorating the top floor of Dreamy Room Level 817 by filling the open space to the right of the tea area. Hang the framed fish illustration on the rear wall, roughly between the reading chick and the tall narrow blue window. The window belongs near the right edge of the wall and has a softly rounded decorative frame.
Place the rectangular wooden planter or low display box near the front-right corner of the loft. The small red pot containing a compact green succulent sits here, next to a red book or box. Beside it, position the larger leafy plant in a terracotta-colored pot. Along the front edge of the upper platform, add the two round dark-green cushions with small orange flower-like centers. Below them hangs a second set of blue fabric panels, this time displaying circular pale motifs. These panels should cover the upper edge of the open space beside the staircase. In Dreamy Room Level 817, the layered placement is important: plants and cushions remain on top of the platform, while the blue curtains hang vertically from its front edge rather than sitting on the floor below.
Step 5. Furnish the central lower floor and glass reading nook
The central floor of Dreamy Room Level 817 contains several objects packed into a small area. Start with the turquoise glass-front refrigerator against the central support wall beneath the loft. Its translucent door reveals rows of pastel drinks inside. Immediately to its right, place the tall leafy houseplant in the small golden-yellow pot.
At the front of this area, build the low blue cabinet and transparent glass partition that form a miniature reading or resting nook. Books fill the shelves of the blue cabinet, with folded purple items resting on its top-left corner. Center the teal vase on the cabinet and insert the branch covered with tiny pink blossoms. Behind the transparent panel, arrange the colorful cushions and soft green throw so they form a cozy seat.
A short green brick pillar topped with snow stands to the left of this nook. Along the outer edge behind it, place the large cluster of pink-and-purple hydrangeas. These close-fitting objects are an important Dreamy Room Level 817 placement test: the refrigerator stays behind the nook, the blossom vase sits on the blue cabinet, and the cushions remain enclosed behind the clear partition.
Step 6. Construct the right terrace and plant-filled garden corner
Move to the upper-right half of Dreamy Room Level 817 and create the narrow wooden terrace. Extend the long mint-green railing diagonally across the back-right edge. A golden cord wraps around the railing and carries a string of pink triangular pennants. Near its left end, position the square gray post or chimney-like block with the decorative yellow rope tied around it.
Below the railing, attach the small brown shingled awning to the wall. Under this cover, place the narrow hanging shelf containing three compact potted plants in green and blue-green shades. Another long planter filled with dense turquoise foliage sits directly below. The tall segmented cactus goes farther left on the wooden floor inside a blue pot; small pink blossoms appear around its stems.
Finish this part of Dreamy Room Level 817 with the pale green privacy curtain hanging vertically near the bath. A trailing vine drapes over its upper edge. Because the terrace contains so many shades of green, it is easy to confuse the cactus, planters, and curtain locations, so use the brown awning and rear railing as your main visual anchors.
Step 7. Arrange the bath, towels, watermelon, candles, and right wall
The lower-right corner of Dreamy Room Level 817 becomes a whimsical bathing space. Place the small blue bath directly behind the low wooden cabinet. Inside the water sits the round brown capybara-like animal, surrounded by white foam and wearing a small pink item on its head. The bath should be tucked directly against the pale green curtain rather than pushed toward the entrance.
Place the long wooden chest in front of the bath. Arrange the folded pale-yellow and coral-pink towels or cushions on its left side and the sliced watermelon pieces on its right. Three pink candles with small flames stand together near the front-right edge of this section, just above the stone boundary wall.
Complete the surrounding structure with the brown wooden wall and green lattice window on the far right. The top wooden ledge carries patches of snow, and a tiny white, pink-eared animal peeks from the snowy upper edge. Correct layering matters greatly in Dreamy Room Level 817: the chest remains in front, the bath and animal sit behind it, and the green curtain forms the backdrop.
Step 8. Finish the gates, walls, flower boxes, and entrance path
Next, organize the lower boundaries of Dreamy Room Level 817. Two separate wooden gate sections frame the main approach. Place the taller gate panel beside the glass reading nook near the center, then put the second gate farther right along the pale green edge of the bath area. Leave the gap between them open so the yellow entrance mat remains visible inside.
Build the short pale stone wall immediately to the right of the second gate. Its top provides the platform for the trio of pink candles near the bath. Along the outside of the right wall, place the rectangular brown planter overflowing with green leaves and several pink flowers. On the opposite side, the large hydrangea planter remains beside the snowy green pillar near the drink shop.
The small yellow-orange rectangular mat belongs just inside the gateway where the wooden interior flooring meets the mint-colored foundation. Dreamy Room Level 817 uses these boundary pieces to define the entire front of the cabin, so if the gates, stone wall, flower boxes, or mat seem misaligned, check them before adjusting smaller decorations.
Step 9. Add the lanterns, winter birds, bench, firewood, and signpost
The snowy foreground gives Dreamy Room Level 817 much of its personality. Place the bare wooden lantern post just outside the central-left gate. Two warm yellow lanterns hang from its branches, one on either side at different heights. Beside it stand the two bundled-up bird characters: the smaller bird wears purple winter clothing, while the larger one wears a red hat and thick red scarf.
Farther left, position the wooden bench with a heavy layer of snow across its back and seat. In front of the bench goes the rustic directional signpost. Stack the cut firewood horizontally at the base of this sign, while the small campfire sits near the far-left edge of the scene.
These items should remain outside the cabin rather than on the wooden floor. In Dreamy Room Level 817, players often concentrate on the detailed interior and accidentally overlook these foreground pieces. The lanterns, birds, bench, logs, sign, and fire create the visual transition between the warm lodge and the surrounding snowy forest.
Step 10. Complete the snowy foreground and make the final placement check
Finish Dreamy Room Level 817 with the objects on the lower-right snowfield. Lay the large fallen tree trunk diagonally across the foreground, with irregular white snow patches covering much of its pale brown surface. Place the freestanding wooden trail marker in front of the trunk toward the right. Its rectangular sign carries a simple mountain symbol and has a thick cap of snow along the top.
The small snowman stands farther back near the right side of the cabin. Give it its red pointed hat, simple smiling face, and short brown arms. Check that scattered snow patches remain visible around the lantern post, birds, sign, and fallen trunk rather than being covered by misplaced furniture.
For the last Dreamy Room Level 817 inspection, compare each vertical layer: snowy decorations outside, gates at the front edge, furniture inside, balcony pieces above them, and roof decorations at the top. The main difficulty of Dreamy Room Level 817 is always determining which exact surface accepts each object, so correcting the large structural layers usually resolves any stubborn leftover item.
Notes and Precautions
Dreamy Room Level 817 contains many pieces that are visually similar but belong to very different heights. The numerous green objects are the biggest source of confusion: the large plant belongs upstairs, the golden-pot plant sits beside the refrigerator, the cactus belongs near the stairs, the small plants sit beneath the terrace awning, and the trailing greenery hangs beside the privacy curtain.
Be equally careful with the blue pieces in Dreamy Room Level 817. The floral cloth panels belong under the upper tea area, the circular-pattern curtains hang from the right edge of the loft, the turquoise refrigerator stands on the lower floor, and the transparent blue partition surrounds the reading nook.
Small tabletop objects should usually be placed only after their furniture is settled. This applies to the kettle, cups, cake, drink, succulent, books, photo frame, doll, towels, watermelon, and candles. If Dreamy Room Level 817 refuses an apparently correct item, first check whether the supporting table, shelf, wall, cabinet, or floor section is properly positioned. The game often requires a more exact placement than the object's appearance initially suggests.
Tips and Tricks from top player
The fastest reliable approach to Dreamy Room Level 817 is to solve it in layers rather than unpacking items randomly. Start with walls, roof beams, lofts, staircase, terrace, counters, partitions, and boundary walls. Those pieces reveal the usable surfaces for almost everything that follows. Next place medium objects such as the table, refrigerator, cabinets, plants, bath, bench, gates, and signs. Leave food, cups, decorations, candles, books, and tiny characters until last.
Another useful Dreamy Room Level 817 strategy is to work clockwise. Finish the drink shop first, then the upper tea room, central lower nook, stairs, right terrace, bath, front gates, and finally the snowy exterior. This reduces the need to search the whole image whenever you pick up a new item.
When two placements look plausible in Dreamy Room Level 817, compare nearby objects instead of the item itself. For example, the sleeping cat is positioned relative to the tea table, the blossom vase relative to the glass partition, and the watermelon relative to the bath cabinet. Using these relationships makes the hardest placements much easier.
Final Scene: Dreamy Room Level 817 Completed
When Dreamy Room Level 817 is complete, the once-empty platform becomes a charming winter lodge glowing with warmth amid snow-covered pine trees. The left side functions as a tiny drink shop with its mint sign, star garland, counter, stools, flowers, and refreshments. Above it, a peaceful tea loft contains the kettle, cups, sleeping cat, reading chick, dessert, books, cushions, framed fish art, and leafy plants. The center of Dreamy Room Level 817 is filled with a refrigerator and glass-walled reading nook, while the right terrace overflows with plants, pennants, a cactus, and a private bath where the little brown animal relaxes beside towels and watermelon. Outside, lanterns illuminate two bundled birds near a snowy bench, firewood, signs, fallen tree, and cheerful snowman. The finished Dreamy Room Level 817 feels like a secluded woodland café and bathhouse designed for a quiet snowy afternoon.