Dreamy Room Level 908
Dreamy Room Level 908 guide - Dreamy Room 908 Walkthrough & Solution.
Important Notice Regarding Level Numbering
Due to frequent changes in Dreamy Room's level numbering and differences between platforms (Android/iOS) – for example, level 908 on Android might not be the same as level 908 on iOS – the text guide below may not always match the images and video above. Please prioritize the image and video guides. If you find that the guide content doesn't match your current level, please visit the All Level Walkthroughs page to find the correct guide based on level images. Thank you for your understanding.
Dreamy Room Level 908 Walkthroughs & Guide
Step 1. Place the Wooden Dock and Staircase Along the Front Waterfront.
Begin Dreamy Room Level 908 by establishing the waterfront structure along the bottom of the island. The empty landscape already features a snowy shoreline, winding brown pathways, scattered rocks, and tall evergreen trees. These natural features provide useful landmarks for positioning the village buildings.
Start with the small rectangular wooden dock extending into the water near the bottom center of the scene. Its planked platform rests on four short wooden posts, with the longer edge running parallel to the shoreline.
Next, position the long staircase diagonally upward from the dock toward the left-side fishing market. The staircase should connect the lower waterfront to the elevated platform where the market will eventually stand.
In Dreamy Room Level 908, the staircase is an important alignment reference because it separates the fishing market from the larger residential building on the right.
Keep the front-right snowy peninsula clear for the upcoming storefront. Before continuing Dreamy Room Level 908, check that the dock, staircase, and shoreline form a continuous route between the water and the village.
Step 2. Position the Pink Fishing Boat and Cargo Containers in the Lower-Left Water.
The next task in Dreamy Room Level 908 is arranging the colorful cargo boat in the lower-left corner. This boat adds a distinctive harbor atmosphere and sits directly beside the fishing market's elevated wooden platform.
Place the long pink vessel in the water, pointing its bow toward the lower-right side of the scene. Most of its hull extends toward the left edge of the screen. The visible boat has a raised bow, decorative golden circular fittings along the side, and a small golden mooring post near the front.
Load the rectangular cargo containers onto the boat's central deck. The containers are pale blue-green, with darker vertical lines that create a ribbed appearance. Arrange them in a compact stack rather than spreading them across the deck.
Dreamy Room Level 908 requires careful placement here because the boat must remain beside the market without overlapping the dock staircase.
Check that the cargo stack appears securely positioned inside the pink hull. When correctly assembled, this section of Dreamy Room Level 908 should resemble a working winter harbor, ready to transport supplies between the snowy village and the surrounding water.
Step 3. Build the Covered Fish Market on the Front-Left Pier.
Continue Dreamy Room Level 908 by assembling the fishing market on the large raised platform in the lower-left section. The market is one of the most detailed parts of the completed village, so positioning its individual pieces accurately is essential.
Place the wooden market shelter toward the back-right side of the pier. Its sloping roof features red tiles, a thick layer of snow, and a small red fish-shaped decoration. Beneath the roof, position the market's wooden service area, including the small display stand and pink container holding paper signs or utensils.
Arrange the seafood displays across the front edge of the platform. Several shallow crates hold blue fish, red fish, pink seafood, and orange-red crustaceans. Add the purple containers holding pale green fish and the round basket with additional seafood near the right corner.
In Dreamy Room Level 908, the arrangement should appear densely stocked but organized. Position the wooden posts and rope barriers along the platform edges, leaving the staircase entrance accessible.
The correct Dreamy Room Level 908 market layout places the displays facing the waterfront, with the covered shelter behind them and the fishing boat floating just below.
Step 4. Place the Harbor Watchtowers, Wooden Fences, and Barrels on the Left.
The left side of Dreamy Room Level 908 features distinctive lookout structures that make the harbor feel like a small coastal village. Begin with the taller watchtower positioned along the left-middle portion of the island, behind the fishing market.
This tower has a narrow multistory body, pale blue-green lower walls, reddish wooden framing, illuminated upper windows, and a snow-covered roof. Its top includes an open wooden lookout structure with crossed supporting beams, a red roof, and a small blue flag.
Place the additional lookout building farther left, where part of its structure extends toward the image's edge. Its exposed wooden supports, greenish walls, snow-covered roof, and matching blue flag should complement the taller tower.
At the foot of the central tower, position two large wooden barrels and a small coil of rope. Add the wooden fence sections along the snowy pathway behind the market.
Dreamy Room Level 908 uses these smaller accessories to connect the harbor architecture visually. Keep the barrels close to the tower rather than placing them on the seafood display platform.
Once these pieces are arranged, the left side of Dreamy Room Level 908 should show a clear transition from the waterfront market to the higher village paths.
Step 5. Arrange the Elevated Cozy Terrace and Gift Decorations at the Upper Left.
Now move to the upper-left hillside of Dreamy Room Level 908, where a cozy elevated terrace sits among the snow-covered evergreen trees. This location is above and slightly right of the harbor watchtowers.
Place the wooden terrace on its tall support posts, with its staircase descending from the front-right edge toward the central village pathway. The upper structure resembles a compact open-front shop or private relaxation area, featuring a sloping gray-brown roof covered in thick snow.
Inside the sheltered area, arrange the small wooden cabinet against the left wall. Add colorful books, small decorative objects, and a green potted plant. A warm yellow window beneath the roof provides the inviting indoor glow.
In the center of the terrace, position the pink table covered with a cloth. Decorate it with a small dessert, a cup, and accompanying treats. Place the pink upholstered seat along the right side, with wrapped gifts near the front of the table.
Dreamy Room Level 908 requires the terrace furniture to remain within the raised platform boundaries. Make sure the staircase is not blocked.
This upper-left corner of Dreamy Room Level 908 should look like a peaceful winter retreat overlooking the busy harbor below.
Step 6. Place the Small Central Chalet, Snowman, and Decorative Lantern.
The next important area in Dreamy Room Level 908 is the small chalet standing near the center of the island, directly below the larger hillside house.
Position the brown wooden cottage slightly left of center, facing toward the lower-right. Its triangular front gable has exposed wooden beams, while the sloping gray roof is covered in uneven layers of snow. The roof also features small patches where the underlying structure remains visible.
Arrange the warmly illuminated rectangular windows along the front and side walls. Add the small circular window near the right section of the building, just beneath the roofline.
Beside the cottage, place the cheerful snowman near the pathway leading toward the main house. It has a purple top hat, orange carrot nose, striped multicolored scarf, rounded snow body, and dark buttons. Position it facing slightly right.
Dreamy Room Level 908 also includes a small green decorative lantern with a yellow star accent near the snowman and the nearby house entrance.
Be careful not to move the snowman too far onto the central path. In Dreamy Room Level 908, it belongs between the small chalet and the main residence, creating a charming focal point in the snowy village.
Step 7. Build the Large Two-Story House With a Snowy Balcony and Chimney.
The centerpiece of Dreamy Room Level 908 is the large two-story winter house occupying the upper-middle section of the island. This is the tallest residential building and should be positioned behind the smaller chalet.
Begin with the main structure, featuring turquoise-blue walls, reddish wooden supports, and a steep red-tiled roof buried beneath thick snow. The upper roof includes a glowing triangular dormer window, while the left extension contains a large rectangular window with warm yellow light.
At the rear of the roof, place the tall brick chimney capped with snow. Pale rounded smoke clouds rise from its opening, adding movement and warmth to the winter scene.
Next, arrange the second-floor balcony with its lavender-colored railing. The snowy railing wraps around the front and right side of the house, connecting to an upper wooden door. Add the small snow-covered shrub beside the upstairs entrance.
On the lower floor, position the glowing entrance door, nearby window, and decorative hanging lantern. A short staircase with snowy handrails leads from the lower entrance toward the village pathway.
Dreamy Room Level 908 depends on the house fitting accurately between the background evergreen trees and the smaller chalet.
Before moving on, verify that the balcony, chimney, doors, and exterior staircase all align. The finished main house gives Dreamy Room Level 908 its recognizable alpine village appearance.
Step 8. Add the Right-Side Cottage, Firewood, and Covered Parking Area.
Continue Dreamy Room Level 908 by decorating the upper-right portion of the village. Start with the small pinkish-red cottage situated to the right of the main two-story house.
This cottage has a steep snow-covered roof, reddish tiles, and a small glowing dormer window near the top. Its front entrance features a rounded wooden door with a short gray doorstep. Warm rectangular windows illuminate the side walls.
Place the stacked firewood immediately left of the cottage's front entrance. The pile contains cut wooden logs and rectangular wooden pieces arranged in a compact stack beside the snowy path.
Next, move slightly downward and farther right to position the covered parking shelter. Its reddish wooden roof is supported by upright posts, with heavy snow resting along the roof edges.
Under the shelter, park the small blue-purple vehicle, with its front oriented toward the right side of the image. Its dark wheels and light-colored windows should remain visible beneath the roof.
Dreamy Room Level 908 requires the parking shelter to stand behind the larger foreground shop, rather than beside the fishing dock.
Check that the cottage, logs, vehicle, and shelter occupy their respective places. This completes the residential and transportation details on the right side of Dreamy Room Level 908.
Step 9. Finish the Front-Right Shop, Small Annex, Bench, and Snowy Decorations.
The final major construction stage in Dreamy Room Level 908 focuses on the large pink storefront occupying the lower-right foreground. This building stands on the raised snowy peninsula, across from the fish market.
Place the main two-story structure with its pink exterior walls, brown sloping roof, and small upper dormer section. The dormer has two glowing arched windows and a thick blanket of snow covering its roof.
Position the large glass storefront along the front wall, facing the waterfront. The warmly illuminated interior is visible through the glass. On the right-facing upper wall, add the broad display window revealing a softly lit room with shelving and a green potted plant.
Next, arrange the narrow entrance on the building's left side, beneath the small purple snow-covered awning. Place the wooden porch flooring and low lavender bench outside the front window.
In Dreamy Room Level 908, a snow-covered evergreen stands in front of the building near its right corner. Position this tree between the shop and the smaller annex.
Finally, add the little purple-pink cottage-like annex directly to the right, complete with its snow-covered roof and glowing arched windows.
Review the surrounding snowbanks, exposed pathway, nearby rocks, and roof details. Once everything is aligned, the foreground of Dreamy Room Level 908 should match the cozy, fully decorated winter village.
Notes and Precautions
When completing Dreamy Room Level 908, several placement details deserve extra attention.
- Use the empty landscape as a reference. The existing snowy paths, evergreen trees, cliff edges, and waterline help identify the correct positions for buildings and platforms.
- Watch for overlapping structures. The large central house sits behind the smaller chalet, while the upper-left terrace stands above the harbor structures.
- Keep the waterfront organized. The fish market belongs on the elevated pier, while the pink cargo boat remains in the water below.
- Check small accessories carefully. Wrapped gifts, desserts, fish crates, barrels, lanterns, firewood, and the snowman's clothing can be easy to overlook.
- Preserve the visible pathways. Do not allow buildings or decorative objects to block the village's winding brown routes.
The biggest challenge in Dreamy Room Level 908 is identifying each object's intended location rather than simply filling empty spaces. If something looks misplaced, compare its position with nearby architectural landmarks before adjusting it.
Tips and Tricks from top player
To complete Dreamy Room Level 908 more efficiently, organize the placement process around the largest structures before dealing with tiny accessories.
- Start with the waterfront boundaries. Position the dock and staircase first to establish the relationship between the fishing market and the foreground shoreline.
- Group objects by area. Complete the harbor, left hillside, central houses, and right foreground separately to avoid constantly moving between sections.
- Use rooftop silhouettes. The main house has a large chimney and balcony, the left terrace has an illuminated sloping roof, and the right cottage has a smaller red roof with a dormer.
- Place large pieces before decorations. Buildings and platforms provide reliable reference points for arranging windows, furniture, crates, and signs.
- Inspect the narrow spaces. Check behind buildings, beside entrances, and along platform edges for smaller details.
An effective Dreamy Room Level 908 strategy is to compare the finished scene from top to bottom after placing everything. Inspect the skyline first, then the middle village, and finally the waterfront.
This technique makes misplaced items easier to spot and helps prevent unnecessary rearrangement in Dreamy Room Level 908.
Final Scene: A Charming Winter Harbor Village
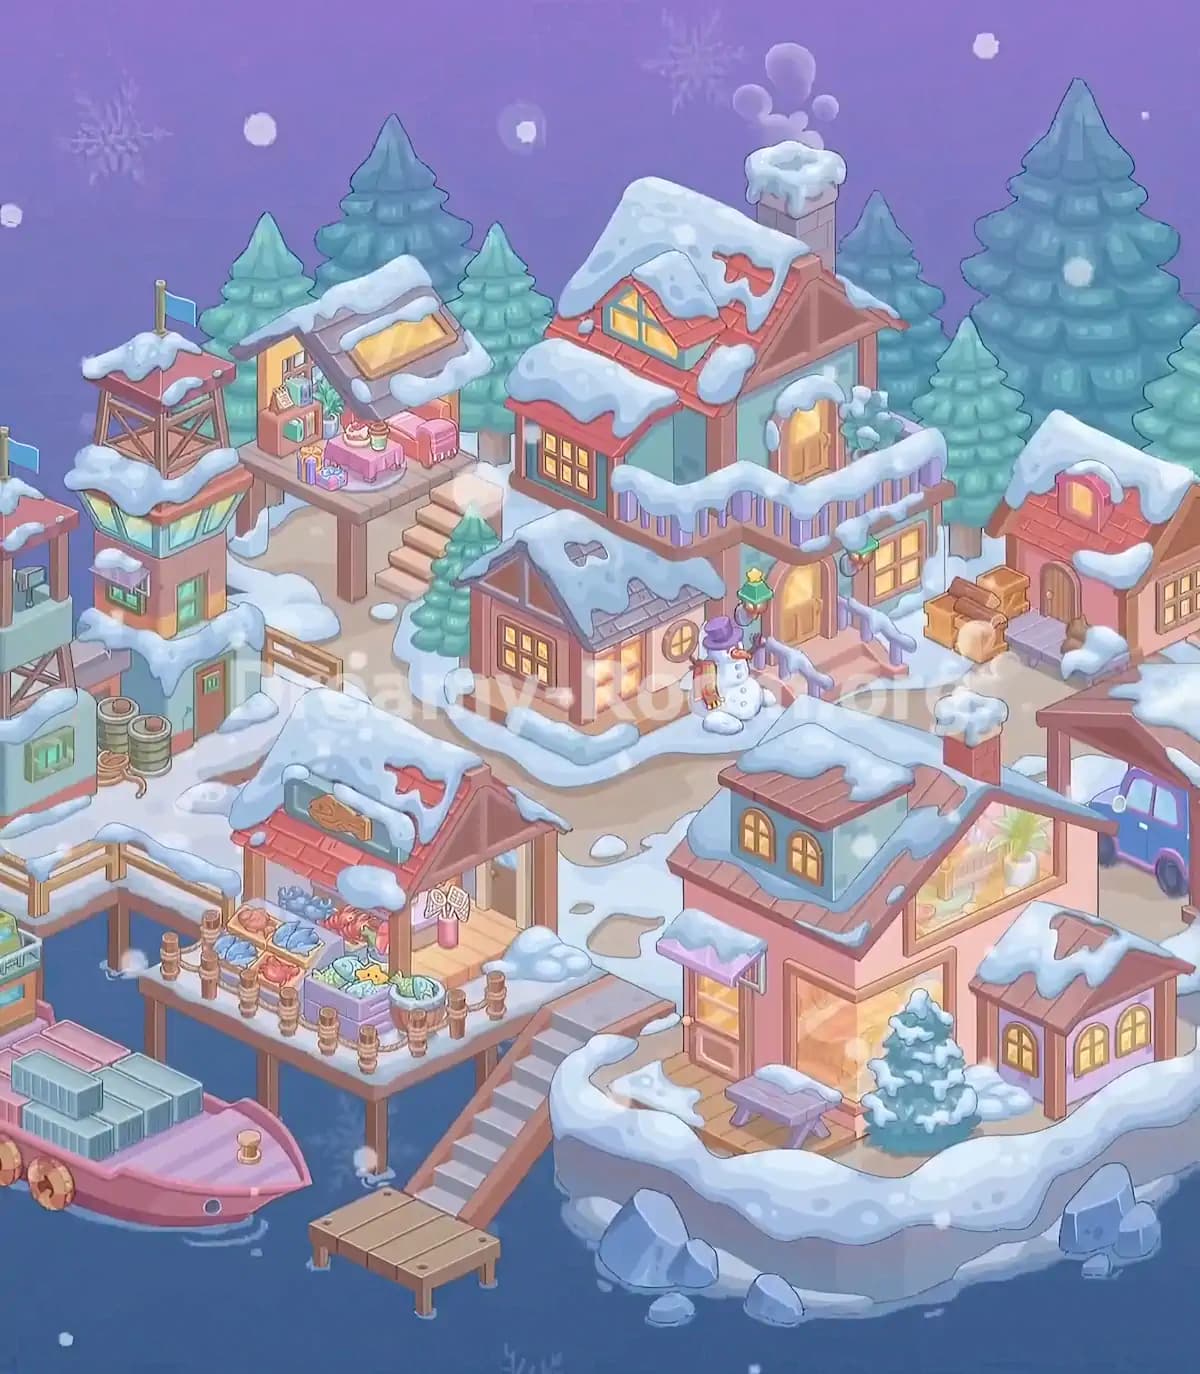
The completed Dreamy Room Level 908 reveals a picturesque coastal village glowing warmly beneath a gentle winter snowfall. Colorful houses with snowy roofs stand along winding pathways, surrounded by towering blue-green evergreen trees and a beautiful purple evening sky.
At the upper center, the large chalet welcomes visitors with illuminated windows, a cozy balcony, and a smoking chimney. Nearby, a cheerful snowman stands beside a small wooden cottage, while the elevated terrace offers a peaceful place to enjoy desserts and exchange gifts.
Below, the busy harbor features a covered seafood market displaying colorful fish and fresh catches. A pink cargo boat floats beside the wooden piers, while lookout towers rise above the waterfront.
On the right, a glowing storefront, small annex, snowy bench, parked vehicle, and neatly stacked firewood complete the neighborhood.
Dreamy Room Level 908 transforms an empty snowy island into a lively, welcoming winter community where every carefully placed object contributes to the finished scene.