Dreamy Room Level 747
Dreamy Room Level 747 guide - Dreamy Room 747 Walkthrough & Solution.
Important Notice Regarding Level Numbering
Due to frequent changes in Dreamy Room's level numbering and differences between platforms (Android/iOS) – for example, level 747 on Android might not be the same as level 747 on iOS – the text guide below may not always match the images and video above. Please prioritize the image and video guides. If you find that the guide content doesn't match your current level, please visit the All Level Walkthroughs page to find the correct guide based on level images. Thank you for your understanding.
Dreamy Room Level 747 Walkthroughs & Guide
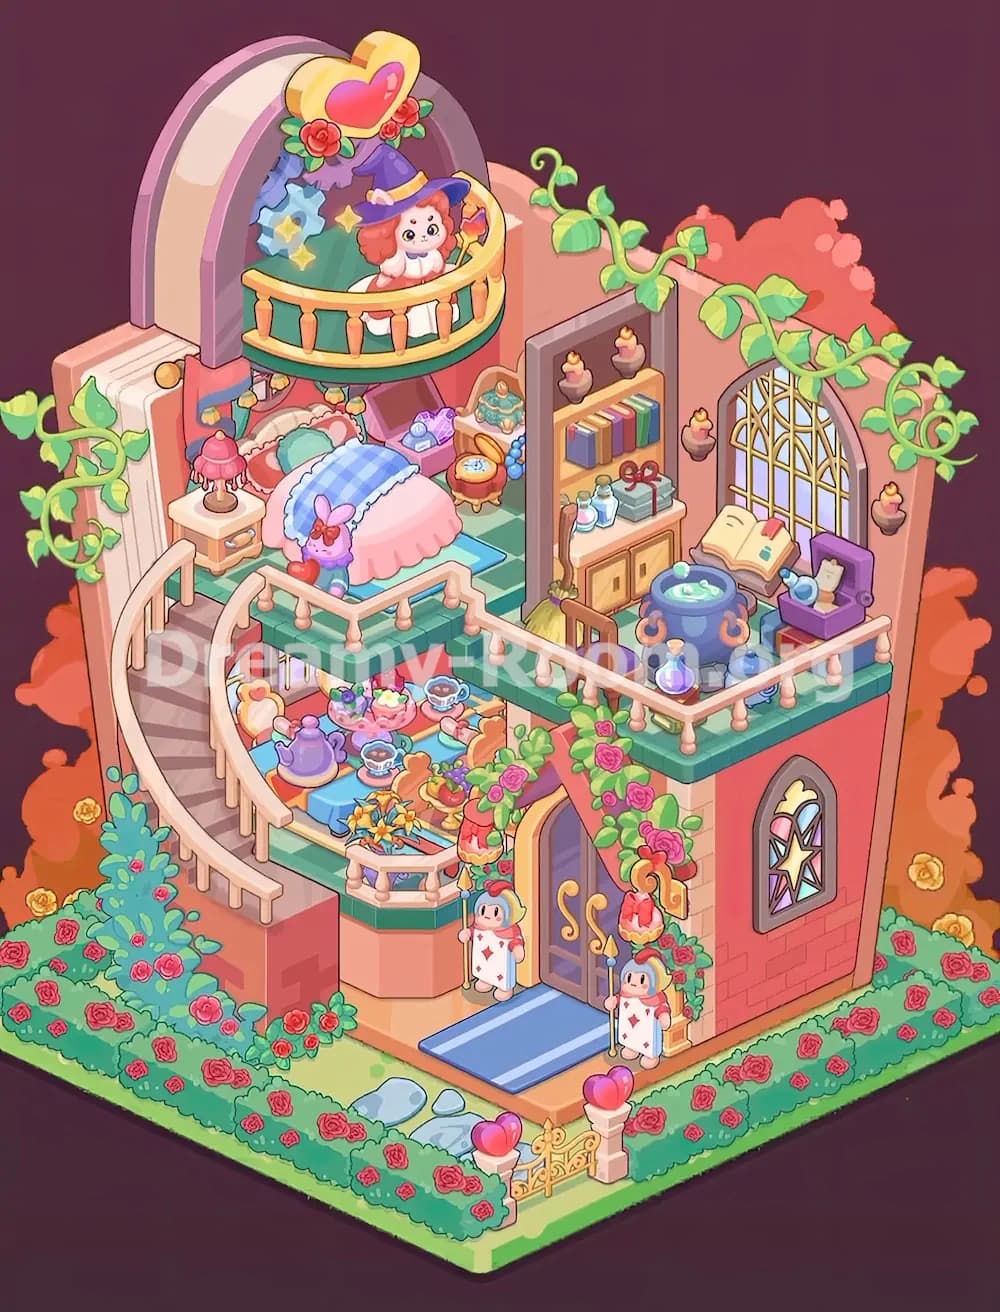
Dreamy Room Level 747 transforms a simple storybook-shaped room into a magical fairytale house filled with roses, potions, tea sets, and whimsical decorations. The main challenge in Dreamy Room Level 747 is figuring out the exact placement of every object. Even small items such as potion bottles, candles, books, and flowers must be positioned correctly to complete the scene. Follow this detailed Dreamy Room Level 747 walkthrough step by step to recreate the enchanting magical house perfectly. As with every level in the game, patience and observation are the keys to success. Dreamy Room invites players to enjoy a relaxing decorating experience where every item has a meaningful place.
Step 1. Build the Exterior Structure and Garden
Begin Dreamy Room Level 747 by constructing the main building structure. Place the large pink lower walls on the right side of the storybook room and install the arched front entrance in the center of the ground floor. Add the blue welcome mat directly in front of the door. Next, position the curved exterior staircase along the left side of the building, allowing access to the upper floor balcony.
Once the structure is complete, focus on the garden. Create a rose-covered hedge around the entire perimeter of the base. The front edge should feature a neat hedge decorated with countless red roses. Place the golden gate at the center front, supported by two cream-colored pillars topped with pink heart ornaments. Add the stepping stones inside the front garden path. On the left side, position the large flowering bush filled with pink and red roses. Continue decorating the edges with additional rose clusters until the exterior matches the completed design. In Dreamy Room Level 747, establishing the correct foundation makes the remaining object placement much easier.
Step 2. Create the Upper Bedroom Area
The second stage of Dreamy Room Level 747 focuses on the cozy bedroom located on the upper-left platform. First, install the green-tiled floor section that serves as the bedroom base. Place the elegant pink bed near the center of the platform. The bed should face outward and feature a blue checkered blanket draped across the top.
Next, add the bedside table on the left side of the bed and place the decorative pink lamp on top. Position the small pink rabbit plush near the front of the bed. Behind the bed, install the curved balcony railing that protects the edge of the upper platform. Add the decorative arch structure rising above the room. At the center of this arch, place the large heart-shaped ornament decorated with flowers.
The upper balcony above the bed should contain the adorable red-haired witch character wearing a purple hat. Position her behind the golden railing. Add the colorful decorative backdrop behind her, including the blue and green ornamental shapes. Correct placement of these whimsical elements is essential in Dreamy Room Level 747, as even slight misalignment can prevent completion.
Step 3. Furnish the Magical Potion Library
The right side of the upper floor in Dreamy Room Level 747 becomes a magical study and potion workshop. Start by placing the tall bookshelf against the back wall. Arrange the colorful books neatly on the shelves. Add the candles mounted on the wall around the shelf area, ensuring they are evenly distributed.
Install the large arched window on the right wall. This window occupies much of the wall space and serves as a major visual focal point. In front of the window, place the large blue cauldron filled with glowing magical liquid. Around the cauldron, arrange multiple potion bottles of different shapes and colors.
Next, place the wooden cabinet beneath the bookshelf and position the decorative bottles on top. Add the open spellbook on the stand beside the cauldron. To the right of the spellbook, place the purple treasure chest and the rolled parchment. Finish the area with additional potion containers scattered around the floor. This magical laboratory section gives Dreamy Room Level 747 its enchanting fairytale atmosphere and requires careful attention to detail.
Step 4. Arrange the Tea Party Balcony
The center balcony area is one of the most charming sections of Dreamy Room Level 747. Begin by placing the blue rectangular tablecloth across the middle of the balcony floor. Position the tea table directly on top of it.
Next, arrange the tea service. Place the purple teapot toward the left side of the table and distribute the matching teacups and saucers around it. Add the decorative cake stand filled with colorful pastries near the center. Position the fruit arrangements and floral decorations throughout the table setting.
Around the table, place the whimsical chairs with heart-shaped backs. Make sure each chair faces inward toward the tea service. Add the decorative flower bouquet positioned near the front balcony railing. The table should appear ready for a magical afternoon tea gathering. Because many small objects share this space, players often spend extra time on this portion of Dreamy Room Level 747. Carefully comparing object sizes and positions helps avoid mistakes.
Step 5. Decorate the Entrance and Add Final Details
The final decorative stage of Dreamy Room Level 747 brings the entire magical house to life. Above the front door, install the climbing rose vines that extend upward across the walls and railings. Place the hanging lantern decorated with flowers directly above the entrance.
On each side of the doorway, position the two playing-card-style guard figures wearing white outfits and holding staffs. These whimsical characters frame the entrance perfectly. Continue adding rose vines that climb across the balcony railings and extend toward the roofline.
Place the stained-glass window on the right exterior wall beneath the balcony. Add the twisting green vines that stretch across the upper walls and arch around the building. Finally, inspect the entire scene and ensure every candle, potion bottle, flower, railing, hedge, and decorative ornament is positioned exactly as shown. Success in Dreamy Room Level 747 depends on placing every object in its precise location, no matter how small.
Notes and Precautions
When playing Dreamy Room Level 747, remember that many decorative items look similar but have unique positions. Potion bottles vary slightly in shape and must be placed correctly around the cauldron.
Pay close attention to the balcony furniture arrangement. Chairs and teacups often fit only in one exact location. The rose vines also have specific attachment points along the walls and railings.
Avoid rushing through the upper bedroom section. The witch character, heart ornament, and decorative backdrop must align correctly to complete the scene.
Check the garden perimeter carefully. Missing even a single hedge section or rose cluster may prevent full completion. Since Dreamy Room Level 747 contains numerous tiny decorative objects, zooming in and working methodically is highly recommended.
Tips and Tricks from Top Player
- Complete large structural objects before placing decorations.
- Build from bottom to top to avoid overlooking hidden placement spots.
- Install walls, stairs, railings, and floors first in Dreamy Room Level 747.
- Group similar items together, such as potion bottles and tea party accessories.
- Use the balcony railing as a visual guide for positioning furniture.
- Place all major furniture before adding flowers and vines.
- If an item seems not to fit, inspect nearby decorative elements that may need placement first.
- Regularly compare your progress with the completed image to identify missing objects.
- Save the smallest decorative items for the final stages.
- Take advantage of the relaxing pace of Dreamy Room Level 747 and focus on accuracy rather than speed.
Final Scene Description
After completing Dreamy Room Level 747, the empty storybook room transforms into a breathtaking magical fairytale house. A beautiful rose garden surrounds the building, enclosed by flowering hedges and a golden heart-themed gate. The ground floor welcomes visitors through an elegant arched doorway guarded by whimsical playing-card characters. Above, a cozy tea party balcony overflows with colorful pastries, teacups, flowers, and charming decorations. The upper bedroom features a soft pink bed, a rabbit plush, and a magical balcony where a cheerful young witch overlooks the house. On the opposite side, a potion laboratory glows with candles, books, bubbling magic, and mysterious elixirs. Climbing vines, stained-glass windows, and blooming roses cover the structure from top to bottom. Every detail contributes to the enchanting atmosphere that makes Dreamy Room Level 747 one of the most visually delightful and memorable levels in the game.