Dreamy Room Level 619
Dreamy Room Level 619 guide - Dreamy Room 619 Walkthrough & Solution.
Important Notice Regarding Level Numbering
Due to frequent changes in Dreamy Room's level numbering and differences between platforms (Android/iOS) – for example, level 619 on Android might not be the same as level 619 on iOS – the text guide below may not always match the images and video above. Please prioritize the image and video guides. If you find that the guide content doesn't match your current level, please visit the All Level Walkthroughs page to find the correct guide based on level images. Thank you for your understanding.
Dreamy Room Level 619 Walkthroughs & Guide
Dreamy Room Level 619 Walkthrough
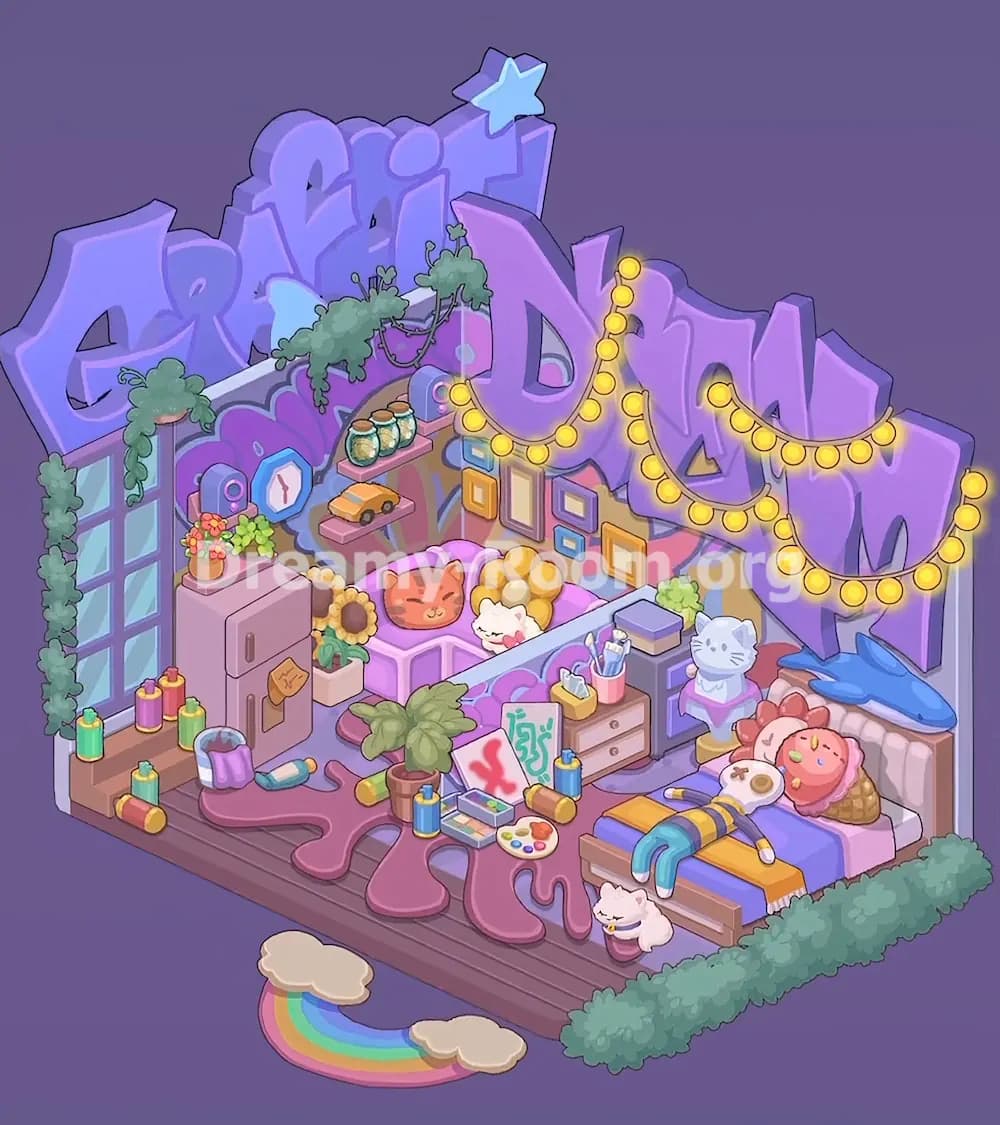
In Dreamy Room Level 619, the real puzzle is not finding the items but understanding their exact positions, layers, and relationships inside the room. This stage turns a plain pastel shell into a dense graffiti-style bedroom filled with art supplies, plush details, lighting, plants, and cozy furniture. To clear Dreamy Room Level 619, pay close attention to wall height, floor spacing, and how decorative objects overlap one another. The finished room is busy, but every single object has a precise home. Follow the order below and rebuild Dreamy Room Level 619 from the back wall outward so that nothing blocks the next piece.
Step 1. Place the oversized graffiti wall art, star, lights, and greenery on the back walls
Start Dreamy Room Level 619 by building the vertical background, because nearly everything else depends on it. The bare room already shows the soft mural on the walls, but the completed space adds a huge purple graffiti word installation stretching across the rear and right walls. Place the left portion first so it rises above the window side, then continue the large curved purple letters across the center and right wall. At the very top near the middle, add the bright blue star that caps the graffiti. After that, drape the warm yellow string lights in three soft hanging loops across the letters, letting them sag naturally from the center toward the right. Next, wrap green ivy around the left window frame and continue some of the vine across the upper back wall so it hangs in front of the purple lettering. In Dreamy Room Level 619, these background pieces must feel layered: graffiti in back, ivy slightly forward, and glowing bulbs hanging in front. If the lights or vines sit too low, later furniture will look cramped and the room will not match the completed image.
Step 2. Install the tall left window, shelves, cabinet, and left-side decorative pieces
Once the backdrop is finished, move to the left side of Dreamy Room Level 619. Place the tall blue-paned window tightly against the left wall, letting it rise almost to the top of the room. The ivy should frame it, not float apart from it. In front of the window area, add the pink cabinet or mini fridge slightly left of center. A small note belongs on its front door. On top of that cabinet, place the flowerpots: one full of warm orange blossoms and another with fresh green foliage. Just to the right of the cabinet, set the white planter with tall sunflowers so it bridges the cabinet area and the future couch zone. Above and behind this section, attach the short wall shelves. One shelf holds three jars, while the lower shelf displays the small orange toy car. Near the shelves, place the purple speaker and the blue-and-white wall clock. Finish the left floor area of Dreamy Room Level 619 with scattered spray paint cans and bottles, plus the open purple paint bucket and the turquoise tube or tool lying nearby. This side should already feel like an artist’s corner.
Step 3. Build the central lounge nook with the pink sofa, cushions, frames, and balloon cluster
The middle of Dreamy Room Level 619 becomes cozy once you place the seating nook. Set the pink sofa against the back wall, slightly left of center, below the shelves and just right of the cabinet. It should sit deep enough that the front edge leaves room for art supplies later. On the sofa, place the orange cat-face cushion on the left side and the small white plush pillow on the right. Behind the sofa on the right, add the cluster of round yellow balloon-like shapes, which helps fill the corner and makes the seating area look playful rather than empty. Above and to the right of the sofa, arrange the mismatched rectangular picture frames on the wall in a compact gallery. Their colors vary, so keep them tight together and centered beneath the hanging lights. In Dreamy Room Level 619, this zone is important because it visually connects the heavy graffiti overhead with the furniture below. If the sofa is too far forward or the frames are too high, the center of the room loses that layered, tucked-in feeling seen in the completed image.
Step 4. Create the art workspace on the floor with the paint spill, plant, canvas, palette, and cans
Now shape the messy creative heart of Dreamy Room Level 619 across the floor. Spread the large mauve paint spill from the left-center floor toward the middle front, making sure its curved arms stretch around the furniture rather than under the wrong objects. This spill is one of the most recognizable shapes in the room, so its outline matters. Near the middle of the spill, position the large leafy potted plant in a terracotta pot. Slightly in front of that, lean the painted canvas upright so it shows colorful brush marks, including the bold red X-like stroke and green scribble. On the floor beside the canvas, add the open paint or pastel box and the round artist palette. Scatter extra spray cans around this central area, including the upright blue-and-yellow cans and the small yellow can lying on its side. The purple paint bucket from the left side should visually connect to this messy workspace. In Dreamy Room Level 619, the challenge here is balance: the floor should look cluttered, but each item still has a fixed location. Too much spacing makes the area look empty, while overlapping the plant, canvas, and cans incorrectly will break the composition.
Step 5. Place the right-side furniture, bedside storage, cat figure, skateboard, and bed
The right side of Dreamy Room Level 619 is packed, so place it carefully from back to front. Start with the small purple side unit against the right-center wall, then add the beige two-drawer nightstand in front of it. On and around this storage area, place the pink cup of brushes, the yellow pencil holder, and the closed purple box or book on top. A tiny green potted plant belongs at the back of this cluster. Next, position the pale cat figure or statue just right of the drawers, raised slightly so it stands beside the bed rather than on the floor. Behind that area, add the blue skateboard leaning along the right wall near the headboard. Then install the bed along the lower-right side of the room with the tall lavender headboard against the wall. Dress it with the purple blanket and the mustard-yellow runner across the middle. Add the fried-egg-shaped pillow near the front and the pink doll or plush figure resting on the bed, with its striped blue-and-yellow legs stretched outward. In Dreamy Room Level 619, this furniture block must be snug. If the bed shifts too far left, the central art area becomes crowded and the right wall loses its neat stacked look.
Step 6. Finish Dreamy Room Level 619 with the smallest accents along the front edge and open floor
To complete Dreamy Room Level 619, add the small finishing details that make the room feel alive. Place the tiny white cat in the striped cup on the floor near the foot of the bed, slightly right of center. This little character sits low and forward, helping bridge the bed and the front edge. Along the outer front-right boundary, place the fluffy green hedge strip so it runs parallel to the floor edge. At the very front outside the room, set the rainbow with cream-colored clouds at both ends, centered slightly left of the bed area. Recheck the left floor too: the extra cans should remain scattered near the window, cabinet, and paint spill, not grouped too neatly. Make sure the mural on the back wall is still visible behind the furniture, especially the flower wings, stars, and cloud shapes. In Dreamy Room Level 619, these small placements are what separate a near-finish from a true clear. The room should feel crowded but intentional, with every accent locking into a precise spot instead of floating randomly.
Notes and Precautions
Dreamy Room Level 619 can be deceptive because the room looks chaotic after completion, but the solution is highly structured. Always place the tallest background elements first, especially the graffiti letters, star, string lights, ivy, and window. If you begin with floor items, you may misjudge spacing and end up forcing the sofa or bed into the wrong position. Another important point in Dreamy Room Level 619 is layering. The shelves, frames, and wall décor must sit behind the furniture, while the paint spill, cans, canvas, and plant belong in front. Watch the right side carefully because the bed, drawers, cat figure, skateboard, and plush pieces are close together. Also avoid spreading the floor clutter too evenly. The finished room works because the mess is artistically concentrated in the center-left, while the bed zone stays cozy and slightly more organized.
Tips and Tricks from top player
Top players clear Dreamy Room Level 619 faster by dividing the room into three zones: left art-storage zone, middle lounge-art zone, and right sleeping zone. That mental map prevents accidental misplacement. Another strong strategy for Dreamy Room Level 619 is to match items by function before matching by color. For example, shelves, clock, speaker, cabinet, and spray cans belong near the creative side, while pillows, plushies, drawers, and the cat figure belong near the bed and sofa. It also helps to look for anchor objects: the window anchors the left wall, the sofa anchors the middle, and the bed anchors the right. After those are correct, the smaller objects usually reveal themselves. Finally, use the hanging lights and the frame gallery as spacing guides. If those look centered and balanced above the sofa-bed line, the rest of the room usually falls into place naturally.
Final Scene Description
The completed Dreamy Room Level 619 feels like a dreamy street-art bedroom built inside a tiny pastel studio. Giant purple graffiti letters sweep across the walls, crowned by a blue star and softened by glowing yellow string lights. Ivy trails around the tall left window, while shelves, jars, a clock, flowers, and a pink cabinet turn the left side into a creative nook. In the middle, a pink sofa with cute animal cushions sits beneath colorful frames, and the floor blooms with a dramatic paint spill, art cans, a plant, a canvas, and a painter’s palette. On the right, drawers, brushes, a cat figure, a skateboard, and a cozy bed with layered bedding and plush décor create a warm sleeping area. A tiny cat in a cup, a hedge border, and a rainbow at the front complete Dreamy Room Level 619, where every object proves that the true challenge is perfect placement.