Dreamy Room Level 727
Dreamy Room Level 727 guide - Dreamy Room 727 Walkthrough & Solution.
Important Notice Regarding Level Numbering
Due to frequent changes in Dreamy Room's level numbering and differences between platforms (Android/iOS) – for example, level 727 on Android might not be the same as level 727 on iOS – the text guide below may not always match the images and video above. Please prioritize the image and video guides. If you find that the guide content doesn't match your current level, please visit the All Level Walkthroughs page to find the correct guide based on level images. Thank you for your understanding.
Dreamy Room Level 727 Walkthroughs & Guide
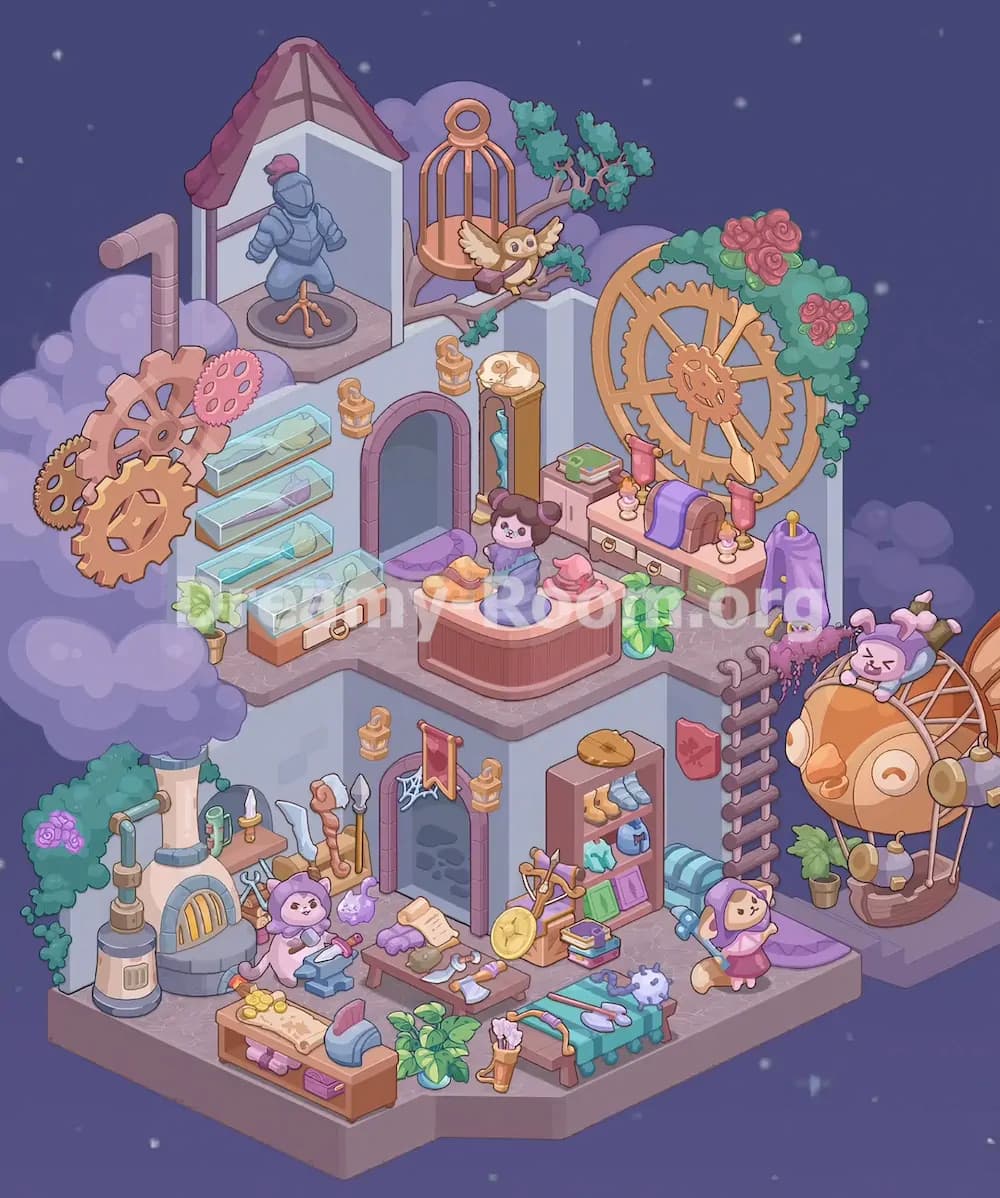
Step 1. Place the upper-left knight display and roof structure.
Start Dreamy Room Level 727 by building the upper-left display area against the left wall. Place the tall white alcove first, then add the red curved roof on top so it looks like a small castle exhibit booth. Inside this alcove, position the gray knight armor on the round platform, making sure the helmet, shoulders, arms, and leg armor face forward. The armor stand should sit slightly above the main floor, tucked neatly into the corner. Add the small pink cloth or plume on the helmet, then place the pink pipe protruding from the left side of the structure. In Dreamy Room Level 727, this upper-left section is an important anchor because it helps you judge the height and alignment of the later gears, glass cases, and lower workshop items.
Step 2. Arrange the large gears on the left exterior side.
Next in Dreamy Room Level 727, decorate the left side with the oversized steampunk gears. The biggest copper gear belongs on the left wall area below the knight display, partly outside the room edge, with its teeth overlapping the purple cloud background. Place the smaller pink gear near its upper-right edge, then add the golden gear toward the lower-left side. A darker central hub should sit inside the largest gear, creating a layered mechanical look. These gears should not sit on the floor like furniture; they are mounted visually along the outer wall and cloud area. Dreamy Room Level 727 uses these gears to connect the medieval exhibit above with the magical workshop below, so check that the gear cluster does not block the glass display cases that will be placed to its right.
Step 3. Set the stacked glass display cases on the left-middle floor.
In the left-middle area of Dreamy Room Level 727, place the four horizontal glass display boxes in a descending stack. They sit on brown bases, just to the right of the big gear cluster and below the knight alcove. The top case contains pale green items, while the lower cases show blue-green objects, small tools, or magical artifacts. Make sure each transparent case is angled with the room perspective, slanting from upper left to lower right. The bottom case has a small drawer handle on the brown base, so it should be closest to the floor. Add the small potted plant near the bottom-left corner of these cases. This display area is easy to misplace in Dreamy Room Level 727 because the cases look similar, but the correct stack creates a neat shop-counter effect.
Step 4. Build the central doorway and upper balcony details.
Now place the central purple arched doorway in Dreamy Room Level 727. It belongs in the middle back wall, slightly left of center, below the birdcage area and above the lower workshop door. The doorway has a dark blue interior opening, pink-purple trim, and a small purple mat at the base. On both sides of the upper doorway, place the golden pillar-like decorations with small lantern tops. To the right of the doorway, add the narrow vertical display with a blue hanging cloth or crystal inside a wooden frame. Above and around this section, add the branch pieces that connect toward the birdcage and owl. Dreamy Room Level 727 relies on this doorway to divide the room into upper boutique space and lower crafting space, so keep it centered and unobstructed.
Step 5. Place the birdcage, owl, branches, and treetop details.
The upper-center section of Dreamy Room Level 727 features the golden birdcage and the owl. Place the tall orange-gold cage behind the wall corner, slightly right of the knight display. Its round loop should point upward, and the cage should sit among brown branches. Put the small owl with spread wings on the branch just in front of the cage, facing toward the room. Add green leafy clusters around the branch and behind the cage, including the taller tree-like foliage rising at the top-right of this area. The owl should look as if it is perched between the cage and the central wall. In Dreamy Room Level 727, this is one of the trickier placements because the cage, branch, and owl overlap, but the owl must remain visible in front.
Step 6. Install the giant right-side gear and rose vines.
Move to the upper-right side of Dreamy Room Level 727 and place the massive golden gear wheel against the right wall. It should dominate the upper-right background, with its large circular rim and inner spokes visible behind the furniture. Add the green vine clusters around the top and right side of the gear, then place the red rose clusters on the upper-right and mid-right foliage. The gear should sit behind the dresser area, not in front of it. Its lower rim disappears behind the furniture and plants, while the upper rim rises above the wall line. Dreamy Room Level 727 uses this huge gear as the main background decoration, so align it carefully with the wall corner and leave space below for the dresser, cloak stand, and lamps.
Step 7. Arrange the upper-right dresser, lamps, books, chest, and cloak stand.
In Dreamy Room Level 727, the upper-right shop area is filled with small but important objects. Place the long pink dresser against the back wall under the giant gear. On top of it, put the green book stack near the left, the small vase or perfume bottle closer to the center, and the pink lamps with golden bases on both sides. The rounded chest with a purple cloth belongs on the right side of the dresser. The drawers and green shelf sections should face forward. Next, place the purple cloak stand to the far right, with the gold-tipped hanger and draped cloak hanging down. Add the leafy plant in front of the dresser’s left side. Dreamy Room Level 727 often tests whether you can distinguish background furniture from foreground decorations, so keep the dresser neatly behind the central table.
Step 8. Place the central rounded counter with hats, fabric, and the small character.
The central counter is one of the most recognizable pieces in Dreamy Room Level 727. Place the rounded pink-and-brown counter on the upper platform, slightly forward of the purple doorway. On top, arrange the orange folded fabric or hat on the left, the blue dress-like fabric in the middle, and the pink hat or cloth on the right. The small cute character with purple hair buns should sit behind or on the central blue piece, facing forward. The counter front has vertical paneling and a curved shape, so it should be centered between the left display cases and the right dresser. In Dreamy Room Level 727, this object establishes the room as a magical costume, armor, and artifact shop, so make sure it does not drift too far down into the lower workshop area.
Step 9. Build the lower-left forge, pipe system, tree, shrubs, and weapon area.
The lower-left corner of Dreamy Room Level 727 becomes a busy blacksmith zone. Place the gray furnace or forge near the left wall, with its arched orange grate facing forward. Add the tall white chimney or trunk rising behind it into the purple tree canopy. Attach the pipes and metal tank on the far left side, including the small cylindrical base and curved pipe pieces. Around this area, place the green shrubs, purple flowers, and leafy bushes to soften the mechanical look. Add the weapons and tools on the wooden surface: sword, spear, axe-like blades, curved tools, and small metal pieces. Dreamy Room Level 727 mixes nature and machinery here, so the correct placement should make the forge look embedded into a magical garden-workshop corner.
Step 10. Decorate the bottom-left counter with coins, helmet, fabrics, and storage drawers.
At the very bottom-left of Dreamy Room Level 727, place the low wooden counter or chest. The top surface holds a parchment or map with gold coins scattered across it, while the lower drawers contain folded purple and pink fabrics. Position the blue-gray helmet with the red plume on the right side of this counter, angled toward the center of the room. Nearby, add the small stool, tools, and loose items that connect the sales counter to the crafting area. This section should sit in front of the forge but not cover the furnace opening. Dreamy Room Level 727 rewards careful layering: the counter is in the foreground, the forge is behind it, and the purple tree canopy rises above both. Keep these depths clear to match the completed room.
Step 11. Place the lower-center workshop door, banner, cobweb, table, and scattered tools.
The lower-center wall in Dreamy Room Level 727 contains another purple arched doorway. Place this doorway below the upper platform, with gray stone-like shapes inside and a red banner hanging above or beside it. Add the small cobweb near the doorway’s upper-left area. In front of the door, place the messy workbench covered with parchment, tools, a small hammer, fabric pieces, bottles, and crafting supplies. Set the cute purple-hooded character near the left side of this workspace, holding a tool or wand as if inspecting the items. Add the glowing purple bottle or crystal near the character. Dreamy Room Level 727’s main challenge is determining the correct placement for tiny objects, and this lower-center workshop is where many small tools can easily be shifted too far left or right.
Step 12. Fill the lower-right shelf, plant, books, boots, blankets, and floor objects.
On the lower-right side of Dreamy Room Level 727, place the tall open shelf against the wall. The shelf contains a golden hat on top, boots on an upper shelf, folded blue clothing, colored fabric pieces, and books or boxes near the bottom. Put the stack of books or boxes in front of the shelf at the lower edge. To the left of the shelf, place the large green leafy plant. On the floor in front, arrange the purple mat, turquoise workbench or bed-like table, small creature figure, tools, and loose magical items. The purple-hooded character with a broom should stand near the right side of this lower platform, facing inward. Dreamy Room Level 727 uses this area as a storage and preparation corner, so keep the shelf upright and the floor objects neatly grouped.
Step 13. Add the ladder, hanging rack, potted plants, and floating airship on the right.
The far-right side is one of the most playful parts of Dreamy Room Level 727. Place the vertical ladder or hanging rack along the right wall edge, with several curved hooks extending leftward. Add the pink vine-like hanging decoration near the top of this rack. Set the small potted plants at the base, one near the ladder and another closer to the airship platform. Then place the large orange fish-shaped airship outside the room on the right. It should attach visually to a small gray platform and include a round body, fins, goggles or side parts, hanging lanterns, and a lower basket frame. Put the sleepy bunny-like character on top of the airship. In Dreamy Room Level 727, this airship must remain partly outside the room, floating in the purple sky rather than sitting on the main floor.
Step 14. Add final small ornaments, lighting pieces, and background clouds.
Finish Dreamy Room Level 727 by checking all the tiny finishing items. Add the small golden wall lanterns on the upper and lower walls, especially near the arched doors. Place the purple cloud shapes behind the upper-left knight display, behind the birdcage, and along the right-side sky so the room feels suspended in space. Add the small plants, bottles, crystals, cloth rolls, scrolls, and handles wherever gaps remain. Confirm that the pink stone floor remains visible in the walkways, especially around the central counter and lower workbench. The biggest mistake in Dreamy Room Level 727 is placing decorative items too flat or too centered; the scene is isometric, so every object must follow the diagonal perspective of the floor and walls.
Notes and Precautions
Dreamy Room Level 727 has many overlapping objects, so place large background items before small foreground decorations. Start with the knight alcove, giant gears, doors, dresser, forge, shelf, and airship, then add tools, books, lamps, plants, and fabrics. The main challenge in Dreamy Room Level 727 is determining the correct placement for each object, not simply recognizing what the object is. The large right gear belongs behind the dresser, while the airship belongs outside the room on the right platform. The glass cases should stack on the left-middle side, not beside the lower forge. Keep the upper fantasy shop and lower crafting workshop visually separate. In Dreamy Room Level 727, small items like lanterns, cobwebs, bottles, scrolls, and tools can disappear behind bigger objects if placed too early, so always finish with the smallest accessories.
Tips and Tricks from top player
For Dreamy Room Level 727, use a “big to small” placement strategy. First lock in the walls, roofed knight display, giant gears, central doors, dresser, forge, shelf, and orange airship. Once these large shapes match the completed layout, the smaller items become easier to place. A top player would also use color grouping: purple items often belong near the fantasy clothing sections, gold and copper items belong near gears or lamps, and blue-gray items usually connect to armor, tools, or storage. In Dreamy Room Level 727, compare object shadows and bases carefully; if an item has a flat base, it usually belongs on the floor or counter, while objects with no clear base may hang on walls or sit behind furniture. Save tiny tools, coins, bottles, plants, and scrolls for the final pass.
Final Scene Description
The completed Dreamy Room Level 727 scene becomes a floating magical workshop and fantasy boutique set against a starry purple sky. The upper-left corner displays a knight armor set beneath a red roof, while copper gears and glass cases create a steampunk museum feeling. In the center, the golden birdcage, winged owl, purple doorway, and rounded counter add charm and story. The right side glows with a huge gear covered in roses, a pink dresser, lamps, books, a chest, plants, and a purple cloak stand. Below, Dreamy Room Level 727 turns into a busy crafting floor with a forge, weapons, tools, scrolls, coins, shelves, fabrics, boots, books, and cute hooded characters. On the far right, an orange fish-shaped airship floats beside the room with a sleepy bunny passenger, completing the whimsical handmade fantasy atmosphere.