Dreamy Room Level 723
Dreamy Room Level 723 guide - Dreamy Room 723 Walkthrough & Solution.
Important Notice Regarding Level Numbering
Due to frequent changes in Dreamy Room's level numbering and differences between platforms (Android/iOS) – for example, level 723 on Android might not be the same as level 723 on iOS – the text guide below may not always match the images and video above. Please prioritize the image and video guides. If you find that the guide content doesn't match your current level, please visit the All Level Walkthroughs page to find the correct guide based on level images. Thank you for your understanding.
Dreamy Room Level 723 Walkthroughs & Guide
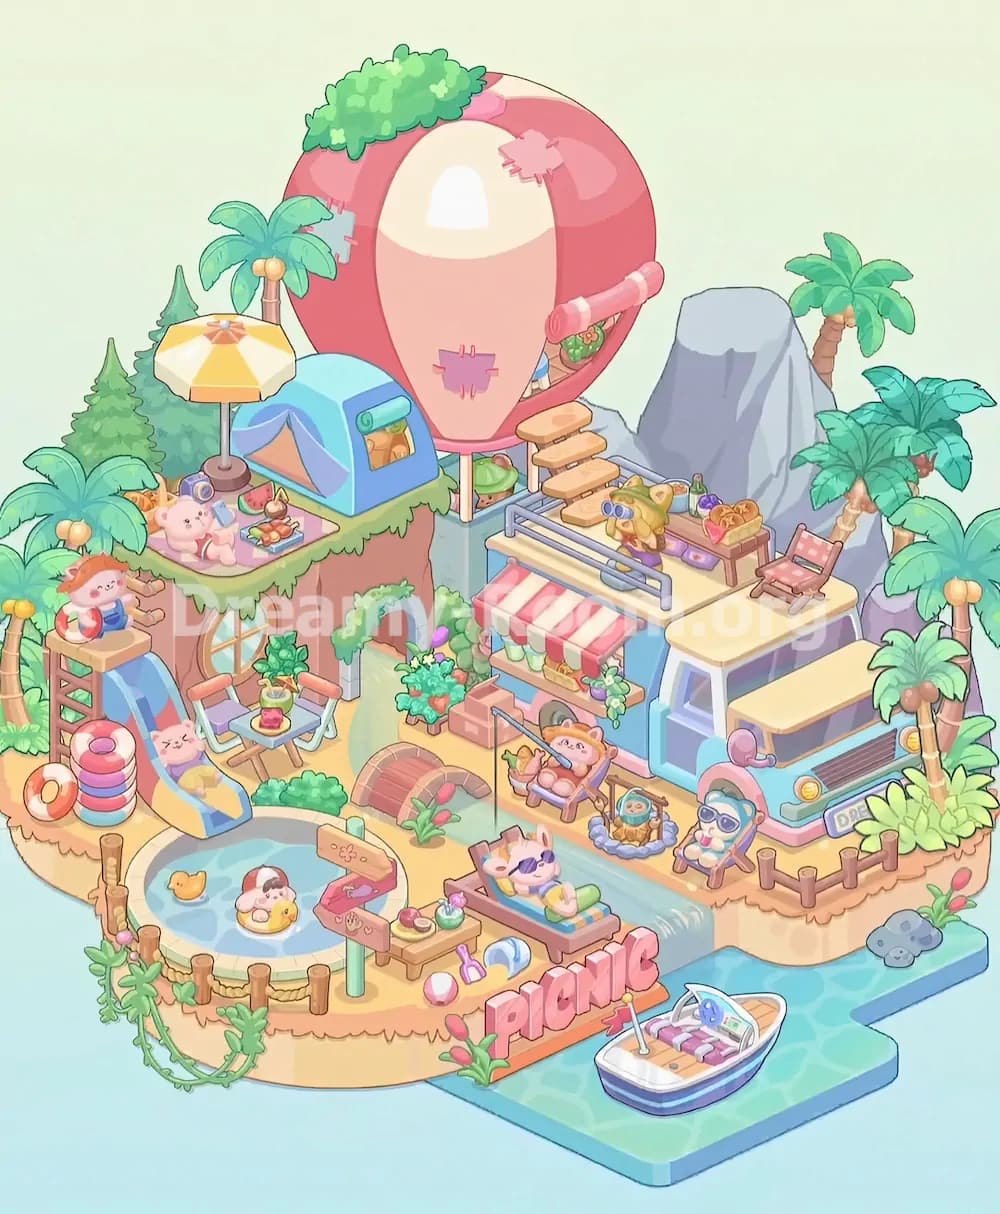
Step 1. Place the sandy island base, water channel, and mountain backdrop.
Begin Dreamy Room Level 723 by treating the sandy island as the foundation for every later object. The finished scene has two main sand terraces: a rounded lower-left beach area and a long rectangular upper platform stretching to the right. A narrow blue stream cuts diagonally from the upper middle down toward the front-right water dock, so make sure this water strip remains visible and unobstructed. At the back-right corner, place the large gray rock formation first, with the tallest cliff rising behind the future balloon area. Add the smaller purple and dark teal rocks in front of it, then tuck the palm trees behind and beside the rocks. In Dreamy Room Level 723, these background pieces anchor the whole composition, so do not place foreground furniture before the cliffs and palms are settled.
Step 2. Build the upper-left camping platform with the tent and umbrella.
For the next part of Dreamy Room Level 723, focus on the raised grassy platform on the upper-left side. Place the blue camping tent slightly right of center on this upper ledge, with its orange triangular entrance facing forward. The rolled green mat should sit near the tent opening, and the small window with camping supplies belongs on the tent’s right wall. Put the yellow-and-white beach umbrella just to the left-front of the tent, with its pole planted on the picnic mat area. Around the umbrella, arrange the picnic basket, camera, small food tray, and two cute animal figures sitting on the blanket. A palm tree rises behind this camp zone, while two evergreen trees fill the far-left background. In Dreamy Room Level 723, this corner becomes the cozy campsite, so keep the tent, umbrella, and picnic items tightly grouped.
Step 3. Add the giant hot-air balloon behind the center platform.
The most eye-catching object in Dreamy Room Level 723 is the huge red-and-cream hot-air balloon in the upper middle. Place it behind the camper deck but in front of the pale background, so its round body towers over the scene without covering the mountain completely. The cream center panel faces forward, while the red side panels curve around it. Add the pink patch details on the balloon surface and the leafy green bush sitting on top. The small pink rolled awning attaches to the right side of the balloon, and the tiny basket-like lower entrance should align above the central path near the stairs. In Dreamy Room Level 723, the balloon is not just decoration; it acts like a fantasy vacation house. Its position must leave space below for stairs, plants, and the camper roof area.
Step 4. Set up the central stairs, doorway, plants, and cliff-house details.
Now move to the middle of Dreamy Room Level 723, where the sandy island becomes a tiny cliffside resort house. Place the arched doorway under the balloon area, framed by green vines and flowers. The door sits slightly left of the camper and slightly right of the lower patio. Add the small round window with crossbars on the lower-left cliff wall, directly beneath the camping platform. Place shrubs, potted plants, and flower clusters around the doorway so the entrance feels hidden and tropical. The wooden stairs should rise from the camper roof area toward the balloon entrance, with each step stacked diagonally upward from right to left. This part of Dreamy Room Level 723 can be tricky because the doorway, stairs, and plants overlap visually. The correct placement keeps the path readable while still looking crowded and lush.
Step 5. Place the camper van and striped snack awning on the right.
The large camper van is one of the main anchors in Dreamy Room Level 723, so place it on the right side of the sandy platform, facing forward-left. The vehicle has a pale cream roof, blue-and-white body, pink side mirror, front window, grille, round headlights, and a small license plate. It should sit just above the lower-right water dock, leaving the blue water tile visible beneath the front edge. Attach the red-and-white striped awning to the camper’s left side, creating a little snack counter beneath it. Add the hanging plants and small food items under the awning, with flower pots on either side. In Dreamy Room Level 723, the camper must not cover the stream completely; the water should still flow in front of it and toward the boat.
Step 6. Decorate the camper roof deck with railings, fruit, and a lookout character.
After the camper is positioned, decorate its roof deck in Dreamy Room Level 723. Place the gray safety railing along the front edge of the roof, leaving the deck surface visible behind it. The small character wearing a yellow sun hat sits or stands near the center-right of the deck, holding binoculars and looking outward like a beach lookout. A tray or table with tropical fruit should sit to the character’s right, with bottles and picnic supplies nearby. The pink checkered lounge chair belongs on the far-right side of the camper roof, angled slightly toward the center. The wooden stairway connects this roof deck to the balloon entrance above. In Dreamy Room Level 723, this elevated area is easy to misread, but it should feel like a rooftop picnic terrace rather than a separate floor.
Step 7. Arrange the left-side tower, slide, pool, and stacked float rings.
The lower-left corner of Dreamy Room Level 723 is a water-play zone. Start by placing the small wooden lifeguard tower on the left edge, with the seated character wearing a swim ring on top. The blue slide curves down from the tower into the circular pool below, so align the slide mouth with the pool’s upper-left rim. The pool itself belongs in the lower-left sandy area, filled with pale blue water. Place the yellow duck float, the animal on the yellow inflatable ring, and the red-white beach ball inside the pool. Stack the colorful round float rings on the left side of the pool, with an orange lifebuoy nearby. In Dreamy Room Level 723, this section depends heavily on layering: tower first, slide second, pool toys last.
Step 8. Complete the lower patio with chairs, table, drink, plants, and fence posts.
The lower middle-left of Dreamy Room Level 723 contains a relaxed patio outside the cliff house. Place the small square table near the arched window area, then set the drink or dessert cup on top. Add the two folding chairs around it, angled toward the table. A leafy potted plant sits close by, helping connect the patio to the doorway and the bushes. Along the front-left edge, place the short wooden fence posts and rope barrier, then add trailing vines around the lower-left corner. These fences should curve around the pool and beach edge without blocking the water toys. In Dreamy Room Level 723, the patio decorations are small, but they make the cliff house feel lived-in. Check that the table, chairs, and plants do not cover the pool or the nearby stream.
Step 9. Add the central bridge, picnic sign, lounge chair, and beach accessories.
The front-center area of Dreamy Room Level 723 is where the picnic theme becomes obvious. Place the small wooden barrel bridge over the narrow stream, slightly below the central doorway. Nearby, add the wooden signpost pointing toward the picnic area. The large pink “PICNIC” letters belong at the front-center edge of the sand, just above the water dock and beside the stream. Place the lounging animal character on the striped beach chair near the sign, wearing sunglasses and facing upward. Around this area, set the small table with desserts, bottles, shell, beach ball, and tiny accessories. Add the pink flowers and green plants around the base of the sign. In Dreamy Room Level 723, this is a dense object cluster, so use the stream and sign as your alignment guides.
Step 10. Place the fishing chair, campfire setup, and stream-side character.
Next, decorate the right side of the stream in Dreamy Room Level 723. Put the reclining chair with the small animal character near the center-right edge of the stream, just below the camper awning. The character should hold a fishing rod angled toward the water, making it look like they are fishing from the sandy bank. Beside the chair, place the small round campfire or cooking setup with a pot, stump, or bucket-like accessory. A few tiny food items and beach objects sit around this stream-side rest area. The placement challenge in Dreamy Room Level 723 is making this cluster fit between the camper, the bridge, the water, and the front sign. Keep the chair close to the stream, but do not cover the flowing blue water completely.
Step 11. Fill the right beach edge with palm trees, rocks, fence, plants, and the boat dock.
The right side of Dreamy Room Level 723 needs several tropical details to feel complete. Place the tall palm trees along the far-right edge, with their trunks leaning inward and leafy tops framing the camper. Add the short brown fence posts in front of the camper, following the sandy edge. Put the small gray stones and green plants near the lower-right shoreline. The blue water dock tile extends from the stream to the bottom-right corner, and the white-and-blue boat sits on this water surface. Inside the boat, place the striped cushion, small flag, and tiny equipment details. In Dreamy Room Level 723, the boat should float slightly below the picnic sign and to the right of the stream outlet. Leave enough blue water visible around it so it does not look stranded on sand.
Step 12. Finish with food, animals, tiny props, and final alignment checks.
The last step in Dreamy Room Level 723 is placing the smallest props that give the island personality. Add the snack trays, fruit baskets, bottles, desserts, camera, bucket, sunglasses, shell, beach toys, and flower pots wherever the completed scene shows them: camping items on the upper-left mat, food under the camper awning, fruit on the roof deck, picnic treats near the front sign, and pool toys inside the round pool. Place every animal character in its exact activity zone: swimmers by the pool, campers under the umbrella, the lookout on the roof, the fisher by the stream, and the sunbather near the picnic sign. Dreamy Room Level 723 rewards careful observation, because the main challenge is determining the correct placement for each object. Once every item snaps into place, the whole island becomes balanced and readable.
Notes and Precautions
In Dreamy Room Level 723, always place large structural items before small decorations. The mountains, palms, hot-air balloon, camper, tent, pool, stream, and boat define the usable space. If you place small props too early, they may hide the correct anchor points for larger objects. Watch the layering carefully: the balloon sits behind the stairs, the camper sits in front of the rocks, the awning attaches to the camper, and the pool toys sit inside the pool rather than on top of the sand. Dreamy Room Level 723 also uses many similar tropical items, such as palm trees, plants, food trays, and beach toys, so do not assume every small object belongs near the same area. The game’s main challenge is correct placement, especially where the camper roof, central stream, and lower picnic sign overlap.
Tips and Tricks from top player
A reliable strategy for Dreamy Room Level 723 is to divide the island into five zones: upper-left campsite, upper-center balloon house, right-side camper, lower-left pool, and front-center picnic dock. Complete one zone at a time instead of dragging every object randomly across the map. In Dreamy Room Level 723, start with objects that have obvious silhouettes, such as the giant balloon, camper van, tent, pool, slide, and boat. Then use those pieces as landmarks for smaller items. If a prop will not snap into place, check whether another object should be underneath it first. For example, deck items need the camper placed, pool toys need the pool placed, and food-counter details need the striped awning positioned. Top players also keep the stream visible, because many objects align around its edges.
Final Scene Description
The completed Dreamy Room Level 723 scene is a bright tropical picnic paradise built on a sandy island. At the back, gray cliffs and palm trees frame a giant red-and-cream hot-air balloon, while the upper-left platform holds a blue tent, umbrella, picnic blanket, and camping animals. On the right, a cheerful camper van becomes a snack stand with a striped awning, rooftop lookout deck, stairs, fruit, plants, and a lounge chair. The lower-left side turns into a pool zone with a slide, lifeguard tower, duck float, beach ball, and stacked swim rings. Across the center, a stream flows past a bridge, fishing chair, sunbather, picnic treats, and big pink “PICNIC” letters before reaching the boat dock. Dreamy Room Level 723 feels busy but peaceful, with every object placed to create a complete seaside vacation story.