Dreamy Room Level 144
Dreamy Room Level 144 guide - Dreamy Room 144 Walkthrough & Solution.
Important Notice Regarding Level Numbering
Due to frequent changes in Dreamy Room's level numbering and differences between platforms (Android/iOS) – for example, level 144 on Android might not be the same as level 144 on iOS – the text guide below may not always match the images and video above. Please prioritize the image and video guides. If you find that the guide content doesn't match your current level, please visit the All Level Walkthroughs page to find the correct guide based on level images. Thank you for your understanding.
Dreamy Room Level 144 Walkthroughs & Guide
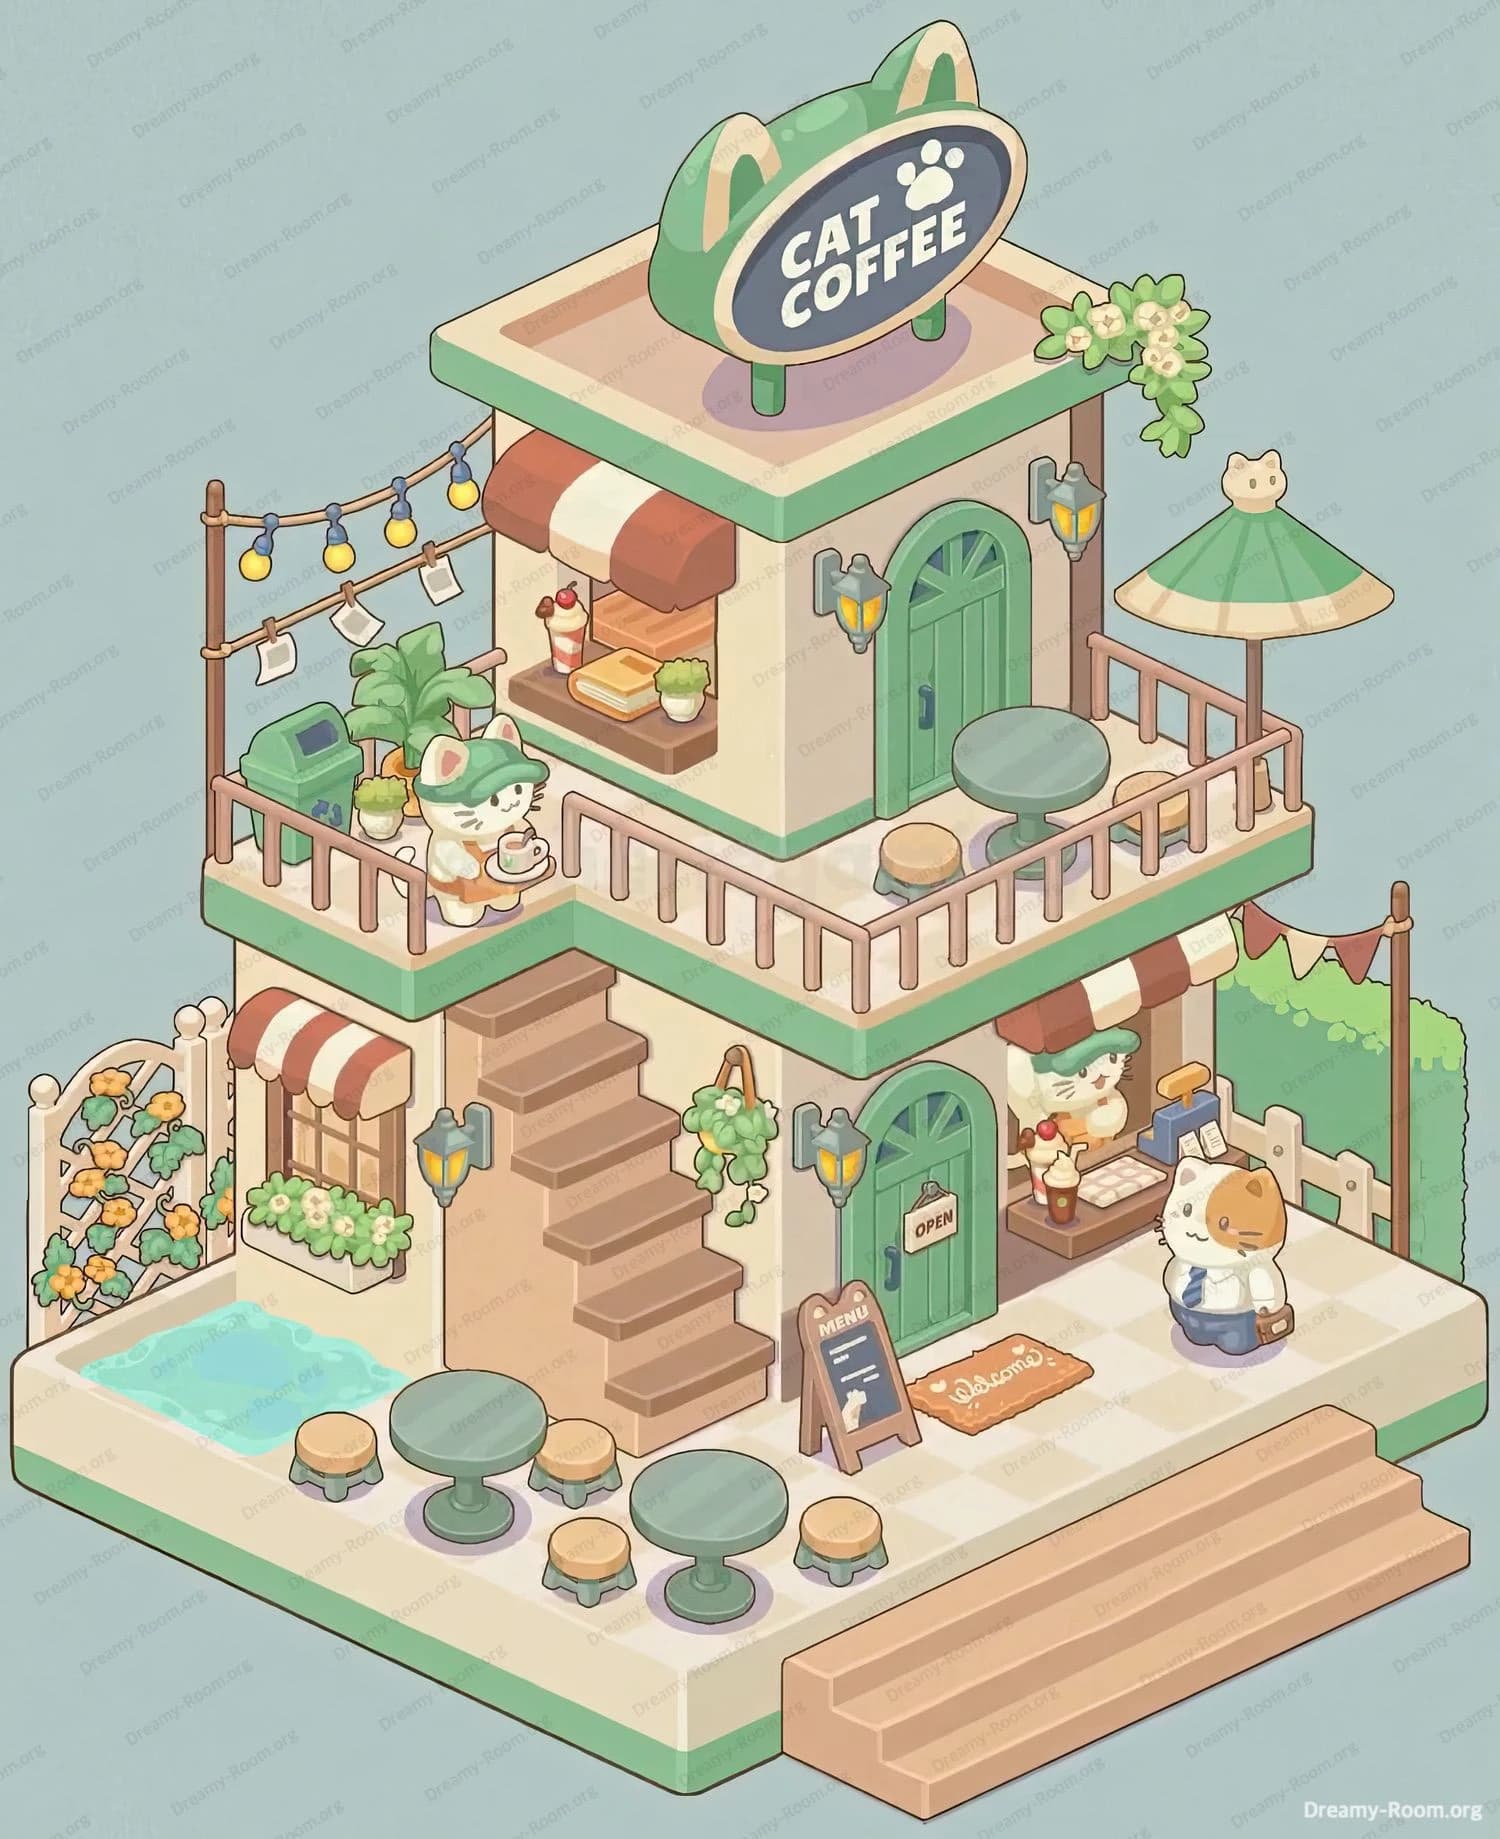
Step 1. Place the full checkerboard base platform in the center of your room – Dreamy Room Level 144
In Dreamy Room Level 144, you begin with a blank grid-like platform. This checkerboard floor sets the stage for all objects. Place the large cream-and-white checkerboard base in the exact center. Make sure the edges align flush with the game’s grid so that subsequent objects in Dreamy Room Level 144 will snap properly. The main challenge of Dreamy Room Level 144 is aligning every object perfectly on this base. Starting with a stable base ensures that walls, furniture, and characters will be placed at the correct height and orientation. The platform must occupy the full footprint across the entire isometric view, with the green trim visible on all sides, exactly as shown in the reference image for Dreamy Room Level 144.
Step 2. Erect the rear walls and central staircase – Dreamy Room Level 144
In Dreamy Room Level 144, once the base platform is secure, it’s time to bring in the structural elements that define the space. Begin by placing two identical cream-colored back walls along the rear edges of the platform, each outlined with a subtle green trim. These walls should meet at the center, creating a corner behind the middle of the base. Next, position the arched doorway wall piece to the right of this corner, ensuring the arch aligns flush with the grid. The heart of the level’s challenge in Dreamy Room Level 144 lies in aligning these panels perfectly at the correct angle so that the staircase will fit. Carefully attach the wide staircase directly below the doorway arch, spanning two grid units, and ensure its steps align at a 45° slant. Solid attachment of walls and stairs forms the backbone of Dreamy Room Level 144, allowing for precise placement of doors, windows, and decor.
Step 3. Install the ground floor entrance and window with canopy – Dreamy Room Level 144
Now that the structural frame is in place in Dreamy Room Level 144, focus on the main entrance and natural light features on the ground floor. On the right-hand side of the front wall, slide in the green arched door piece, making sure the handle faces outward. Adjacent to this, on the left side of the front face, insert a square window panel topped by a red-and-white striped fabric canopy. This little awning should seat snugly just above the window frame, matching the precise angle of the roofline in Dreamy Room Level 144. As you place these primitives, remember that the game’s primary puzzle in Dreamy Room Level 144 is the correct alignment and orientation, so take the extra moment to nudge each piece until grid markers highlight in green. The ground floor entrance and window are the first interactive elements players encounter in Dreamy Room Level 144, setting the aesthetic tone for every subsequent decoration.
Step 4. Arrange the ground floor seating, water feature, and exterior accents – Dreamy Room Level 144
In Dreamy Room Level 144, it’s time to add the interactive outdoor seating and decorative accents on the ground floor platform. Begin by placing three round green café tables evenly spaced along the front edge, each accompanied by four matching pastel stools. Ensure each stool is oriented towards its table, maintaining equal distance from neighboring tables to preserve symmetry in Dreamy Room Level 144. Next, in the rear left corner of the platform, insert the small turquoise water pool, taking care to align its edges flush against the left wall. Beside the pool, attach the white lattice gate and adjacent fence section, trimming any overhangs so they meet the grid precisely. Finally, tuck in a green trash bin and a pair of potted leafy plants just inside the fence, making sure they face inward. These steps in Dreamy Room Level 144 set the stage for a cozy outdoor café vibe outside the cat coffee shop.
Step 5. Set up the lower level service counter, menu sign, and welcome mat – Dreamy Room Level 144
The heart of Dreamy Room Level 144’s immersive café experience lies in the service area on the lower right corner of the ground floor. First, slot the wooden service counter under the canopy, aligning it one grid unit from the right edge and one unit from the front edge. The register platform fits perfectly on the left side of the counter, leaving space to the right for display items. In Dreamy Room Level 144, players must carefully adjust the counter so it doesn’t overlap with the walkway or seating. Once the counter is placed, position the small chalkboard menu sign on the floor just in front of the counter and lean it slightly backward so it remains upright. Then, lay the rectangular welcome mat directly at the threshold of the green arched door. Placement precision in Dreamy Room Level 144 ensures that customers and baristas animate naturally around the counter in the finished scene.
Step 6. Install railings and support posts for the second-floor balcony – Dreamy Room Level 144
Transition smoothly into the upper section of Dreamy Room Level 144 by adding the protective railings and structural supports. Begin by laying out the pastel pink railing segments along the entire perimeter of the second-floor platform. There should be four railing pieces on the front edge, two on each side edge, and two at the back, adjacent to the rooftop foundation. In Dreamy Room Level 144, misaligned railings will prevent players from adding rooftop décor correctly. Next, insert the vertical support posts at the four corners where the railings meet the base, ensuring they extend exactly one grid unit above the railing height. These posts provide the visual lift needed for the café sign later. Pay attention to the orientation of each support—rotate them if necessary so that the trim faces outward. Proper railing and post placement is crucial in Dreamy Room Level 144 to uphold the building’s structural integrity and visual balance.
Step 7. Add the second-floor service window, awning, and counter display – Dreamy Room Level 144
Now carve out the upper service nook in Dreamy Room Level 144 by placing the service window and its charming accessories. Position the half-height counter piece directly against the back wall in the center of the railing, leaving a one-unit clearance on each side. Above this opening, clip on the red-and-white striped awning, ensuring the fabric canopy extends exactly two units outward for maximum visual appeal in Dreamy Room Level 144. On the countertop, arrange the tiny sandwich prop and iced coffee cup, tucking the small green potted succulent beside them. Adjust these miniature items so that none overlap the railing edge or hinder customer animations. The precision required in Dreamy Room Level 144’s service area encourages players to softly nudge pieces until they snap into place, unlocking the next layer of decorative possibilities.
Step 8. Arrange the upper balcony seating, umbrella, and greenery – Dreamy Room Level 144
Dreamy Room Level 144 invites players to furnish the upper balcony with inviting seating and vibrant accents. Start by placing a round green table at the right side of the balcony, two grid units from the front railing and one unit from the right railing. Surround this table with three matching stools, each rotated to face the tabletop directly. Next, anchor the cat-face umbrella base into the center of the table, then secure its canopy so the cat ears point toward the entrance. In Dreamy Room Level 144, umbrella orientation affects shadow placement and overall realism. Once stable, position the single potted plant beside the table against the railing. Finally, drape the cute polaroid string lights across the left railing, hanging three photo frames evenly across. Each light strand and plant cluster must be nudged until the game’s grid highlights confirm proper alignment in Dreamy Room Level 144.
Step 9. Mount the rooftop sign and trailing vines – Dreamy Room Level 144
To crown the structure in Dreamy Room Level 144 with branding flair, it’s time to install the rooftop sign and greenery. Begin by selecting the large oval sign with cat ears labeled “CAT COFFEE” and place it at the center of the roof platform, exactly aligned along the grid’s central axis. Make sure the sign’s legs sit flush on the green trim border so there’s no visible gap. In Dreamy Room Level 144, a misplaced sign can clip into the roof’s checkerboard tiles, breaking immersion. Next, attach the trailing vine piece to the right side of the sign, positioning each tendril so it cascades naturally over the edge. Adjust the vine until it overlaps two rooftop tiles without obscuring the sign text. Perfect sign and vine placement marks the player’s progress in Dreamy Room Level 144, opening the way for character placement.
Step 10. Place the character figures and final decorative accents – Dreamy Room Level 144
The final interactive challenge of Dreamy Room Level 144 is bringing your scene to life with character figures and finishing touches. First, position the cat barista figure behind the lower service counter, ensuring her paws align just above the countertop to hold the coffee cup prop seamlessly. Next, arrange the customer cat figure carrying a briefcase in front of the welcome mat, rotating him slightly to face the door. In Dreamy Room Level 144, character placement must respect collision boundaries so animations trigger correctly. Then, place the upstairs barista cat holding a cup next to the second-floor countertop, adjusting the figure so the cup rests naturally on its paw. Finally, scatter the remaining potted flowers, trim stray leaves, and attach the small wall lamps beside each doorway. The intricate placement in Dreamy Room Level 144 underscores its core puzzle: discovering the exact spot for each charming detail.
Notes and Precautions
- The base platform in Dreamy Room Level 144 must be placed precisely at the center grid; any offset will cascade errors when you install walls and decorative pieces.
- Walls and staircase segments in Dreamy Room Level 144 rely on grid snapping; if a piece won’t click, rotate it slightly or nudge it until grid highlights confirm placement.
- When positioning the red-and-white striped awnings on both floors in Dreamy Room Level 144, ensure they do not overlap with adjacent railings or window frames, which can trigger placement errors.
- The wooden service counter, menu sign, and welcome mat in Dreamy Room Level 144 have defined collision boundaries that guide character animation triggers; misplacement may result in floating or clipped figures.
- Railing segments and support posts in Dreamy Room Level 144 must form a continuous perimeter before you add second-floor components; gaps or misaligned posts will block subsequent items.
- Interactive objects such as the CAT COFFEE sign and umbrella in Dreamy Room Level 144 should be checked against the underlying grid; if the sign clips through the roof, re-adjust orientation.
- Decorative vines, string lights, and potted plants in Dreamy Room Level 144 can be slightly overhung, but large overhangs will cause the game to reset their position; aim for subtle drapes.
Tips and Tricks from top player
Experienced players of Dreamy Room Level 144 know that a methodical approach saves frustration. First, use the game’s visible grid toggles to preview placement boundaries before you drag any piece. In Dreamy Room Level 144, toggling grid visibility helps prevent tiny misalignments that can block snapping. Second, group similar objects in your inventory—such as all green-trimmed walls and all red-striped awnings—so you can place them in one sweep, streamlining your progress in Dreamy Room Level 144. Third, leverage the undo button sparingly: if you accidentally misplace the CAT COFFEE sign in Dreamy Room Level 144 by more than one tile, undoing will snap everything back to the last confirmed grid highlight. Finally, save periodically; because Dreamy Room Level 144 does not feature an auto-save midpoint, manually saving after each major section—base, walls, ground floor, balcony, and rooftop—ensures you can revert without redoing the entire level. Another shortcut for Dreamy Room Level 144 is using the rotate function to adjust orientation before dragging; this reduces the need to fine-tune placement with pixel-level nudges. Veteran players also recommend previewing character animations after placing key objects to check for collision errors. Following these strategies in Dreamy Room Level 144 can cut your decoration time in half and lead to a flawless café display.
Final Scene Description
In the completed Dreamy Room Level 144, the pastel café stands as a showcase of design. The cream-and-mint checkerboard floor extends across both levels, while the sturdy staircase occupies the front, guiding the eye upward. On the ground floor, the arched green door and adjacent window under a red-and-white striped awning invite visitors in, with a wooden service counter, welcoming mat, and menu board positioned outside. A cat barista works behind the counter as a feline customer approaches carrying a briefcase. Outside, round tables with matching stools cluster near a turquoise pond, by a white lattice fence and potted greenery. Above, the rooftop displays a cat-ear shaped “CAT COFFEE” sign with vines draping its edge. The second-floor balcony offers café seating around a shaded table under a cat-face umbrella, strung lights overhead, potted flora adding a cozy ambiance, completing a tableau in Dreamy Room Level 144 that exudes cozy whimsy.