Dreamy Room Level 352
Dreamy Room Level 352 guide - Dreamy Room 352 Walkthrough & Solution.
Important Notice Regarding Level Numbering
Due to frequent changes in Dreamy Room's level numbering and differences between platforms (Android/iOS) – for example, level 352 on Android might not be the same as level 352 on iOS – the text guide below may not always match the images and video above. Please prioritize the image and video guides. If you find that the guide content doesn't match your current level, please visit the All Level Walkthroughs page to find the correct guide based on level images. Thank you for your understanding.
Dreamy Room Level 352 Walkthroughs & Guide
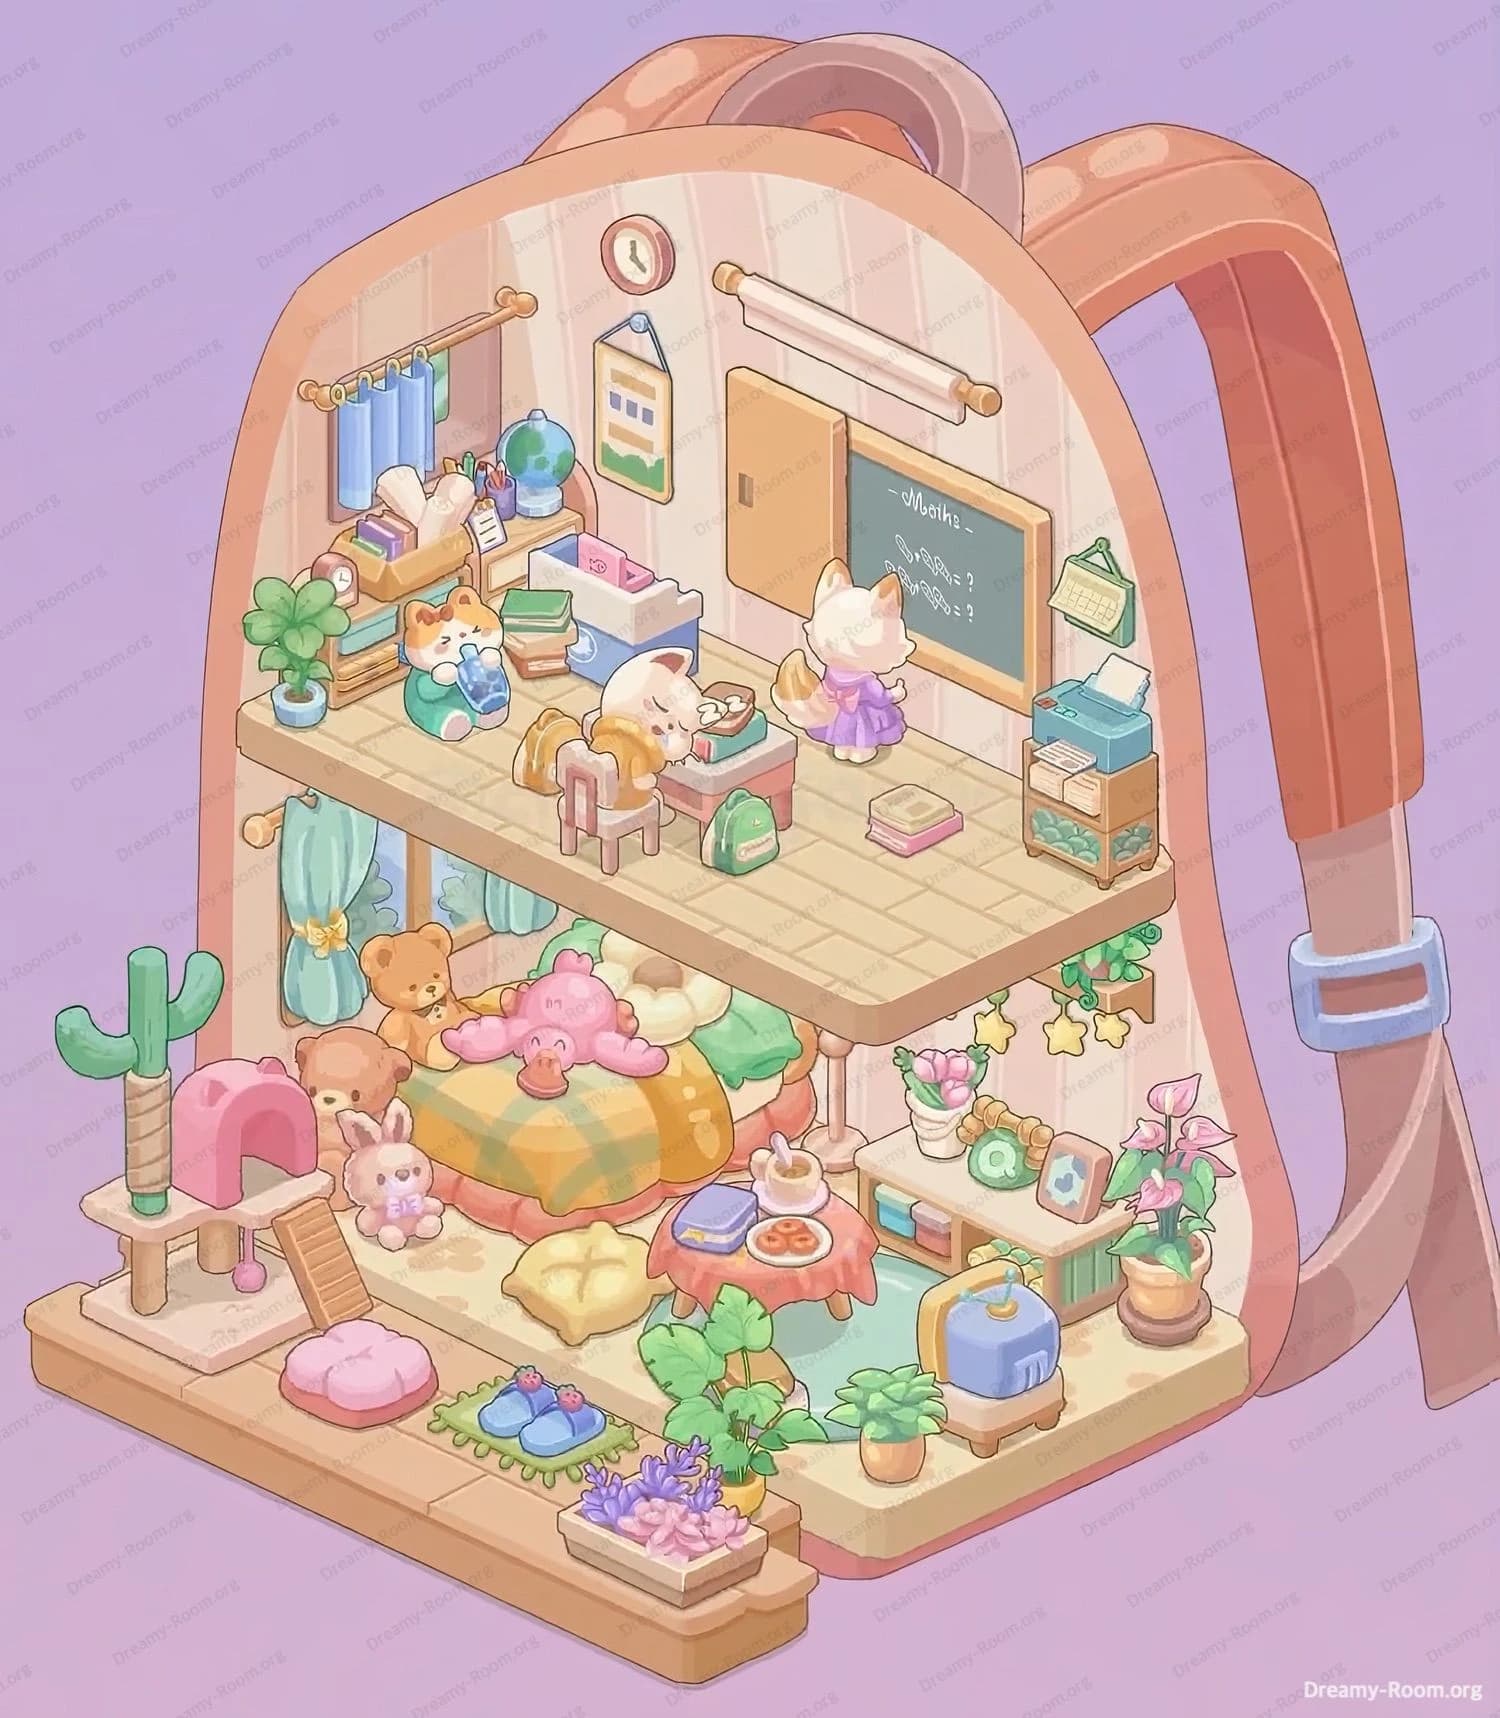
Step 1. Place the mattress base in the bottom center.
Start by laying the soft floral mattress in the exact bottom-center of the backpack interior. In Dreamy Room Level 352 the mattress sits flush with the backpack base and forms the foundation for everything that follows. Make sure the patterned mattress aligns with the front edge of the base so the carved step and raised platform remain visible. When placing the mattress in Dreamy Room Level 352, nudge it slightly to the right if your UI snap points feel off — the mattress should appear slightly inset from the backpack rim. Establishing the mattress position correctly early prevents overlaps later with the bed, rugs, and cat tree. Remember: in Dreamy Room Level 352 this mattress is the anchor for subsequent placements, so take time to center it visually and lock position when possible.
Step 2. Place the round checked bed and plush cluster on the lower left.
Next, place the round checked bed on the lower level, slightly to the back-left of the mattress base. In Dreamy Room Level 352 the bed is the large focal point on the lower story and must sit under the upper floor overhang. Add the pink octopus plush directly on top of the checked bed, then arrange three teddy bears clustered at the bed’s rear. When you place these in Dreamy Room Level 352, tilt and rotate each plush slightly so their faces point toward the front center — this creates the snug, lived-in look. Leave a small gap between the bed and the left wall for the cat tree and cactus later. Getting the bed and plush cluster right will define the cozy character of the lower scene in Dreamy Room Level 352.
Step 3. Place the cat tree, cactus, and bunny play area at the front left.
With the bed set, place the tall cat tree on the front-left edge of the base and the green cactus beside it. In Dreamy Room Level 352 the cat tree is visible from the front and must not overlap the bed cushion; position the small ladder and pink arch entry to face the center area. Now add the little bunny plush and the small ramp leading up to the pink arch — these accent pieces create visual depth in Dreamy Room Level 352. Make sure the cactus pot sits on the platform edge and the ladder’s base hugs the floorboard without sliding under the bed. Fine adjustments here will prevent clipping when you later add the slippers and low table for the lower living nook in Dreamy Room Level 352.
Step 4. Place the low table, tea set, slippers and front greenery.
Place the low round table a touch to the right of center on the lower level, keeping it closer to the bed than the front edge. In Dreamy Room Level 352 the table holds a tea set and a plate of cookies; place the teapot and plates then rotate them slightly for realism. Position the tiny slippers on the green mat at the table’s front and a pink floor cushion to the left of the mat. Add the planter box of purple succulents at the very front edge and two potted leafy plants just behind the table — these plants anchor the foreground in Dreamy Room Level 352. Check that none of these items overlap the base platform steps and that visual spacing matches the reference image for the best result.
Step 5. Place the right shelf, framed photo, calendar and retro TV on the lower right.
On the lower right, set the low shelving unit against the inner backpack wall and place the framed photo and calendar on the top shelf. In Dreamy Room Level 352 the small blue retro TV sits on the rightmost corner of the base — position it so the cordless design faces slightly toward the center. Add the stack of books and a tiny plant on the shelf’s middle tier and a tissue box on the top of the adjacent small filing cabinet. These elements in Dreamy Room Level 352 must be tidy and not obscured by the floor plants; if the TV hides the shelf, nudge the TV outward until both are visible from the default camera angle. Proper alignment here makes the lower vignette feel balanced and lived-in.
Step 6. Build and place the upper floor platform and support poles.
Before placing upper items, drop the upper wooden platform into place, aligned with the backpack’s midline so it overhangs evenly on both sides. In Dreamy Room Level 352 the platform should sit level and be supported by two slender poles that match the reference positions; attach supports directly under the platform’s front corners. Confirm that the platform doesn’t clip the lower bed or plants — if it does, lift it slightly and recheck the support anchor. When the platform is level in Dreamy Room Level 352, you can start arranging the classroom pieces: the desk cluster, teacher area, and left shelving will all depend on this solid platform placement, so take care to match height and rotation precisely.
Step 7. Place the classroom furniture: desk, chair, teacher, and chalkboard.
On the upper level, place the desk in the center-front of the platform and the small chair so the seated student faces the chalkboard. In Dreamy Room Level 352 the teacher cat stands near the chalkboard wearing a lavender dress; position the teacher facing the board, then place the sleeping pupil at the desk with the green backpack beside the desk leg. Mount the chalkboard on the back wall and add the small cabinet and rolled shade above it. Add a globe, tissue box, and stacked books to the left shelf; arrange a small clock above the curtain rod. These details in Dreamy Room Level 352 are essential — small misplacements around the chalkboard will be obvious from the front camera view, so line up edges and angles carefully.
Step 8. Final touches: garland, wall art, pillows, rugs, and small desk accessories.
Now add the final accents: star garland under the upper platform edge, the wall poster to the left of the chalkboard, the calendar hook with a tiny pad, and the slim filing drawer stack on the right. In Dreamy Room Level 352 you should now scatter throw pillows around the lower bed, lay down the pastel rugs in front, and put the small picture frame and vase on the lower shelf. Add the desk accessories on the upper teacher’s desk — pencil cup, note, and a little notebook — and position a small green plant on the desk corner. Walk through Dreamy Room Level 352 from the default camera angle; tweak any item that looks misaligned until the entire composition matches the reference.
Notes and Precautions
- Placement order matters for Dreamy Room Level 352: always start with bases (mattress, platform) and work outward; otherwise items may clip or snap incorrectly.
- Use the item rotation and nudge tools while placing pieces in Dreamy Room Level 352 — many objects require a slight angle to match the reference and to avoid overlap.
- Save after major placements in Dreamy Room Level 352 so you can revert if a later addition causes clipping.
- Watch the camera view: what looks centered in a topdown mode may be off in the front camera, so check the default scene frequently while arranging Dreamy Room Level 352.
- Small props (slippers, photos, pens) are easy to misplace; zoom in and verify each matches the reference orientation for Dreamy Room Level 352.
Tips and Tricks from top player
- Work with layers: place large furniture first, then medium pieces, then tiny accessories — this is the same approach top players use to finish Dreamy Room Level 352 quickly and accurately.
- Use temporary placeholders: if an item is missing its final spot, drop a generic object to reserve the space in Dreamy Room Level 352; then swap it for the real prop later.
- Mirror and symmetry: many elements in Dreamy Room Level 352 are balanced left to right — use symmetry to speed alignment, then add slight asymmetrical touches for realism.
- Camera snapshots: take a screenshot after each section in Dreamy Room Level 352 so you can compare against the reference and restore earlier states if needed.
- Patience on micro-adjustments: moving a pillow one notch or rotating a plant 6–10 degrees can transform the scene; this is a hallmark technique used by experienced Dreamy Room Level 352 players.
Final Scene: The completed Dreamy Room Level 352 presents cozy diorama nested inside a pastel backpack. On the upper level a small classroom sits under an arch: a chalkboard with equations, a teacher cat in a lavender dress facing students, a row of desks with a sleeping pupil and a green backpack beside it, a globe and stacked books on a shelf, a clock above the curtain rod and a rolled shade. The lower level is a plush living nook with round checked bed piled with teddy bears and pink octopus plush, a low table holding tea and cookies, potted plants clustered near a blue retro TV, a cactus and cat tree at the front left, slippers on a tiny mat and framed photos on a shelf. Star garlands and pastel rugs tie the scene together. Dreamy Room Level 352 feels warm, balanced and rewarding the player’s placement choices today.