Dreamy Room Level 391
Dreamy Room Level 391 guide - Dreamy Room 391 Walkthrough & Solution.
Important Notice Regarding Level Numbering
Due to frequent changes in Dreamy Room's level numbering and differences between platforms (Android/iOS) – for example, level 391 on Android might not be the same as level 391 on iOS – the text guide below may not always match the images and video above. Please prioritize the image and video guides. If you find that the guide content doesn't match your current level, please visit the All Level Walkthroughs page to find the correct guide based on level images. Thank you for your understanding.
Dreamy Room Level 391 Walkthroughs & Guide
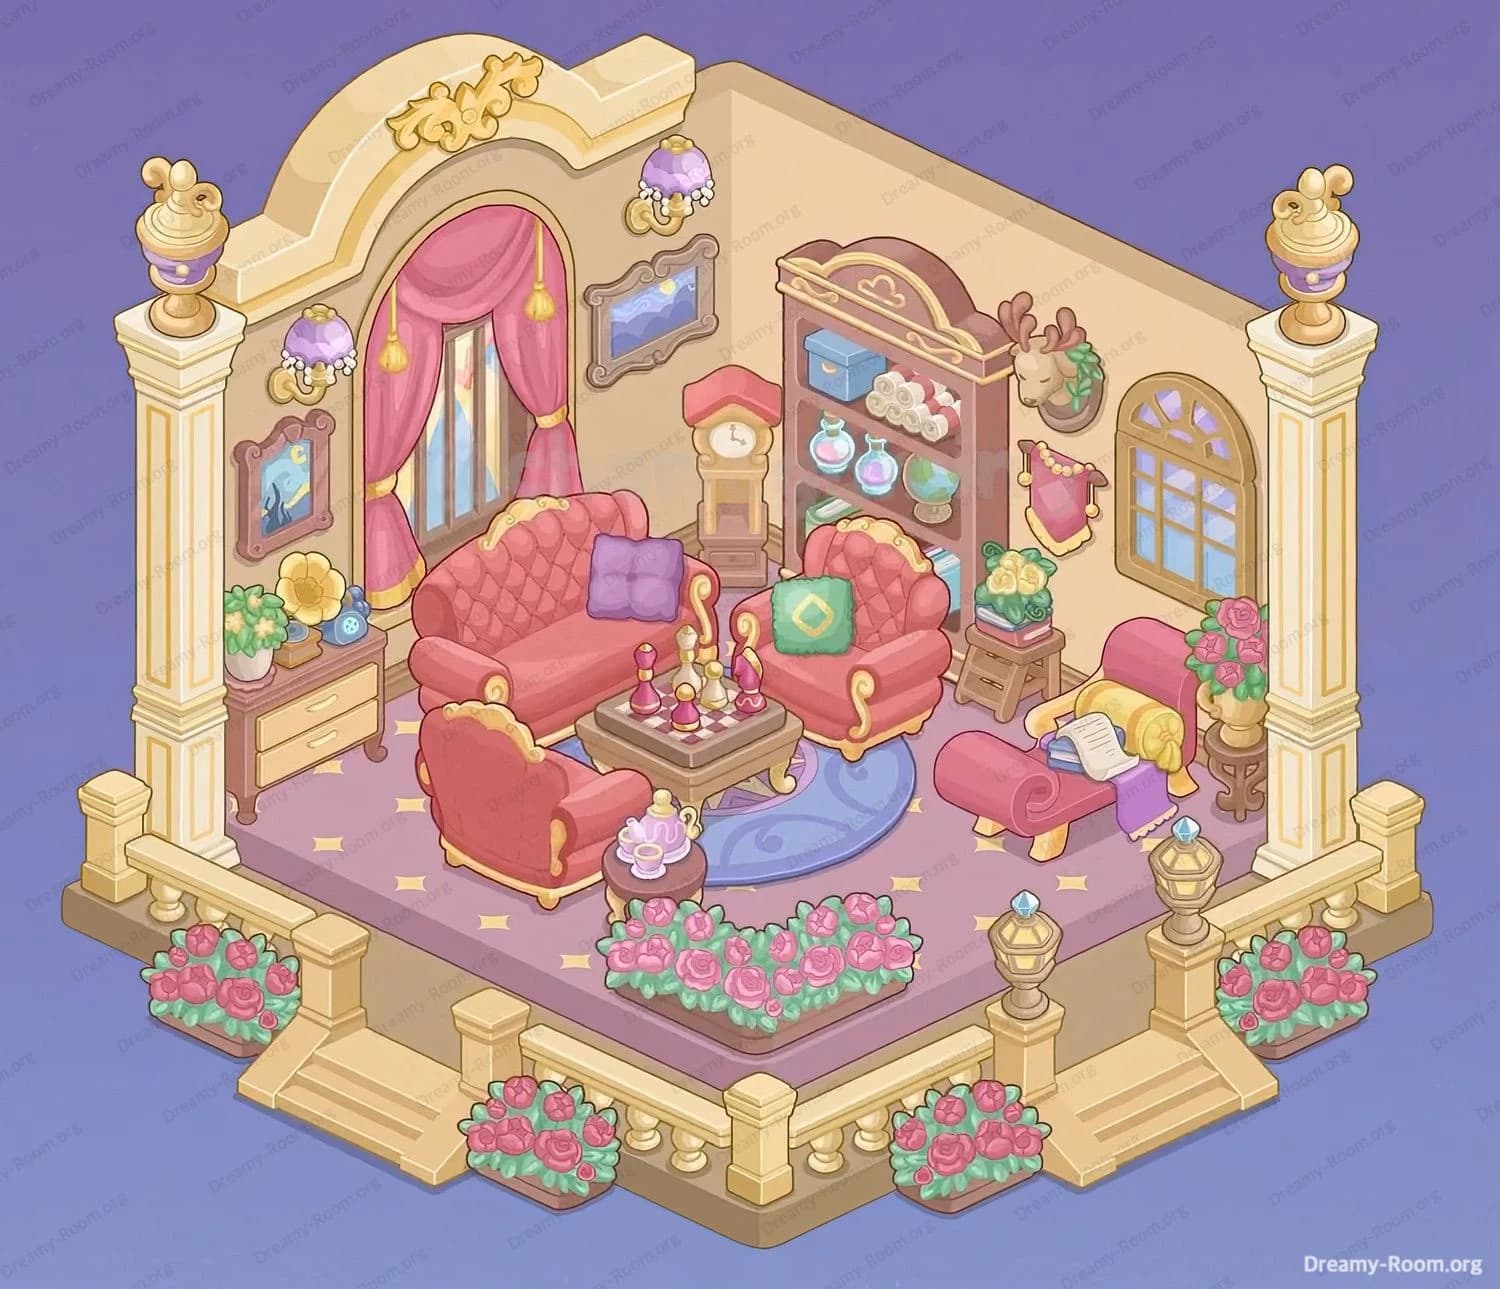
Step 1. Place the archway and curtain on the back-left wall.
Begin Dreamy Room Level 391 by crowning the scalloped wall with the cream archway that carries the gold crest. Snap it to the back-left corner so the arch follows the wall’s curve. Inside that arch, hang the magenta stage-style curtain with gold tiebacks and tassels; make sure the hem kisses the patterned purple carpet. This doorway is the focal axis for Dreamy Room Level 391, so if it’s off by a tile, later furniture will misalign. The curtain must sit slightly forward of the wall to allow the wall sconces from a later step to nestle around it. Verify that the arch’s shadow falls toward the center of the room; that’s how you’ll know the rotation is correct for Dreamy Room Level 391.
Step 2. Mount the four wall pieces: two sconces, two pictures.
Next, decorate the walls for Dreamy Room Level 391. On the left wall, hang the small framed painting with a wavy border roughly shoulder height, one tile forward from the back corner. Between that painting and the archway, mount a purple crystal sconce; mirror a second purple sconce on the back wall, left of center above the sofa’s future position. On the back wall, just right of the arch, add the starry landscape picture with the gray curvy frame. These must be level so Dreamy Room Level 391 keeps its symmetrical rhythm. If a sconce sits too low, it will collide with sofa backs later; if too high, it will float awkwardly above the arch molding. Keep everything tucked above the future seating line.
Step 3. Build the left storage corner: sideboard, gramophone, and plant.
For Dreamy Room Level 391, slide the two-drawer sideboard along the left wall, centered between the front column and the arch. Place the turn-of-the-century gramophone on its right half; its golden horn should face the room. On the left half, place a potted green plant with rounded leaves for color balance. This trio defines the room’s musical reading vibe in Dreamy Room Level 391 and fills the negative space under the painting and sconce. Keep the cabinet’s back edge flush with the baseboard, and rotate the gramophone so its horn doesn’t clip the column. If you push the cabinet too far forward, pathing for the front armchair will be blocked—precise spacing is critical to complete Dreamy Room Level 391 cleanly.
Step 4. Arrange the seating set: sofa, two armchairs, and side tea table.
Centerpiece time for Dreamy Room Level 391. Anchor the quilted red three-seat sofa along the left half of the back wall, its gilded crest rail curving under the sconce. In front of it—slightly to the left—place one red armchair facing inward. Place the second red armchair opposite, forming a conversational triangle with the sofa. Between the forward armchair and the front edge of the carpet, drop the tiny round tea table topped with a rose-tinted teapot and cup. The lavender and green accent pillows go on the sofa (lavender left, green right) to echo the art frames. Correct orientation matters in Dreamy Room Level 391: each seat’s golden scroll arms should face the coffee table zone you’ll add next, keeping the flow natural and uncluttered.
Step 5. Set the coffee table, candelabra, and rug ellipse.
In Dreamy Room Level 391, slide the carved rectangular coffee table into the middle of the seating triangle so its legs align diagonally with the carpet’s star motifs. On top, place the multibranch gold candelabra at the center, with a candy dish beside it if your item set allows. Now tuck the pale blue oval rug just under the table; its swirl pattern should peek out toward the right, overlapping the carpet slightly to create depth. This layer order—rug, table, then centerpiece—is crucial in Dreamy Room Level 391 because incorrect stacking hides the rug or causes candles to sink into wood. Leave one tile of walking space between the table and each seat so the room feels navigable and the vignette reads clearly.
Step 6. Build the back-right feature: grandfather clock and display cabinet.
For the room’s scholarly feel in Dreamy Room Level 391, position the square-base grandfather clock first, just right of center on the back wall. Its red bonnet should face left, nudging under the sconce’s glow. Immediately to the right of the clock, place the tall arched display cabinet. Load its shelves with pastel potion bottles, a folded blue blanket, and a pink box; rotate until the crown molding matches the wall curve. This is a tight cluster in Dreamy Room Level 391: if the clock touches the cabinet, slide the cabinet one notch right. The clock must remain visible from the sofa. Don’t put décor on top of the cabinet; the arched top needs breathing room under the ceiling molding for the composition to feel airy.
Step 7. Dress the right wall: window, trophy mount, dress display, and side table plant.
On the right wall of Dreamy Room Level 391, mount the tall arched window above the mid-carpet line so the muntins form a sunburst. Just left of the window hangs the deer trophy bust; keep it higher than eye level so it doesn’t clash with the chaise. Beneath the deer, hook the pink dress with gold trim—this sits slightly forward like a wall mannequin. In the corner between the window and front column, place the round pedestal side table with a leafy plant. This series makes Dreamy Room Level 391 feel vertical and gallery-like. If the dress floats, lower it one click; if the plant hides behind the chaise you’ll add next, scoot it outward. Every millimeter of spacing matters for a perfect clear finish.
Step 8. Finish the reading nook: chaise, reader character, and pillow.
Now craft Dreamy Room Level 391’s sweetest vignette. Along the right wall, set the red chaise lounge horizontally with its back toward the wall and foot toward the front steps. Add the blonde reader character reclining on the chaise, book open, legs tucked. A small rectangular pillow props behind her. The chaise must not overlap the coffee table footprint; maintain one tile gap. This nook completes the story tone of Dreamy Room Level 391 and aligns sightlines toward the center. If the reader snaps behind the chaise in your editor, re-order until she sits above the furniture layer. Confirm that the window’s light appears to fall over her shoulder; that tells you the chaise orientation is correct and the plant remains visible at the corner.
Step 9. Install exterior trim: balustrade, lamp posts, flowers, and stairs.
With the interior locked, frame Dreamy Room Level 391 with exterior décor. Run the cream-and-gold balustrade along the platform edge. Insert two jewel-topped lamp posts on the right front terrace, evenly spaced. Add twin stair sets: a wider centered stair at the right and a smaller step cluster at the left front corner. Along the entire front edge and both front corners, plant dense rose beds with green foliage and pink blooms; they should tuck between the square pedestals. This border completes Dreamy Room Level 391 by guiding the eye up the steps and into the lounge. Ensure no flower sprite clips the stair rails. Finally, cap both front columns with golden urn finials to mirror the arch’s crest and unify the palette.
Step 10. Polish the columns, moldings, and micro-alignments.
To perfect Dreamy Room Level 391, verify all four ivory columns: two structural at the back corners and two front pedestals integrated with the terrace. Snap the left rear column’s capital beneath the arch trim; the right rear column sits just in front of the window line. Check that floor star motifs remain visible around furniture feet; if not, bump pieces by a pixel so patterns peek through. Turn the candelabra flames outward, straighten the pillows, and re-confirm that every wall object—paintings, sconces, trophy, and dress—sits without overlap. In Dreamy Room Level 391, tiny nudges make a big difference because the isometric angles exaggerate collisions. When everything breathes evenly, the room reads as refined, not crowded, and you’ll secure a satisfying completion.
Notes and Precautions
- Placement order matters. In Dreamy Room Level 391, the arch and curtains must go before sconces and before the sofa, or else layers will hide details.
- Mind collision zones. The left sideboard can block the front armchair if pushed forward. Keep a one-tile walkway everywhere in Dreamy Room Level 391.
- Wall height alignment. Pictures and sconces should share a horizon; mismatched heights make Dreamy Room Level 391 feel messy and can cause visual clipping with the sofa backs.
- Right-wall stack. Window → trophy → dress → chaise → plant is the safest order to avoid pop-throughs.
- Light balance. Two sconces + window glow should triangulate around the coffee table; if the room feels dim, your sconces are likely too far apart in Dreamy Room Level 391.
Tips and Tricks from top player
- Block out big shapes first. In Dreamy Room Level 391, place sofa, armchairs, chaise, and cabinet before small props; this locks the traffic flow.
- Use symmetry with slight asymmetry. The lamp posts and roses mirror, but the gramophone sideboard offsets the clock—this is the secret sauce of Dreamy Room Level 391.
- Tile counting beats guessing. Count one tile gap around the coffee table and two along the front edge; this prevents last-minute pushes in Dreamy Room Level 391.
- Color anchors. Repeat magenta (curtains, seats, teapot) and gold (moldings, lamp posts) to guide placement when shadows are subtle in Dreamy Room Level 391.
- Layer check at the end. Temporarily hide the rug; if chairs float, restack. Restore the rug to finish Dreamy Room Level 391 cleanly.
Final Scene Description
The completed Dreamy Room Level 391 glows like a petite palace lounge. Cream columns and balustrades frame rose-lined steps, inviting you onto a lilac carpet sprinkled with star motifs. A regal red sofa faces a carved coffee table crowned with a gold candelabra atop a pale blue oval rug, while twin armchairs create an intimate triangle. To the left, a sideboard hosts a cheerful gramophone and plant beneath a framed picture and crystal sconce. The arched backdrop with magenta drapery commands the room, flanked by a starry painting. On the back wall, a red-topped grandfather clock ticks beside a potion-filled display cabinet. To the right, an arched window, deer bust, and dress display overlook a cozy chaise where a blonde reader relaxes. Jewel-tipped lamp posts sparkle, completing the serene, story-rich harmony of Dreamy Room Level 391.