Dreamy Room Level 226
Dreamy Room Level 226 guide - Dreamy Room 226 Walkthrough & Solution.

Important Notice Regarding Level Numbering
Due to frequent changes in Dreamy Room's level numbering and differences between platforms (Android/iOS) – for example, level 226 on Android might not be the same as level 226 on iOS – the text guide below may not always match the images and video above. Please prioritize the image and video guides. If you find that the guide content doesn't match your current level, please visit the All Level Walkthroughs page to find the correct guide based on level images. Thank you for your understanding.
Dreamy Room Level 226 Walkthroughs & Guide
Step 1. Place the grand staircase and railing on the left side of the room
Begin by selecting the staircase piece in the furniture inventory for Dreamy Room Level 226. This sturdy wooden staircase features a soft blue carpet runner that perfectly complements the lavender walls. In Dreamy Room Level 226, drag the staircase to the lower-left corner of the empty room, aligning the bottom tread flush with the left wall and the runner facing inward. Once the staircase is in position, choose the matching railing segments and snap them into place along the top platform edge and down the staircase. In Dreamy Room Level 226, ensure each railing baluster clicks securely in the designated slots to avoid awkward gaps. This structural placement anchors your layout in Dreamy Room Level 226 and provides a solid base for all subsequent decorative steps.
Step 2. Add the arched windows and elegant curtains
For Dreamy Room Level 226, begin decorating by installing the two large arched windows that will grace the back walls. These windows feature rich wooden frames and gracefully curved tops to echo the room’s vaulted arch. In Dreamy Room Level 226, position one window on the left rear wall and the other on the right rear wall, centering them both at equal height. Next, choose the floor-length blue curtains with gold tassel trim from the textile menu. In Dreamy Room Level 226, attach the curtains so they elegantly drape over each window frame, ensuring the folds hang naturally. Confirm that the curtain brackets are snapped into the notches above each window—Dreamy Room Level 226 will not register the draperies unless they are fully clicked into place.
Step 3. Place the wooden bookshelf and decorative accents between the windows
In Dreamy Room Level 226, the next key furnishing is the tall wooden bookshelf, sized to fit snugly between the two arched windows on the left wall. Select the bookshelf module from the shelving category and drag it into the center position, verifying that it aligns squarely with the parquet floor tiles. In Dreamy Room Level 226, load the bookshelf with the pastel-colored books, arranging them by height for a balanced gradient effect. Then place the miniature camera and glass jar accessories on the upper and middle shelves, making sure each item snaps onto its designated peg. Double-check in Dreamy Room Level 226 that none of the decorative jars overlap the bookshelf frame; each accessory should slot cleanly to maintain the polished look of this inviting corner.
Step 4. Arrange the piano and candelabra in the left corner
Start this stage in Dreamy Room Level 226 by choosing the antique wooden piano and placing it flush against the left corner wall, just beneath the left window. Rotate the piano slightly so the keyboard faces the room’s center at a shallow angle. In Dreamy Room Level 226, be precise: the piano legs must rest on the lighter wood parquet design rather than the blue trim to trigger the correct placement. Next, select the tall gold candelabra and snap it beside the piano’s left side, ensuring the candle flames point upward. In Dreamy Room Level 226, insert the sheet music on the piano stand and place the round pink stool directly in front of the keys. This combination in Dreamy Room Level 226 creates a charming recital nook that enriches the overall ambiance.
Step 5. Position the cozy loveseat and accent pillows on the raised platform
Now in Dreamy Room Level 226, select the tufted blue loveseat with cream trim and carefully position it on the raised platform area, centering it a few inches away from the railing. Rotate the loveseat until it faces toward the room’s center, where guests will admire its comfort. In Dreamy Room Level 226, you must ensure the loveseat’s front legs straddle a single parquet square without overlapping the platform edge. After placing the loveseat, choose the decorative pillows: add the yellow grid-pattern pillow on the left side, then place the light green heart-shaped pillow on the right. In Dreamy Room Level 226, each pillow will only lock into place if aligned flat against the back cushion, so exert a gentle nudge before releasing.
Step 6. Lay out the tea service, cupcakes, and footstool accessory
Next, in Dreamy Room Level 226, open the tabletop category to select the tea service tray, complete with three delicate green teacups and matching teapot. Position this tray on the loveseat’s built-in sideboard tray extension, ensuring it rests level across the armrests. In Dreamy Room Level 226, the tray will click correctly only when the back-edge peg inserts fully into the loveseat bracket. Afterward, pick up the trio of pastel cupcakes and arrange them evenly on the tray next to the teapot. Then choose the round blue footstool and align it in front of the loveseat, keeping a small walking path open. In Dreamy Room Level 226, the footstool must be centered on a single parquet tile to avoid unwanted overlap with the staircase runner.
Step 7. Install the side table, gramophone, mirror, and console tableau
In Dreamy Room Level 226, select the small wooden side table with mechanical gramophone and place it directly behind the loveseat on the raised platform. Rotate the table so the gramophone horn faces inward at a slight diagonal. Next, choose the ornate gold-framed mirror and console table set; position this ensemble between the windows on the right side of the room. In Dreamy Room Level 226, snap the mirror into the golden brackets and ensure the console legs rest flush with the parquet floor. Then decorate the console tabletop with the pink teddy bear on the left, the cluster of ivory candles in a candelabra holder on the center, and the hydrangea-filled glass vase on the right. Dreamy Room Level 226 will reward you when all seven items are perfectly placed and lock into position.
Step 8. Arrange the dining table, chairs, and place settings on the balcony area
For Dreamy Room Level 226, select the round dining table draped in the blue tablecloth and position it on the lower balcony platform toward the right side, keeping it parallel to the railing. In Dreamy Room Level 226, center the table so that each chair can access it from all angles without colliding with columns. Next, pick up the four cream-colored chairs and place them evenly around the table’s perimeter, aligning the chair backs with the table’s circumference. Then access the place settings: arrange the pastel napkin and plate sets on each of the two facing seats, add the gold utensils, and top each plate with a decorative napkin rose. Dreamy Room Level 226 will only confirm completion when every chair snaps exactly at a 90-degree angle to its table quadrant.
Step 9. Set up the serving cart, fruit bowl, and railing teacup vignette
In Dreamy Room Level 226, grab the two-tiered wooden serving cart with wheels and position it near the dining table, leaving just enough space to pull it forward. Arrange the extra cupcakes on the top shelf, followed by the teal teacup and folded cloth napkin on the bottom shelf. Next, choose the polished wooden fruit bowl and place it on the railing ledge at the front center of the lower platform, followed by the single matching teapot beside it. In Dreamy Room Level 226, verify that each item “snaps” by observing the green highlight as you hover over the railing. When done correctly, Dreamy Room Level 226 will give an audible click to confirm these mobile accessories are locked into place.
Step 10. Add potted plants, wall sconces, and finishing snowflake accents
Finally, in Dreamy Room Level 226, embellish the space by selecting and positioning the golden vase of yellow lilies to the right of the stairs on the raised platform. Then add the identical lily vase to the opposite corner beside the console table. In Dreamy Room Level 226, next choose the pink hydrangea pot and place it next to the staircase base for a pop of color. After that, select the twin wall sconces with blue lampshades and snap them onto the right wall at equal height near the arched window. As a final seasonal flourish, position the small snowflake ornaments around the upper arch beams. Dreamy Room Level 226 will congratulate you when every last accessory is correctly placed and the room glows with harmony.
Notes and Precautions for Dreamy Room Level 226
When moving delicate furnishings in Dreamy Room Level 226, watch for the green placement highlight to ensure proper alignment. Misaligned items may appear in the scene but will not trigger the completion indicator. During Dreamy Room Level 226, avoid overlapping objects by zooming in slightly before dropping each piece; this prevents accidental placement on adjacent grid squares. Be aware that certain accessories—like the curtain brackets and vase pegs—must click precisely into their wall or floor anchors. In Dreamy Room Level 226, if an item seems “stuck,” deselect and rotate it by 15 degrees, then reattempt placement. Finally, remember that refreshing the game or exiting mid-placement can reset progress in Dreamy Room Level 226, so save your game before making major structural changes.
Tips and Tricks from top player for Dreamy Room Level 226
Veteran decorators tackling Dreamy Room Level 226 recommend starting with the largest structural pieces first—like the staircase and windows—to frame the space before adding smaller decor. In Dreamy Room Level 226, using the rotate tool in small increments (5 to 10 degrees) often reveals hidden snap points. Power players approaching Dreamy Room Level 226 also advise grouping similar items—such as your potted plants—onto a single inventory panel so you can place them consecutively. Additionally, double-tap the item icon in Dreamy Room Level 226 to quickly center it in your view, making it easier to fine-tune positioning. Finally, experienced users of Dreamy Room Level 226 suggest toggling the grid overlay if available, which improves precision placement and ensures your final scene looks impeccable.
Final Scene Description
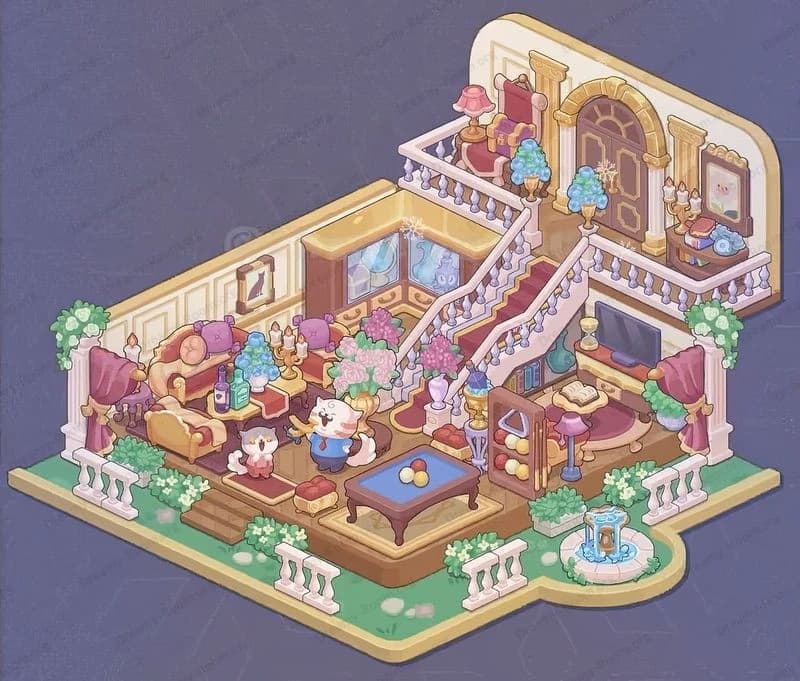
The final scene in Dreamy Room Level 226 presents a lounge alcove surrounded by lavender walls and parquet flooring. A wooden staircase with a blue runner connects the balcony to the raised platform. Atop the platform, a plush blue loveseat with cream trim features a yellow grid pillow and a heart cushion on its seat. Its side shelf holds a teapot, green teacups, and pastel cupcakes, with a footstool nearby. Beneath the left window, an antique piano and golden candelabra stand beside a tall bookshelf filled with pastel volumes framed by blue curtains. To the right, a gold-framed mirror and console display pink teddy, candles, and a hydrangea vase. On the balcony, a table draped in blue hosts place settings and a floral centerpiece, joined by a serving cart and fruit bowl on the railing. Golden lily vases, blue wall sconces, and snowflake decals complete this charming and inviting tableau.