Dreamy Room Level 233
Dreamy Room Level 233 guide - Dreamy Room 233 Walkthrough & Solution.
Important Notice Regarding Level Numbering
Due to frequent changes in Dreamy Room's level numbering and differences between platforms (Android/iOS) – for example, level 233 on Android might not be the same as level 233 on iOS – the text guide below may not always match the images and video above. Please prioritize the image and video guides. If you find that the guide content doesn't match your current level, please visit the All Level Walkthroughs page to find the correct guide based on level images. Thank you for your understanding.
Dreamy Room Level 233 Walkthroughs & Guide
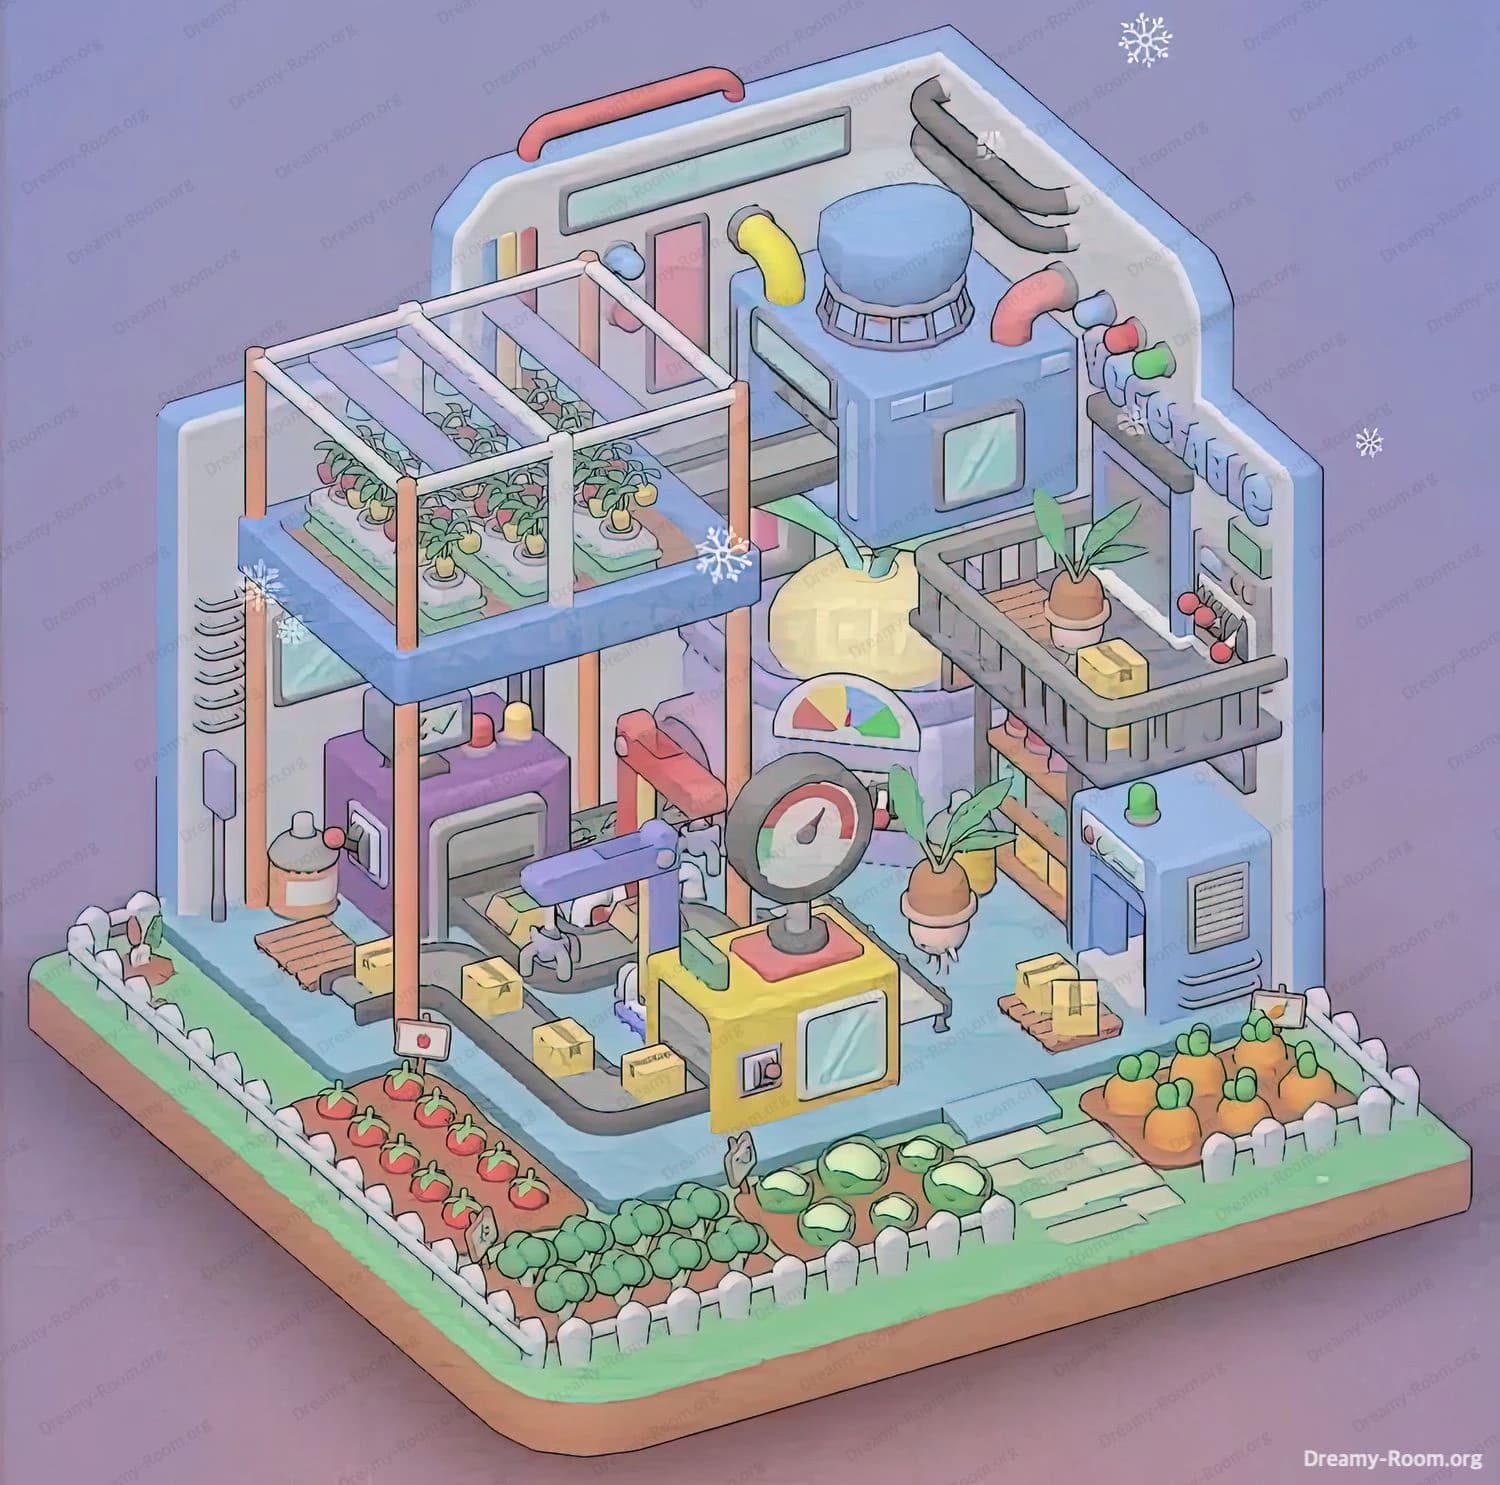
Step 1. Place the hydroponic greenhouse platform in the left section of Dreamy Room Level 233
Begin by selecting the tall hydroponic greenhouse module from your furniture library. In Dreamy Room Level 233, you’ll find this piece under the “Garden Structures” category. Carefully align the base of the pastel-blue platform so that its two back legs touch the grey back wall and its side rails meet the left wall. Use grid snapping to rotate the platform exactly ninety degrees, ensuring it aligns with the checkered floor tiles. Once the foundation is secure, attach the white tubular rails to the top edge, then place the transparent cover panels over the frame. Next, slot in four small green planters into the designated cavities. These planters will cradle the ripe tomato plants in later steps. Precision during this placement in Dreamy Room Level 233 is vital; a misaligned greenhouse will prevent subsequent pieces from snapping correctly into the scene.
Step 2. Install the processing machine and conveyor system in Dreamy Room Level 233
After constructing the greenhouse frame, proceed to the processing station directly underneath it. In the Dreamy Room Level 233 inventory, locate the compact purple processing unit with an attached monitor. Place this block so it fits snugly beneath the greenhouse’s central edge, positioning it one grid tile forward from the back wall. Rotate the unit until the green checkmark on its screen faces the center of the room. Next, grab the cylindrical container piece and connect it to the left side of the processing unit by snapping their ports together. Then, assemble the yellow conveyor belt segments, routing them from the machine’s front output toward the center of the floor. Align the conveyor carefully along the blue-tiled grid lines to maintain a straight path. In Dreamy Room Level 233, ensuring the conveyor’s perfect alignment is crucial for the machinery to operate smoothly without clipping or gaps.
Step 3. Add the central gauge station and decorative elements in Dreamy Room Level 233
With your conveyor system in place, focus on the central zone to establish the control console and decorative modules. In Dreamy Room Level 233’s item list, select the bright yellow gauge station. Position this block at the end of the conveyor line, ensuring its circular meter faces toward the player’s viewpoint. Snap the pressure gauge dial securely on top and adjust the needle to hover slightly right of center for visual balance. Behind the gauge, align the purple hydraulic arm: connect its base to the left side of the gauge station and extend the mechanical gripper over the conveyor. To the right of the gauge piece, grab the pie-chart console module and click it into the designated slot against the back wall. These combined elements in Dreamy Room Level 233 will create a believable workflow sequence—harvest, transport, evaluate, and package—so make sure each piece locks firmly into place for a seamless final tableau.
Step 4. Position the reactor and onion bulb in Dreamy Room Level 233
Next, you’ll introduce the larger reactor block and organic centerpiece that give Dreamy Room Level 233 its unique character. Locate the sky-blue reactor unit with a domed vent attachment in your selection panel. Snap this piece into place on the right side of the back wall, adjacent to the greenhouse and gauge station. Rotate it slightly so the vent faces forward and its side panel aligns flush with the grey wall. Then, choose the oversized onion bulb prop from the decoration menu—it resembles a creamy-white sphere with vibrant green sprouts. Slot the bulb directly in front of the reactor block, centered between the pie-chart console and the gauge station. Ensure the onion’s sprouts do not clip through neighboring modules. This strategic arrangement in Dreamy Room Level 233 highlights the fusion of mechanical precision and botanical life, setting the stage for the final composition.
Step 5. Build the right-side shelving and refrigerated storage in Dreamy Room Level 233
Shift your focus to the right wall, where you will construct the storage rack and cooling unit. In Dreamy Room Level 233, locate the grey metal shelving crate and snap it midway up the right-side grey panel, making sure its support bars rest evenly on the wall studs. Inside the crate, arrange one potted root vegetable—depicted as a terra-cotta pot with leafy green tops—and two small yellow package boxes spaced evenly on either side. Next, find the compact blue refrigeration module in your catalog and place it directly beneath the shelf, aligning it with the floor grid. Top the fridge unit with a single yellow box, then connect a miniature lift tray so that packages can slide onto the top surface. Proper placement in Dreamy Room Level 233 prevents visual clutter and guarantees that the shelving elements remain fully interlocked with the wall tracks.
Step 6. Arrange the floor gardens and finish wall piping in Dreamy Room Level 233
The final assembly in Dreamy Room Level 233 involves decorating the floor perimeter and detailing the walls with pipes and valves. Begin by selecting the white picket fence pieces to outline each garden bed. In the front-left corner, place six tomato plants in neat rows behind the fence for a pop of red. Move to the front-center bed and insert four leafy green heads, ensuring they align with the checkered tiles. In the front-right corner, set five small herbs or lettuce sprouts, then complete the layout with three carrot plants in the bottom-right section. After the floor beds are secured, switch to the wall category and attach three colored valve handles—green, red, and blue—near the top right wall. Finally, snap curved black and pink pipes across the upper back wall, connecting the greenhouse, reactor, and shelving areas. These final touches in Dreamy Room Level 233 fuse functional detail and aesthetic cohesion.
Notes and Precautions
- Always enable grid snapping before starting Dreamy Room Level 233. Disabling snap can cause slight misalignment, making modules refuse to connect or float awkwardly off the floor plane.
- Confirm each piece is fully locked by looking for an audible click and visual snap outline. In Dreamy Room Level 233, objects that appear to rest but aren’t latched can drift with minor camera adjustments.
- Avoid overlapping furniture or decorative items, particularly around the greenhouse and shelving areas. Overlap will trigger collision warnings in Dreamy Room Level 233 and require time-consuming readjustments.
- Rotate heavy modules like the reactor block with care; excessive rotation angles beyond grid increments may lead to clipping through the back wall.
- Save your progress often using the auto-save function to prevent loss of intricate configurations in Dreamy Room Level 233.
Tips and Tricks from top player
- Plan your layout before placing modules. In Dreamy Room Level 233, sketching a rough map of the greenhouse, machines, and garden beds on a paper guide helps minimize trial-and-error.
- Use the rotate-collider tool to preview collision boundaries. This trick in Dreamy Room Level 233 reveals hidden overlaps and prevents objects from glitching during placement.
- Group similar items in your inventory. Assign colors or tags—like “Plants” for all botanical props—to access tomato and carrot batches quickly while building Dreamy Room Level 233.
- Adjust the camera angle to a higher isometric view to judge depth placements. Many players overlook the front garden beds because the default view obscures their alignment with the room’s border.
- If you encounter a stubborn piece that refuses to snap, pick it up and move it slightly off-grid, then drag it back on-grid. This “nudge method” is a staple trick in Dreamy Room Level 233 speedruns.
Final Scene
Dreamy Room Level 233 culminates in a picturesque, factory garden that blends whimsical machinery with vibrant horticulture. The pastel-blue checkered floor supports a conveyor belt system, complete with yellow crates moving under a purple robotic arm. To the left, a raised hydroponic greenhouse bursts with ripe red tomatoes, framed by white tubular supports. Centered against the back wall, a blue reactor unit with a domed vent stands beside a colorful pie-chart console and a giant onion bulb sprouting green shoots. On the right, a gray wall-mounted shelf displays a potted root vegetable and neatly stacked crates beside a compact blue refrigeration unit topped by a yellow parcel. Encircling the scene, three distinct garden beds—tomatoes, leafy greens, and carrots—sit behind white picket fences, while snowflake motifs overhead. Winding pipes and colored valves trace the walls, uniting every element into a harmonious tableau that captures the essence of Dreamy Room Level 233.