Dreamy Room Level 620
Dreamy Room Level 620 guide - Dreamy Room 620 Walkthrough & Solution.
Important Notice Regarding Level Numbering
Due to frequent changes in Dreamy Room's level numbering and differences between platforms (Android/iOS) – for example, level 620 on Android might not be the same as level 620 on iOS – the text guide below may not always match the images and video above. Please prioritize the image and video guides. If you find that the guide content doesn't match your current level, please visit the All Level Walkthroughs page to find the correct guide based on level images. Thank you for your understanding.
Dreamy Room Level 620 Walkthroughs & Guide
Dreamy Room Level 620 Walkthrough
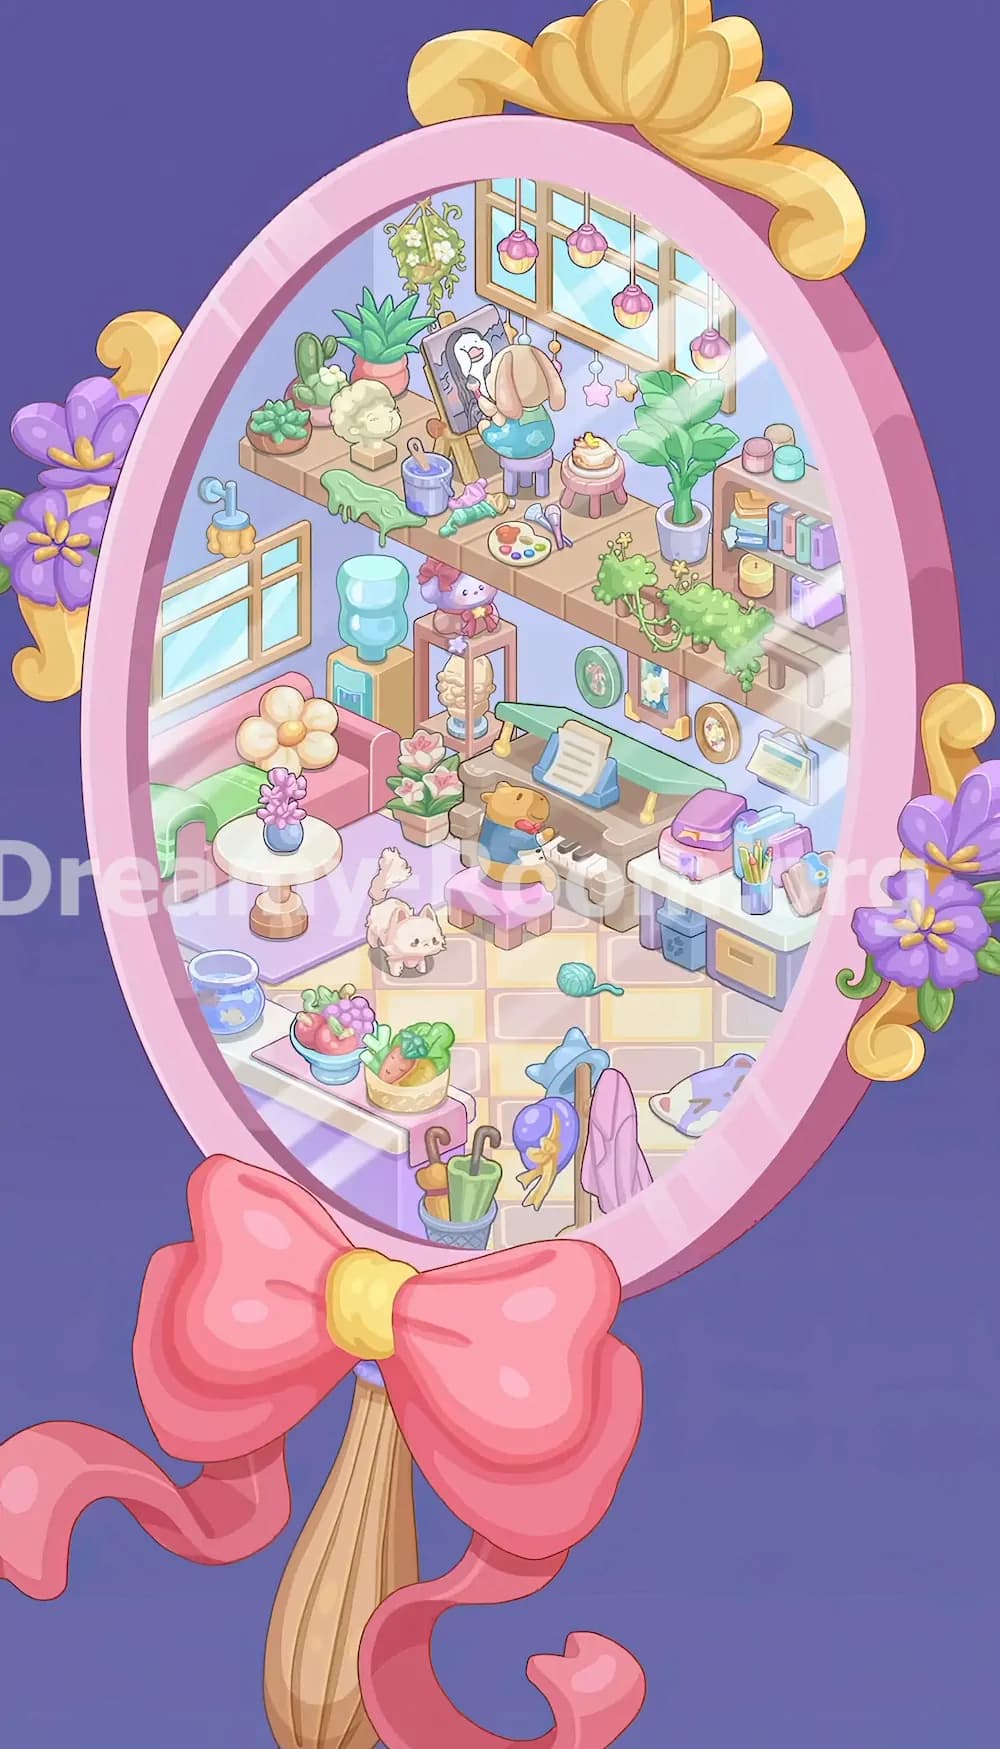
Dreamy Room Level 620 turns a plain oval mirror scene into a delicate art studio, music corner, and cozy lounge all inside one whimsical reflection. The real challenge in Dreamy Room Level 620 is not spotting the objects, but understanding their exact placement, layering, and balance. Large furniture must anchor the scene first, then the upper shelf decorations, then the tiny finishing touches that make the room look alive. This Dreamy Room Level 620 guide follows a logical order so you can recreate the completed design cleanly and avoid misplacing small items that only fit in one precise spot.
Step 1. Build the ornate mirror frame and the main structure in Dreamy Room Level 620
Start Dreamy Room Level 620 by treating the mirror itself as part of the room design, not just the border. The plain pink oval mirror from the empty image becomes much more decorative in the finished layout. Add the gold shell-shaped crest at the top center of the mirror frame first. After that, place the curling gold ornaments on both outer sides of the frame. Each side ornament holds a purple flower cluster with yellow centers and a few green leaves, so make sure the floral decorations sit midway down the left and right sides rather than too high. Finally, tie the oversized pink bow around the lower handle area so it spreads across the bottom front of the mirror. Inside the mirror, keep the lavender walls and brick-pattern floor aligned exactly as shown. Dreamy Room Level 620 depends on this balance, because every interior item is positioned according to the mirror’s slanted floor line and curved border.
Step 2. Place the windows, wall light, and shelves before adding furniture in Dreamy Room Level 620
In Dreamy Room Level 620, the next priority is building the wall layout that supports the rest of the objects. Put the small rectangular window on the left wall, around the upper-middle area above the sofa space. Above and slightly left of that window, attach the tiny blue-and-yellow wall light. Then place the large back window high on the rear wall, slightly right of center near the top. From that back window, hang the pink pendant bulbs so they drop across the upper section of the room in a gentle line. Under the big window, place the long wooden upper platform shelf that stretches from the left side toward the right shelf unit. On the right wall, add the tall shelving/bookcase structure with its open compartments. These structural pieces are critical in Dreamy Room Level 620 because nearly every decorative object, from plants to books to art supplies, attaches to them. If these are off by even a small amount, the rest of the room will look crowded and uneven.
Step 3. Create the upper art studio corner in Dreamy Room Level 620
Now build the upper creative zone, which is one of the most important sections in Dreamy Room Level 620. On the far left side of the upper wooden shelf, place the small green succulent in a shallow pot. Just to its right, set the cactus with its tiny white bloom, and beside that add the larger spiky aloe-like plant in the terracotta pot. In front of those plants, place the pale cauliflower-shaped sculpture or bust on its square stand. Drape the green cloth over the front edge of the shelf so it hangs downward near the center-left. Next, place the purple paint bucket with a brush inside it, then add the pink and mint paint tubes on the shelf surface. In front, place the round paint palette and the loose brush or tool. Finally, position the easel in the back center with the canvas facing forward, and seat the bunny artist on the small blue stool in front of it. Dreamy Room Level 620 looks right only when this corner feels like a compact but active art station.
Step 4. Finish the upper shelf details and greenery in Dreamy Room Level 620
Once the main art area is in place, finish the smaller top details in Dreamy Room Level 620. Hang the basket of white flowers from the upper-left area near the large rear window. Under the window, add the dangling pastel star charms so they hang just behind and to the right of the bunny painter. Place the little pink stool with the frosted dessert or cake just right of the bunny’s seat. On the upper-right part of the shelf, add the tall leafy plant in the gray pot. Then decorate the right bookcase with the small jars or candles on the top, the row of books in the middle section, and the round yellow candle or container below. In the lower-right cubby, place the pale purple storage item. Across the front edge of the right side shelf, drape the trailing green vine so it spills naturally toward the wall art below. Dreamy Room Level 620 rewards precision here, because these small objects create the layered, lived-in look that defines the finished room.
Step 5. Arrange the left lounge and center display area in Dreamy Room Level 620
Move to the lower-left side and start forming the cozy living corner in Dreamy Room Level 620. Place the pink sofa against the left wall beneath the window, and drape the green throw blanket over its left arm so the cloth hangs outward. Set the large cream-and-yellow flower cushion on the sofa’s back side. In front of the sofa, place the small round white table with the blue vase and purple blossoms centered on top. On the floor at the bottom-left edge, add the blue fishbowl or glass basin. Then build the vertical display unit near the center-left: place the beige stand with the blue water dispenser first, then position the narrow shelf in front of it. On top of this shelf, set the pink plush character with the bow, and inside the shelf place the cream spiral decoration. To the right of the display unit, add the two pink flower pots on the floor. Dreamy Room Level 620 feels much warmer once this seating-and-display cluster softens the room’s left side.
Step 6. Build the piano performance area in Dreamy Room Level 620
The piano section is the heart of Dreamy Room Level 620, so place it carefully in the exact middle-right area of the floor. Start with the piano itself, lining it along the back wall beneath the upper shelves. Add the green cover or top board across the piano’s upper surface, then place the blue music stand and open sheet music at the center. Put the small pink bench directly in front of the keyboard. Next, seat the little animal pianist on the bench area so its paws line up with the keys; the character wears blue clothing and a red scarf, making it easy to recognize as the focal figure. Above the piano on the wall, hang the green round plate to the left, the blue framed picture in the middle, and the round tan portrait plate on the right. Add the small hanging sign or note board farther right below the shelf. Dreamy Room Level 620 only looks complete when this music corner sits neatly between the flower pots on the left and the study desk on the right.
Step 7. Set up the study desk and floor accessories in Dreamy Room Level 620
On the right side of Dreamy Room Level 620, place the white desk so it fits snugly against the wall beside the piano. On top of the desk, set the purple bag or case first, then place the pastel organizer items and the cup full of pencils and pens near the front-right corner. Add the small blue purse or camera-style pouch at the far right edge of the desk. Underneath, position the blue storage box or drawer on the left side and the yellow drawer unit on the right. After the desk is complete, decorate the floor. Put the teal ball of yarn near the center floor, slightly in front of the piano. At the bottom-left foreground, place the pink-topped table or counter with the blue bowl of fruit and the woven basket of vegetables. Near the bottom center, add the umbrella stand holding the orange and green umbrellas. Dreamy Room Level 620 becomes much easier once these practical storage items define the lower foreground.
Step 8. Add the coat rack, pets, cushion, and final tiny placements in Dreamy Room Level 620
Finish Dreamy Room Level 620 with the smallest but most charming details. Position the coat rack near the bottom center-right. It should hold the blue star-shaped topper, the purple hat with its golden ribbon hanging from one side, and the pink coat draped down the other side. On the floor just left of the piano area, place the fluffy white kitten so it faces slightly forward. At the lower-right floor edge, add the cat-face cushion or pet bed. Double-check that the vine still trails over the upper-right shelf, the dessert stool remains beside the bunny artist, and the hanging basket, pendant bulbs, books, jars, and wall decorations all stay visible without covering each other. Dreamy Room Level 620 is all about exact placement, and the final polish comes from making each object look intentionally spaced rather than randomly dropped. When the animals, accessories, and soft furnishings all line up, the room finally matches the completed image.
Notes and Precautions
Dreamy Room Level 620 can be tricky because many objects are small, pastel-colored, and visually similar to the background. The upper shelf area is especially easy to misread. If an item seems to disappear, it is often because it belongs on the upper platform rather than the lower floor. The dangling lights, hanging flower basket, and star ornaments should stay near the rear window, while the palette, paint tubes, bucket, and easel belong on the long wooden shelf below. The right shelf unit also holds several tiny pieces, so place the larger plant and books first before inserting the jars and small container.
Another important precaution in Dreamy Room Level 620 is layering. Some pieces sit behind others, especially around the bunny painter, the piano wall art, and the desk accessories. Place the large furniture first, then medium decorations, then tiny items. If you try to drop the smallest objects too early, you may confuse their true position. The level becomes much easier when you work from the back wall forward and from top to bottom.
Tips and Tricks from top player
A strong strategy for Dreamy Room Level 620 is to divide the room into four zones: mirror frame, upper art shelf, lower lounge-and-piano area, and front floor accessories. That prevents the level from feeling overcrowded. Experienced players also use shape matching rather than color matching. For example, the tall leafy plant clearly belongs on the upper-right shelf because its pot fits that corner, while the round table and flower cushion obviously anchor the sofa area. Thinking in silhouettes makes Dreamy Room Level 620 much faster to solve.
Another top-player trick for Dreamy Room Level 620 is to place all character-related items last within each zone. That means the bunny painter goes down after the easel and art tools are already placed, and the piano player goes down after the piano, sheet music, and bench are aligned. This method helps you understand what each character is interacting with. It also makes it easier to notice misplaced details like the yarn ball, kitten, or hat on the coat rack.
Final Scene Description
The finished Dreamy Room Level 620 scene looks like a magical miniature studio hidden inside an ornate hand mirror. A gold crest crowns the top, purple flowers bloom from both side ornaments, and a huge pink bow wraps the handle below. Inside the reflection, the upper shelf becomes a dreamy art nook filled with plants, paint supplies, a bunny painter at an easel, a tiny dessert stool, hanging flowers, pastel star charms, and glowing pink pendant lights. Below, a pink sofa and flower-topped table create a soft lounge corner, while the middle of Dreamy Room Level 620 is anchored by a piano where a tiny animal performs under framed wall decorations. To the right sits a tidy desk with bags and stationery. The foreground adds fruit, vegetables, umbrellas, a coat rack, a kitten, yarn, and a cat cushion, making Dreamy Room Level 620 feel gentle, busy, and perfectly alive.