Dreamy Room Level 633
Dreamy Room Level 633 guide - Dreamy Room 633 Walkthrough & Solution.
Important Notice Regarding Level Numbering
Due to frequent changes in Dreamy Room's level numbering and differences between platforms (Android/iOS) – for example, level 633 on Android might not be the same as level 633 on iOS – the text guide below may not always match the images and video above. Please prioritize the image and video guides. If you find that the guide content doesn't match your current level, please visit the All Level Walkthroughs page to find the correct guide based on level images. Thank you for your understanding.
Dreamy Room Level 633 Walkthroughs & Guide
Step 1. Build the canal layout and central walkway in Dreamy Room Level 633
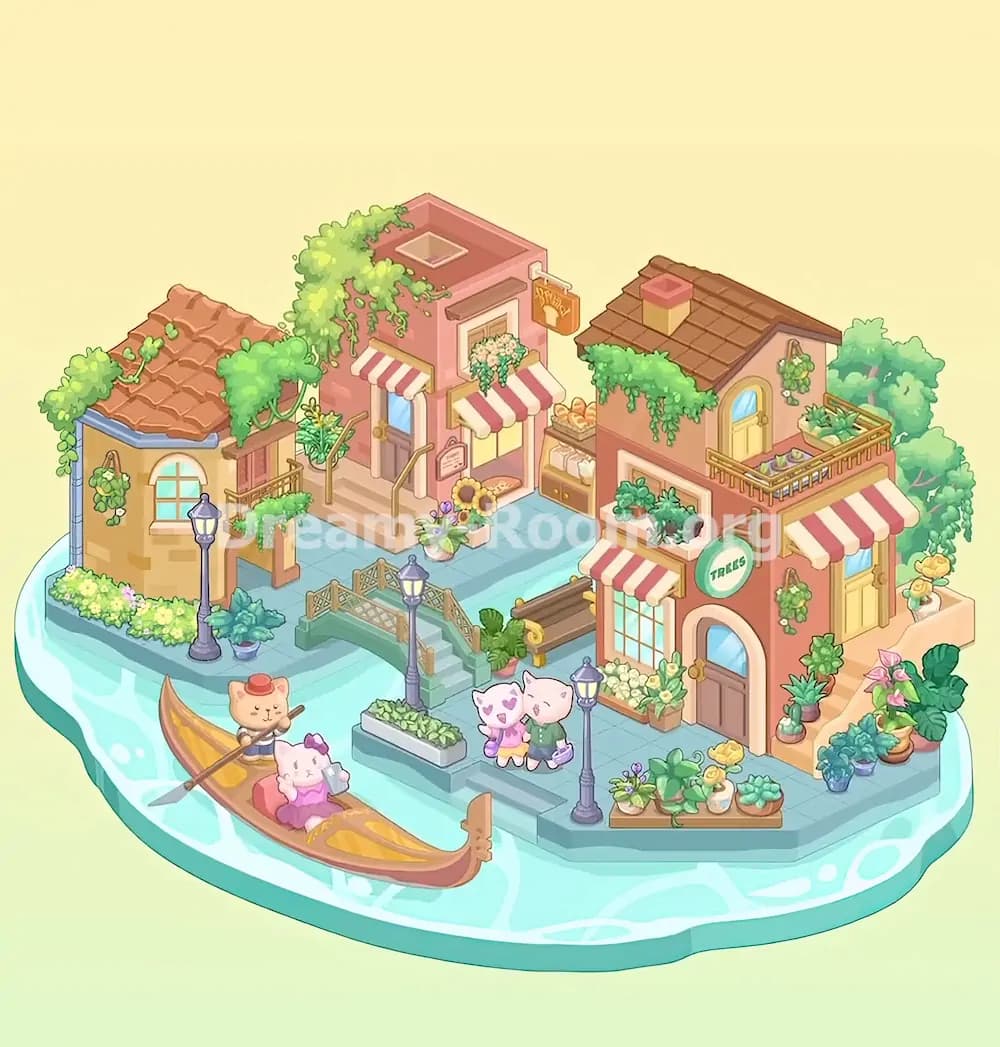
Start Dreamy Room Level 633 by understanding the shape of the map before you place any decorative object. The upper-left platform becomes the left street and middle storefront area, while the lower-right platform becomes the main canal-side promenade and the base of the right building. Leave the water channel open between them, because that gap is essential in Dreamy Room Level 633 and will later hold the bridge, the gondola, and the canal edges. Place the raised walkway pieces so the center steps descend toward the canal. Then add the small green bridge with tan railings so it spans the narrow canal in the middle-left area. Position the rectangular planter under the middle lamp on the lower center ledge. Add the stepped edge sections around the canal so the promenade looks tiered rather than flat. In Dreamy Room Level 633, getting these ground pieces right first prevents nearly every later placement mistake.
Step 2. Place the left house, hedge, and left canal decorations in Dreamy Room Level 633
The left side of Dreamy Room Level 633 is anchored by a small yellow house with a terracotta roof. Set this house on the far left edge of the upper platform. Its blue trim runs under the roofline, and the arched window faces forward toward the canal. Hang the small leafy basket on the outer left wall, then drape green vines across the roof and toward the inner side where the house meets the center area. Along the very front-left edge, place the low pale flower hedge so it follows the curved platform border. Add the tall purple streetlamp in front of the window, near the canal edge, then put the blue potted leafy plant just behind and slightly right of that lamp. Finish this section of Dreamy Room Level 633 with the tiny balcony railing and the short vine-covered passage leading from the left house toward the middle storefront. If this house sits too far inward, the whole left bank of Dreamy Room Level 633 will look cramped.
Step 3. Assemble the pink bakery storefront in the middle of Dreamy Room Level 633
The central building is the visual heart of Dreamy Room Level 633, so place it carefully on the back-middle of the upper platform. This pink two-story shop should sit between the yellow house and the right building, with its front steps facing the canal. Add the rooftop opening, then drape long green vines from the top-left roof corner. Place the striped red-and-white awning above the left doorway and another matching awning above the right service window. Between them, hang the white flower basket under the upper window. Next, attach the small hanging sign to the right side of the building near the roofline. Put the narrow menu sign near the front entrance, then place the bread display case on the right side of the shopfront. At the base of the stairs, add the square flower planter with two sunflowers and purple blossoms, and place the slim potted sapling to the left of the steps. In Dreamy Room Level 633, this middle shop must feel centered and slightly elevated.
Step 4. Build the right shop, balcony, and roof details in Dreamy Room Level 633
Now move to the large right-side building in Dreamy Room Level 633. This peach-toned structure fills most of the lower-right platform and rises into the back-right corner. Start with the main building shell and brown tiled roof, then add the small chimney on top. Place the upper arched door on the second floor, facing front, and hang the small plant basket on the wall to its right. Drape vines from the front roofline so they spill over the façade. Add the long balcony railing along the upper-right terrace and place the planter boxes there. On the front wall, insert the recessed plant display shelf above the lower awning. Then place the circular green “TREES” sign on the front-right wall. Add the striped awning above the front window and another striped awning over the side entrance on the right. Finish with the ground-floor arched door centered beneath the sign area. In Dreamy Room Level 633, the right building should dominate the scene without blocking the canal walkway.
Step 5. Add the bench, lamps, flower boxes, and front-right plants in Dreamy Room Level 633
Once the buildings are fixed, Dreamy Room Level 633 becomes a precision puzzle of smaller objects. Place the wooden bench behind the lower canal steps, slightly right of center, facing outward. Set one tall purple lamp on the raised middle planter, one on the front-left bank near the yellow house, and one on the lower-right promenade near the hugging cat couple. Under the right building’s front window, add the white flower box with pale blossoms. Place the tall potted succulent by the right-side stairs, then cluster the larger potted plants in the far front-right corner: blue pots, broad green leaves, and pink flowers should layer upward along the edge. On the outer right wall, add the hanging vine planter. Along the far-right ledge, place the small yellow flowers near the bushes. Finally, on the triangular front planter bed, arrange the purple flowers, trailing green leaves, yellow blooms, the small cream decorative pot, and the succulent bowl. In Dreamy Room Level 633, these tiny plants are what make the canal street look alive.
Step 6. Place the gondola and cat characters in Dreamy Room Level 633
Finish Dreamy Room Level 633 by placing the characters, because they depend on the exact empty spaces left by the environment. Put the long golden-brown gondola in the lower-left canal, angled from left to right with its curved prow pointing toward the front-right edge. Stand the gondolier cat near the rear of the boat; it wears a red hat and holds the oar across the canal. Seat the white cat passenger in the front half of the gondola on the pink cushion. Then place the hugging cat couple on the center-right promenade, just below the bench area and beside the rightmost purple lamp. They should stand close together on the lower step, facing slightly left toward the canal. In Dreamy Room Level 633, character placement is the final check that your spacing is correct. If the gondola overlaps the stairs or the couple blocks the lamp base, something earlier in Dreamy Room Level 633 is misaligned.
Notes and Precautions
In Dreamy Room Level 633, the biggest mistake is treating the scene like three separate buildings instead of one connected canal street. The bridge, lower steps, bench, lamps, and gondola all depend on the open water corridor remaining clear. Another important point in Dreamy Room Level 633 is height layering. The back buildings belong on the raised sections, while the hugging cats, planter islands, and front lamp belong on the lower promenade. Watch the striped awnings carefully, because they are similar in shape but belong to different storefronts. The same is true for the many plant pots in Dreamy Room Level 633. Put the larger leafy plants on the far right, the sunflower planter in the middle, and the hedge only on the far left edge. Small misplacements make the finished scene look crowded and can prevent the last character pieces from snapping into place.
Tips and Tricks from top player
Top players approach Dreamy Room Level 633 from the back row to the front row. That means placing buildings first, then bridge and stairs, then furniture, then plants, and only then the cats and gondola. This method works because Dreamy Room Level 633 hides many alignment clues in the edges of the platforms. Another useful trick is to match objects by color zones. Warm terracotta and yellow pieces belong mostly on the left and right buildings, while blue-green pieces usually belong to the canal, bridge, lamps, and lower promenade. In Dreamy Room Level 633, use the lamps as anchor points: one on the left bank, one in the center planter, and one near the couple. Once those are right, the bench, flower bed, and gondola positions become much easier to judge. For speed, leave the smallest potted plants until the end.
Final Scene Description
When fully completed, Dreamy Room Level 633 becomes a dreamy miniature Venice street floating on turquoise water. On the left stands a cozy yellow house with a tiled roof, vines, a hanging plant, a flower hedge, and a canal lamp. In the center, the pink bakery adds steps, striped awnings, a hanging sign, bread display, and a bright sunflower planter. On the right, the taller shop with the “TREES” sign features a balcony, rooftop chimney, window boxes, hanging greenery, and a rich cluster of potted plants near the stairs. A small bridge crosses the canal, a bench rests behind the steps, and purple lamps frame the walkways. The canal itself holds a graceful gondola rowed by a cat in a red hat, while another cat rides in front. Nearby, a hugging cat couple stands on the promenade, completing the warm, storybook atmosphere of Dreamy Room Level 633.