Dreamy Room Level 768
Dreamy Room Level 768 guide - Dreamy Room 768 Walkthrough & Solution.
Important Notice Regarding Level Numbering
Due to frequent changes in Dreamy Room's level numbering and differences between platforms (Android/iOS) – for example, level 768 on Android might not be the same as level 768 on iOS – the text guide below may not always match the images and video above. Please prioritize the image and video guides. If you find that the guide content doesn't match your current level, please visit the All Level Walkthroughs page to find the correct guide based on level images. Thank you for your understanding.
Dreamy Room Level 768 Walkthroughs & Guide
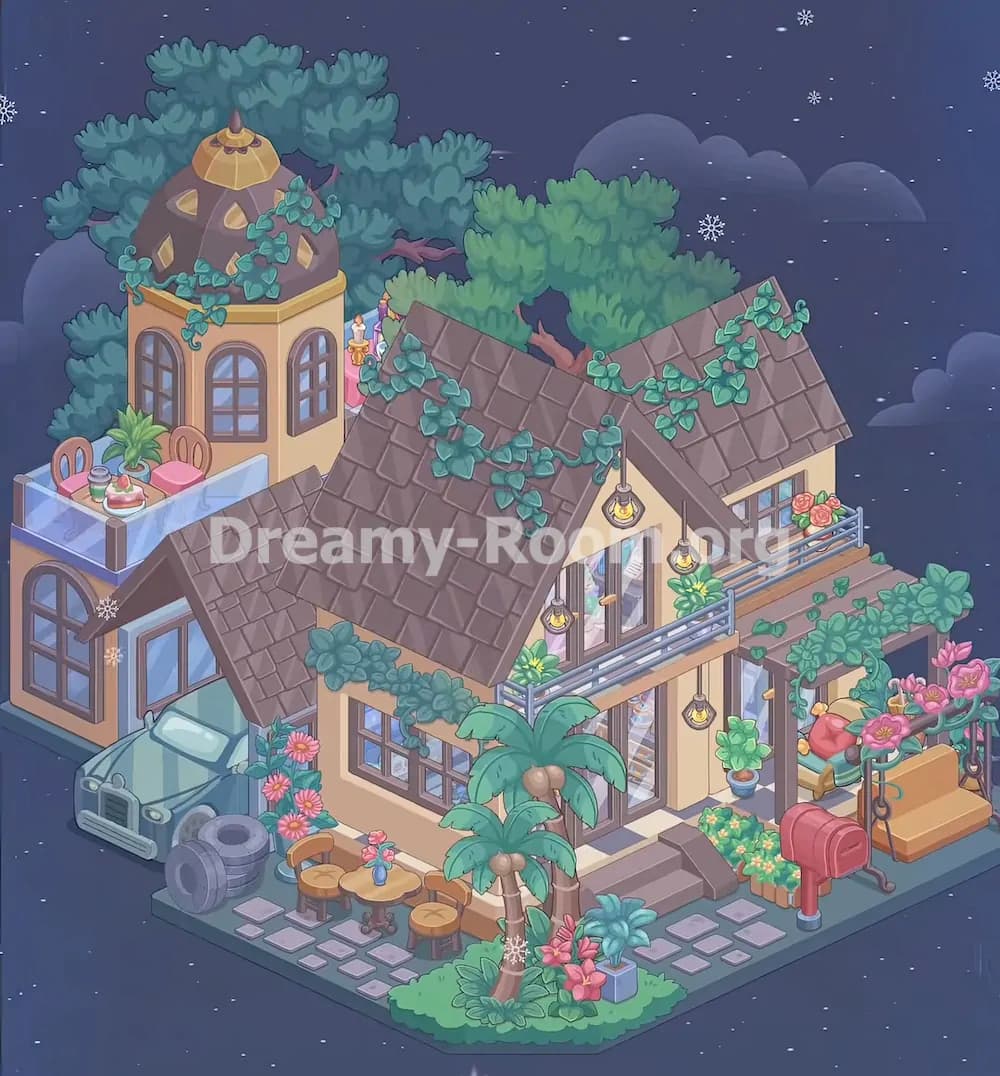
Dreamy Room Level 768 turns a bare floating platform into a cozy night villa wrapped in vines, flowers, balconies, warm lamps, and outdoor seating. The main challenge in Dreamy Room Level 768 is not speed, but figuring out the exact placement of every roof piece, plant, window, railing, lamp, and decorative object so the finished house matches the completed image.
Step 1. Place the main villa structure on the center-left platform.
Begin Dreamy Room Level 768 by building the large cream-colored villa body in the center-left area of the platform. The biggest house section should sit slightly left of center, with its front wall facing the lower-left side and its longer right wall stretching toward the middle-right. Make sure the front entrance area lines up with the stone path that will later lead to the red mailbox. The main building should not cover the entire platform; leave open ground on the lower front for the garden, patio furniture, palm trees, stepping stones, and flowers. In Dreamy Room Level 768, the foundation placement matters because every later item depends on it. The car needs space on the far left, the swing needs room on the far right, and the balcony must sit along the upper-right wall. If the villa body is too far forward or too far back, the roof, railings, windows, and plants will no longer lock into their correct positions.
Step 2. Add the large dark tiled roofs across the main house.
Next in Dreamy Room Level 768, place the large dark brown tiled roof pieces over the central villa. The biggest sloped roof should cover the middle-left portion of the house, running diagonally downward toward the front. A second tall triangular roof section should rise over the center-right wall, forming the pointed front gable above the glass door and balcony area. Then add the right-side sloped roof over the smaller upper-right room. These roof sections are layered, so the correct order is important. The central roof overlaps part of the left roofline, while the right roof connects under the vine-covered ridge. Dreamy Room Level 768 uses roof shape as a major placement clue: the dark square tiles must align in neat rows, and the roof edges should sit tightly against the cream walls. Leave the open upper-left space clear for the round tower, rooftop terrace, and tree canopy behind it.
Step 3. Place the round tower and rooftop terrace on the upper-left side.
For the upper-left corner of Dreamy Room Level 768, place the round tower behind the main roof. The tower has warm yellow walls, tall arched windows, and a dark rounded dome top with a golden cap. It should rise from the left-back section of the house, partially hidden by the large green tree behind it. Add the dome roof directly on top, then attach the blue-tinted glass rooftop terrace in front of the tower. On the terrace, position the small table, dessert plate, drink, green potted plant, and two pink chairs. The terrace railing should frame the left and front edges, with brown posts at the corners. In Dreamy Room Level 768, this area is easy to misplace because it combines several small objects. The chairs face inward toward the table, and the terrace sits above the lower-left room, not on the ground. Its glass panels should look transparent and slightly blue.
Step 4. Install all windows, doors, and wall details.
Dreamy Room Level 768 has many windows, so place them carefully. On the left lower wall, add the tall arched window near the car side. On the front central wall, place the large rectangular windows beneath the big roof, with brown frames and pale blue glass. On the middle-right front wall, install the tall glass double door under the balcony. Above that, place the second-floor window or glass door behind the railing. On the far-right room, add the small window with flower boxes filled with pink roses. The round tower needs multiple arched windows around its curved wall. Dreamy Room Level 768 rewards exact matching: every frame should sit centered in its wall space, and no window should float on the roof or overlap the railings. After the windows, add the small wall ornaments and trim pieces, especially around the front gable and the balcony support area, so the villa looks complete.
Step 5. Place the balcony, railings, hanging lamps, and wall lights.
Now add the long balcony railing across the upper-right front of the house in Dreamy Room Level 768. The railing should run horizontally from the central gable area toward the far-right room, with blue-gray bars and posts. Place a matching railing on the far-right side near the rose window, creating a small balcony strip. Then hang the glowing lanterns: three pendant lamps should drop from the balcony roofline along the front, and another lamp hangs near the lower-right wall by the glass door area. Add the ornate candle-style wall lamp beside the tower and main roof connection on the upper-left. Dreamy Room Level 768 depends on these lamps for the cozy night atmosphere, so they must not be hidden behind vines or roof edges. Each light should hang just below a beam or roofline, with a small golden glow visible. These lighting pieces help separate the villa from the dark starry background.
Step 6. Add vines and leafy decorations over the roofs and walls.
The ivy is one of the most important decorative systems in Dreamy Room Level 768. Start with the large vine trail over the round tower dome, letting the green leaves drape down across the dark roof and over the golden trim. Next, place the vine clusters along the central roof ridge, especially where the left roof meets the main roof. Add more leafy vines across the right roof, stretching from the upper ridge down toward the far-right eaves. There is also a leafy garland along the front lower roof edge above the front windows. In Dreamy Room Level 768, vines are placement markers because they should follow roof slopes naturally. Do not place them as random bushes. The leaves should cling to edges, corners, and roof seams, making the house feel old, dreamy, and overgrown. Finally, add small creeping leaves near the lower-right entrance and the pergola area.
Step 7. Place the trees, palms, shrubs, and garden plants.
Dreamy Room Level 768 uses plants to frame the entire house. First, place the huge dark green tree behind the tower and left roof, with its trunk and branches partly visible. Then add the brighter green tree behind the central-right roof, filling the upper middle background of the villa. In the front yard, place two palm trees near the lower center, slightly in front of the main windows and close to the entry path. Their trunks should rise from the small grassy garden patch, and their broad leaves should overlap the house lightly without hiding key windows. Add the large succulent-style plants, pink tropical flowers, low shrubs, and leafy bushes around the palm bases. Put the potted plant beside the lower-right wall and the flower boxes near the balcony and far-right window. In Dreamy Room Level 768, plant placement creates depth, so taller trees belong behind the house while smaller plants belong around the front edge.
Step 8. Arrange the front path, steps, mailbox, and stone tiles.
After the building and greenery are stable, work on the ground details in Dreamy Room Level 768. Place the short gray stairs at the front entrance, leading down from the glass door area toward the platform. Add the square stepping stones in a loose path across the lower-right and lower-center ground. The stones should not form a perfect straight line; they spread naturally, with several tiles near the mailbox and several more near the outdoor café table. Position the red rounded mailbox on the right-front side, close to the path and just in front of the lower-right garden bed. Its post should stand on a small blue base. In Dreamy Room Level 768, this front area can become crowded, so keep the mailbox separate from the swing and do not cover the stairs with plants. The stepping stones guide the eye from the garden to the entrance and complete the lived-in look.
Step 9. Place the outdoor table, chairs, flowers, car, and tires on the left front.
The lower-left outdoor area of Dreamy Room Level 768 contains several small items. Put the mint-blue vintage car on the far-left front side, parked beside the house under the left roof edge. Its front should face slightly toward the lower-left, with the windshield and hood visible. Place the stacked gray tires just to the right of the car, near the ground edge. In front of the main windows, set the round wooden café table with a small pink flower vase on top. Add two wooden chairs around it, one on each side, and place the small stools nearby. Scatter square stepping stones around the table legs. Add tall pink flowers along the wall between the car and patio table. In Dreamy Room Level 768, this section balances clutter and order: the car and tires belong left, the table belongs near the middle-front wall, and the flowers soften the corner.
Step 10. Build the right-side pergola, swing bench, vines, roses, and cushions.
Finish the right side of Dreamy Room Level 768 by placing the pergola frame and swing bench on the far-right platform edge. The bench should sit under the dark vertical supports, facing forward. Add the orange-yellow seat cushion and back cushion, then place the red pillow and smaller cushion on the left side of the swing. Above it, attach the twisting branch with large pink flowers and green leaves, creating a flowering canopy. Add the hanging chain details on both sides of the swing so it looks suspended from the frame. Place extra leafy vines climbing around the pergola post and along the upper beam. Dreamy Room Level 768 uses this swing as the final cozy corner, so it must sit to the right of the mailbox, not in front of the main door. Keep the swing aligned with the platform edge while leaving room for the mailbox and stepping stones in front.
Step 11. Add the final sky effects, snowflakes, stars, and background balance.
The room in Dreamy Room Level 768 floats in a dreamy night sky, so the final visual layer matters. The starry background, soft clouds, and drifting snowflakes should remain visible around the villa. The largest snowflakes appear near the upper-right sky and near the left side of the house, while tiny white stars scatter across the dark blue backdrop. The large tree can overlap the sky, but it should not cover the entire tower. The platform edge remains visible at the bottom and right side, grounding the scene in space. In Dreamy Room Level 768, these effects are not just decoration; they help confirm that the house is positioned correctly on the floating base. Once the roofs, plants, car, mailbox, balcony, terrace, swing, and lamps are all visible without awkward overlaps, the level should match the completed image.
Notes and Precautions
Dreamy Room Level 768 contains many overlapping decorative objects, so place large structures first and small accessories last. The most common mistake is trying to place vines, lamps, flowers, or furniture before the villa body and roofs are settled. Because Dreamy Room Level 768 is about finding the correct spot for each item, small objects may appear wrong when the base structure is still incomplete. Watch the roof layers closely: the round tower, central roof, right roof, and balcony roof all connect but should not flatten into one shape. The car must stay on the far-left ground, not under the balcony. The red mailbox belongs near the lower-right path, not beside the car. The swing bench sits at the far-right edge, separate from the main entrance. Also check the plants carefully. Tall trees go behind the building, palms and flowers go in front, and vines attach to roofs and railings rather than sitting on the ground.
Tips and Tricks from top player
A strong Dreamy Room Level 768 strategy is to solve by object size and depth. Start with the villa body, then add the roofs, then the tower, balcony, terrace, trees, and only then move to tiny items. In Dreamy Room Level 768, the exact placement puzzle becomes easier when you use fixed anchors: the tower anchors the upper-left, the swing anchors the far-right, the car anchors the lower-left, and the red mailbox anchors the lower-right. Once these four corners are correct, the remaining objects usually fall into place. Another useful trick is to place matching groups together. Put all windows before lamps, all vines before flowers, and all path stones before movable furniture. For tiny items on the rooftop terrace, zoom in and check direction: the two pink chairs should face the small table. For the front garden, keep the palm trees centered and let the stepping stones curve around them instead of blocking the entrance.
Final Scene Description
The completed Dreamy Room Level 768 scene becomes a magical villa floating beneath a snowy, star-filled night sky. A warm cream house fills the platform, covered with dark tiled roofs, green ivy, glowing lanterns, and blue-framed windows. On the upper-left, a round tower with a golden-capped dome rises beside a glass rooftop terrace holding pink chairs, a small table, a drink, dessert, and plants. Huge trees shelter the roofline, while a balcony stretches across the upper-right wall with railings, roses, and hanging lights. At ground level, a mint vintage car, stacked tires, a café table, wooden chairs, stepping stones, tropical flowers, palms, shrubs, and a red mailbox create a charming garden entrance. On the far right, a flower-covered pergola holds a cozy swing bench with cushions. Dreamy Room Level 768 ends as a peaceful, romantic night retreat where every object has found its perfect place.