Dreamy Room Level 438
Dreamy Room Level 438 guide - Dreamy Room 438 Walkthrough & Solution.
Important Notice Regarding Level Numbering
Due to frequent changes in Dreamy Room's level numbering and differences between platforms (Android/iOS) – for example, level 438 on Android might not be the same as level 438 on iOS – the text guide below may not always match the images and video above. Please prioritize the image and video guides. If you find that the guide content doesn't match your current level, please visit the All Level Walkthroughs page to find the correct guide based on level images. Thank you for your understanding.
Dreamy Room Level 438 Walkthroughs & Guide
Step 1. Place the mezzanine, stairs, and floor runners.
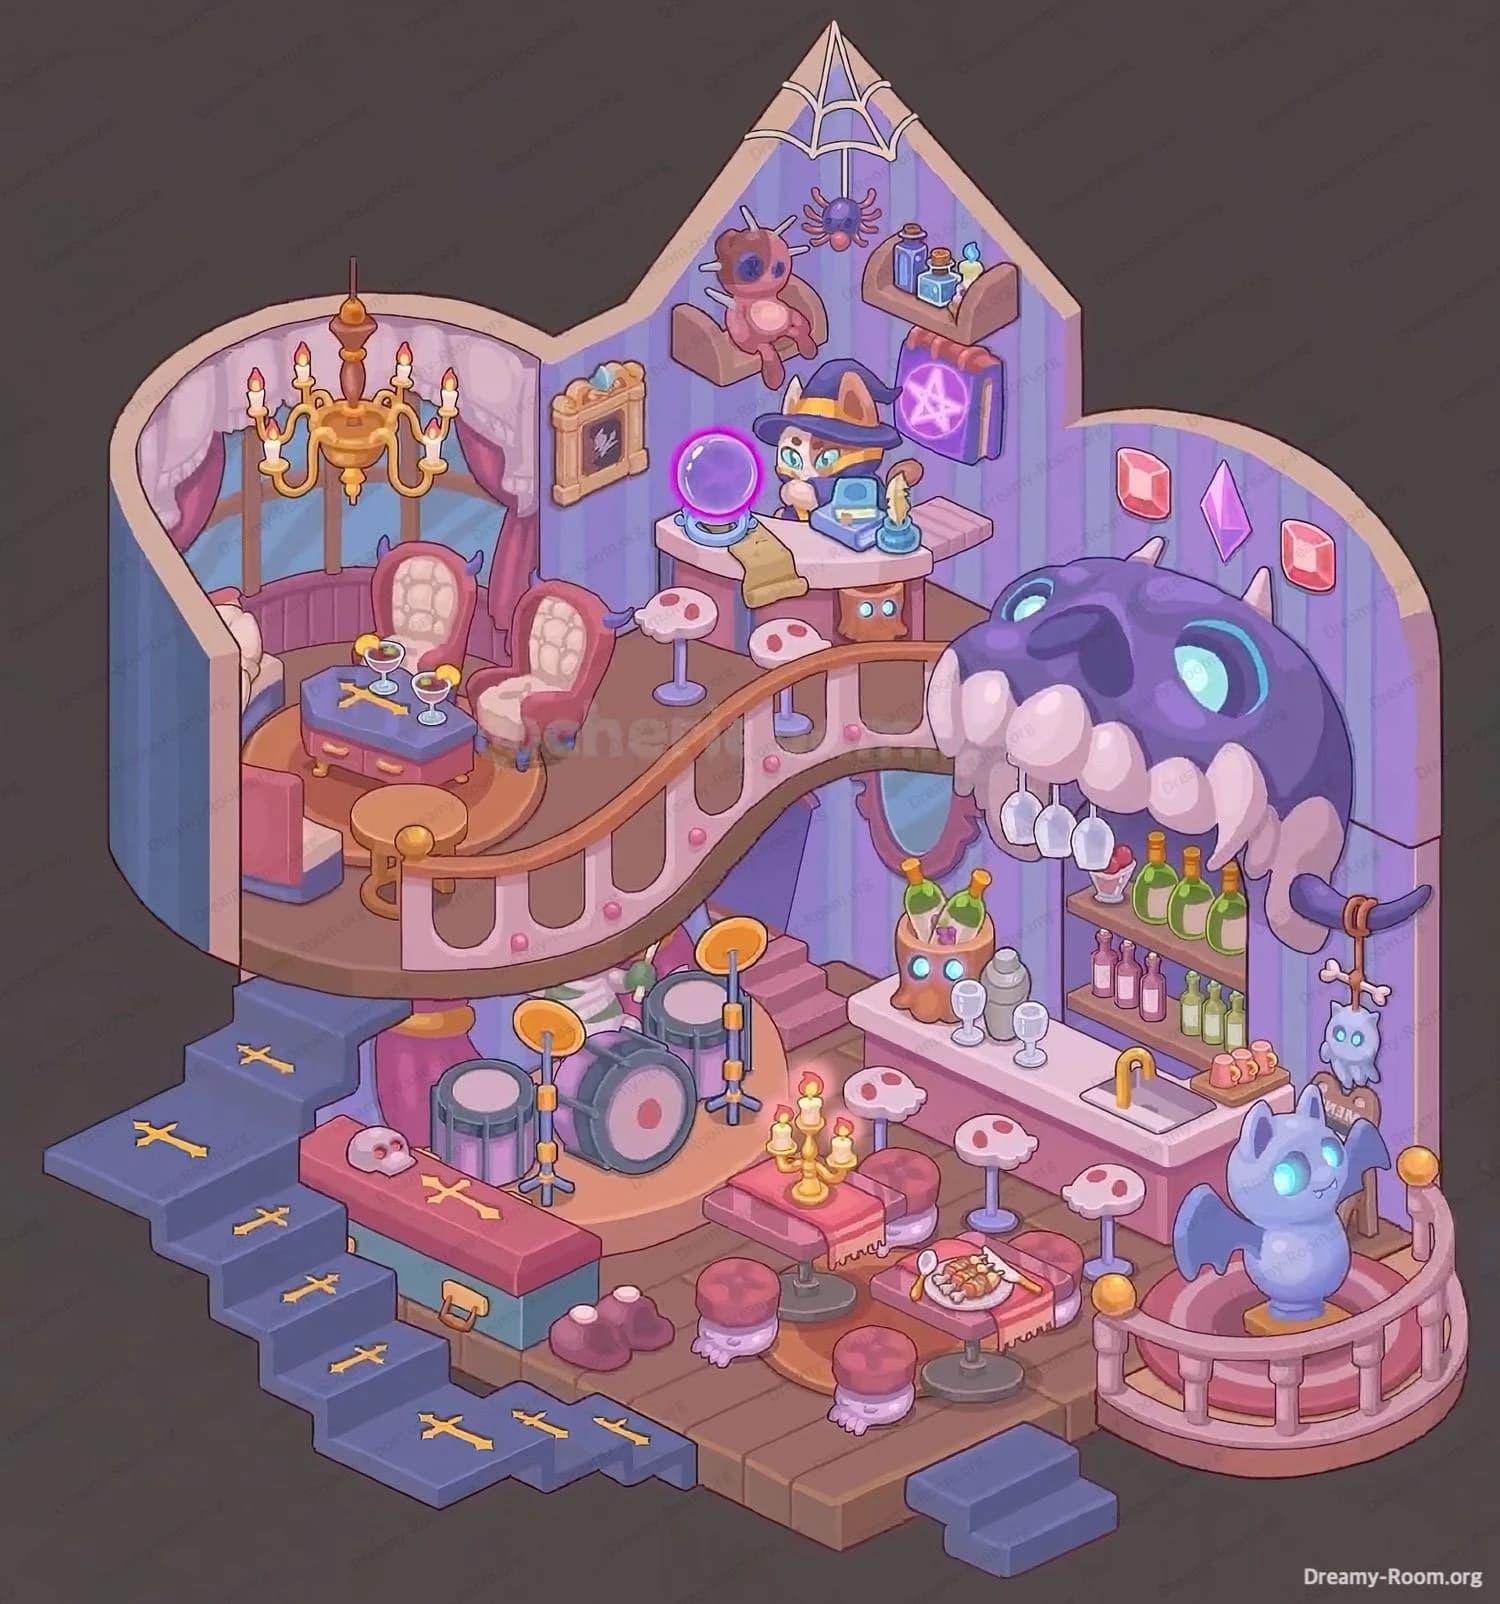
Begin Dreamy Room Level 438 by anchoring the architecture. Drop the curved mezzanine along the back walls so it spans from the upper-left lounge to the upper-right bar canopy. Attach the sweeping wooden staircase at the far left, letting its first tread sit on the blue step runner with small golden crosses that climbs from the foreground. Add the tiny single blue step at the front-right corner of the main floor. Confirm the striped lavender wall panels and pink trim are visible above the mezzanine edge; this alignment keeps perspective clean in Dreamy Room Level 438 and ensures later objects won’t clip the railing. Finally, snap the rounded mini-balustrade platform at the lower right; this will later host the gargoyle statue and completes the circulation loop that defines Dreamy Room Level 438’s pathing.
Step 2. Place the window bay, chandelier, and upstairs lounge set.
Now dress the upper-left lounge of Dreamy Room Level 438. Center the large three-panel window with mauve curtains on the upper-left wall segment. Suspend the golden chandelier directly in front of the window so its candles clear the stair rail. Arrange two tufted, high-back pink chairs facing inward around the short blue coffee table with crossed-bone décor; the table sits near the window, slightly left of the stair landing. Tuck the low round stool beside the table’s near corner and slide a small ottoman beneath if shown in your inventory. This cluster must remain inside the mezzanine boundary to avoid collision as you move down the stairs during Dreamy Room Level 438. Keep the sightline to the window clear so the chandelier silhouette reads cleanly against the glass.
Step 3. Place the fortune desk, crystal ball, and mezzanine bar stools.
Shift to the center of the mezzanine in Dreamy Room Level 438. Position the narrow counter that holds the luminous purple crystal ball midway along the back wall. Seat the masked cat-in-hat fortune teller behind it, with the open scroll angled toward the orb. On the wall shelf above, place the stuffed bear, the potion bottles, and the hose-shaped hookah; hang the pink book-bag to the right and mount the glowing pentagram plaque beside it. Cap the corner with the cobweb and its plump spider near the roof peak. At the rail, line three toadstool bar stools (white caps with red dots) evenly, stems touching the mezzanine edge. This grouping sells the midair café vibe of Dreamy Room Level 438 while keeping walkway space open for the stairs.
Step 4. Place the skull canopy, wall gems, and oval mirror.
For the right wall of Dreamy Room Level 438, center the massive purple skull canopy high on the wall so its fanged overbite hangs into the room. The blue eye sockets should point slightly down toward the bar workspace that you’ll add next. Under the skull’s teeth, align the hanging wine glasses like extra “fangs.” To the right of the skull, mount the two pink gem plaques in a horizontal row, evenly spaced. Beneath the skull, hang the oval mirror so it reflects the bar top; keep its top rim just below tooth height. This entire wall read is a signature silhouette of Dreamy Room Level 438—if the skull sits too low, it crowds the counter; too high, and the hanging stemware won’t align.
Step 5. Place the L-bar, sink, bottles, and bar tools.
Drop the white L-shaped counter at the lower-right, directly beneath the skull in Dreamy Room Level 438. The short leg runs along the back wall; the long leg projects forward. Fit the brass faucet and inset sink at the inside corner. On the rear wall shelf, arrange green and pink bottles from tall to short, then stand the metal cocktail shaker and two clear goblets on the bar surface. Hang additional stemware under the skull’s teeth rail. On the right wall, add the small bone hook and the tiny blue spirit creature just under the shelf edge. Leave two toadstool stools in front of the long leg for seating. This tight, layered stacking is essential for Dreamy Room Level 438’s bar to read full but uncluttered.
Step 6. Place the central dining cluster, candles, and food trays.
In the middle of Dreamy Room Level 438, create a low-table bistro. Place two short square tables with red cloths, one left of the bar path and one slightly nearer the stairs. On the left table, set the three-branch candelabrum; on the right, lay the tray of snacks and goblets. Surround the area with fungus stools—two facing the bar, one angled toward the drum stage—with their red caps centered under each tabletop edge. Tuck a pair of tiny ghost-footstools (white puffy bases) along the near side as improvised poufs. Ensure walking lanes remain between tables and bar. This cluster provides warmth and a gameplay checkpoint: in Dreamy Room Level 438, misplacing a stool often blocks the path and breaks the visual rhythm of the red textiles.
Step 7. Place the drum kit, trunk, and stair runner details.
Focus on the lower-left of Dreamy Room Level 438. Stage the drum kit just off the stair base: bass drum front, two toms behind, and twin cymbals on stands flanking the set. Nudge the kit so drummers would face the dining area. Set the coffin-red travel trunk with gold latch on the step landing to the left of the drums; its lid lines parallel to the blue runner with gold crosses. Scatter the three chunky mushrooms at the trunk’s right and along the runner edge as décor props. Make sure the runner’s crosses remain visible on the top three steps—these are easy alignment markers in Dreamy Room Level 438 and confirm the staircase doesn’t float. This stage corner balances the bar’s visual weight with instruments and storage.
Step 8. Place the gargoyle, crowned slimes, and finishing accents.
Complete Dreamy Room Level 438 by populating the character props. Set the glossy blue gargoyle statue on the small circular balcony at the extreme lower-right; its glowing eyes should face the bar. Place the two crown-topped slime-candle creatures on the floor in front of the bar’s long leg, one nearer the mirror, the other by the shaker. Add the small wall picture frame with the spooky motif on the upper-left side wall near the fortune desk. Double-check the web-and-spider at the roof apex and the pentagram plaque on the right edge of the mezzanine shelf. If you followed the flow, Dreamy Room Level 438 now reads as a perfectly balanced haunted lounge with clear walking lines and zero clipping.
Notes and Precautions
Dreamy Room Level 438 relies on isometric depth. Pieces must not float over rails, so always check shadow footprints against floor tile seams. The chandelier can overlap the stair if the window isn’t centered—recenter the window first. The skull canopy is a wall mount, not a shelf item; mis-snapping it will misalign the hanging glasses and the mirror below. Keep at least one floor tile of clearance around the stair landing; otherwise, characters snag on stools during Dreamy Room Level 438. Candle clusters and the drum stands snap to floor, not to tables—verify green placement ticks. Finally, remember this is a calm, no-timer puzzle where correct placement is the entire challenge; let the layout guide your sequence in Dreamy Room Level 438.
Tips and Tricks from top player
Group by zones before fine-tuning: “Lounge,” “Fortune,” “Skull Bar,” “Dining,” and “Stage.” In Dreamy Room Level 438, placing anchors first (window, skull canopy, L-bar) prevents later drift. Use object edges to measure: three stool diameters equals one table width—handy for centering in Dreamy Room Level 438. Rotate the drum kit so cymbals point to traffic lanes; that makes collision checks obvious. Hang glasses under the skull before placing bottles; the vertical alignment acts like a plumb line. Nudge toadstool stools until their stems kiss table rims; that reads as tucked seating in Dreamy Room Level 438. Finally, if something looks crowded, it is—slide tables by half a tile rather than moving the big fixtures.
Final Scene — What You Should See
When Dreamy Room Level 438 is complete, the room glows like a whimsical speakeasy. A curved mezzanine hugs the striped lavender walls, the left window and golden chandelier bathing two tufted pink chairs and a blue bone-motif table in warm light. At center, a fortune desk with a purple crystal ball, potions, a pentagram sign, a webbed spider, a hanging bag, and a plush bear crowns the upper tier, with toadstool stools lining the rail. The right wall showcases a gigantic purple skull canopy; its “fangs” become hanging stemware over an L-bar stocked with bottles, a sink, goblets, and a shaker, plus a tiny blue spirit. Below, two candlelit red-cloth tables and fungus stools form a cozy dining zone. The left stage features a drum kit beside a coffin-red trunk and mushrooms. A blue gargoyle guards a round balcony, while crowned slime candles blink near the bar—perfect, eerie harmony.