Dreamy Room Level 222
Dreamy Room Level 222 guide - Dreamy Room 222 Walkthrough & Solution.

Important Notice Regarding Level Numbering
Due to frequent changes in Dreamy Room's level numbering and differences between platforms (Android/iOS) – for example, level 222 on Android might not be the same as level 222 on iOS – the text guide below may not always match the images and video above. Please prioritize the image and video guides. If you find that the guide content doesn't match your current level, please visit the All Level Walkthroughs page to find the correct guide based on level images. Thank you for your understanding.
Dreamy Room Level 222 Walkthroughs & Guide
Step 1. Place the winding water stream in the center of the base
In Dreamy Room Level 222, the very first piece you bring into the blank bowl-shaped room is the winding water stream that serves as the lifeblood of the scene. As a player of Dreamy Room Level 222, you will notice the empty base glows softly, waiting for the stream’s gentle curves to define the landscape. Carefully select the river asset from your inventory, then drag it slowly into the middle of the floor, ensuring that the water’s edges are flush against the inner contours of the petal-shaped walls. Dreamy Room Level 222 insists on precision: orient the stream so that its curves follow the bowl’s curvature exactly. Dreamy Room Level 222 allows for subtle rotation, so take your time to adjust the flow until it sits naturally in the base. This initial challenge in Dreamy Room Level 222 sets the tone for object placement, teaching you that even the most basic element must align flawlessly with the room’s geometry.
Step 2. Place the windmill house at the rear center
In Dreamy Room Level 222, your next task is to position the charming windmill house directly at the rear center of the water stream. The windmill asset—complete with its cylindrical brick tower, white-trimmed windows, and wooden cross blades—should sit just beyond the deepest part of the stream. Dreamy Room Level 222 rewards patience: rotate the windmill slowly so that its blades face the front of the scene at a slight angle, catching an imaginary breeze. As you slide it back, make sure the base of the tower rests on the grassy patch that forms around the water’s edge. Dreamy Room Level 222 requires that the door faces the viewer, inviting a sense of entrance. Adjust the height so that the bottom of the windmill is partially nestled in the bank, mimicking natural settlement. Remember, Dreamy Room Level 222 challenges you to balance aesthetic harmony with technical accuracy, and perfect alignment here will anchor the entire scene.
Step 3. Place the flower dome house on the left bank
In Dreamy Room Level 222, after anchoring the windmill, trace your eyes to the left side of the room: this is where the flower dome house belongs. This delightful dome, topped with overlapping pink and yellow petals and encircled by a wooden railing, must sit on the grassy plateau. Dreamy Room Level 222 guides you to position it so its round window faces the camera at about a 30-degree angle. Use the in-game gridlines to nudge it until the bottom edge of the dome perfectly hugs the grass. Dreamy Room Level 222 lets you zoom in to verify that no petal tips poke through the walls. Don’t rush—this object’s whimsical roof is one of the most eye-catching elements in Dreamy Room Level 222, and misalignment will break the scene’s delicate balance. Rotate the dome slightly until its petals appear evenly spaced around the edge of the bowl, creating a cohesive floral border.
Step 4. Place the green cylindrical tower on the front-left bank
In Dreamy Room Level 222, the green cylindrical tower with a circular window and conical top is the next element to find a home. Head to the front-left quadrant of the room, just beside the flower dome house. Dreamy Room Level 222 demands you press the tower low into the grass so that its base seamlessly transitions from the floral dwelling. Rotate the tower so its round porthole faces inward, toward the center of the stream, creating a visual dialogue between structures. Dreamy Room Level 222 allows fine height adjustments—lower it until the grass blades at its foot intersect naturally. Ensure no part of the tower overlaps the water. This placement in Dreamy Room Level 222 introduces vertical interest to the left side and balances the heavier windmill on the right. Take your time to nudge and pivot until the tower’s shade echoes the soft cyan tones of the water beneath it.
Step 5. Place the wooden arched bridge over the stream
In Dreamy Room Level 222, the wooden arched bridge is the scene’s connective tissue, physically and visually linking banks. Drag the bridge asset from your toolbox and hover it over the narrowing of the stream between the flower dome bank and the windmill bank. Dreamy Room Level 222 requires you to align the bridge’s ends with the grassy shores flush, with neither end floating nor sunk. Rotate the bridge slightly if needed so that its planks run perpendicular to the flow of water. Dreamy Room Level 222 rewards meticulous placement: if the bridge is even a pixel off, shadows will look unnatural. Gently lower it until the underside kisses the surface of the water, giving the impression of a sturdy wooden crossing. In Dreamy Room Level 222, this bridge is not just decoration—it’s the axis that ties the entire micro-landscape together.
Step 6. Scatter lily pads across the water surface
In Dreamy Room Level 222, no stream is complete without lily pads floating serenely on its surface. Select the lily pad cluster asset, then carefully place three or four pads at varying points along the waterway. Dreamy Room Level 222 demands that you stagger them asymmetrically: one near the bridge, one closer to the windmill, and another drifting toward the flower dome. Rotate each pad slightly so they don’t look identical; Dreamy Room Level 222 thrives on small, organic discrepancies. Lower them gently so they lie just above the water plane, creating a subtle shadow. If you place them too high, Dreamy Room Level 222 will show a jarring gap; too low, and they’ll disappear under the ripples. Take your time—this delicate scattering in Dreamy Room Level 222 lends authenticity and a playful touch to the aquatic environment.
Step 7. Arrange cattail clusters around the stream edges
In Dreamy Room Level 222, to breathe life into the banks, you’ll place cattail clusters along the water’s edge. Choose the cattail asset, featuring slender green stalks topped with brown seed heads, and place one cluster near the windmill side, another at the back-right curve of the water, and a third by the bridge. Dreamy Room Level 222 insists you stagger their heights so they don’t form a rigid line; rotate them subtly to face toward the center. Lower each cluster until the roots intersect the grass, but ensure the seed heads hover above, casting light shadows on the water. This arrangement in Dreamy Room Level 222 adds natural framing and guides the eye around the diorama, reinforcing the sense of a lush, living scene.
Step 8. Install the pink bell-flower arch behind the flower dome
In Dreamy Room Level 222, the whimsical bell-flower arch—three hanging pink blossoms—needs to be set just behind the flower dome house. Drag the arch into place on the left bank and rotate it about 15 degrees inward so the blossoms hang visibly over the grassy ledge. Dreamy Room Level 222 enables you to adjust the arch’s height; lower it until the bells almost graze the roof petals, but don’t let them clip through. Fine-tune its lateral position so that each bell appears evenly spaced in the viewer’s frame. In Dreamy Room Level 222, accurate placement here will create a focal point that balances the windmill’s verticality, adding softness and color contrast to the left side of your landscape.
Step 9. Lay the stepping stones from the windmill door to the grass
In Dreamy Room Level 222, the next accessory is a short path of stone stepping stones leading from the windmill’s front door into the grassy clearing. Select the stepping-stone set—usually five flat, round stones—and position the first one directly outside the door. Dreamy Room Level 222 challenges you to maintain equal spacing: place each subsequent stone about two inches apart in-game, curving slightly toward the picnic area you’ll craft later. Rotate each stone randomly to avoid uniformity, reflecting a hand-laid trail. Lower them just enough so they emerge halfway through the grass blades, creating the impression they are embedded in the earth. In Dreamy Room Level 222, these small details deepen the sense of realism and narrative.
Step 10. Place the daisy-topped bushes near the windmill
In Dreamy Room Level 222, you’ll find two spherical green bushes dotted with white daisy flowers. Drag one bush to the right side of the windmill, near the water’s edge, and the second one slightly behind it against the petal walls. Dreamy Room Level 222 lets you rotate the bushes so the daisies face forward, towards the scene center. Lower each bush until its base gently meets the grass but ensure no part clips into the stone of the stepping path. Dreamy Room Level 222 emphasizes balance: these floral accents should complement the flowers on the dome and the cattails, tying both sides of the room together in harmonious symmetry.
Step 11. Add the hanging vine lantern near the daisies
In Dreamy Room Level 222, the vine lantern—a twisting green vine topped with a small purple lantern—adds a cozy glow. Position it just behind the daisy bush on the windmill’s right side. Dreamy Room Level 222 requires you to angle the vine so it leans naturally toward the lantern’s bulb, creating a gentle curve. Adjust the height so the lantern hovers three inches above the bush’s topmost flower. In Dreamy Room Level 222, this placement will cast a soft light over the daisies and stepping stones, enhancing the scene’s depth. Make sure it doesn’t overlap the boundary of the petal wall.
Step 12. Spread the blue picnic blanket on the grass
In Dreamy Room Level 222, it’s time to set up a cozy picnic. Choose the rectangular blue picnic blanket and unfold it on the grass patch in front of the windmill, slightly to the right. Dreamy Room Level 222 allows you to rotate the blanket so its edges are parallel to the camera’s bottom border, giving viewers a direct overhead perspective. Lower it until its corners lightly press into the grass without bending unnaturally. Dreamy Room Level 222 emphasizes placing it away from the stepping stones to avoid clipping. This blanket forms the heart of your gathering area, so ensure its edges are crisp and fully visible within the bowl walls.
Step 13. Position the two stools and picnic accessories on the blanket
In Dreamy Room Level 222, your picnic comes alive with two small stools and an assortment of treats. Select the round-top stools—one orange-topped and one pink-topped—and place them side by side on the blanket’s near edge, tilting them slightly toward the center. Dreamy Room Level 222 encourages you to leave a small gap between the stools to accommodate the treats. Then, from your inventory, pick up the cake slices and pastel radio: position the treats centrally on the blanket, and place the radio just beyond them, angled toward the windmill. Dreamy Room Level 222 requires that no accessory floats: lower each item until it makes believable contact with the fabric. This arrangement invites an imaginary gathering in your charming micro-universe.
Step 14. Seat the black bear figurine at the picnic
In Dreamy Room Level 222, the first of two adorable bear figurines takes its place on the picnic blanket. Select the small black bear and gently position it on the pink-topped stool. Dreamy Room Level 222 demands that you angle its head slightly toward the cake, evoking a sense of anticipation. Lower the bear until its bottom aligns with the stool’s seat; don’t let its paws clip through the stool. Rotate the bear’s body about ten degrees to the right so it faces the radio and cake at a relaxed posture. This lifelike pose in Dreamy Room Level 222 transforms static decoration into a playful narrative.
Step 15. Set the brown bear on the swan float in the stream
In Dreamy Room Level 222, the final figurine—the brown bear—nearly completes the story. Pick up the swan-shaped float and place it in the stream near the bridge. Dreamy Room Level 222 requires you to orient it so the swan’s head points upstream, toward the flower dome. Then, select the brown bear and carefully lower it onto the float’s back. Dreamy Room Level 222 allows micro-adjustments: rotate the bear so its gaze follows the black bear at the picnic, creating an unspoken connection. Adjust both float and bear until they settle naturally on the water’s surface without penetration. This delightful duo in Dreamy Room Level 222 adds whimsy and completes your serene, storybook tableau.
Notes and Precautions
- Alignment sensitivity: In Dreamy Room Level 222, slight misplacements will cause objects to clip or cast unnatural shadows. Always zoom in to verify edges flush perfectly with the grass, water, or walls.
- Layer order: Ensure that aquatic elements (lily pads, swan float) are always above the water texture, and floral or structural items never sink below the grass layer in Dreamy Room Level 222.
- Rotation precision: The mini-editor in Dreamy Room Level 222 can be tricky. Use slow, small rotations to avoid over-rotating items; a 5° shift can make the difference between natural and jarring.
- No timer: Although there’s no countdown in Dreamy Room Level 222, rushing leads to errors. Take advantage of the calm pace to perfect each placement.
Tips and Tricks from top player
- Snap edges: Toggle the grid snap feature in Dreamy Room Level 222 to align objects quickly without manual nudging—ideal for repetitive elements like stepping stones or lily pads.
- Camera angles: Rotate the camera slightly off-center before placing large assets in Dreamy Room Level 222; this helps you see hidden clipping issues.
- Inventory grouping: Group related items (floral, water, furniture) in Dreamy Room Level 222’s inventory panel—you’ll save time hunting for the next piece.
- Soft shadows: Use the game’s lighting slider to preview how shadows fall on each asset in Dreamy Room Level 222; adjust placement until shadows look consistent.
- Undo history: Remember that Dreamy Room Level 222 retains an undo stack of ten moves—if you misplace something, don’t hesitate to rewind and refine!
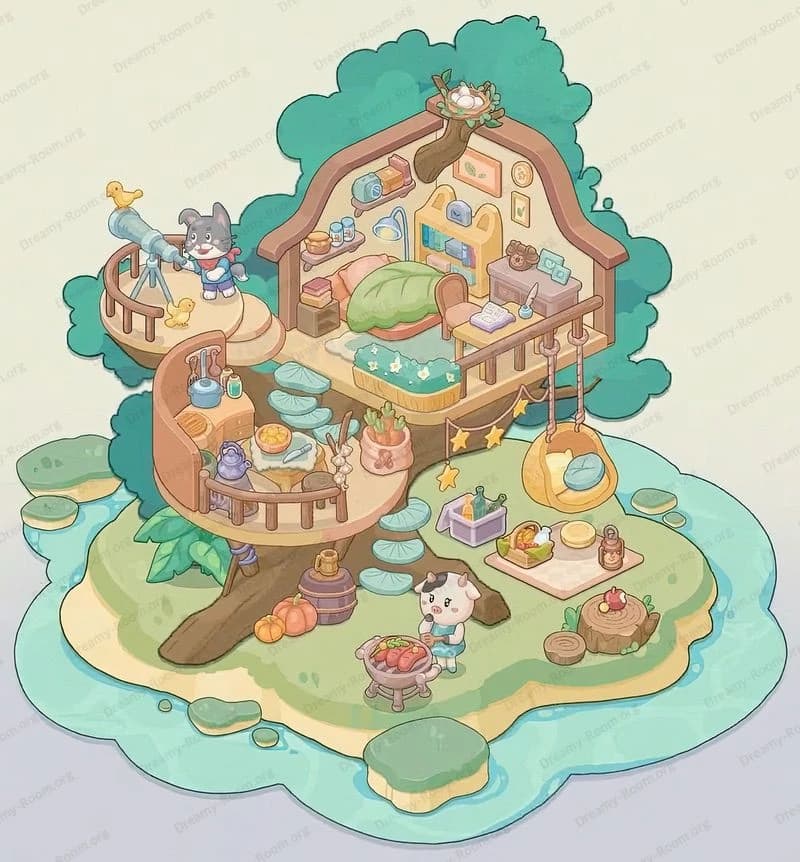
Final Scene Description
The completed Dreamy Room Level 222 scene presents a captivating miniature world nestled within a bowl-like setting edged by petal-shaped walls. At its core, a winding stream shimmers beneath a gracefully arched wooden bridge, while pastel lily pads drift lazily on the water. To the right, a brick windmill with rotating blades stands guard, flanked by two daisy-topped bushes and a gentle vine lantern. On the left bank sits a whimsical flower-roofed dome beside a slender green tower, both framed by a hanging pink bell-flower arch. A curving path of stone steps leads to a cheerful picnic: a blue blanket hosts colorful stools, cake slices, and a vintage radio, where a black bear perches expectantly. On the water below, a brown bear lounges atop a swan float, gazing toward its friend. Cattails, lilies, and soft grass complete the harmonious tableau, blending structure and nature in a serene, storybook atmosphere.