Dreamy Room Level 772
Dreamy Room Level 772 guide - Dreamy Room 772 Walkthrough & Solution.
Important Notice Regarding Level Numbering
Due to frequent changes in Dreamy Room's level numbering and differences between platforms (Android/iOS) – for example, level 772 on Android might not be the same as level 772 on iOS – the text guide below may not always match the images and video above. Please prioritize the image and video guides. If you find that the guide content doesn't match your current level, please visit the All Level Walkthroughs page to find the correct guide based on level images. Thank you for your understanding.
Dreamy Room Level 772 Walkthroughs & Guide
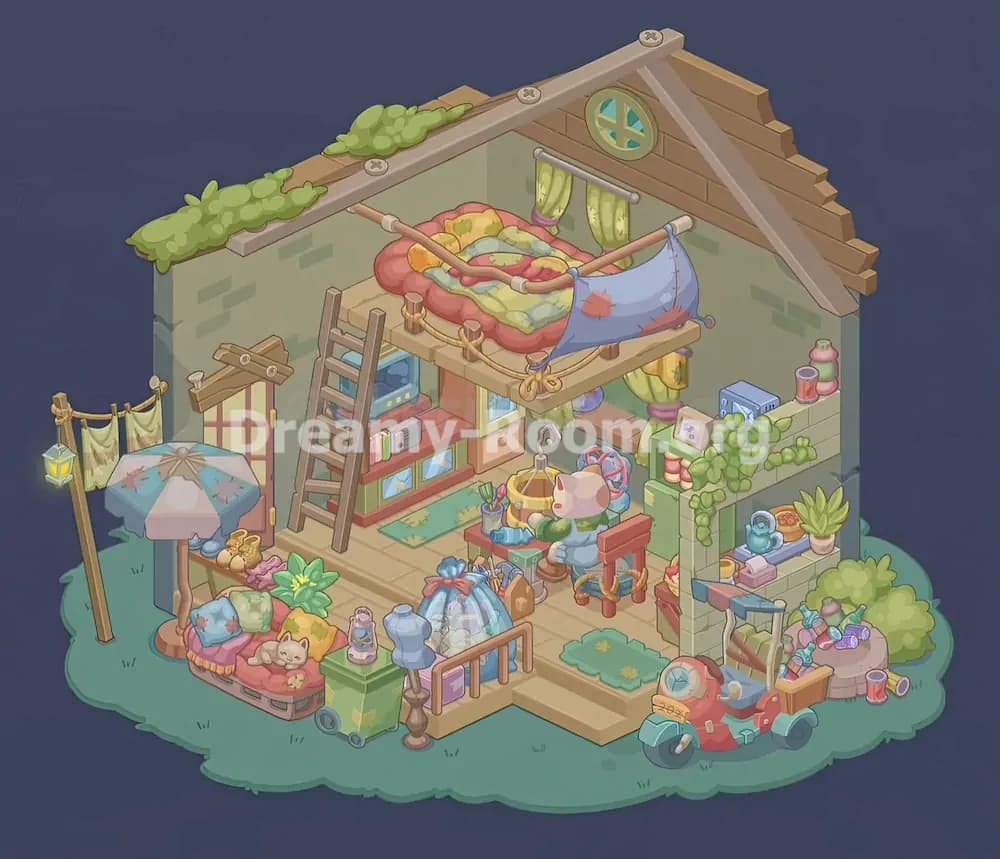
Dreamy Room Level 772 transforms a bare wooden room into a whimsical attic sewing studio surrounded by greenery. The completed space combines a raised sleeping loft, a compact tailoring workshop, a sheltered outdoor lounge, storage shelves, colorful fabrics, and a small delivery scooter. As usual, the main challenge in Dreamy Room Level 772 is not simply identifying the objects but determining the one exact position where each item belongs. Large structural pieces should be placed first because they create reliable reference points for the many smaller decorations.
Step 1. Build the gabled roof and complete the upper walls in Dreamy Room Level 772.
Begin Dreamy Room Level 772 with the largest architectural components. Install the brown wooden gabled roof across the top of the two existing walls. The roof ridge should rise above the back-right corner, while the exposed stepped wooden boards form the right-hand slope. Attach the pale gray support beams along both roof edges and across the peak, making sure the round metal fasteners remain visible. Place the thick patches of green moss and creeping foliage over the left roof slope, with one large patch near the outer corner and another closer to the ridge.
Next, fit the round attic window into the triangular wooden panel directly beneath the roof peak. Its pale green frame and divided blue-green glass should face forward. In Dreamy Room Level 772, these roof parts establish the room’s final height, so placing furniture before them can make alignment harder. Finish this stage by adding the small rear window beneath the circular attic opening and hanging the two light green curtains from the horizontal rod. Tie the curtains back with purple bands so the opening remains visible.
Step 2. Install the raised sleeping platform and ladder.
The largest piece of furniture in Dreamy Room Level 772 is the raised wooden sleeping platform. Position it across the upper back-left portion of the room, directly below the curtained rear window. The long front beam should extend from the left wall toward the center-right, leaving the lower floor open for the sewing area. Add the short wooden posts around the front and left edges, then connect them with the curved rope railing. The rope knot belongs near the front-right corner of the platform.
Lean the tall brown ladder against the platform’s front-left edge. Its feet rest on the main wooden floor beside the entertainment cabinet, while its top reaches the platform beside the bed. Keep the ladder angled slightly toward the right rather than placing it vertically. This is an important placement detail in Dreamy Room Level 772 because the ladder must remain clear of the door and television cabinet. Under the platform’s right side, hang the additional yellow-green curtains and secure them with purple ties. These lower curtains create a secluded nook behind the sewing station and visually connect the loft with the green curtains above.
Step 3. Arrange the patchwork loft bed and hanging canopy.
Place the large red, scalloped mattress on top of the platform in Dreamy Room Level 772. It fills most of the loft and sits close to the back-left wall. Spread the thick patchwork quilt across the mattress, keeping its pale green, blue, yellow, orange, and pink sections visible. Arrange the rounded cushions and pillows near the back and left sides so that the center of the bed looks soft and layered rather than flat.
Fit the curved wooden canopy poles around the mattress. One pole extends from the rear-left area toward the front center, while the other runs from the back-right side toward the front-right corner. The joints are wrapped with light bands. Hang the large patched blue fabric panel from the front-right pole. Its reddish repair patches, visible stitches, lower fringe, and loose thread should face outward. In Dreamy Room Level 772, this cloth resembles a handmade privacy screen rather than a conventional bed curtain. The exact order matters: platform first, mattress second, quilt and pillows third, and canopy last. Correctly assembled, the loft becomes the dominant focal point and leaves enough room below for the cabinet, worktable, and storage pieces.
Step 4. Complete the media cabinet and storage area beneath the loft.
Move to the space directly underneath the loft in Dreamy Room Level 772. Place the long red-and-green cabinet against the back-left wall, immediately to the right of the ladder. Set the small blue television on the cabinet’s upper-left section. The screen faces the open front of the room, and its control buttons run along the lower edge. Arrange several upright books beside it, followed by the compact gray radio.
Fill the lower cabinet compartments with the blue decorative panels or framed storage doors. To the right, install the taller peach-colored cabinet beneath the platform, with its pale drawer and round knob facing forward. Hang or place the small framed blue picture above the lower drawer area. Finally, lay the narrow turquoise rug with yellow stitched patches on the floor in front of the cabinet. This rug should remain partly visible between the ladder and the central worktable. Dreamy Room Level 772 contains many overlapping pieces, so this area should be completed before adding the central furniture. If the cabinet is shifted too far forward, the ladder will not sit correctly and the walking path through the room will appear blocked.
Step 5. Create the left-side laundry and umbrella corner.
The outdoor left corner of Dreamy Room Level 772 contains several tall items that must be carefully layered. Start with the wooden folding screen or narrow door against the left wall. It has cream panels divided by pink lines, yellow hinges, and crossed wooden boards along its top. Position it behind the umbrella and just left of the ladder.
Next, plant the two tall laundry poles in the grass along the far-left edge. Stretch the dark rope between them and hang the two pale yellow-green cloths from small pegs. Attach the glowing square lantern to the front pole so it hangs slightly below the laundry line. In front of the screen, place the large patchwork patio umbrella. Its brown central pole stands on a circular wooden base, while the broad canopy combines pale pink and blue sections with visible repaired patches. The canopy should partly overlap the screen without hiding the ladder. This arrangement is especially easy to misread in Dreamy Room Level 772 because the laundry frame, umbrella, screen, and lounge seat occupy nearly the same visual area. Building from the back toward the front prevents incorrect overlaps.
Step 6. Furnish the outdoor lounge at the front-left.
Place the low cushioned lounge seat on the grass beneath the umbrella in Dreamy Room Level 772. The base resembles stacked wooden crates or pallets, with a red and pink cushion across the top. Arrange the blue patched pillow at the left end, the pale green patterned cushion in the middle, and the yellow cushion toward the right. Set the small cream-colored sleeping cat on the red seat in front of the yellow pillow.
Behind the lounge, place the narrow wooden side table. Arrange the blue bowl or folded accessory, the pair of yellow slippers, the small tan pouch, and the pink scarf across its top. Add the leafy plant with the bright yellow flower just behind the cushions, allowing its leaves to rise between the lounge and the table. At the lounge’s right side, position the green wheeled cabinet with its two gray wheels facing outward. Place the pink decorative lantern or jar on top. In Dreamy Room Level 772, these tiny pieces are easy to confuse with sewing-room supplies, but their correct location is outdoors beside the lounge. The finished corner should feel like a comfortable resting place connected to the indoor workshop.
Step 7. Assemble the central sewing table and work chairs.
The middle of Dreamy Room Level 772 is occupied by a compact sewing station. Place the rectangular red worktable beneath the front-right edge of the loft. Position the whimsical pig-shaped sewing machine on the tabletop, with its pale patched head facing left and its blue body extending toward the right. Fit the large blue-and-red wheel behind it. Arrange the green ball of yarn, folded blue fabric, and other soft materials around the machine.
Set the cup of tools on the table’s left side, with scissors, brushes, or sewing implements pointing upward. Suspend the yellow work lamp above the table from the curled metal hook, centering the shade over the work surface. Place one red chair at the right side of the table and another partly behind or opposite it, ensuring their woven seats remain visible. Add the small stool, fabric rolls, brown supply bag, and compact containers on the floor beside the table. Dreamy Room Level 772 demands very precise layering here because the machine, lamp, chairs, and floor supplies overlap from the isometric viewpoint. Use the table as the anchor and add accessories from largest to smallest.
Step 8. Organize the dress form, garments, and front-center tailoring supplies.
The front-center portion of Dreamy Room Level 772 displays the studio’s finished clothing and tailoring equipment. Place the blue dressmaker’s mannequin on its carved brown stand immediately to the right of the green wheeled cabinet. The torso should face forward and stand close to the edge of the wooden floor.
Behind the low front railing, arrange the large bundle of clothing. The blue striped garment tied with a red bow belongs toward the left, while the pale white dress with a delicate floral or lace pattern hangs toward the center-right. Add the smaller folded fabrics, wooden hanger, thread bundles, and sewing tools around the base. A brown bag and additional rolled materials sit closer to the central worktable. Drape the purple cloth over the short railing at the front. In Dreamy Room Level 772, this collection may initially look like one oversized object, but it is a layered display of garments and supplies. Keep the dress form in front of the clothing pile so its silhouette remains clear. Once positioned correctly, this section links the outdoor lounge to the professional sewing area and explains the room’s tailoring theme.
Step 9. Construct the vine-covered right partition and fill its shelves.
Install the pale green brick partition along the right side of the room in Dreamy Room Level 772. It forms a tall open arch or shelving wall between the indoor floor and the outdoor supply area. Place the green cabinet against its inner-left side. Fill the cabinet cubby with the small pink-and-cream jars, and set the framed flower picture on top.
Arrange the blue storage box or binders along the partition’s upper ledge, followed by the tall red cup and the rounded pink-and-green bottle at the far right. Drape the long leafy vine over the top, allowing it to trail down the front-left edge of the arch. Inside the recessed shelf, place the blue kettle and cup on the left, the pie or pastry near the center, and the spiky green potted plant on the right. On the lower ledge, add the yellow mug, purple book, and pink tissue box. Attach the short blue and reddish fabric strips across the lower front edge. The main difficulty in Dreamy Room Level 772 is recognizing which decorations belong on the partition rather than on the sewing table or outdoor stump.
Step 10. Add the rugs, scooter, thread supplies, and final outdoor decorations.
Finish the lower-right portion of Dreamy Room Level 772 by laying the two turquoise rugs with yellow flower motifs on the wooden floor near the front step. One sits near the sewing chairs, while the larger one rests closer to the room’s open entrance. Keep the wooden step and floor edge unobstructed.
Park the small red-and-turquoise delivery scooter on the grass outside the right partition. Its front wheel points slightly toward the left, the round windshield and headlight face forward, and the small number plate sits below the front lamp. Attach the pale canopy frame above the seat and place the wooden cargo box at the rear. Fill the rear box with sewing or delivery materials. Beside the scooter, position the round tree-stump table and cover it with colorful spools, bottles, and thread containers. Add the overflowing wooden supply bin nearby, then scatter the red and yellow loose spools on the grass. Place the rounded green bushes behind the stump and along the partition. These final objects complete Dreamy Room Level 772 and reinforce the idea that the studio produces, stores, and delivers handmade goods.
Notes and Precautions
Dreamy Room Level 772 has unusually dense object layering, especially around the loft, central sewing station, and right partition. Always place structural pieces before decorations. The roof, platform, cabinet, partition, umbrella, and scooter provide dependable visual anchors, while cups, spools, books, fabrics, and jars can be added afterward.
Watch the distinction between indoor and outdoor flooring. The cabinet, ladder, sewing table, chairs, dress form, clothing display, and rugs belong on the wooden floor. The laundry poles, umbrella base, lounge seat, scooter, stump table, loose spools, and bushes belong on the surrounding grass.
Do not mistake the blue patched canopy for a blanket. It hangs vertically from the loft’s front pole. Similarly, the pig-shaped object belongs on the central table as part of the sewing station, not on the bed or lounge.
The main challenge of Dreamy Room Level 772 is determining the exact placement of every item. When an object appears correct but will not lock into place, check whether another larger item must be installed beneath or behind it first.
Tips and Tricks from top player
A reliable strategy for Dreamy Room Level 772 is to divide the scene into five zones: roof, loft, back-wall storage, left outdoor lounge, and right workshop extension. Finish one zone before moving to the next instead of dragging random objects around the room.
Use recognizable silhouettes as anchors. The triangular roof, round window, loft platform, ladder, patio umbrella, brick partition, and scooter are difficult to confuse with other pieces. Once those items are placed, the remaining gaps reveal where smaller decorations belong.
For crowded groups, work from back to front. Place the screen before the umbrella, the side table before the lounge, the cabinet before the ladder, the partition before its shelf decorations, and the bushes before the stump supplies. This prevents larger pieces from obscuring their correct targets.
In Dreamy Room Level 772, accessories often share similar colors. Identify them by purpose instead: books and electronics belong beneath the loft, fabrics and tools belong around the sewing table, dishes belong in the right shelf, and personal comfort items belong beside the lounge or bed.
Final Scene
The completed Dreamy Room Level 772 becomes a charming handmade clothing studio built inside a moss-covered attic cottage. A thick patchwork bed fills the raised loft beneath the circular window, protected by rope rails and a repaired blue canopy. Below it, a television cabinet, books, radio, framed pictures, and a turquoise rug create a cozy living area. The center of the room functions as a busy sewing workshop, complete with a pig-shaped machine, hanging lamp, tools, yarn, chairs, garments, and a dress form. Outside on the left, laundry, a glowing lantern, patchwork umbrella, sleeping cat, cushions, slippers, and flowering plants form a restful garden corner. On the right, a vine-covered partition displays jars, dishes, a kettle, pie, books, and plants. A colorful delivery scooter waits beside a stump overflowing with thread spools, making Dreamy Room Level 772 feel both practical and delightfully imaginative.