Dreamy Room Level 882
Dreamy Room Level 882 guide - Dreamy Room 882 Walkthrough & Solution.
Important Notice Regarding Level Numbering
Due to frequent changes in Dreamy Room's level numbering and differences between platforms (Android/iOS) – for example, level 882 on Android might not be the same as level 882 on iOS – the text guide below may not always match the images and video above. Please prioritize the image and video guides. If you find that the guide content doesn't match your current level, please visit the All Level Walkthroughs page to find the correct guide based on level images. Thank you for your understanding.
Dreamy Room Level 882 Walkthroughs & Guide
Step 1. Build the main cottage structure in the center of Dreamy Room Level 882
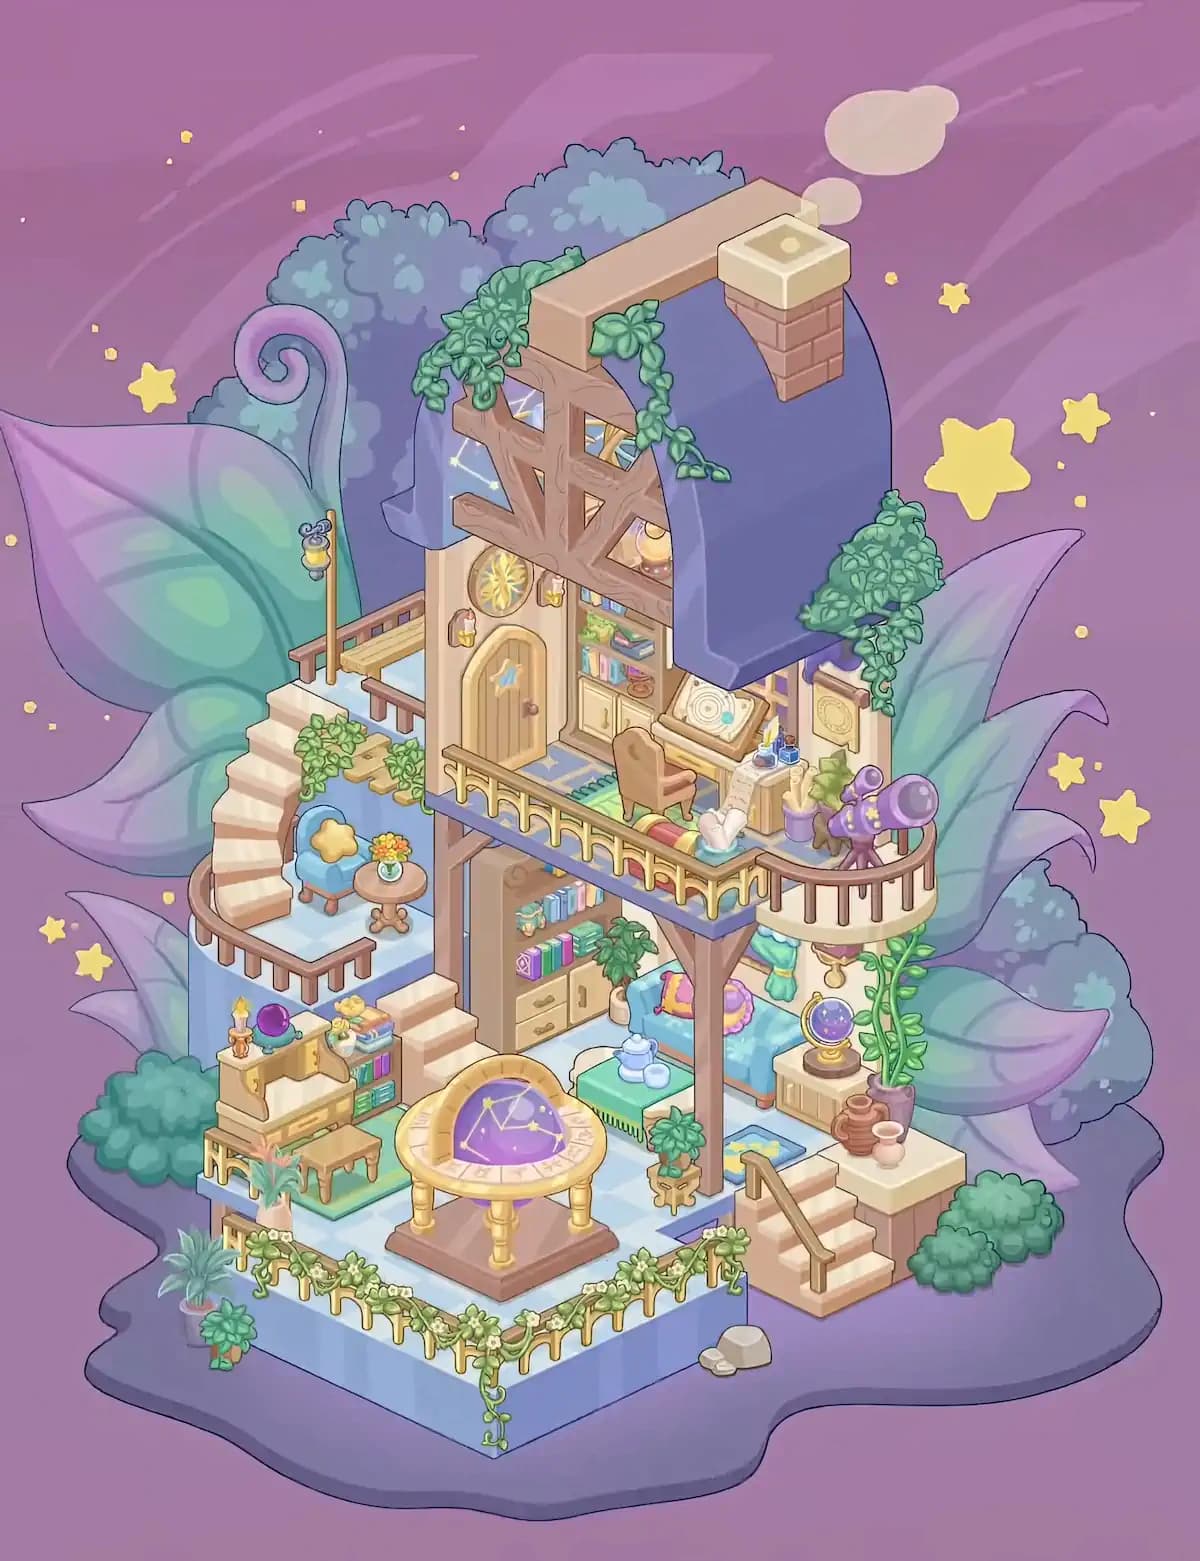
Begin Dreamy Room Level 882 by establishing the large house structure in the middle of the purple ground. The finished cottage occupies most of the central clearing, with its lower floor sitting slightly forward and the upper floor rising toward the back. Place the tall vertical wooden support posts first because these define where the two levels connect. The main upper room should be positioned above the lower living area, while enough open space remains on the left for an exterior staircase and on the right for another staircase leading down from the lower room.
Add the pale walls and exposed brown wooden framing to the upper section. The cottage has an intentionally whimsical, irregular shape rather than a perfectly rectangular one. In Dreamy Room Level 882, getting these structural pieces correct is important because nearly every later object—doors, shelves, furniture, balcony rails, roof pieces, and plants—depends on this central alignment.
Step 2. Add the dark blue roof, chimney, wooden beams, and rooftop vines
Next, complete the highest part of Dreamy Room Level 882. Place the large dark blue sloping roof over the upper room, with the roof descending dramatically along the right side. The exposed brown timber framing should remain visible at the front beneath the roof. Across the roof ridge, position the long tan wooden beam, then attach the brick chimney near its right end. The chimney has a pale cream cap and releases several soft clouds of smoke upward.
Now decorate the roof with greenery. Thick curling ivy spreads across the upper-left roofline and around the exposed timber, while another dense leafy plant cascades down the right edge of the roof. Smaller vines trail toward the study wall. These plants help Dreamy Room Level 882 blend naturally into the enormous fantasy foliage behind it. If the roof seems too plain compared with the completed image, check that the ivy clusters and chimney have both been placed before moving on.
Step 3. Install the exterior staircases, balconies, railings, and support posts
The multi-level layout is one of the most important visual clues in Dreamy Room Level 882. On the far left, place the long pale staircase that curves upward from the middle level toward the upper balcony. Its steps should rise from lower right to upper left, with a dark wooden railing following the exposed outer edge. At the top, connect it to the small upper-left sitting balcony.
Across the front of the upper floor, install the long decorative railing with repeated pale arch-shaped panels beneath its wooden handrail. Continue the railing around the curved balcony on the upper-right side, where the telescope will eventually sit. Two tall brown posts descend from this balcony and support the structure below.
Finally, position the shorter staircase on the lower-right side of Dreamy Room Level 882. It descends outward toward the purple ground and has a simple brown handrail. Correct staircase placement makes the entire cottage read clearly as one connected home.
Step 4. Furnish the upper-left outdoor sitting nook
Now work on the cozy left balcony of Dreamy Room Level 882. Place the small blue upholstered armchair near the left side of the balcony, close to the railing. Its rounded back includes a large pale yellow cushion or cloud-shaped pillow, which should face inward toward the house. Next to the chair, place the small round wooden side table. Set the tiny vase of colorful flowers on top of this table.
Add the small patches of greenery around the landing and near the stair connection. A leafy plant spills across part of the upper stair edge, helping soften the wooden structure. On the wall or post near the top of the stairs, position the hanging lantern on its tall narrow support.
This corner is easy to overlook because the larger astronomical room attracts most of the attention. In Dreamy Room Level 882, however, the chair, table, flowers, railing, lamp, and plants all have fixed locations, so check the finished image carefully if anything remains unplaced.
Step 5. Complete the upper doorway, celestial decorations, lanterns, and book storage
Move into the main upper room of Dreamy Room Level 882. Place the tall rounded wooden door toward the left-center wall. It has a small blue decorative detail and a knob on the right side. Directly above the doorway, install the circular golden sun or celestial wall ornament. A small hanging light should sit nearby, and another small lantern belongs on the wall to the left of the door.
To the right of the doorway, build the low storage and bookcase area. The cream-colored cabinet doors occupy the bottom, while colorful books, small boxes, and other objects fill the shelves above. Keep the books tightly grouped so they resemble the completed Dreamy Room Level 882 arrangement rather than a random stack.
Place the blue-and-gold floor rug in front of the doorway and study area. The room should now feel like a compact scholar’s retreat, with the door, celestial symbol, lights, books, cabinets, and rug forming the background for the desk.
Step 6. Arrange the upper study desk, chair, scrolls, potions, and telescope
The astronomy workspace is one of the defining areas of Dreamy Room Level 882. Place the wooden chair near the center-right of the upper room, facing the large desk built against the wall. On the desk, position the large open book or astronomical chart on its angled stand. Its circular diagram should face outward so it remains visible.
Add the tiny blue and purple potion bottles to the right side of the desk. Nearby, arrange the writing accessories and containers. A pale rolled scroll or parchment sits toward the balcony edge, along with a white quill-like object and other small study tools.
On the curved balcony at the far right, place the purple telescope on its tripod. The telescope points diagonally upward and outward toward the stars, with a large rounded eyepiece or lens assembly. This object is a major landmark for Dreamy Room Level 882, so if the right balcony still appears empty, the telescope is probably one of the missing pieces.
Step 7. Build the lower-left magical workbench and reading area
Continue Dreamy Room Level 882 by filling the lower-left corner underneath the exterior staircase. Place the compact wooden workbench against the left wall. On its upper surface, arrange the lit candle, the purple crystal-like orb, and the small golden objects. The desk contains open shelves and cubbies, so place the books and supplies into their matching compartments rather than leaving them on the floor.
A small rectangular bench or low wooden seat belongs directly in front of this workspace, positioned on a green rectangular mat. Additional books sit along the lower shelving near the staircase.
Decorate the edge of this area with leafy plants. There is also a potted plant close to the front-left boundary of the cottage. In Dreamy Room Level 882, these small furnishings make the lower floor feel occupied rather than simply serving as support for the larger room above. Check the candle, orb, books, bench, rug, shelving, and plants before continuing.
Step 8. Arrange the lower bookshelf, sofa, table, teapot, and decorative textiles
The rear center of the lower level in Dreamy Room Level 882 contains another cozy living and reading zone. Position the tall shelving unit against the back wall underneath the upper balcony. Fill its upper shelves with colorful books and boxes. The lower portion includes pale cabinet doors and drawers. Add the leafy potted plant in front of or slightly beside this shelving area.
To the right, place the blue sofa or daybed against the wall. Decorate it with the bright multicolored cushions, including the pink-and-yellow pillow. Above and beside the sofa, add the hanging fabric decorations or scarves in turquoise, yellow, and green.
In front of the sofa, set the low mint-colored table or footstool. Place the pale blue teapot and matching cups on top. A small blue rectangular mat lies nearby on the floor. These softer furnishings balance the magical instruments elsewhere in Dreamy Room Level 882 and should make the lower room feel comfortable and lived-in.
Step 9. Place the large constellation table in the center
The biggest individual furnishing in Dreamy Room Level 882 is the circular astronomical table occupying the front-center of the lower floor. Place its square brown base first, then align the four golden legs around it. The large round golden tabletop sits above these supports.
At the center of the table is a raised purple celestial display containing bright stars connected by thin constellation lines. The outer golden rim includes additional decorative symbols and markings. Orient the purple constellation design so it faces toward the player and remains fully visible rather than being hidden behind the surrounding furniture.
Because this table is so large, its position is an excellent reference point when correcting other objects in Dreamy Room Level 882. It should sit in the open central area without blocking the lower-left workstation or the right staircase. A small plant with a twisting wooden base stands behind and to the right of the table, close to the vertical support post.
Step 10. Finish the lower-right crystal-ball corner, vines, pottery, and stairs
The lower-right section of Dreamy Room Level 882 contains another cluster of magical items. Place the pale wooden cabinet or pedestal against the right wall, underneath the upper balcony. Set the purple crystal ball on its golden stand directly on top. The sphere has a starry appearance and should remain clearly visible from the front.
Behind this cabinet, position the very tall green climbing plant. Its vine rises all the way toward the upper balcony railing, with large leaves alternating along the stem. Next to the cabinet, arrange the stacked brown clay pots and the pair of pale cups or small vessels.
Make sure the short right-hand staircase begins immediately beside this area and descends toward the foreground. Its wooden railing runs along the exposed edge. The combination of the crystal ball, tall vine, pottery, and staircase gives this side of Dreamy Room Level 882 a distinctive silhouette, making it useful for checking whether the lower floor has been aligned correctly.
Step 11. Add the perimeter flowers, trailing vines, rocks, bushes, and final exterior details
Finish the placement work in Dreamy Room Level 882 by decorating the exposed edges of the building. Along the entire front boundary of the lower floor, install the golden railing. Cover much of its top edge with pale flowers and leafy vines, allowing several strands to hang downward over the blue foundation. Add the taller plants near the front-left corner and the smaller potted greenery around the structure.
Keep the large pre-existing fantasy bushes and enormous translucent leaves visible around the cottage rather than covering them. The left side is framed by a huge curled leaf, while several tall pointed leaves rise behind the right side. Blue-green bushes surround the rear and lower edges. Place the small gray stones on the purple ground near the bottom-right corner of the foundation.
Finally, compare all the tiny greenery, stars, and exterior details. Dreamy Room Level 882 succeeds only when each decorative object is placed in its intended position.
Notes and Precautions
The most difficult part of Dreamy Room Level 882 is distinguishing between objects that belong inside the cottage and objects that decorate its exterior. Several plants look interchangeable at first, but their shapes reveal their intended locations. The long climbing vine belongs beside the lower-right crystal-ball cabinet, the dense ivy clusters belong on the roof, and the flower-covered vines belong along the front railing.
Be especially careful with the two staircases. The large staircase is on the left and leads upward to the blue-chair balcony, while the smaller staircase belongs on the lower right. Similarly, the purple telescope belongs on the curved upper-right balcony, not beside the large constellation table.
Tiny pieces such as bottles, candles, cups, books, scrolls, flowers, and lanterns can easily disappear visually among the larger furnishings. In Dreamy Room Level 882, place large architectural objects first and use them as anchors before attempting these miniature decorations. Since the experience is intentionally relaxed and has no timer pressure, you can compare positions carefully rather than rushing. dreamy room instruction
Tips and Tricks from top player
A reliable strategy for Dreamy Room Level 882 is to work from largest to smallest. Start with the house shell, roof, support posts, balconies, railings, and staircases. Then divide the level into four zones: upper-left balcony, upper study, lower-left workshop, and lower-right living area. Completing one zone at a time prevents similar books, plants, pots, and magical objects from becoming confused.
Use unique landmark pieces as orientation points. The chimney identifies the upper-right roof, the blue chair marks the upper-left balcony, the telescope defines the upper-right balcony, the huge constellation table fixes the lower center, and the crystal ball identifies the lower-right corner. Once these are correct, surrounding objects become much easier to place.
For the smallest pieces in Dreamy Room Level 882, look at relationships rather than absolute coordinates. For example, place potion bottles beside the study desk, cups with the teapot, flowers on the round balcony table, and pottery beside the crystal-ball cabinet. This greatly reduces trial and error.
Final Scene of Dreamy Room Level 882
When Dreamy Room Level 882 is complete, the empty purple clearing has transformed into a magical astrologer’s cottage suspended among enormous glowing leaves and soft blue bushes. A dark blue roof crowns the timber-framed upper room, where ivy wraps around the beams and smoke drifts from the brick chimney. The upper floor contains an arched wooden door, bookshelves, lanterns, a celestial wall emblem, an astronomy desk, potions, scrolls, and a purple telescope overlooking the curved balcony. On the left, a blue chair and flower-topped table create a quiet outdoor nook.
Below, Dreamy Room Level 882 becomes even richer with bookshelves, a magical workbench, candles, crystal objects, a blue sofa, colorful cushions, teapot, cups, climbing plants, pottery, and a glowing crystal ball. At the center stands the large golden constellation table, while flower-covered railings, staircases, vines, stones, and surrounding fantasy foliage complete the enchanting observatory home.