Dreamy Room Level 806
Dreamy Room Level 806 guide - Dreamy Room 806 Walkthrough & Solution.
Important Notice Regarding Level Numbering
Due to frequent changes in Dreamy Room's level numbering and differences between platforms (Android/iOS) – for example, level 806 on Android might not be the same as level 806 on iOS – the text guide below may not always match the images and video above. Please prioritize the image and video guides. If you find that the guide content doesn't match your current level, please visit the All Level Walkthroughs page to find the correct guide based on level images. Thank you for your understanding.
Dreamy Room Level 806 Walkthroughs & Guide
Step 1. Build the tree village foundation and background in Dreamy Room Level 806
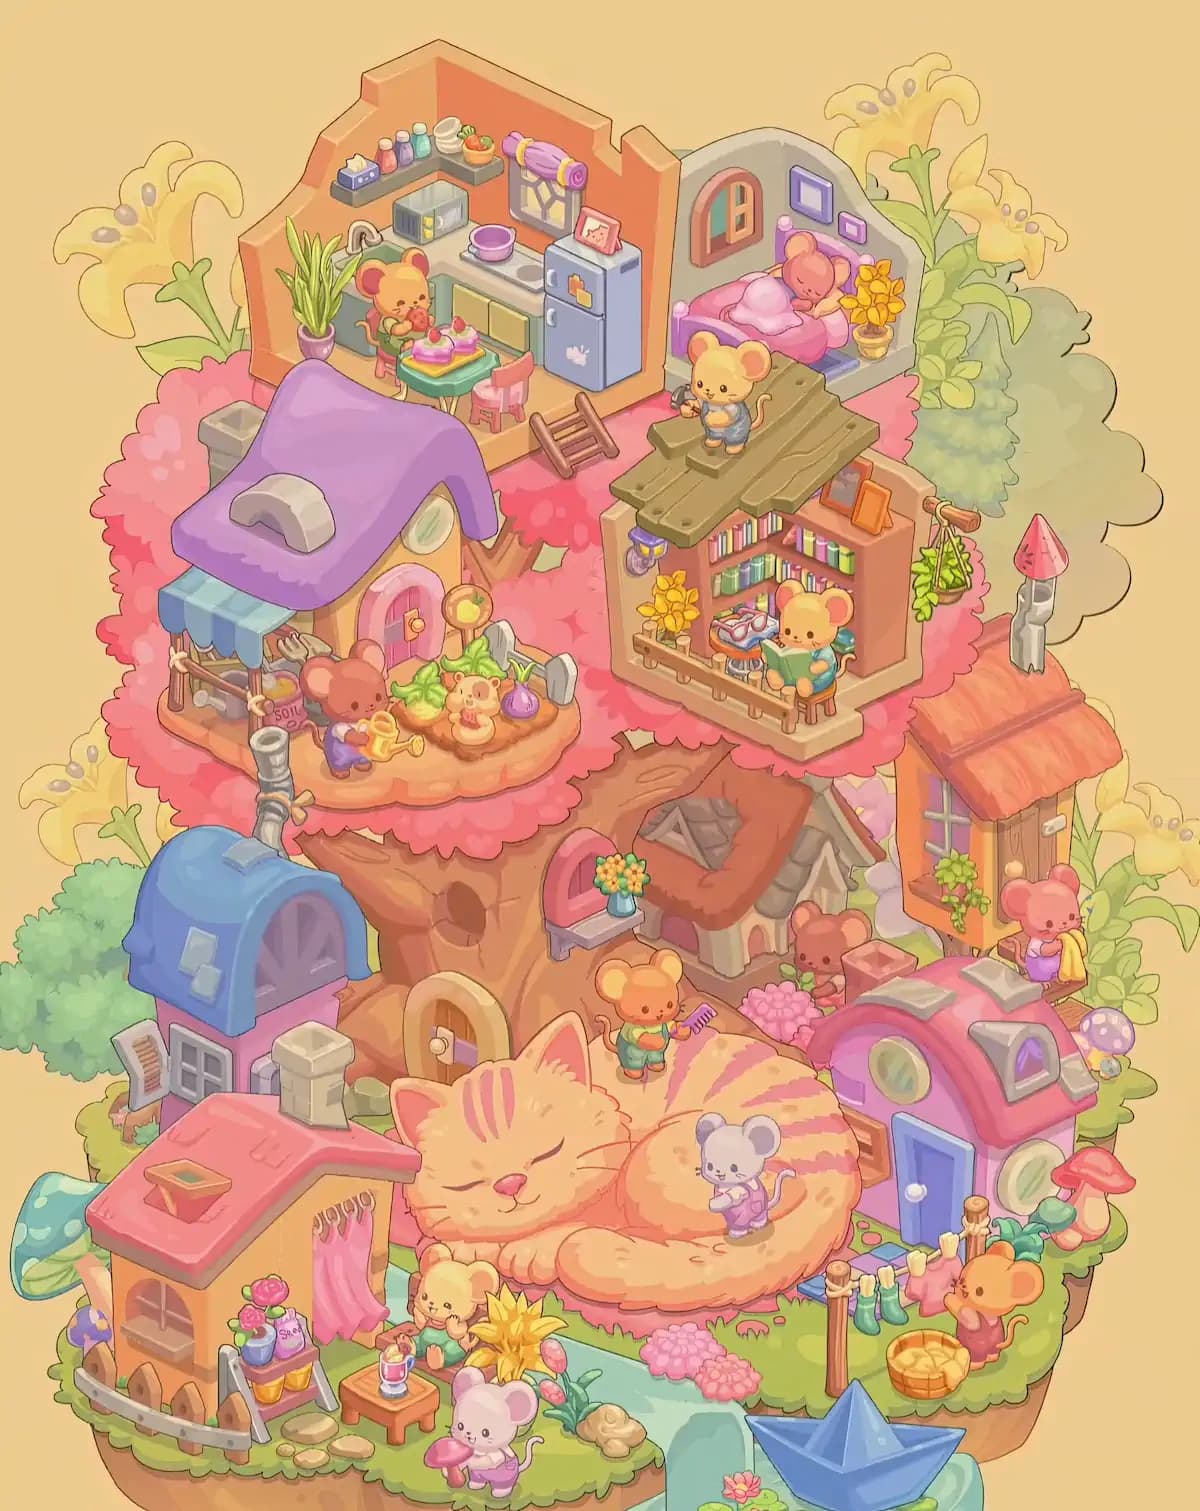
Start Dreamy Room Level 806 by establishing the scenery that everything else will attach to. The enormous brown tree trunk belongs in the middle of the original green platform, extending vertically through most of the finished composition. Add the broad layers of bright pink foliage around its upper branches so they form platforms beneath the kitchen, garden cottage, and library. The trunk should show a small dark hollow on its left-middle side and a rounded wooden door with a cream stone frame lower down. Around the outer rear edge of Dreamy Room Level 806, place the tall yellow lily-like flowers, pale green leaves, and large rounded bushes. The biggest foliage clusters sit behind the upper-left and upper-right rooms and along both sides. These background plants are important orientation markers because Dreamy Room Level 806 later becomes extremely dense, and getting the tree and rear vegetation aligned first prevents the houses from drifting too far outward.
Step 2. Place the upper-left kitchen and dining area in Dreamy Room Level 806
The highest left room in Dreamy Room Level 806 is the orange-walled kitchen. Place it at the upper-left rear of the tree, with its open side facing the viewer. Run a grey counter along the back and left walls. The curved faucet and sink sit toward the left, while a small grey appliance sits near the back corner. Put green and yellow cabinet doors underneath. The upper shelves hold a blue tissue box, several pastel bottles, white stacked dishes, and a small bowl of orange-red produce. A rolled purple-striped item rests near the little yellow-paned window. Place the purple cup and saucer on the counter. The tall blue refrigerator belongs on the right, decorated with small magnets and topped by a pink-framed picture. In Dreamy Room Level 806, the tall potted green plant stands at the far left. Finish the dining area with the yellow mouse, green square table, pink chairs, and small decorated cake. A short wooden ladder descends from the front-right edge of this room.
Step 3. Complete the upper-right bedroom in Dreamy Room Level 806
Immediately to the right of the kitchen, build the compact bedroom of Dreamy Room Level 806. Its back wall is rounded and grey rather than orange, which makes it easy to distinguish from the kitchen. Place the small arched orange-trimmed window on the left portion of the wall, then hang the larger purple picture frame high on the right with the smaller purple frame beneath it. The pink bed fits horizontally across the lower part of the room. Add the pale pillow and soft pink-and-white blanket, then position the reddish-brown sleeping mouse against the head of the bed. A pot of large golden-yellow flowers belongs beside the bed at the far right. This bedroom should sit slightly behind the wooden library roof below it. In Dreamy Room Level 806, do not push the bed too far forward because the next roof platform overlaps its lower edge. When correctly arranged, the bedroom makes the top-right corner of Dreamy Room Level 806 feel enclosed while still remaining completely visible.
Step 4. Build the rooftop library and reading nook in Dreamy Room Level 806
The library is one of the strongest landmarks in Dreamy Room Level 806. Place the tall open-front bookcase structure on the upper-right pink foliage platform, below the bedroom. Its flat, irregular wooden-plank roof extends well beyond the bookcase walls. Position the standing yellow mouse near the left-center of that roof, holding a tiny dark object. Inside the library, fill both shelves with rows of colorful books in pink, green, yellow, purple, and blue. Two orange picture frames lean along the upper-right wall, while a trailing green plant hangs from the outside right side. Add the golden flowers on the lower-left interior shelf and the small purple wall lamp above them. At the bottom of the reading nook, place the second yellow mouse on a little stool with an open green book. A tiny round table with reading glasses sits beside the mouse, and a low brown railing runs across the front. Correct placement in Dreamy Room Level 806 leaves the entire reading mouse visible.
Step 5. Assemble the purple-roof garden cottage in Dreamy Room Level 806
Move to the upper-left middle of Dreamy Room Level 806 and place the whimsical yellow cottage with the oversized purple roof. The curved grey chimney cap sits on the left half of the roof, while a small oval window appears high on the right wall. Put the rounded pink front door with its gold knob beneath that window. A blue-and-teal striped awning projects from the cottage’s left side. The garden platform stretches across the front. Place the brown mouse toward the left, holding the yellow watering can and facing the vegetable bed. Behind the mouse are gardening tools, rope, a grey pipe or container, and the bag marked “SOIL.” Across the soil, arrange the leafy green vegetables, pale green squash, purple onion, grey stone, and the small mouse-shaped garden ornament. The round yellow garden marker rises near the door. In Dreamy Room Level 806, this cottage sits directly below the kitchen and left of the library, surrounded by pink tree foliage.
Step 6. Add the central tree house and flower window in Dreamy Room Level 806
The central-middle portion of Dreamy Room Level 806 contains a small cream cottage seemingly built directly into the tree. Place its rust-brown sloping roof beneath the library. The roof has a small raised grey-brown dormer detail near the top. The front walls are light cream with darker timber accents, and the main opening is mostly hidden by surrounding objects. To the cottage’s left, attach the pink arched window alcove to the tree trunk. A narrow grey shelf extends below the window, holding a blue vase filled with small yellow and orange flowers. Keep the tree’s dark oval hollow visible farther left and the cream-framed round door below it. Pink flower clusters grow in front of the cottage. A brown mouse peeks from behind the right side near a small reddish box. In Dreamy Room Level 806, these details form the transition between the high tree platforms and the giant cat below, so preserving the layered overlap is essential.
Step 7. Place the narrow orange hut on the right side of Dreamy Room Level 806
On the far-right middle edge of Dreamy Room Level 806, add the tall, narrow orange hut. Its red-orange roof slopes toward the viewer and should sit below the library but above the pink rounded cottage. A tall grey metal pipe with a pointed pink cap rises behind and slightly above the roof. Place the purple-framed window on the hut’s left wall and add the trailing leafy green plant directly beneath it. The brown front door faces slightly toward the viewer and carries a tiny pale sign near the top. A pink mouse sits just outside the doorway on the lower-right side, holding or resting against a folded yellow cloth. Large pale-yellow flowers and green foliage fill the background behind the building, while a purple spotted mushroom appears near its lower-right edge. The hut occupies relatively little space, so in Dreamy Room Level 806 it must remain tucked tightly between the central cottage and the right-side house rather than floating independently.
Step 8. Build the blue house and lower-left orange home in Dreamy Room Level 806
Now fill the lower-left architectural cluster in Dreamy Room Level 806. First position the tall blue-roofed house behind everything else on this side. Its rounded dark-blue roof sits over a purple wall and grey-paned window, with an open shutter on the left. A bent grey metal pipe rises from the roof and extends upward toward the garden platform. In front of this house, place the smaller orange cottage with a broad coral-red roof and square stone chimney. Add the small roof vent, brown arched window, and short grey fence along the cottage’s front edge. A pink curtain hangs from the right-side opening. Against the wall, set the small plant stand containing pink flowers, a blue pot, yellow containers, and a pale bottle. Flat stepping stones lead past it. The overlapping roofs are intentional in Dreamy Room Level 806: the orange house should partly hide the blue building while leaving its roof, window, shutter, and pipe visible.
Step 9. Position the giant sleeping cat and the mice in Dreamy Room Level 806
The centerpiece of Dreamy Room Level 806 is the enormous sleeping orange cat. Lay the cat across the lower center, with its head facing left and its curled striped body extending toward the right. The face should remain fully visible: closed eyes, pink nose, whiskers, upright ears, and three darker forehead stripes. The cat’s large front paw rests beneath its chin, while the tail and body curve into a soft circular shape. Add the orange mouse standing above the cat near the upper back; this mouse wears green clothing and holds a purple comb as though grooming the cat. Place the pale grey mouse in purple clothing on the right side of the cat’s curled body. Because the cat overlaps several buildings in Dreamy Room Level 806, its position determines whether the lower scene aligns correctly. Keep the head in front of the orange cottage and the body in front of the pink rounded house.
Step 10. Complete the pink house and laundry corner in Dreamy Room Level 806
To the right of the sleeping cat, place the rounded pink-and-purple house in Dreamy Room Level 806. Its blue front door with a white knob faces forward. Add the round pale-green window on the upper-left wall and another round window on the lower-right side. The curved pink roof contains a small purple dormer framed by grey trim. Two open books rest across the roof ridge, making them important tiny pieces that are easy to overlook. Surround the house with oversized mushrooms: a red-capped mushroom stands near the lower-right wall and a purple spotted mushroom remains farther behind. In front of the house, install the clothesline between two wooden posts. Hang the small green, blue, yellow, and pink garments with tiny pegs. The orange mouse stands at the right end of the line, beside a round wicker laundry basket. This corner of Dreamy Room Level 806 should occupy the far-right foreground without covering the cat’s curled tail.
Step 11. Decorate the foreground garden in Dreamy Room Level 806
The bottom-left and center garden of Dreamy Room Level 806 contains many of the smallest pieces, so place them only after the buildings and cat are secure. Near the orange cottage, position the seated yellow mouse beside the tall star-shaped yellow plant. In front of that mouse, add the low square wooden table with the small pink-and-white drink or jar. A pale grey mouse stands closer to the bottom edge holding a large pink mushroom. Fill the surrounding ground with pink hydrangea-like clusters, red-pink flower buds, broad green leaves, small beige rocks, and scattered stepping stones. Keep the flower stand against the orange house rather than in the open garden. In Dreamy Room Level 806, these props create a continuous foreground path from the cottage toward the water. Watch the scale carefully: the mice should remain taller than the flowers but much smaller than the sleeping cat, which helps confirm correct placement.
Step 12. Finish the water feature, boat, and remaining landscape details in Dreamy Room Level 806
Complete Dreamy Room Level 806 with the foreground water feature and remaining natural accents. A pale turquoise stream or pond enters from the bottom center beneath the grassy edge. Place the large folded blue paper boat prominently on the water near the lower-right foreground, angled diagonally so its pointed bow faces upward-left. Add the tiny pink water flower near the bottom edge and keep the rounded green bank visible around it. Continue the pink flower patches along the grass above the water and leave the beige stone cluster near the left side of the bank. Check the outer perimeter for the oversized teal mushroom at far left, the red and purple mushrooms on the right, and the tall yellow flowers behind the village. At this stage, Dreamy Room Level 806 should have no large empty holes. Scan from the highest kitchen down to the boat; this vertical sweep is the easiest way to detect a misplaced miniature object in Dreamy Room Level 806.
Notes and Precautions
The biggest difficulty in Dreamy Room Level 806 is determining which layer each object belongs to. Several houses overlap the tree, the cat overlaps the lower buildings, and tiny decorative pieces can visually resemble props from another area. Place large structures before characters, then characters before flowers, books, dishes, tools, and other accessories.
Pay particular attention to the wooden library roof, the kitchen ladder, the two open books on the pink roof, the laundry basket, the vase beneath the pink tree window, the rooftop pipe above the blue house, and the tiny framed decorations in the kitchen and bedroom. These are easy to miss in Dreamy Room Level 806.
Do not judge placement only by color. Dreamy Room Level 806 uses the same pinks, greens, oranges, and purples across many different objects. Instead, match pieces by shape and by their relationship to nearby landmarks. Since the game is designed without time pressure, you can carefully organize each object rather than rushing. dreamy room instruction
Tips and Tricks from top player
For Dreamy Room Level 806, use a “large-to-small” placement strategy. Start with the tree trunk, pink canopy platforms, major rooms, and sleeping cat. Next place medium-size objects such as the refrigerator, beds, bookcases, tables, windows, doors, laundry line, and garden beds. Only then tackle tiny items such as bottles, dishes, frames, books, flowers, gardening tools, and mushrooms.
Another useful method for Dreamy Room Level 806 is to divide the finished scene into four zones: upper-left kitchen and garden cottage, upper-right bedroom and library, middle tree-house district, and lower cat-and-garden district. Finish one zone before moving to another.
If an item refuses to fit where you expect, compare its silhouette rather than repeatedly dragging it around. In Dreamy Room Level 806, curved pieces usually belong to the rounded houses, wooden pieces cluster around the library and gardening areas, and soft pink objects are commonly associated with the bedroom, flowers, or laundry. Keeping these visual families together makes Dreamy Room Level 806 much faster to solve.
Final Scene in Dreamy Room Level 806
The completed Dreamy Room Level 806 transforms the plain green island into a densely layered miniature village full of warmth and activity. At the top, a kitchen, pink bedroom, and book-filled reading room sit among towering flowers and leafy bushes. A purple-roof garden cottage occupies the left tree platform, while smaller homes, windows, pipes, plants, and pink foliage wrap around the central trunk. Below them, the enormous striped orange cat sleeps peacefully across the village, with one mouse combing its back and another standing on its curled body. Tiny mice water vegetables, read books, tend laundry, relax near flowers, and carry mushrooms. The bottom of Dreamy Room Level 806 finishes with cottages, stepping stones, flower beds, a turquoise stream, and a large blue paper boat. Every part of Dreamy Room Level 806 feels intentionally packed together, turning the original empty platform into a colorful, cozy woodland community.