Dreamy Room Level 905
Dreamy Room Level 905 guide - Dreamy Room 905 Walkthrough & Solution.
Important Notice Regarding Level Numbering
Due to frequent changes in Dreamy Room's level numbering and differences between platforms (Android/iOS) – for example, level 905 on Android might not be the same as level 905 on iOS – the text guide below may not always match the images and video above. Please prioritize the image and video guides. If you find that the guide content doesn't match your current level, please visit the All Level Walkthroughs page to find the correct guide based on level images. Thank you for your understanding.
Dreamy Room Level 905 Walkthroughs & Guide
Step 1. Identify the Four Platforms and Build the Treehouse Layout
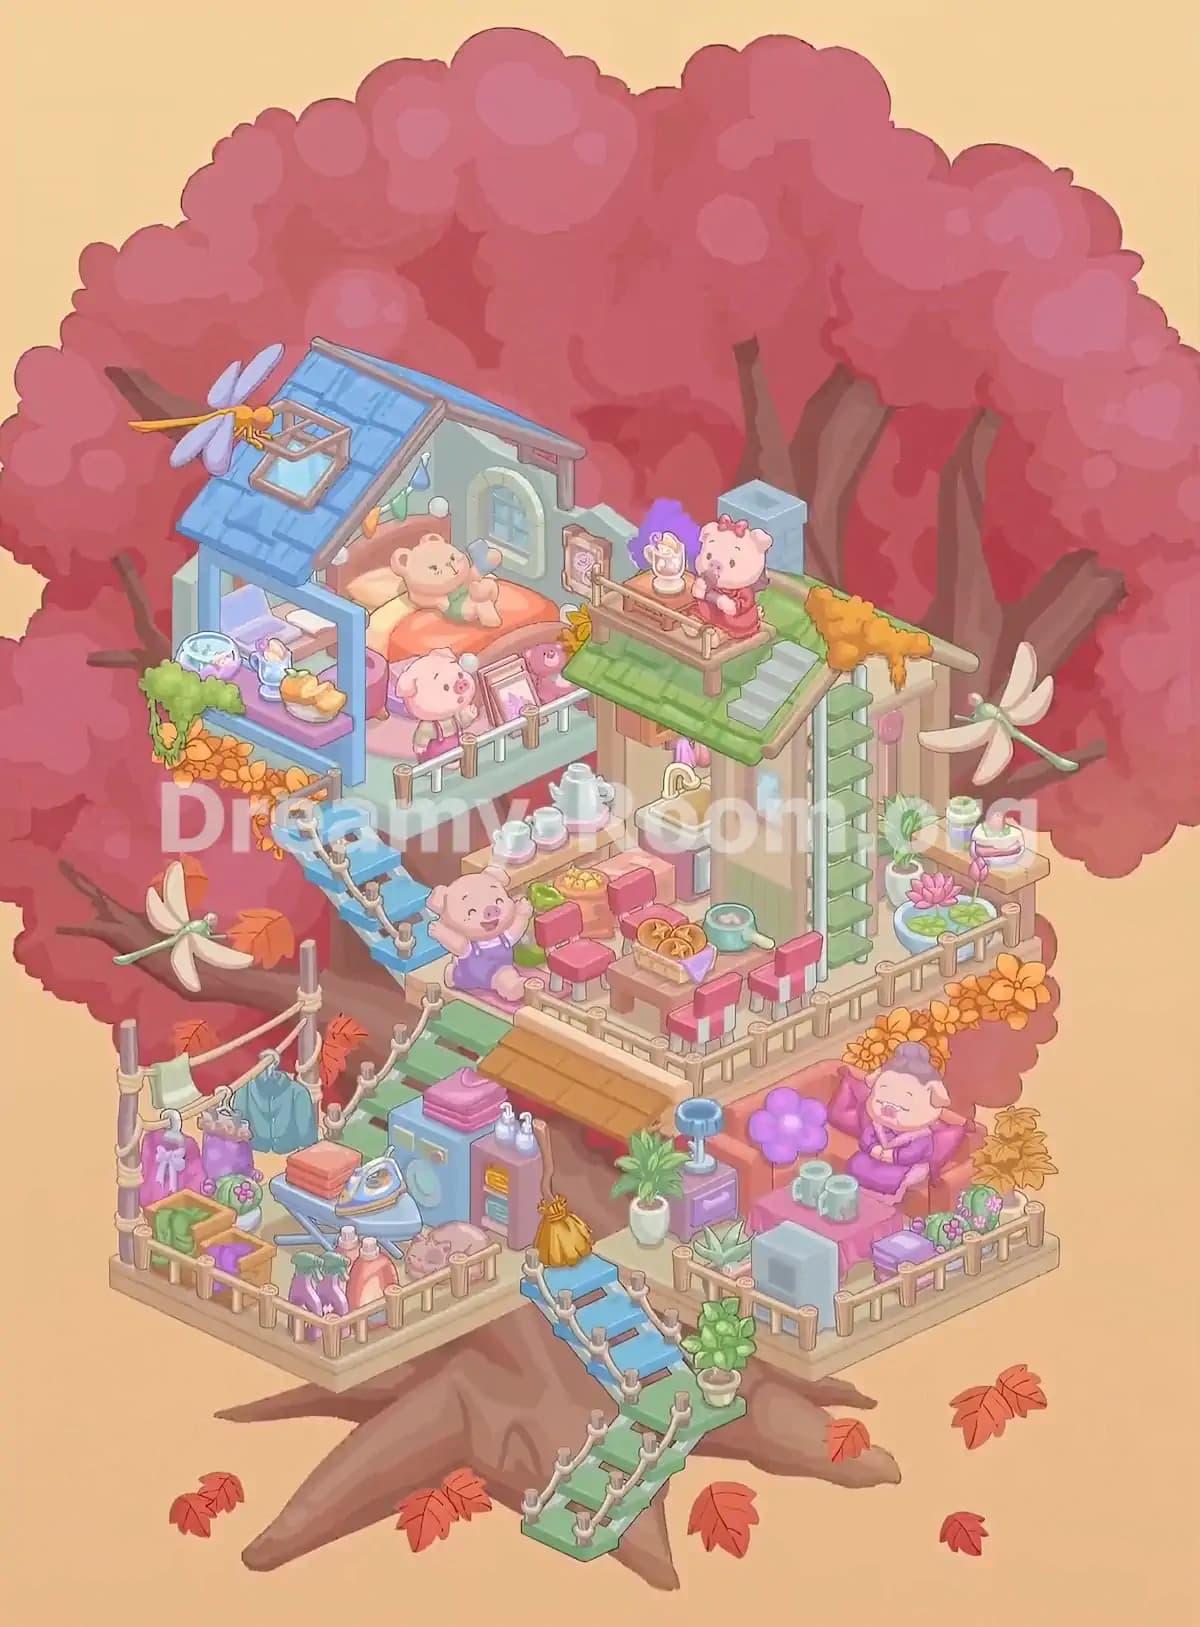
Begin Dreamy Room Level 905 by examining the empty structure floating in front of the enormous autumn tree. The background features a thick brown trunk, sprawling branches, clusters of pink and crimson leaves, and scattered orange maple leaves around the roots.
There are four main construction areas. The highest platform, positioned toward the upper left, already has pale blue-green walls forming a partially enclosed corner. This is where the bedroom will be built.
Below and slightly to the right is a large rectangular cream-colored platform intended for the central dining and kitchen area.
The two lowest platforms sit side by side. The left platform becomes a laundry and clothing station, while the right platform becomes a relaxing outdoor lounge.
In Dreamy Room Level 905, understanding these four locations before unpacking smaller items makes the remaining placements much easier. Keep the front edges clear for stairways and railings.
Step 2. Construct the Blue-Roofed Bedroom on the Upper-Left Platform
The next part of Dreamy Room Level 905 focuses on building the charming bedroom at the top left of the treehouse.
Position the cottage structure against the existing corner walls. Install the steep blue-tiled roof over the left side, with the sloping roof extending down toward the viewer. The roof features a small rectangular skylight framed in brown wood.
Place the pale blue support columns at the front of the room, creating an open porch-like appearance. The rear walls should remain visible, including the small arched window with its yellow frame and blue windowpanes.
Add the brown wooden roof trim and the colorful string of small hanging lights beneath the roofline.
In Dreamy Room Level 905, the bedroom's open front is important because several decorations must remain visible. Avoid positioning the roof too far forward, where it would obscure the bed or balcony.
Finish by attaching the large decorative dragonfly near the upper-left roof. Its pale lavender wings and orange body extend outward from the skylight area.
Step 3. Furnish the Bedroom with the Bed, Toys, and Balcony Decorations
With the bedroom structure ready, continue Dreamy Room Level 905 by arranging the sleeping area.
Place the large bed across the back of the room beneath the sloping roof. Its wooden headboard sits against the rear wall, and the bed is covered with an orange quilt and light-colored pillows.
Position the brown teddy bear directly on top of the bed. The bear should face forward and hold its small blue accessory, creating the bedroom's main focal point.
At the front-left side, add the purple bedside counter or shelf. Arrange the blue drinking glass, bowl, small dishes, and plate of orange-colored snacks on its surface. A small purple bed furnishing is tucked behind this counter.
Next, position the pink pig character near the front balcony railing. Add the framed picture beside the pig, along with the small pink plush toy.
The final touches in this part of Dreamy Room Level 905 are the wooden-and-white balcony railing, green foliage, and orange flowers cascading over the left exterior edge. These details make the elevated bedroom feel connected to the surrounding tree.
Step 4. Create the Green-Roofed Tower and Upper Observation Terrace
The central tower is one of the most distinctive structures in Dreamy Room Level 905.
Build the narrow cream-colored tower on the right side of the middle platform. Its walls feature soft brown trim, a small blue window, and green accents. Position the sloping green roof above the tower, with the roof extending toward the front and right.
On the roof, construct a small wooden observation terrace enclosed by short brown railings. Place a purple flowering decoration behind the terrace's tiny display table, and set the glass ornament or illuminated decorative object on the tabletop.
Seat the pink pig wearing a red outfit and matching bow at the right side of the observation terrace. The character faces outward while holding a treat.
Install the short gray roof steps just behind and to the right of the terrace.
To complete this Dreamy Room Level 905 section, add the square blue-gray chimney-like structure behind the roof and the orange flowering vines cascading down its right edge.
Finally, attach the vertical green ladder to the tower's right wall. Make sure it runs downward from the roof area toward the central platform.
Step 5. Arrange the Kitchen Sink and Tea Station Beneath the Upper Rooms
Continue Dreamy Room Level 905 by furnishing the sheltered space beneath the upper bedroom and beside the green-roofed tower.
Start with the kitchen sink. Position the yellow basin and curved cream-colored faucet against the left side of the narrow tower, just beneath the overhanging green roof. The pink and cream cabinet below the sink should face toward the viewer.
Next, place the long wooden serving shelf beneath the upper-left bedroom balcony. Arrange the pale blue teapot and matching cups on top. The teapot belongs on the right, while the smaller cups sit to its left on individual pink saucers.
Make sure this serving station fits behind the dining chairs and remains visible from the front.
In Dreamy Room Level 905, this kitchen area is compact, so positioning the sink or teapot shelf incorrectly may interfere with other furniture.
The finished arrangement should connect the upper bedroom, the tower wall, and the main dining platform without covering the kitchen accessories.
Step 6. Set Up the Dining Table, Pink Chairs, and Food Decorations
The central dining platform is the social heart of Dreamy Room Level 905.
Place the rectangular wooden dining table toward the front-center of the middle platform, immediately to the left of the green-roofed tower. Surround it with the small pink-backed chairs featuring striped pink-and-white lower sections.
Arrange the chairs so that the seating follows the table's edges and leaves space along the wooden platform railing.
Add the wicker basket filled with golden pastries to the tabletop. Position a small turquoise saucepan or serving pot behind the basket, closer to the tower.
Behind the chairs, place the food station containing a bowl of yellow snacks and small green vegetables or side dishes.
Seat the cheerful pink pig wearing purple overalls at the left entrance of the dining deck. The pig has both arms raised and sits beside the staircase landing.
For Dreamy Room Level 905, pay special attention to the balcony fence around the front and right sides of the dining platform. Its posts and horizontal bars must align with the platform edges.
Step 7. Decorate the Right-Side Garden and Connect the Upper Staircase
The next stage of Dreamy Room Level 905 involves adding greenery and small decorative elements around the right side of the central tower.
Begin by positioning the pale wooden fence behind the tower. Its top edge follows the right side of the platform, providing a background for the garden decorations.
Add the small wooden side table near the rear-right corner. Arrange the green cup and layered pink-and-white dessert on top.
In front of this table, place the round blue water basin containing green lily pads, pink lotus flowers, and a tall pink bud. A white flowerpot with leafy greenery belongs behind the basin.
Attach the large pale-winged dragonfly extending outward from the right side of the wooden fence.
Dreamy Room Level 905 also features another dragonfly hovering near the left side of the tree, close to the staircase and autumn branches.
Connect the upper-left bedroom to the central dining deck using the blue staircase with rope-lined railings. It should descend diagonally from the bedroom's front-left edge to the dining area's left side.
Complete the garden with the golden-yellow flowers spilling over the platform's right exterior edge.
Step 8. Build the Lower-Left Laundry and Clothing Area
Move to the lower-left platform to create the laundry corner in Dreamy Room Level 905.
Start by installing the wooden railing around the exposed front and left edges. Set up the clothesline posts at the back-left corner, then stretch the rope between them.
Hang the small pastel garments along the clothesline, including pink clothing, a purple patterned piece, a blue-green shirt, and a light green cloth.
Place the blue washing machine toward the center-right of this platform. Stack neatly folded purple towels on top.
In front of the washing machine, position the light blue ironing board and place the blue-and-white iron on it. A stack of folded orange towels sits next to the iron.
Add the wooden laundry baskets filled with green and purple fabric near the front-left corner.
Complete this Dreamy Room Level 905 section with detergent bottles, smaller cleaning containers, and a little sleeping animal curled beside the ironing area. The narrow purple cabinet with two bottles on top goes to the right of the washer.
Finish by hanging the yellow broom or cleaning brush near the stairs and adding a strip of green steps behind the laundry station.
Step 9. Create the Cozy Lounge on the Lower-Right Platform
The lower-right platform transforms into a peaceful seating area in Dreamy Room Level 905.
Begin by placing the orange-pink sofa against the rear of the platform, facing slightly forward. Decorate it with deep purple cushions and a large purple flower-shaped pillow.
Position the relaxed pig character in purple clothing on the sofa's right side. The character has a small topknot and rests comfortably among the cushions.
In front of the sofa, place the low rectangular pink coffee table. Arrange two pale green mugs on its surface.
Set the purple bedside cabinet at the sofa's left end and place the blue standing lamp on top.
A small white planter with green leaves should stand beside the cabinet, while another spiky succulent sits near the front edge.
For Dreamy Room Level 905, the remaining decorations include a gray box-shaped television or appliance at the front-right edge, a purple rectangular storage box, flowering cacti along the right railing, and a golden-orange shrub behind the sofa.
Surround the platform with wooden railings and make sure the orange flowers continue along the upper outside edge.
Step 10. Connect the Lower Platforms and Add the Final Autumn Details
The final construction stage of Dreamy Room Level 905 is to connect the different areas into one complete treehouse.
Position the blue staircase between the lower platforms so that it descends toward the front-center of the tree. Add the rope railings along both sides, matching the wooden posts on the other staircases.
At the lower end of the blue staircase, install the small green landing. Place the round leafy potted plant on the right edge of this landing.
Continue downward with the green staircase extending toward the tree's exposed roots. The final staircase should reach the bottom foreground, creating a clear entrance into the treehouse.
Check the green steps behind the laundry area and the blue steps leading down from the bedroom. Every staircase should appear connected to its appropriate platform.
In Dreamy Room Level 905, finish by checking the placement of the orange maple leaves, leafy flower arrangements, and decorative dragonflies. These objects reinforce the peaceful autumn atmosphere.
Once the furniture, plants, railings, characters, and accessories match the completed image, the entire multi-level treehouse should look balanced and fully decorated.
Notes and Precautions
Dreamy Room Level 905 includes multiple overlapping platforms, narrow decorative spaces, and small objects that are easy to confuse. Keep these points in mind while completing the level.
- Identify the correct platform first. The bedroom belongs at the upper left, the kitchen and dining area occupy the middle, the laundry area goes to the lower left, and the lounge belongs at the lower right.
- Place larger structures before small objects. Roofs, walls, tables, stairs, and cabinets establish the positions of surrounding decorations.
- Watch the overlapping stairs. The blue and green staircases must connect the appropriate levels without appearing to pass through furniture.
- Be careful with miniature items. Cups, food baskets, ornaments, flowerpots, and clothing must occupy their intended positions.
- Do not mix up the pig characters. The bedroom pig stands near the railing, the red-dressed pig occupies the rooftop terrace, the happy pig sits beside the dining steps, and the purple-dressed pig relaxes on the sofa.
- Check the outside edges. Hanging flowers, dragonflies, roof decorations, and railings extend beyond the main platforms.
The key to completing Dreamy Room Level 905 is accurate object placement, not simply filling every available space. Compare the overall structure regularly before making small adjustments.
Tips and Tricks from top player
The most efficient way to complete Dreamy Room Level 905 is to organize items according to the four main areas and decorate each section in a consistent order.
- Use the roofs as landmarks. The blue roof identifies the bedroom, while the green roof marks the central tower. These are the easiest structures to recognize and position.
- Work from back to front. Place rear walls, cabinets, large furniture, and decorations before adding objects closer to the viewer.
- Complete one platform at a time. Finishing the upper-left bedroom before moving to the dining area reduces confusion between similar decorations.
- Save tiny objects for last. Small cups, plants, ornaments, and pastries are easier to position once their supporting furniture is correctly arranged.
- Use characters to verify placement. The four main pig characters serve as useful visual checkpoints for the bedroom, rooftop terrace, dining deck, and lounge.
- Check the railings and stair connections. These determine whether the treehouse appears structurally complete.
- Compare the silhouette of the completed treehouse. The roofs, staircases, flower clusters, and lower platforms should create a balanced shape against the giant pink tree.
For Dreamy Room Level 905, patience and careful observation are more effective than repeatedly moving objects at random. Build the structure first, furnish the living spaces second, and finish with small decorative details.
Final Scene: A Magical Autumn Treehouse
The completed Dreamy Room Level 905 reveals a delightful multi-level home nestled among the branches of an enormous pink autumn tree.
At the upper left, a charming blue-roofed bedroom shelters a teddy bear resting on an orange bed, while a little pig enjoys the view from the balcony. Beside it, another pig sits on a miniature rooftop terrace overlooking the woodland surroundings.
Below, a cheerful dining area welcomes visitors with pink chairs, freshly baked pastries, warm tea, and a compact kitchen. A tiny garden of lotus flowers, green plants, and decorative dragonflies adds natural beauty.
The lower-left platform becomes a practical laundry area filled with colorful clothing, cleaning supplies, and a washing machine. Across from it, a cozy lounge provides the perfect spot for relaxation, complete with a sofa, cushions, tea table, and flowering plants.
With rope-lined staircases connecting every level, Dreamy Room Level 905 becomes a warm, imaginative autumn retreat filled with peaceful moments and adorable details.