Dreamy Room Level 147
Dreamy Room Level 147 guide - Dreamy Room 147 Walkthrough & Solution.
Important Notice Regarding Level Numbering
Due to frequent changes in Dreamy Room's level numbering and differences between platforms (Android/iOS) – for example, level 147 on Android might not be the same as level 147 on iOS – the text guide below may not always match the images and video above. Please prioritize the image and video guides. If you find that the guide content doesn't match your current level, please visit the All Level Walkthroughs page to find the correct guide based on level images. Thank you for your understanding.
Dreamy Room Level 147 Walkthroughs & Guide
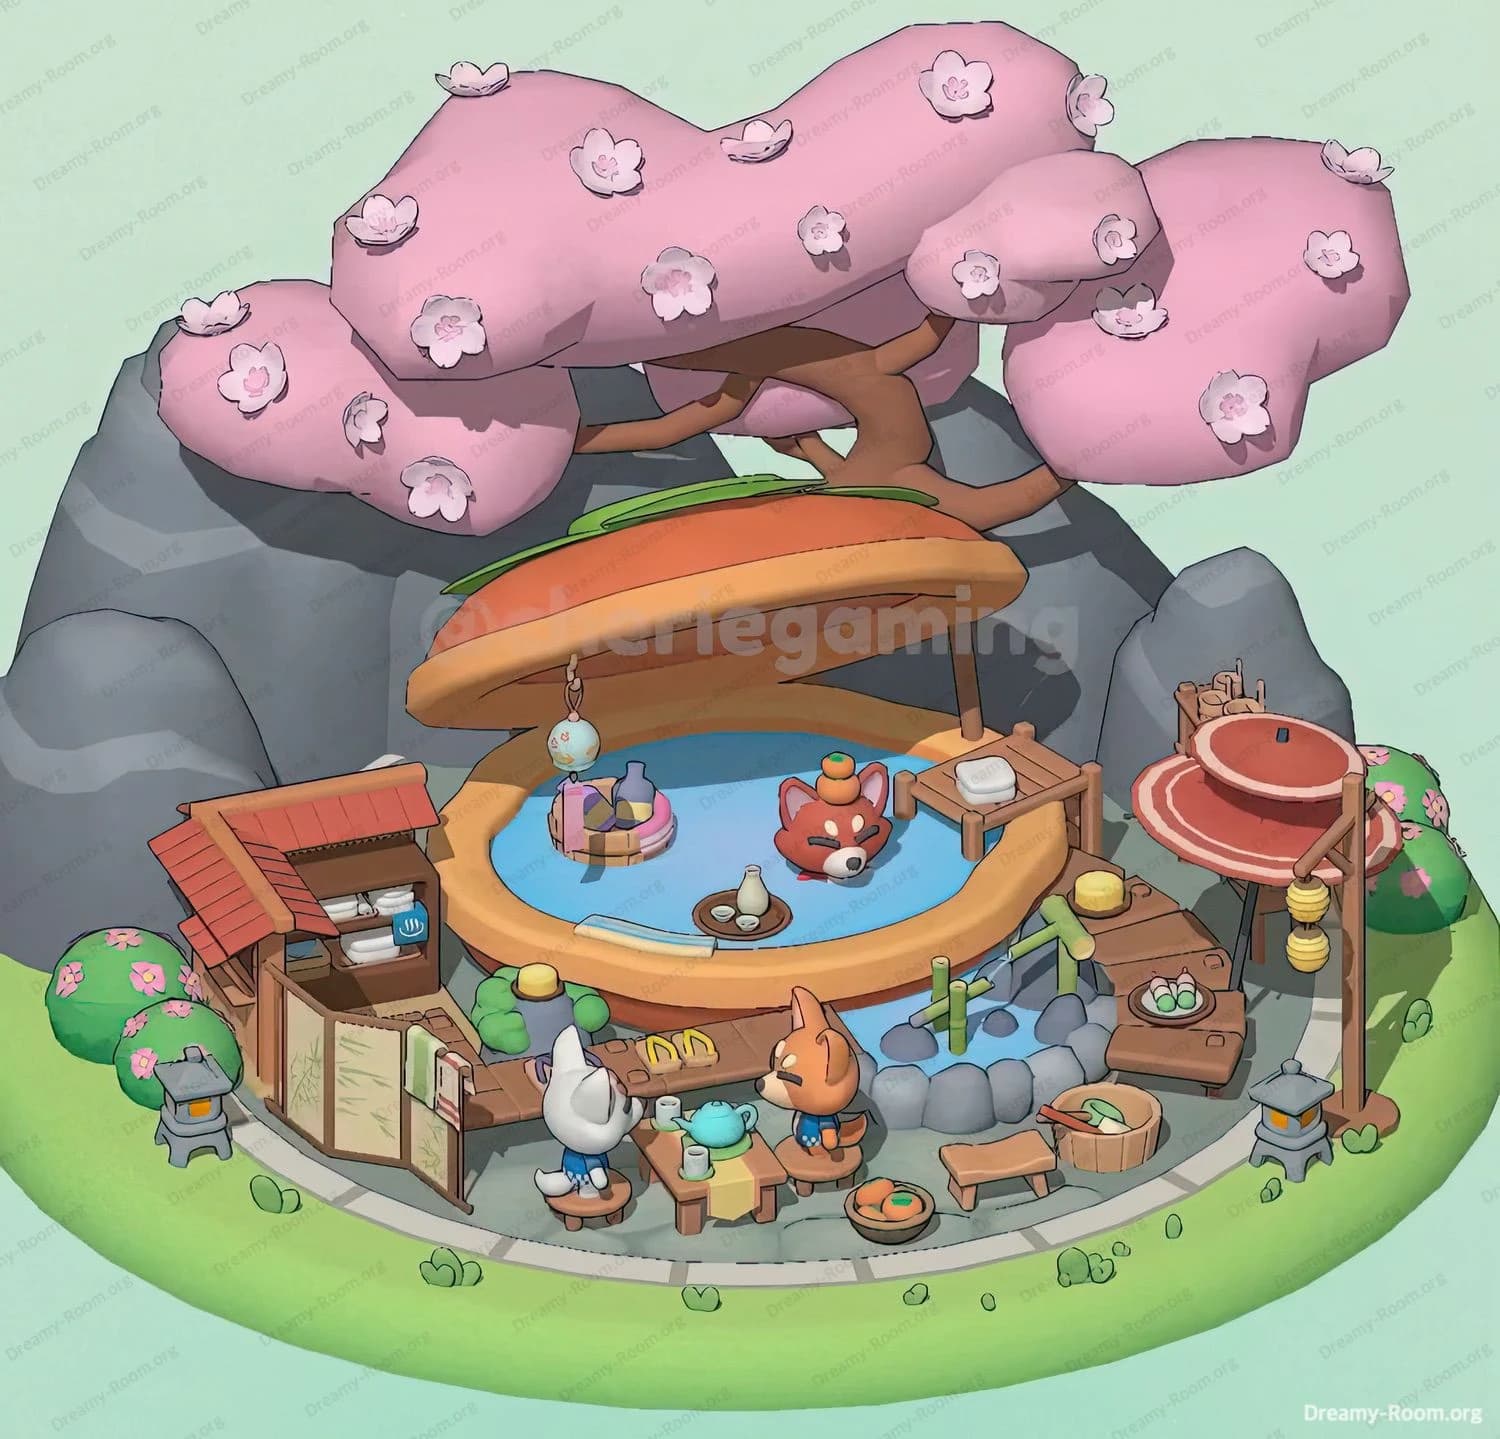
Step 1. Place the rocky base and add the pond.
In Dreamy Room Level 147, the first step is to lay down the foundation of large gray rocks around the edges of the space. This rock formation will define the layout of your space. After the rocks are positioned, select the pond element and place it in the center of the rocky formation. Ensure that the pond’s edges align nicely with the stone, creating a seamless visual flow. The pond should feel integrated into the environment. In Dreamy Room Level 147, make sure to adjust the pond's placement until it sits perfectly within the rock circle, as any misalignment can disrupt the look. A gentle glow will confirm the placement of both rocks and the pond, marking the successful completion of this foundational step. The pond serves as the heart of the space in Dreamy Room Level 147 and will help guide the rest of the design choices.
Step 2. Add the cherry blossom tree.
In Dreamy Room Level 147, the next major decorative element is the vibrant cherry blossom tree. Choose the pink tree from the inventory and position it at the back of the pond, slightly off-center but balanced enough to give the space depth. The tree should sit on the grass patch near the rocks, with the branches extending over the water slightly, adding to the visual interest of Dreamy Room Level 147. Ensure the tree doesn’t obstruct the path around the pond or block key view areas. The tree's blossoms should spill gracefully into the surrounding space. Once placed, a confirmation animation will signal that this iconic piece is correctly situated. The cherry blossom tree acts as both a beautiful focal point and a visual connection between the natural elements in Dreamy Room Level 147.
Step 3. Set up the kiosk and food baskets.
In Dreamy Room Level 147, place the quaint wooden kiosk along the left side of the pond, facing the water to create an inviting atmosphere for visitors. The kiosk should be placed on a flat surface, just beside the rocks, with enough room for the characters to interact with it. Select the food baskets from your inventory and place them in front of the kiosk, slightly to the left. The baskets will contain various fruits and snacks, adding color and texture to the scene. Arrange the baskets in a way that doesn’t crowd the kiosk but ensures they are easily accessible. In Dreamy Room Level 147, these food elements will help bring the space to life, inviting the characters to interact with the scene. After placing the kiosk and baskets, a confirmation glow will appear, letting you know everything is in its right place.
Step 4. Place the seating and dining table.
To add functionality and charm to the space in Dreamy Room Level 147, you need to place the seating and dining table. Begin by positioning the small round dining table next to the kiosk, ensuring it has enough space for characters to sit around it. Place four wooden chairs around the table, adjusting them slightly to maintain symmetry while avoiding overlap with other items like the baskets or rocks. The seating area should feel cozy and well-integrated into the environment, with characters able to interact with both the table and the food. In Dreamy Room Level 147, the arrangement should encourage a sense of togetherness. After positioning the chairs and table, check for alignment by rotating the camera for a more dynamic view. Once confirmed, Dreamy Room Level 147 will trigger a soft glow to mark the completion of this step.
Step 5. Add the lanterns and outdoor decor.
In Dreamy Room Level 147, the next step involves adding ambiance to the scene with decorative lanterns. Start by placing the tall red lantern on a wooden stand to the right of the pond, making sure it doesn’t obscure the tree or the seating area. Then, select the smaller lanterns and arrange them along the path that curves around the pond, adding a soft, glowing light to the space. In Dreamy Room Level 147, the lanterns should be evenly spaced to create a visually pleasing layout. Ensure that the lanterns are not placed too close to the characters, as this may cause them to be blocked or interact awkwardly with the environment. Completing this step will trigger a confirmation effect, signaling that your outdoor decor has been successfully added to Dreamy Room Level 147.
Step 6. Position the character figurines.
Now that the environment is set up, it’s time to add life to the space by placing character figurines in Dreamy Room Level 147. Begin by placing the character with a red scarf near the dining table, positioning them so that they face the food baskets. Next, place another character in the water area, sitting on the edge of the pond, interacting with the water or holding a teapot. In Dreamy Room Level 147, ensure that the characters are placed naturally, as if they are interacting with the environment around them. The final step in Dreamy Room Level 147 is to adjust the placement of each figurine carefully, ensuring they are not blocking key areas of the design, like the pond or the seating area. Once the characters are in place, the game will confirm with a visual cue, marking the completion of your layout.
Step 7. Complete the scene with small details.
For the final touch in Dreamy Room Level 147, add small decorative elements that bring the scene together. Start by positioning some small flower pots around the rocks, adding pops of color to the lower corners of the design. Then, place a few bowls of fruit or snacks on the tables to make the space feel more lived-in and inviting. Ensure that these smaller details complement the existing décor without overwhelming the scene. In Dreamy Room Level 147, the placement of these little elements is crucial, as they help fill in gaps and make the space feel complete. Once all the items are placed, take a step back and review the scene. If everything looks balanced and well-placed, a final confirmation effect will show that Dreamy Room Level 147 is complete.
Notes and Precautions for Dreamy Room Level 147
- Pay close attention to the alignment of larger items like the tree and kiosk to avoid any overlap or awkward positioning.
- Make sure that the seating and dining areas have enough space for characters to interact comfortably without blocking other key areas of the design.
- Keep an eye on the placement of the lanterns; if they are too close to characters or other large objects, they may block interaction or obscure important elements of the scene.
- Rotate the camera frequently to check for any hidden overlaps or misalignments that may be hard to spot from the default view.
- Check the spacing of small decorative elements, like flowers and bowls, to ensure they don’t crowd the main objects of the design.
Tips and Tricks from top player for Dreamy Room Level 147
- Start with the large objects first: The tree, rocks, and pond form the foundation of your design. Place these first to give yourself a clear framework for the rest of the elements.
- Use symmetry to your advantage: In Dreamy Room Level 147, balancing the placement of objects like lanterns and seating can enhance the visual appeal.
- Focus on interaction points: Place characters near the key interactive elements (like the food baskets or the pond) to create a dynamic, lively scene.
- Rotate the view frequently: Regularly adjusting the camera angle will help you spot any alignment issues or objects that look out of place.
- Avoid cluttering the space: In Dreamy Room Level 147, maintaining some open space around objects helps each element shine and prevents the scene from feeling overcrowded.
Final Scene Description for Dreamy Room Level 147
The completed scene in Dreamy Room Level 147 is a peaceful and serene garden retreat nestled between towering gray rocks. A calming pond lies at the heart of the space, surrounded by a stone pathway and lush greenery. Above, a cherry blossom tree with soft pink blossoms stretches across the top of the area, casting a gentle shadow over the pond. A quaint wooden kiosk sits at the edge of the water, surrounded by food baskets filled with colorful fruits. Nearby, a round dining table with wooden chairs invites guests to enjoy the peaceful setting. Lanterns light up the area, casting a soft glow on the scene, while the characters interact with their environment—one sits by the pond with a teapot, while others gather around the food. The final touches, including small flower pots and bowls of fruit, complete this idyllic outdoor retreat in Dreamy Room Level 147.