Dreamy Room Level 501
Dreamy Room Level 501 guide - Dreamy Room 501 Walkthrough & Solution.

Important Notice Regarding Level Numbering
Due to frequent changes in Dreamy Room's level numbering and differences between platforms (Android/iOS) – for example, level 501 on Android might not be the same as level 501 on iOS – the text guide below may not always match the images and video above. Please prioritize the image and video guides. If you find that the guide content doesn't match your current level, please visit the All Level Walkthroughs page to find the correct guide based on level images. Thank you for your understanding.
Dreamy Room Level 501 Walkthroughs & Guide
Step 1. Place the turquoise charger frame at the front in Dreamy Room Level 501
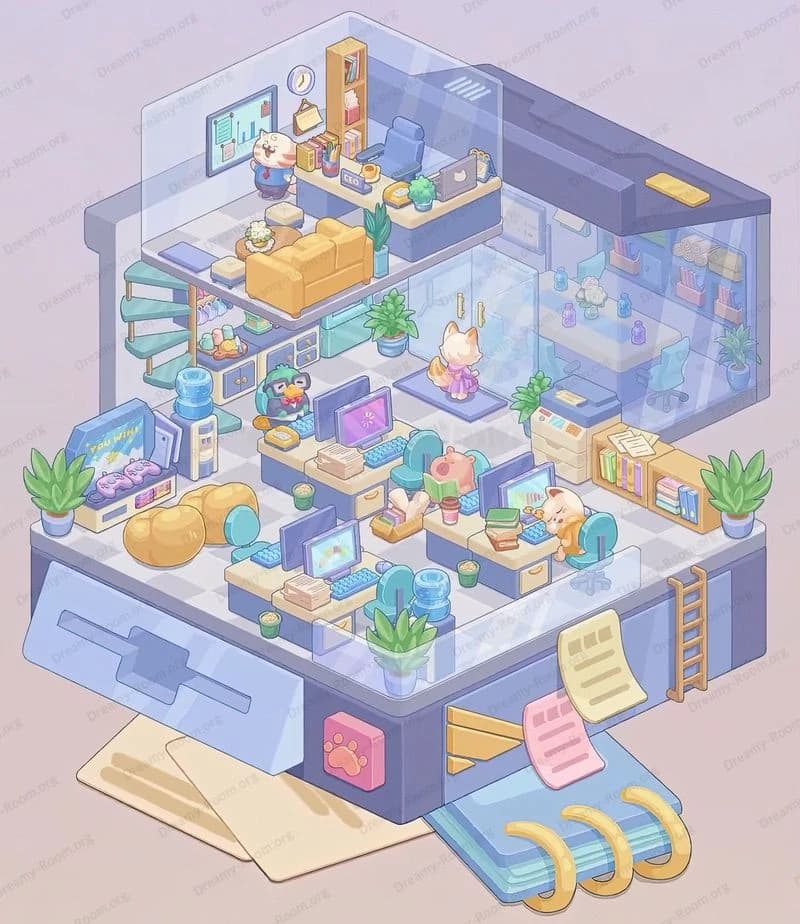
In Dreamy Room Level 501, start by framing the empty orange shell. Drag the turquoise rectangular frame and snap it to the front-left edge of the charger, where the open wall is. The frame’s long side should run along the left edge, and its cut-out window must expose the lower floor so you can later see the garden inside Dreamy Room Level 501. Make sure the small golden USB slot sits on the left face of this frame, with the words “5V 1A”, “5V 2.1A”, and “MIC” printed vertically beside it. If the turquoise frame floats or clips into the orange wall, the later pieces of Dreamy Room Level 501 will not line up correctly, so ensure it is flush with the base.
Step 2. Place the garden floor, stepping stones, and fence on the lower left
Next, turn the front-left lower platform into a garden. In Dreamy Room Level 501, drop the green grass carpet piece onto the beige lower floor inside the turquoise frame so it fills that front-left rectangle. Then place the curved row of pale stepping stones so they start near the front center of the grass and curve back toward the left wall. On the back-left corner, directly behind the stones, position the big orange tree, trunk against the left wall and branches rising into the top of the charger in Dreamy Room Level 501. Along the front-right edge of the grass, inside the frame, snap the short brown fence with three posts and tuck the pink and blue flowers just behind it. This completes the outdoor yard that anchors the rest of Dreamy Room Level 501.
Step 3. Place the staircase and arched window along the back-left wall
Now you need vertical structure in Dreamy Room Level 501. Take the wooden staircase piece and anchor its bottom step at the back of the garden, slightly right of the tree. The steps should rise diagonally to the upper indoor level, hugging the back wall and turning gently right at the top. Attach the pink handrail so it follows the staircase edge, with the rounded top of the rail aligned with the upper floor balcony. Behind the lower part of the stairs, on the back wall, place the tall arched window with the light blue panes; it should sit just above the garden area in Dreamy Room Level 501, adding daylight to the yard. If stairs or window shift too far right, they will overlap the later living-room furniture, so position them tightly into the back-left corner.
Step 4. Place the lower living area: sofa, dining table, chairs, and plants
With the vertical connection done, fill the main lower interior of Dreamy Room Level 501 on the right side of the garden. On the floor behind the glass panel, drop the long blue sofa so it sits along the inner left of the glass, parallel to the turquoise frame, just to the right of the garden fence. In front of the back wall but centered under the glass, place the round dining table covered with a soft purple cloth; surround it with four wooden chairs, one on each side, making sure the top chair is closest to the back wall. Between sofa and table, set the big green potted plant so the leaves rise into the middle of the glass panel. Add a low strip of greenery with small flowers along the fence edge to visually connect garden and living room in Dreamy Room Level 501.
Step 5. Place the mid-landing cabinet, TV, and table with blue cloth
Now focus on the small platform where the staircase meets the indoor space of Dreamy Room Level 501. At the top of the stairs, on the first indoor landing, place the light brown cabinet so its back touches the back wall and its front faces the glass. On top of this cabinet, put the small orange TV or media box with a tiny white antenna or cup, aligning it slightly left of center. Just to the right of the landing, on the upper wooden floor, drop the square table with the blue checkered cloth. The table must sit close to the railing that overlooks the glass, with the pink gift box or stacked parcels centered on top. This arrangement creates a cozy lounge corner, and in Dreamy Room Level 501 the spacing has to leave enough room behind for the bed platform above.
Step 6. Place the upper lounge cushions, storage chest, and railing
Before you add the bed, you must complete the upper walkway along the right side of Dreamy Room Level 501. Under the bed platform but above the dining area, place the turquoise storage chest with the purple strap so it rests slightly right of the blue-cloth table. Its long side should parallel the back wall. Directly in front of this chest, position the light pink ottoman cushion, and to its right tuck the darker pink block-shaped seat. Between these seats and the tall blue unit that you will place next, drop the small green potted bush so the leaves cheer up the corner. Make sure the long brown railing runs continuously along the edge of this upper level, from the top of the staircase to the far right, forming a protective barrier in Dreamy Room Level 501.
Step 7. Place the bedroom set: bed, pillows, rug, lamp, and wall pictures
Now you can build the heart of Dreamy Room Level 501: the bedroom on the top platform. On the highest raised floor against the back wall, center the large green bed so its headboard touches the wall and its foot points toward the railing. Cover it with the pink blanket piece, leaving the green base visible, and place the blue square pillow nearest the headboard with the white pillow slightly in front of it. Lay the long cylindrical bolster, striped pink and white, across the top of the bed. On the floor in front-left of the bed in Dreamy Room Level 501, place the two small green floor cushions or rolled blankets side by side. On the right side of the bed, near the railing’s corner, set the tall golden floor lamp so its shade rises just above the mattress height. Finally, hang the three small pictures—blue, purple, and orange frames—on the back wall to the left of the bed.
Step 8. Place the storage column, side wall frames, and kitchen area below
On the right side of Dreamy Room Level 501, fill the vertical stack of storage and kitchen pieces. First, on the upper floor near the railing and to the right of the pink seating blocks, place the tall blue cabinet or fridge so its back is flush with the right wall. Stack a small green plant and a pink box on top of this blue unit, forming the colorful column seen in Dreamy Room Level 501. On the right wall above the cabinet, hang the two rectangular frames: the blue one closer to the back, the pink one toward the front. Directly underneath, on the lower floor behind the glass, assemble the compact kitchen: position the white sink and counter piece along the right interior wall, add the small counter accessories like bowl, cup, and bottles on top, and place the round washbasin or toilet unit slightly in front of them. Everything must remain visible through the glass front of Dreamy Room Level 501 without overlapping the dining table.
Step 9. Place the transparent glass wall and finish the charger details
To give Dreamy Room Level 501 its diorama feel, drag the large transparent glass wall and snap it to the open right side of the charger. Its top edge should align with the orange upper frame, while the bottom edge sits along the base of the lower floor, enclosing both the living room and kitchen. The glass must cover from the front edge all the way back to the rear, leaving the turquoise frame on the left and the two teal prongs on the right exposed. Double-check that you can still see the dining table, sofa, plants, and kitchen items through the glass; if anything clips outside, slightly reposition those objects. At this point in Dreamy Room Level 501, the plug prongs, orange shell, and text on the turquoise frame should feel like a real electronic charger housing a tiny home.
Step 10. Place the smartphone pool, ladders, floats, cable, and plug
The final step of Dreamy Room Level 501 happens outside the charger. First, place the long pink smartphone horizontally below the charger’s right side, with its screen facing up to become the swimming pool. Fill the screen with the blue water tile so you see a light grid pattern. Snap the left metal ladder so it touches the left inner wall of the pool, slightly closer to the charger, and place the second ladder at the far right edge. In the center of the pool of Dreamy Room Level 501, drop the yellow and white life ring. Near the top-right corner of the phone, set the large pink flamingo float so it faces left, with its tail touching the far edge. Finally, connect the brown charging cable: plug the golden connector into the turquoise frame’s USB slot and the green connector into the phone’s port. Lay the cable in a loose S-shaped curve on the ground to complete Dreamy Room Level 501.
Notes and Precautions
In Dreamy Room Level 501, object order matters less than precise placement, but starting with big structural pieces (frame, stairs, glass, phone) makes alignment easier. Always use the walls and floor edges as guides; if a tree trunk or cabinet edge floats even a little, later pieces in Dreamy Room Level 501 may refuse to snap. Pay special attention to the railing and staircase—misplacing them can cause the bed or cabinet to overlap, making it hard to see the correct snap points. When positioning items behind the glass, zoom in if the game allows; the transparency in Dreamy Room Level 501 can hide exact outlines, so rely on shadows on the floor as cues. Finally, remember that every area—the garden, living room, bedroom, kitchen, and pool—must feel balanced; if all the clutter ends up on one side, you probably mis-placed something and should nudge items back to their logical centres.
Tips and Tricks from top player
Top players treat Dreamy Room Level 501 as five mini-zones: charger exterior, garden, stairs/landing, indoor rooms, and phone pool. Finish one zone completely before moving on so you can mentally “lock” that part of Dreamy Room Level 501. Use color matching as a shortcut: green items usually belong near plants or bed, pink pieces often sit in the lounge or pool, and blue elements often form furniture or appliances. When stuck, temporarily drag a confusing object around the scene; in Dreamy Room Level 501 the game usually “tugs” slightly when you pass over the correct region. Don’t ignore tiny decorations like wall pictures or small boxes—placing them often confirms you’ve aligned bigger pieces correctly. Finally, if the cable path looks unnatural or crosses important scenery, re-check the positions of the charger frame and phone; in a correctly solved Dreamy Room Level 501, the wire flows smoothly in a loose curve without covering key details.
Final scene description of Dreamy Room Level 501
When Dreamy Room Level 501 is complete, the orange charger block becomes a tiny dream home powered by your phone. On the left, a turquoise shell reveals a lush garden with an orange tree and stepping stones leading to the warm glow of the house. Inside, a round dining table, sofa, and potted plants sit behind a crystal-clear glass wall, with a compact kitchen tucked neatly into the back-right corner. Above, the staircase climbs to a cozy lounge of cushions, storage chests, and framed art, topped by a plush green bed under soft lamplight in Dreamy Room Level 501. Outside, a pink smartphone transforms into a sparkling pool, ladders at each end and a flamingo float drifting beside a life ring, all connected by a gentle charging cable that visually links technology and comfort.