Dreamy Room Level 734
Dreamy Room Level 734 guide - Dreamy Room 734 Walkthrough & Solution.
Important Notice Regarding Level Numbering
Due to frequent changes in Dreamy Room's level numbering and differences between platforms (Android/iOS) – for example, level 734 on Android might not be the same as level 734 on iOS – the text guide below may not always match the images and video above. Please prioritize the image and video guides. If you find that the guide content doesn't match your current level, please visit the All Level Walkthroughs page to find the correct guide based on level images. Thank you for your understanding.
Dreamy Room Level 734 Walkthroughs & Guide
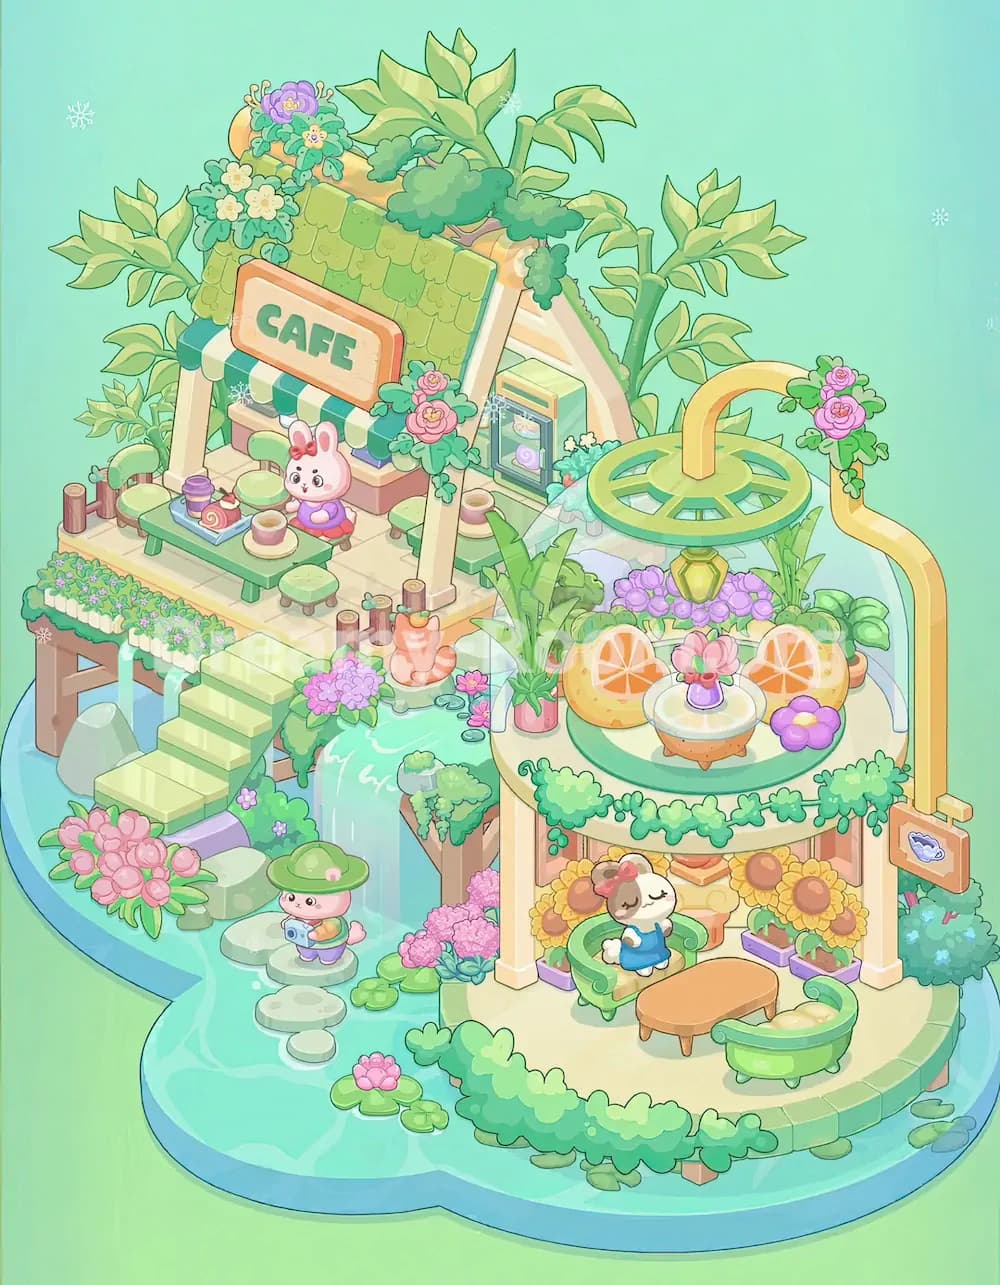
Step 1. Build the main café house on the upper-left platform.
Start Dreamy Room Level 734 by focusing on the square tiled platform at the upper-left side of the water base. This is where the main café house belongs. Place the tall A-frame structure directly on the back edge of the platform, keeping its slanted roof leaning upward toward the top-left corner. The green shingle roof should cover the front café area, while the cream-colored triangular wall and support beams sit slightly behind it. Add the leafy plants and tall bamboo-like branches behind and around the roof so they rise above the building. In Dreamy Room Level 734, this roof placement is important because it anchors the whole level; if it is too far forward, the café sign, counter, flowers, and seating will not align correctly later.
Step 2. Add the café sign, awning, counter, and front decorations.
Next in Dreamy Room Level 734, decorate the front face of the café. Place the rectangular “CAFE” sign on the green roof, centered above the service window. The sign has a cream middle, orange border, and green letters, so it should stand out clearly against the leafy roof. Under the sign, add the striped green-and-white awning across the café window. Then place the small counter beneath it, with pastel blocks and display items arranged inside the shop opening. Add the clustered flowers near the right roof edge, especially the pink roses beside the front pillar. Dreamy Room Level 734 relies heavily on layered placement, so make sure the sign sits above the awning, the awning sits above the counter, and the flowers overlap naturally without covering the word “CAFE.”
Step 3. Arrange the upper café seating area and rabbit customer.
Now place the customer area on the tiled platform in front of the café. In Dreamy Room Level 734, the long green table belongs near the lower-left side of the upper platform, parallel to the front edge. Put the bunny character on the right side of the table, seated on a small round stool, facing slightly left toward the food. The bunny wears a purple outfit and a red bow, making it one of the most noticeable characters in Dreamy Room Level 734. On the table, place the drink cup, rolled dessert, plate, and teacup. Add the small round green stools around the table, with one stool near the front-right corner and another near the left. The table must not float over the stair area; it should remain fully on the tiled café floor.
Step 4. Place the bridge, steps, railing, flowers, and water details.
After the café seating is stable, move to the lower-left transition area of Dreamy Room Level 734. Place the pale green stairs at the front of the upper platform, descending diagonally toward the water path. The steps should connect the café deck to the lower water area. Add the small wooden fence posts and short railing pieces along the left side of the café platform, near the round chairs and leafy plants. Along the front edge of the platform, place the rectangular flower bed filled with tiny blue, purple, and white blossoms. Below the stairs, add the large pink flower cluster on the water’s edge, then place flat stepping stones leading across the water. Dreamy Room Level 734 uses these stones to visually guide the player from the café to the pavilion, so their spacing matters.
Step 5. Add the waterfall, plants, lily pads, and small animal in the water garden.
The middle-left water section is one of the prettiest parts of Dreamy Room Level 734. Place the waterfall effect under the front edge of the café platform, where the turquoise water appears to pour down into the lower pool. Add green moss and hanging plants along the platform edge so the waterfall looks natural. Put the small animal character wearing a green lily-pad hat near the lower center-left, standing on a pale stepping stone and holding a tiny blue camera. Around this character, place several lily pads, round stones, and pink water flowers. In Dreamy Room Level 734, these water objects should stay low and spread out; avoid crowding them against the stairs. The animal should feel like it is exploring the pond path between the café and the pavilion.
Step 6. Construct the round pavilion on the right island.
The large circular island on the right side is the second major structure in Dreamy Room Level 734. Place the round cream floor directly on the circular base, with the green rim following the outside edge. Add the tall cream pillars around the lower pavilion level, especially the two front pillars and the back supports. Then place the upper round balcony floor above them, making sure it aligns with the circular base below. The pavilion should overlap the water on the right side, with the front curve visible and the lower level open underneath. In Dreamy Room Level 734, this pavilion has two levels: the upper garden lounge and the lower sitting area. Getting the circular floors aligned correctly is the key to making the rest of the right-side decorations fit.
Step 7. Decorate the upper pavilion with fruit seats, table, flowers, and hanging lamp.
Now complete the upper pavilion in Dreamy Room Level 734. Place the large green circular canopy frame above the upper round floor, then attach the yellow hanging lamp beneath its center. Add the tall curved yellow handle-like pipe on the right side, rising from the lower-right base and arching over the pavilion roof. On the upper floor, place the orange-slice seats along the back wall, one on the left and one on the right. Put the small round table in the center, topped with a purple vase and red-pink flower. Add the purple flower cushion on the lower-right side of the upper floor and the potted leafy plant on the left. Dreamy Room Level 734 also includes pink roses and green foliage around the upper edge, so tuck those decorations near the right arch and balcony rim.
Step 8. Fill the lower pavilion with the sleeping dog, furniture, and sunflower pots.
The lower part of the round pavilion is a cozy resting nook in Dreamy Room Level 734. Place the sleeping dog character slightly left of center on the lower floor, sitting in a green cushioned chair or leafy seat. The dog wears a blue outfit and has a small bow on its head, so keep it visible between the front pillars. Put the oval wooden table near the front-right side of the lower pavilion, angled horizontally. Add the curved green sofa or tub-like seat to the right of the table. Behind the dog, place the wall shelf and warm orange decorations. Add sunflower pots along the back and side edges, with purple planters at the base. In Dreamy Room Level 734, the lower pavilion must feel sheltered, so do not place the dog outside the circular floor.
Step 9. Add the side sign, plants, flowers, and right-side water border.
Continue Dreamy Room Level 734 by filling the right edge. Attach the small hanging sign to the yellow curved frame on the far right. The sign should be a peach rectangle with a small blue cloud-like drink or dessert icon inside. Place the leafy blue-green bush directly below the sign at the lower-right edge. Add lily pads around the water rim near the pavilion base, especially at the bottom-right and front-right corners. Use trailing vines along the front edge of the upper pavilion balcony, with rounded green bushes forming a soft border. Dreamy Room Level 734 depends on these small edge details to make the scene feel complete. The right side should look lush but not overloaded, with the sign hanging clearly outside the pavilion instead of covering the orange-slice seats.
Step 10. Finish the top background with tall plants, roof flowers, and hidden greenery.
For the final placement stage of Dreamy Room Level 734, return to the top of the scene and fill all the leafy background elements. Place the tallest pale-green tropical leaves behind the café roof, reaching toward the upper center. Add more tall leaves on the far left and far right behind the structures, creating a garden wall around the café. Put the rounded green shrubs along the café roof ridge and around the triangular back wall. Add the flower cluster at the top-left of the roof, including purple, yellow, and cream blossoms. Dreamy Room Level 734 has many overlapping plants, so the correct order matters: large leaves go behind the roof, roof bushes sit on top of the shingles, and flowers sit in front of the bushes. This layering gives the finished café its rich, overgrown garden look.
Notes and Precautions
In Dreamy Room Level 734, most mistakes happen when players place large objects too early without checking alignment. The café roof, round pavilion, stairs, and waterfall should be treated as anchor pieces. Once these are correct, smaller objects become much easier to position. Watch the direction of each item: the café sign faces forward-left, the long table sits across the café platform, the orange-slice seats belong on the upper pavilion, and the sleeping dog belongs on the lower pavilion. Do not confuse the two animal characters; the rabbit is the café customer upstairs, while the dog rests under the pavilion. Dreamy Room Level 734 also uses heavy plant layering, so leaves should often sit behind walls, while flowers and vines sit in front. If an object looks slightly hidden, it may be correct, because the finished scene has many overlapping decorative details.
Tips and Tricks from top player
For Dreamy Room Level 734, place objects from largest to smallest. Start with the café house, pavilion floors, stairs, canopy, and yellow arch. Then add furniture, characters, plants, and tiny water details. A useful shortcut is to divide Dreamy Room Level 734 into four zones: upper-left café, lower-left pond path, upper-right fruit pavilion, and lower-right lounge. Complete one zone before moving to the next. Another top-player trick is to use the characters as reference points: the bunny confirms the café table position, the lily-pad animal confirms the stepping-stone route, and the sleeping dog confirms the lower pavilion layout. Finally, check all circular objects carefully. The round pavilion floor, canopy, table, stools, lily pads, and stones must follow the soft curved shape of the water base, or the final scene will feel uneven.
Final Scene Description
The completed Dreamy Room Level 734 scene becomes a dreamy garden café floating over clear turquoise water. On the upper-left platform, a leafy A-frame café is covered with green shingles, flowers, vines, a striped awning, and a bold “CAFE” sign. A rabbit customer enjoys desserts and tea at a long green table, while stairs lead down to a pond path of stones, lily pads, blossoms, and a small animal wearing a lily-pad hat. On the right, a two-level round pavilion rises from the water. The upper floor has orange-slice seats, a flower table, purple blooms, a hanging lantern, and a yellow curved frame with a sign. Below, a sleepy dog rests beside a wooden table, green sofa, and sunflower pots. Dreamy Room Level 734 finishes as a peaceful café island where every object has a precise, charming place.