Dreamy Room Level 461
Dreamy Room Level 461 guide - Dreamy Room 461 Walkthrough & Solution.
Important Notice Regarding Level Numbering
Due to frequent changes in Dreamy Room's level numbering and differences between platforms (Android/iOS) – for example, level 461 on Android might not be the same as level 461 on iOS – the text guide below may not always match the images and video above. Please prioritize the image and video guides. If you find that the guide content doesn't match your current level, please visit the All Level Walkthroughs page to find the correct guide based on level images. Thank you for your understanding.
Dreamy Room Level 461 Walkthroughs & Guide
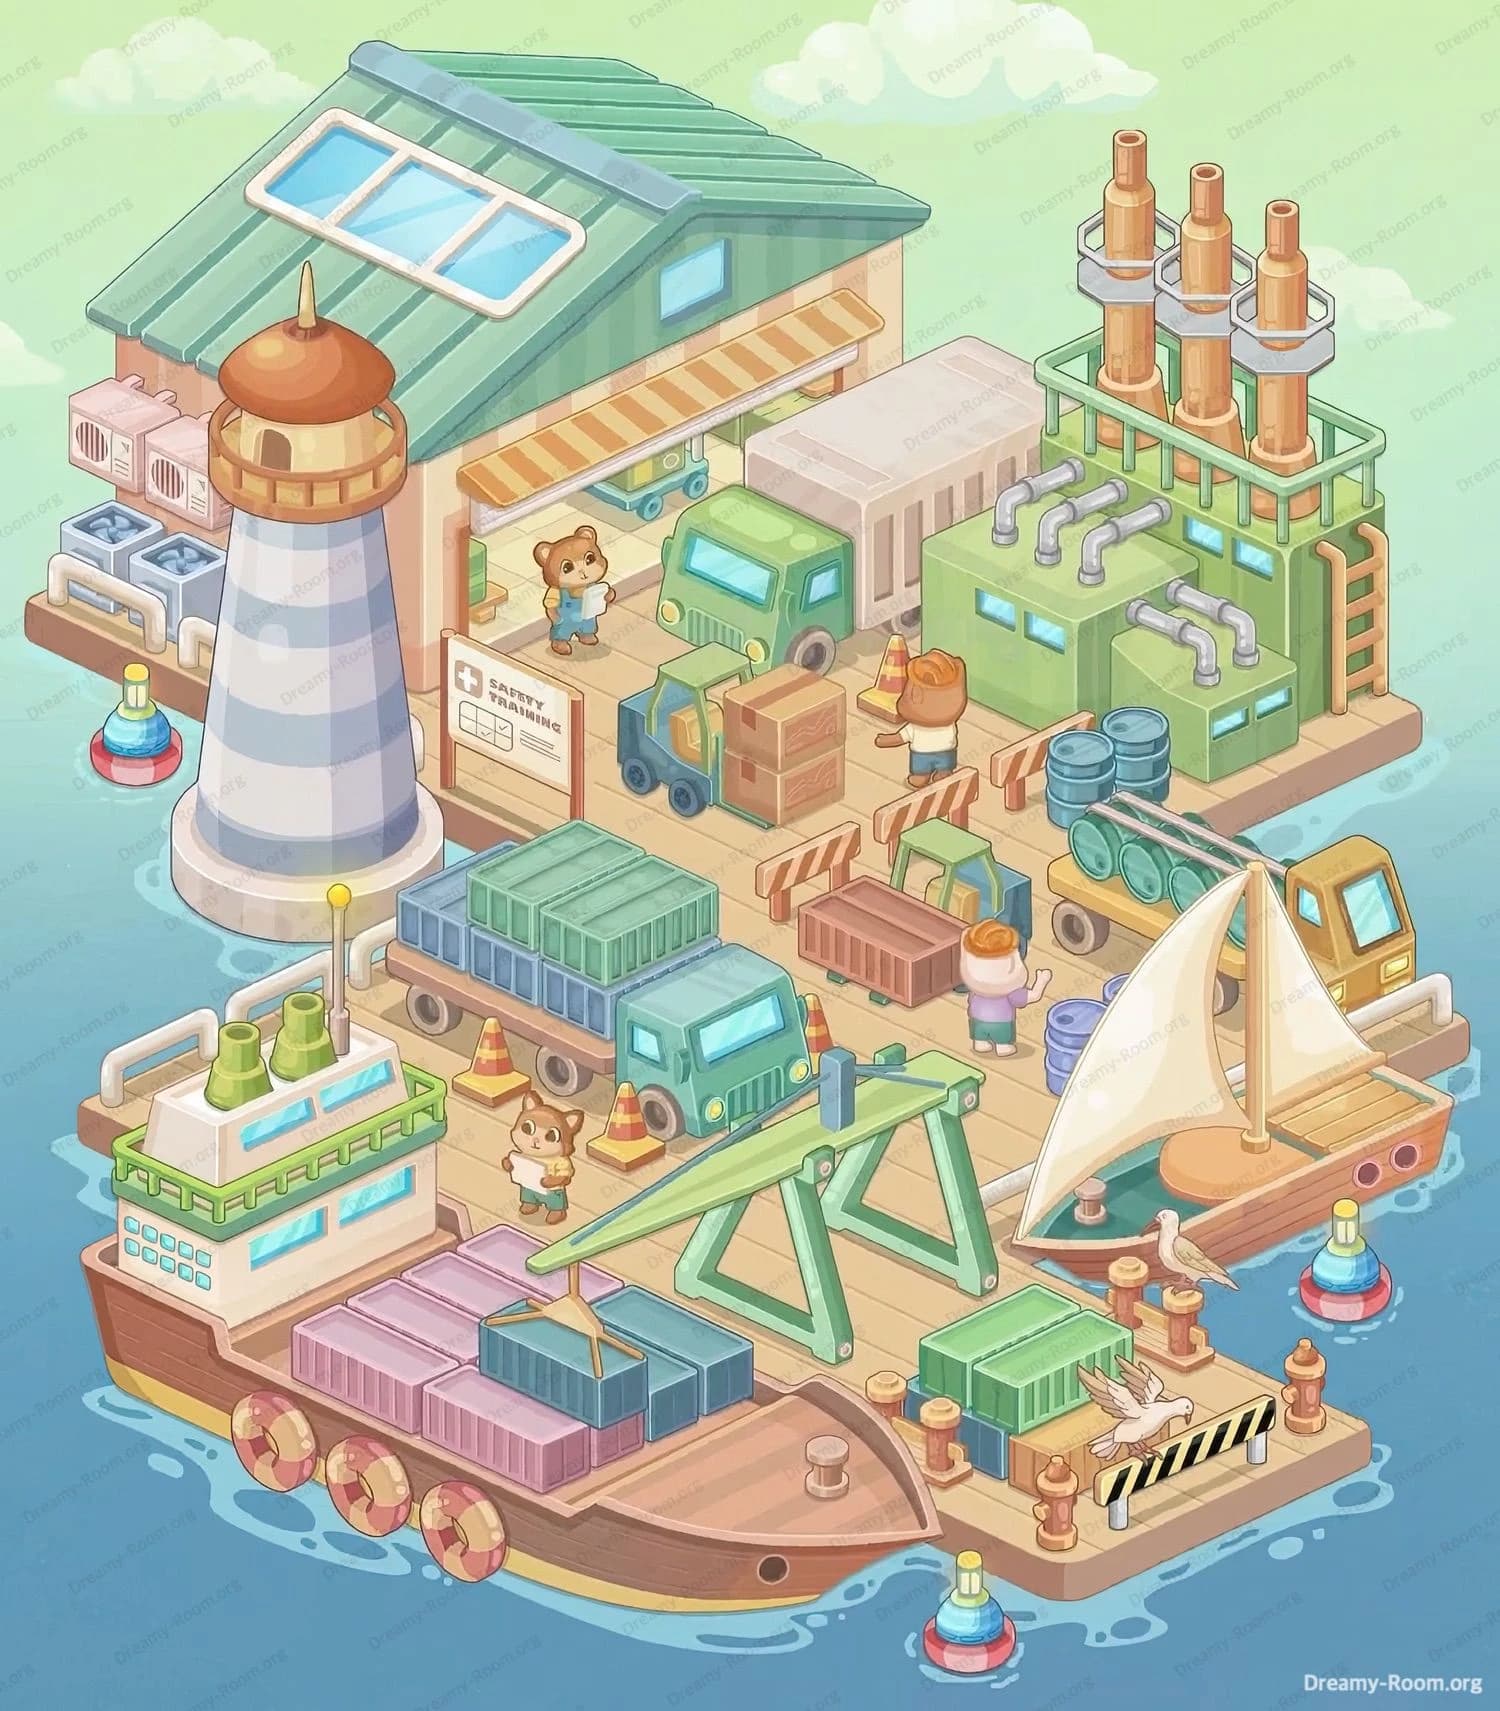
Step 1. Place the warehouse and lighthouse at the back-left of the pier
Start Dreamy Room Level 461 by filling the large back-left corner with the tall lighthouse and the main green-roof warehouse. The warehouse sits along the top edge of the pier, slightly left of center, with its slanted teal roof pointing up-left and the big white skylight panel facing the sky. Directly under the roof’s overhang, line up the yellow-and-white striped awning so it runs horizontally across the middle back wall. To the right side of the wall, leave room for later vehicles to park inside Dreamy Room Level 461.
Now tuck the lighthouse on the extreme left edge, overlapping the pier corner so its circular base is just above the water. Its striped white-and-blue body should stand in front of the warehouse wall, with the copper-brown top just below the roofline. Behind the lighthouse, on the tiny side platform sticking out over the water, stack the four cooling units: two pink boxes on top, two blue units below, all hugging the warehouse’s left wall. This completes the signature silhouette of Dreamy Room Level 461’s back-left area.
Step 2. Place the factory block and chimneys on the back-right
Next, Dreamy Room Level 461 needs the industrial factory complex on the back-right side of the pier. Take the rectangular green factory building with small blue windows and four curved silver pipes; position it along the top-right edge so its front faces diagonally toward the center of the dock. Slightly behind it, on a raised platform with railings, place the trio of tall orange chimneys inside their gray support frame. The chimneys should stand at the very top-right corner, becoming the highest objects in Dreamy Room Level 461.
Attach the yellow ladder to the outer right side of this platform so it descends toward the pier. In front of the green factory block, arrange three blue barrels in a tight group on the right side, and place the roller conveyor carrying green cylinders just in front and slightly left of them. Leave a clear strip of floor between the factory and the middle of the dock for trucks and forklifts; this gap is important for solving Dreamy Room Level 461 because it defines the loading lane between warehouse and factory.
Step 3. Place the trucks, trailer, forklift, and barricades in the center
The heart of Dreamy Room Level 461 is its line of vehicles running through the center of the pier. First, slide the green truck with the white cargo trailer so the trailer sits directly in front of the factory on the right, parallel to the back edge. Its cab should point left, just behind the warehouse awning. Under that awning, place the small green cart so it peeks out from the building’s shadow. In front of the trailer, position the blue forklift facing right, carrying a stack of two brown crates on its forks.
Drop more wooden crates beside the forklift so a small pile fills the space between it and the warehouse wall. Now align three orange-and-white striped barricades across the dock, just in front of the factory area, forming a safety line. Slightly left of center, put the large blue truck loaded with green and blue containers so it points down-left along the pier. Near its front and at the right side of the main lane, scatter several orange traffic cones. Finally, on the right-front part of the central area, place the small yellow truck pointing toward the sailboat’s dock. All of this traffic must sit neatly within the middle zone of Dreamy Room Level 461 so the next objects fit around them.
Step 4. Place the cargo ship and containers on the front-left waterline
Now it’s time to anchor the biggest object in Dreamy Room Level 461: the cargo ship. Position the ship along the lower-left edge of the pier so its brown hull floats in the water and its wooden bow points down-right. The white cabin with teal windows should hug the pier’s left side, and the two green exhaust funnels stand on top at the very back of the ship. Ensure the three red-and-white lifebuoys line the outer hull, just above the water in Dreamy Room Level 461’s foreground.
On the ship’s deck, stack the pastel containers: keep the long purple ones at the back, with the blue and teal containers on top and toward the front. A thin gangway from the cabin should meet the left side of the pier, and a yellow navigation post with a round light sits just above the ship’s bow along the dock edge. Make sure the ship is snug against the pier but not overlapping the central crane area, because the crane’s hook in Dreamy Room Level 461 must later swing directly above these containers.
Step 5. Place the central crane and dockside containers
The next focus in Dreamy Room Level 461 is the large green crane that dominates the center-front of the pier. Plant its three-legged base a little right of the cargo ship, with the legs spread across the planks so they straddle the central lane. The long light-green boom should angle down-left over the ship, while the blue pivot block sits on top of the legs. Hang the hook from a short purple cable so it dangles exactly above the teal container on the ship’s front stack; this alignment is a key detail in Dreamy Room Level 461’s completed look.
In front of the crane, nearer the waterline, arrange more cargo. Place two green rectangular containers on the right-front section of the dock, one stacked on another with a small brown crate nearby. On the left-front corner of the pier, align extra pastel containers near the ship’s bow, making a tidy pile that visually connects ship and dock. When finished, you’ll see that the crane in Dreamy Room Level 461 forms a diagonal visual bridge between the stacked cargo on ship and pier.
Step 6. Place the sailboat, right-front pier, barrier, and seagulls
Dreamy Room Level 461 now needs its small sailboat and the busy right-front pier. Position the wooden extension of the pier at the lower-right corner so it juts out into the water, matching the zig-zag shape of the base. On this extension, place the black-and-yellow striped safety barrier along the very front edge. Two squat brown bollards belong on either side of the barrier, ready for mooring ropes in Dreamy Room Level 461. Set one white seagull perched on the green container just behind the barrier, wings open as if about to take off.
Place the second seagull standing on the right side of the wooden pier edge beside the water. Now move the sailboat so its curved orange deck rests immediately to the right of the crane area, touching the pier but mostly floating in the water. The creamy white sail should lean slightly left, and its mast rises from the round base fixed to the dock edge. Make sure the small yellow truck from Step 3 appears just behind the sailboat, facing it, so the front-right quarter of Dreamy Room Level 461 feels like a dedicated loading zone for this vessel.
Step 7. Place characters, cones, barrels, buoys, and final details
To complete Dreamy Room Level 461, populate the dock with workers and small props. Start at the warehouse doorway: place the bear character in a blue shirt standing just left of the green truck cab, holding a clipboard as if checking deliveries. In front of the barricades near the factory, set the worker with orange helmet and blue overalls, standing between crates and barrels. Slightly lower and to the right, put the character with orange hair, pink shirt, and blue shorts waving toward the sailboat.
On the central pier, near the blue truck’s front bumper, place the small animal in a white shirt standing between two orange traffic cones. Add more cones along the edge between trucks and crane; these make the traffic pattern in Dreamy Room Level 461 clear. Around the factory front keep the three blue barrels and the conveyor from Step 2 visible. Finally, drop the colorful floating buoys into the surrounding water: one to the left of the lighthouse, one near the bottom-center, one at the front-right below the pier, and one just behind the sailboat. Once these final accents are in place, Dreamy Room Level 461 matches the completed image exactly.
Notes and Precautions for Dreamy Room Level 461
Because the base is a jagged pier, it’s easy in Dreamy Room Level 461 to misjudge depth and place buildings too far forward. Always anchor the warehouse and factory flush with the back edge before adding vehicles; if they sit too low, trucks and ship will have nowhere to go. The game’s main challenge is the precise ordering of placements: big structures first, then vehicles, then props. If you rush in Dreamy Room Level 461 and drop cones or buoys too early, they may block snapping spots for trucks or crates.
Watch for overlapping hints: the crane only looks correct when its hook hangs directly over a container, and the barricades must line up in front of the factory without touching the forklift. Also, some items like the AC units and skylight belong tightly against the warehouse; if they float away from the wall, you’ll know something is misaligned. Patience and careful observation keep Dreamy Room Level 461 relaxing instead of frustrating.
Tips and Tricks from top player
Top players approach Dreamy Room Level 461 by mentally dividing the pier into zones: back-left navigation (warehouse and lighthouse), back-right industry (factory), center lane (trucks and forklift), front-left shipping (cargo ship), and front-right marina (sailboat and seagulls). Solve each zone one by one instead of dragging pieces randomly. In Dreamy Room Level 461, always place the tallest objects first—lighthouse, warehouse, chimneys, crane—because they provide instant visual anchors for lining up smaller items.
Another strong tactic is to group similar items in your inventory before you start: all vehicles together, then containers and crates, then cones, barrels, and buoys. This mirrors the way they’re laid out on the finished pier in Dreamy Room Level 461 and makes misplacements easier to spot. Finally, if something looks visually cramped—like a truck bumping the factory or a buoy hidden under the pier edge—assume it’s in the wrong place and nudge it until the composition feels balanced and readable.
Final Scene Description – Dreamy Room Level 461 Completed Harbor
When Dreamy Room Level 461 is finished, the empty wooden platform has become a bustling, story-book harbor. The green-roof warehouse and proud striped lighthouse guard the back-left corner, while chimneys and pipes of the right-side factory puff above the water. Trucks queue neatly through the center, cones and barricades guiding traffic as forklifts shuffle crates between building and dock. At the front-left, a loaded cargo ship nestles against the planks, its pastel containers stacked beneath the sweeping arm of the central crane. On the opposite side, a graceful white-sailed boat rocks gently beside the right-front pier, where seagulls rest near a hazard-striped barrier. Colorful buoys bob in the surrounding water, framing the entire pier in bright markers. Characters bustle everywhere, checking lists, waving, and supervising, turning Dreamy Room Level 461 into a warm, lively maritime diorama where every object sits in its perfect place.