Dreamy Room Level 706
Dreamy Room Level 706 guide - Dreamy Room 706 Walkthrough & Solution.
Important Notice Regarding Level Numbering
Due to frequent changes in Dreamy Room's level numbering and differences between platforms (Android/iOS) – for example, level 706 on Android might not be the same as level 706 on iOS – the text guide below may not always match the images and video above. Please prioritize the image and video guides. If you find that the guide content doesn't match your current level, please visit the All Level Walkthroughs page to find the correct guide based on level images. Thank you for your understanding.
Dreamy Room Level 706 Walkthroughs & Guide
Step 1. Place the treehouse base, green walls, and wooden floor platforms.
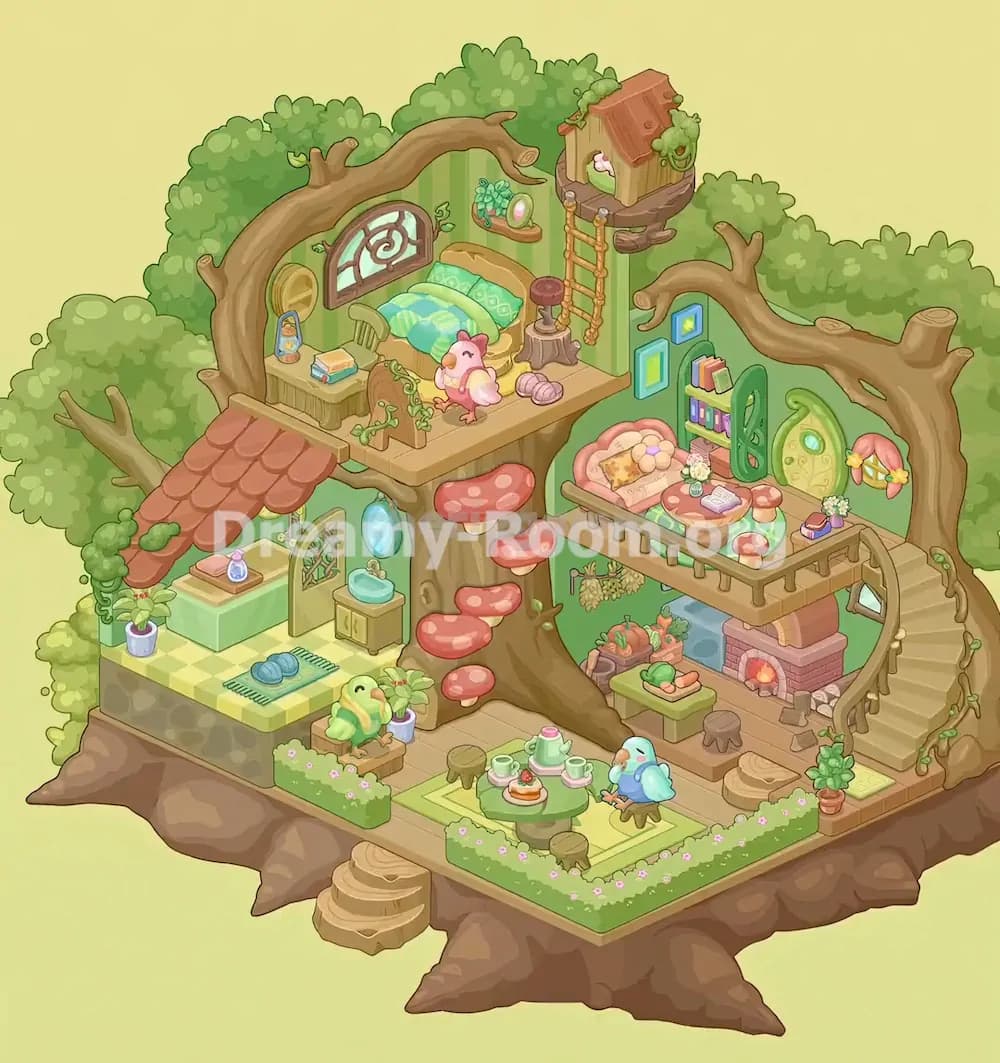
Begin Dreamy Room Level 706 by treating the large tree trunk as the center anchor of the whole build. The empty scene already gives you the raised wooden floors, green wall panels, and tree-supported platforms, so your first task is to understand the room layout before placing small objects. In Dreamy Room Level 706, the lower left area becomes a bathroom and wash corner, the upper left platform becomes the bedroom, the right balcony becomes the sitting room, and the lower right area becomes the kitchen with a fireplace. Make sure the main trunk remains visible in the center because many objects attach to it later, especially the red mushroom stairs. The main challenge in Dreamy Room Level 706 is not speed, but determining the correct placement for each object based on the final decorated treehouse shape.
Step 2. Build the lower-left bathroom corner under the red roof.
In Dreamy Room Level 706, the lower-left section should be decorated as a cozy bathroom and wash area. Place the red-tiled roof over the left wall so it covers the small arched doorway and makes this corner look like a tucked-away room inside the treehouse. Under that roof, position the mint-green counter against the left wall, then place the pink folded cloth and small blue bottle on top of it. The yellow-and-green checkerboard floor belongs here, sitting on the stone base at the far left. Add the arched window with vines on the back wall, then place the round blue window or mirror on the right side near the doorway. Dreamy Room Level 706 rewards careful observation because these bathroom objects only look correct when they are grouped tightly in this left corner.
Step 3. Add the sink cabinet, bath accessories, plant, and soft floor details.
Continue working in the same lower-left bathroom zone of Dreamy Room Level 706. Place the small beige cabinet with the blue sink bowl against the right side of the bathroom wall, just below the round blue wall feature. Next, set the potted plant in the white pot on the checkerboard floor near the front-left edge. On the floor, place the soft blue rolled towel or yarn bundle beside the striped bath mat and comb-like rug detail. These small objects make the corner feel lived in rather than empty. Add the tiny low stool near the front of this room, then position the cute green frog seat or frog-shaped cushion just outside the bathroom edge. In Dreamy Room Level 706, the puzzle becomes easier when you place functional items together: sink with wash items, towel with mat, and plant near the bright floor.
Step 4. Arrange the central tea garden at the front of the treehouse.
The front middle area of Dreamy Room Level 706 becomes a relaxing tea space. Place the green rectangular rug on the wooden floor in front of the central trunk. Then put the round green tea table in the middle of the rug. On top of the table, arrange the teapot, cups, saucers, and dessert plate with the strawberry treat. Around the table, place the small round wooden stools and stump seats so they form a casual circle. The blue bird character belongs to the right side of the tea table, facing inward as if enjoying the gathering. Add the low flower hedge along the front edge of the rug, with pink blossoms facing outward. Dreamy Room Level 706 uses this area as the visual welcome point, so keep the table centered and do not let the stools block the bird.
Step 5. Attach the mushroom stairs to the central tree trunk.
Now focus on the trunk in the middle of Dreamy Room Level 706. Place the red mushroom steps along the front-right side of the trunk, starting near the lower floor and climbing upward toward the upper bedroom platform. The mushrooms should stack vertically in a gentle curve, with the largest caps lower down and smaller ones higher up. Their red caps with white spots should face forward clearly. These mushroom stairs are one of the most important placement clues in Dreamy Room Level 706 because they visually connect the lower tea area to the bedroom level above. Do not place them too far right, or they will look detached from the trunk. Also keep them clear of the fireplace area, since they belong directly on the tree rather than on the kitchen wall.
Step 6. Decorate the upper-left bedroom platform with the bed and wall items.
The upper-left platform in Dreamy Room Level 706 is the bedroom. Place the wooden bed against the green striped wall, with the headboard tucked toward the back-left corner and the teal bedding facing the viewer. Add the patterned pillows and folded blanket so the bed looks soft and layered. Above and behind the bed, position the arched window with the decorative wooden swirl frame; this window should sit on the left wall section, not the right balcony wall. Place the small round mirror or wall ornament and the little shelf with green plants near the bed. Dreamy Room Level 706 depends on matching each object to its room function, so anything related to sleep, comfort, books, and personal keepsakes belongs on this upper-left platform.
Step 7. Place the bedroom desk, books, vines, lamp, and pink bird.
Complete the upper-left bedroom scene in Dreamy Room Level 706 by adding the small desk or side table on the left side of the bed. Place the tiny lamp or bottle-shaped ornament on it, then stack the books nearby. The small green chair belongs beside this desk, tucked neatly under or near the tabletop. Put the small wooden chest or cabinet with vine decorations at the front edge of the bedroom platform, slightly left of center. The pink bird character should sit on the platform near the bed, facing the room as if it has just climbed up from the mushroom stairs. Dreamy Room Level 706 hides many small placement clues in object themes: books and lamps belong near the bed, vines belong on the wooden storage piece, and the bird should not be placed in the bathroom or kitchen.
Step 8. Install the ladder, stump stool, and birdhouse on the upper branch.
The top-right area of Dreamy Room Level 706 contains a miniature birdhouse room perched on a branch. Place the vertical rope ladder near the center-right wall, running from the bedroom platform up to the small branch platform. At the bottom of the ladder, set the stump table with the red round stool top. Beside it, place the small shell or cushion-like decoration on the floor. Then position the birdhouse on the branch platform at the top right: it has a tan wooden body, red roof, small opening, flower detail, and leafy vines. In Dreamy Room Level 706, this birdhouse must sit above the right wall, not on the main floor. The ladder should visually connect it to the rest of the treehouse, creating a believable path upward.
Step 9. Build the right-side balcony living room with sofa, rug, and table.
Move to the right balcony in Dreamy Room Level 706 and place the railing along the front edge of the upper platform. The pink cushioned sofa belongs against the back-left side of this balcony area, with its pillows visible. Set the round green rug in front of the sofa, then place the small round table on top of the rug. Add the book, teacups, flowers, and small stools around the table. This balcony should look like a sitting room suspended in the tree. In Dreamy Room Level 706, the railing is an important boundary clue; furniture should stay behind it, while the lower kitchen objects stay underneath. Keep the sofa close to the wall and the table centered so the balcony does not look overcrowded.
Step 10. Add the right wall decorations, bookshelf, green door, and window.
The right wall of Dreamy Room Level 706 needs several decorative items. Place the two blue-framed pictures on the green wall above the balcony area, slightly left of the door. Add the small bookshelf with colorful books below them, then place the tall green leaf-shaped divider beside the shelf. The rounded green door with the glowing oval center belongs on the right wall, just above the staircase area. To its right, place the small window with the pink awning and yellow flowers. Add the books and flower pot on the balcony table or near the railing as shown in the finished room. Dreamy Room Level 706 often tricks players by mixing wall pieces with floor furniture, so check that frames, windows, and doors attach to walls while books and flowers sit on surfaces.
Step 11. Set up the lower-right kitchen and fireplace area.
The lower-right space underneath the balcony becomes the kitchen in Dreamy Room Level 706. Place the brick fireplace against the back-right wall under the balcony, with the glowing fire visible in the opening. Above or near the fireplace, add the hanging dried herbs or vines. Put the green prep table in front of the fireplace and arrange the vegetables, carrot, leafy greens, and food tray on top. Add the small stump stool nearby, plus the scattered logs and stone pieces around the hearth. The blue cabinet or storage block should sit along the back wall, partly under the balcony shadow. Dreamy Room Level 706 makes this section feel warm and practical, so all cooking and food items should stay grouped around the fireplace instead of drifting into the tea garden.
Step 12. Place the staircase, potted plants, steps, and outdoor borders.
Finish the large structural details of Dreamy Room Level 706 by adding the curved staircase on the far right side. It should climb from the lower-right floor up toward the balcony, with its rounded wooden steps following the tree edge. Add the rope or vine railing along the outside of the stairs. At the bottom of the staircase, place the potted green plant and the small green mat. On the front-left outside edge, add the wooden stump steps leading up to the platform. Keep the rocky base visible below the treehouse, especially around the front and right corners. Dreamy Room Level 706 depends on these edge pieces to make the house feel complete, so do not cover the flower hedge, front rug, or lower cooking area with the staircase.
Step 13. Add the large branches, canopy details, and final nature accents.
The final layer of Dreamy Room Level 706 is the natural tree shape. Place the large curved branch stretching across the upper-left side above the bedroom, then position the second thick branch across the right side above the balcony. These branches should frame the rooms without blocking the key furniture. Add leafy details, vines, and small sprouts around the trunk, walls, and branch ends. The lush green bushes in the background should remain behind the treehouse, creating a forest canopy effect. Add the small potted flower near the front-left bathroom edge and another plant near the lower-right stairs. Dreamy Room Level 706 looks correct when the decorated objects feel built into the tree rather than pasted on top, so use branches and leaves to visually connect every room.
Notes and Precautions
In Dreamy Room Level 706, the most important thing to watch is object grouping. Bedroom items belong on the upper-left platform, bathroom items belong under the red roof on the lower-left side, tea items belong on the front rug, living-room items belong on the right balcony, and kitchen items belong below the balcony near the fireplace. The main challenge of Dreamy Room Level 706 is determining the correct placement for each object, not simply filling empty space. Be careful with wall items such as windows, frames, doors, shelves, and vines; they must attach to the green wall surfaces. Also, do not confuse the mushroom stairs with stools or table pieces. The red mushroom caps should climb the central trunk. Keep characters in their proper areas: the pink bird belongs near the bedroom, while the blue bird belongs by the tea table.
Tips and Tricks from top player
A strong strategy for Dreamy Room Level 706 is to solve the room by layers. First place large structures, then furniture, then small decorations. Start with the tree trunk, walls, floors, railings, staircase, and red roof. After that, place the bed, sofa, fireplace, tea table, sink, and kitchen table. Only once those anchors are correct should you add books, cups, bottles, plants, cushions, frames, and flowers. Another top-player trick for Dreamy Room Level 706 is to compare object themes: water items go left, food items go right, rest items go upstairs, and social items go front or balcony. If an object looks wrong, check whether it is blocking a pathway. The ladder should remain usable, the mushroom stairs should remain visible, and the curved staircase should connect cleanly to the balcony.
Final Scene Description
The finished Dreamy Room Level 706 scene becomes a charming forest treehouse filled with tiny rooms and warm details. At the lower left, a red-roofed bathroom corner holds a mint counter, sink, checkerboard floor, towel, plant, and arched window. In front, a peaceful tea garden sits on a green rug with a round table, teapot, cups, dessert, stools, flowers, and a blue bird guest. The central trunk rises through the whole home, decorated with red mushroom stairs. Above it, the bedroom contains a teal bed, books, lamp, desk, arched window, vines, and a pink bird. To the right, the balcony living room has a pink sofa, round table, bookshelf, framed pictures, green door, and flowered window. Below, the kitchen glows with a brick fireplace, vegetables, herbs, and wooden stools. Dreamy Room Level 706 ends as a cozy woodland home where every object has found its perfect place.