Dreamy Room Level 923
Dreamy Room Level 923 guide - Dreamy Room 923 Walkthrough & Solution.
Important Notice Regarding Level Numbering
Due to frequent changes in Dreamy Room's level numbering and differences between platforms (Android/iOS) – for example, level 923 on Android might not be the same as level 923 on iOS – the text guide below may not always match the images and video above. Please prioritize the image and video guides. If you find that the guide content doesn't match your current level, please visit the All Level Walkthroughs page to find the correct guide based on level images. Thank you for your understanding.
Dreamy Room Level 923 Walkthroughs & Guide
Step 1. Build the Central Tree Trunk and Main Supporting Structure
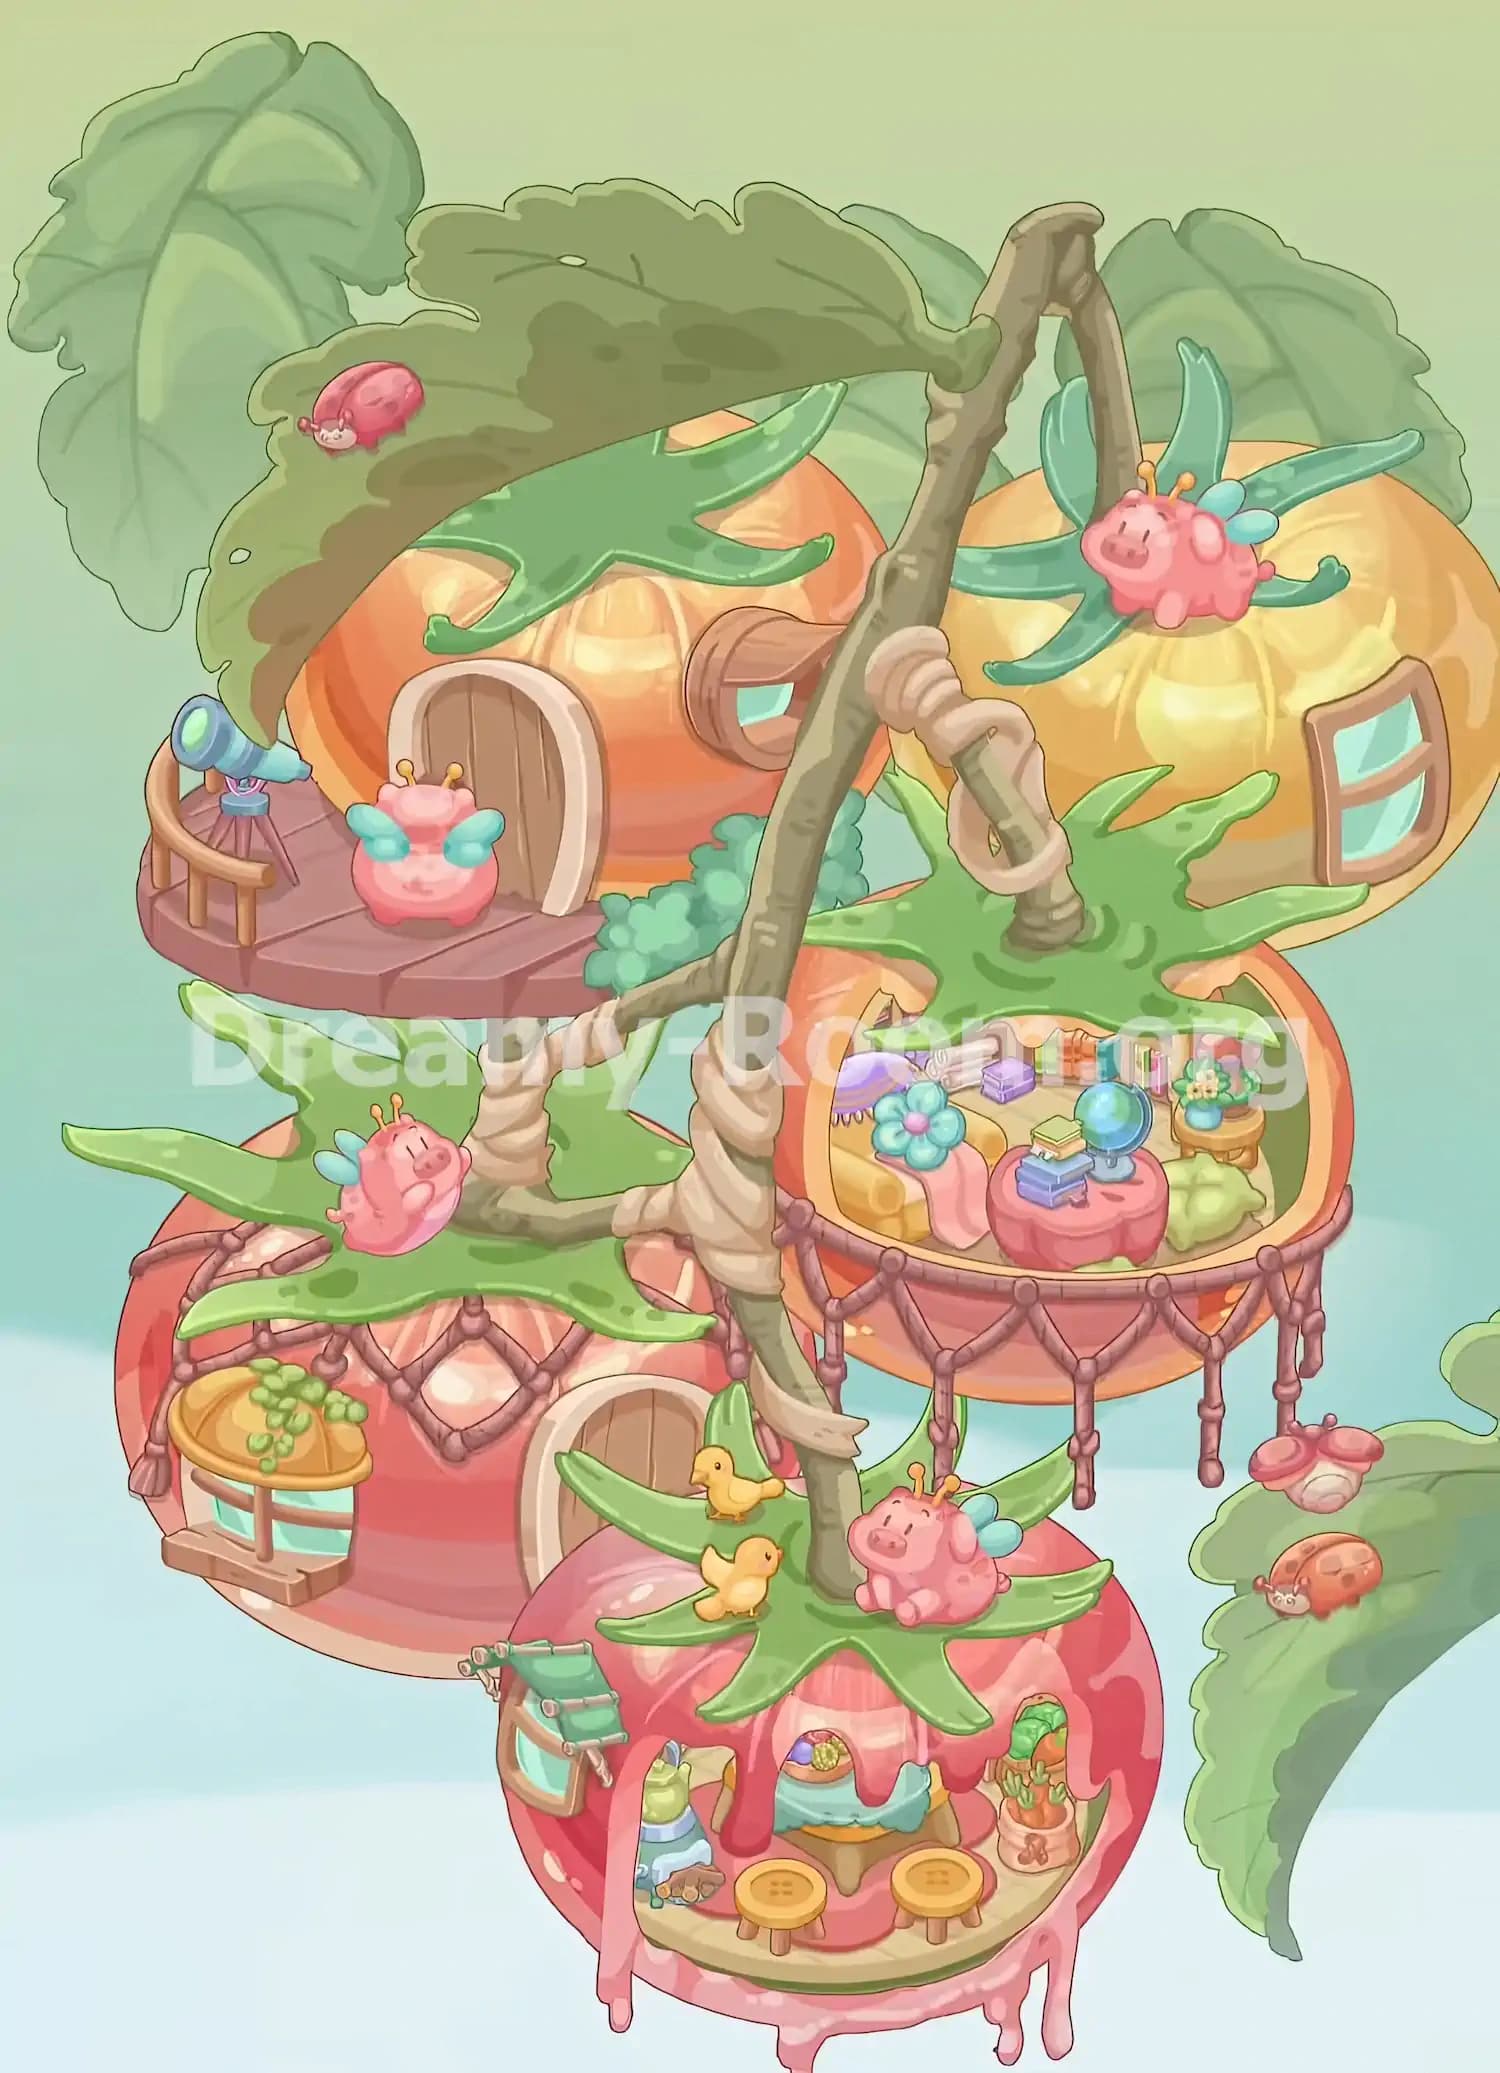
Begin Dreamy Room Level 923 by establishing the foundation of the floating treehouse village. The starting scene contains a small circular room with a pale wooden plank floor, muted green curved walls, and a coral-pink outer rim. This compact space will eventually become a much taller arrangement of fruit houses connected by a branching tree.
Position the large, twisting wooden trunk through the center of the composition. Its main section rises diagonally from the lower middle toward the upper-right area, where it bends into a fork. The trunk should appear in front of some fruit-shaped structures, creating the layered appearance visible in the completed image.
Pay attention to the thick, pale fabric-like bindings wrapped around different sections of the wood. These details emphasize the supporting branches and help connect the various levels.
In Dreamy Room Level 923, the trunk is your primary reference point. The larger fruit homes will sit to its left and right, while the leaf platforms and smaller decorations will extend outward. Establishing this central alignment first makes the remaining placements easier.
Step 2. Place the Large Red Fruit Cottage in the Lower-Left Area
Next, build the large reddish-orange fruit cottage occupying the lower-left section of Dreamy Room Level 923. This rounded building sits behind the central trunk and slightly above the lowest strawberry-shaped structure. Its glossy red exterior features lighter orange highlights, giving the house a warm, ripened appearance.
Orient the cottage so its tall, rounded wooden door faces toward the lower-right side of the scene. The door has a cream-colored frame and vertical wooden panels. On the building's left side, place the small blue-tinted window beneath a circular yellow wooden shelf or balcony.
Add the trailing green plant to this little wooden platform, allowing its leaves to hang naturally over the edge. Across the upper portion of the fruit house, arrange the brown rope netting in a decorative diamond pattern.
A broad, star-shaped green leaf platform extends horizontally over the cottage's roof. This leaf provides a resting spot for one of the pink winged creatures later in the level.
For Dreamy Room Level 923, carefully check that the red cottage stays behind the central branch rather than covering it. The layered relationship between the door, leaf platform, and trunk is important for matching the completed scene.
Step 3. Create the Strawberry Café at the Bottom of the Treehouse
The lowest visible room in Dreamy Room Level 923 is a delightful strawberry-shaped café positioned at the bottom center, slightly to the right. Place the large, rounded red strawberry shell beneath the main wooden trunk, overlapping the lower-right edge of the red fruit cottage.
This miniature café features glossy red walls and a pink, icing-like roof with thick decorative drips hanging over the front opening. Position the green star-shaped leaf crown on top, making sure its pointed sections spread outward around the central tree trunk.
Inside the strawberry, install the curved beige wooden floor. At the rear, position the small serving counter or table covered with a turquoise-blue cloth and a decorative round food item. Set two low, circular golden-yellow stools across the front, spaced evenly in front of the counter.
On the left side of the café, arrange the small green character-shaped decoration beside the opening and the tiny brown accessory near the floor. Place the pot filled with orange flowers or carrot-like plants against the right interior wall.
Finish the exterior by adding the little side window with a green awning on the left.
The strawberry café in Dreamy Room Level 923 is particularly easy to overcrowd. Keep the two stools clearly visible and make sure the interior accessories remain inside the opening rather than extending beyond the curved front edge.
Step 4. Install the Orange Pumpkin Cottage and Upper-Left Balcony
Move to the upper-left section of Dreamy Room Level 923 and place the large orange pumpkin-shaped cottage. This cheerful house sits high above the red fruit cottage and slightly behind the central wooden trunk. Its rounded exterior has deep orange shading and pale yellow highlights, resembling the natural segments of a pumpkin.
Attach the tall, arched wooden entrance to the front-left side of the house. The door has a light cream-colored frame and a rounded top. On the right side of the cottage, position the small circular wooden-framed window with turquoise glass.
Next, install the curved wooden balcony directly outside the entrance. Its reddish-brown floorboards extend toward the left, creating a small observation deck. Add the short wooden railing along the outer-left edge.
Place the turquoise telescope on its thin tripod near the left end of the balcony. Angle it outward toward the open sky, leaving enough space beside the doorway for a pink creature.
Behind the pumpkin, add the large green leaf decorations that spread across its roof.
The key to this section of Dreamy Room Level 923 is the balcony's orientation. The telescope belongs on the far-left side, while the doorway remains near the middle of the platform. Keep the balcony in front of the house without hiding its curved entrance.
Step 5. Position the Golden Pumpkin House on the Upper-Right Side
The next large structure in Dreamy Room Level 923 is the golden-yellow pumpkin house occupying the upper-right portion of the treehouse village. Position this rounded fruit behind the central trunk, beside the orange cottage on the left.
The golden house should appear slightly farther back than the orange cottage. Its exterior has a warm yellow-orange color with luminous highlights and softly defined pumpkin segments.
Attach the rectangular wooden window to the right-facing wall. The window features an irregular brown wooden frame divided into several sections, with bright turquoise panes that contrast against the golden exterior.
Arrange the long, pointed green leaves across the upper surface of the pumpkin. These leaves radiate outward like a decorative crown, with one extending toward the right and another rising behind the central branch.
Leave a visible green leaf perch near the front of the crown for the pink winged creature that will be added later.
The golden pumpkin is an important background element in Dreamy Room Level 923. Its exact position creates the illusion that the two upper cottages share the same tree canopy.
Check that the house's right-side window is fully visible and that the central trunk passes in front of the fruit without concealing the entire building.
Step 6. Furnish the Open Orange Reading Nook on the Middle-Right Side
One of the most detailed areas in Dreamy Room Level 923 is the cozy reading nook built inside a hollow orange fruit. Position this open-front pod in the middle-right section, directly beneath the golden pumpkin house and above the strawberry café.
The orange shell has a thick curved opening that reveals a miniature living room. Its front edge is decorated with brown knotted rope netting, which creates a hanging balcony effect.
Begin furnishing the interior with the rounded yellow armchair against the left wall. Drape a soft pink blanket over the seat and add the large blue flower-shaped cushion.
Place the short, round pink table in front of the chair, slightly toward the right. On top of the table, arrange the blue globe and neatly stacked books in green, blue, and purple.
Along the back wall, install the small bookshelf with its colorful upright books and purple storage box. Add the rolled white cushion or blanket near the upper-left side of the nook.
On the far-right side, position the small wooden plant stand holding a yellow-flowered potted plant. Place the soft light-green cushion on the floor near the right wall.
For Dreamy Room Level 923, keep these furnishings within the curved opening. The armchair should remain on the left, the table near the center, and the flower arrangement at the far right. This layout preserves the comfortable, balanced appearance of the finished room.
Step 7. Arrange the Oversized Leaves, Rope Details, and Natural Decorations
With the main fruit structures completed, Dreamy Room Level 923 now needs its decorative foliage and supporting details. These elements are essential because they connect the individual cottages into one continuous treehouse village.
Start with the large, broad leaf canopy spanning the upper-left and central-top portion of the scene. It should extend horizontally above the orange cottage, partially covering its roof. Behind the upper buildings, arrange the giant pale-green tropical leaves to form a lush background.
Next, position the pointed green leaves across the middle-left area, directly above the red fruit cottage. These leaves fan outward from the central branch and form a small platform.
Add another cluster of green leaves between the golden pumpkin and the orange reading nook. Its leaf tips should extend to the right and across the nook's upper edge.
Check the pale fabric wraps around the central wooden trunk, particularly where the branches meet the fruit houses. Position the distinctive wooden loop-shaped ornament on the upper-middle section of the trunk.
Finally, finish the rope netting around the orange reading nook and the red cottage. The brown cords should hang naturally, with their knotted sections visible.
These organic details give Dreamy Room Level 923 its layered appearance. Keep the leaves behind or above the appropriate structures so that they do not obstruct the windows, doors, and furniture.
Step 8. Add the Pink Winged Creatures, Yellow Birds, Ladybugs, and Final Accessories
The final decorating stage of Dreamy Room Level 923 focuses on the adorable animals and small nature-inspired accessories scattered throughout the treehouse village.
Begin with the pink, pig-like winged creatures. Each has a rounded body, tiny antennae, blue wings, and a cheerful expression.
Place the first creature on the upper-left wooden balcony, immediately outside the orange pumpkin cottage's doorway and to the right of the turquoise telescope. Position another on the pointed green leaves crowning the golden pumpkin house at the upper right.
The third creature belongs on the broad green leaf platform above the lower-left red cottage. It should sit toward the left, near the central tree branch. Position the fourth creature on the green leaf crown above the strawberry café, toward the right of the trunk.
Next, arrange the two tiny yellow birds on the same leaf crown above the café. One bird sits higher and closer to the tree trunk, while the other rests slightly lower on the left.
Add the reddish-pink ladybug to the broad overhead leaf at the upper-left side. Another orange-red beetle belongs on the separate large green leaf extending inward from the right edge of the scene.
Finally, place the small pink mushroom-like decoration near the upper edge of that right-side leaf.
Once these details are in position, Dreamy Room Level 923 should closely match the completed image. Double-check the four pink creatures, two yellow birds, both ladybugs, and the miniature mushroom decoration before finishing.
Notes and Precautions
Dreamy Room Level 923 contains several overlapping structures and miniature accessories, so careful object placement is more important than speed.
- Prioritize large structures. Place the central trunk, fruit cottages, strawberry café, and orange reading nook before the smallest items. Large pieces provide landmarks for the remaining decorations.
- Watch for overlapping objects. The central branch passes in front of several buildings, while oversized leaves partially cover their roofs. An object may appear incorrectly placed if its intended layer is misunderstood.
- Protect the interior spaces. The reading nook's furniture and strawberry café's accessories must remain inside their curved openings.
- Distinguish similar creatures. The four pink winged creatures look alike, but each occupies a different balcony or leaf platform.
- Check the windows and doors. The orange cottage has an arched door and round side window, the golden house has a rectangular window, and the red cottage has a rounded wooden entrance.
- Avoid covering small details. Books, plants, stools, and decorative insects can easily disappear behind larger leaves when placed incorrectly.
The main difficulty in Dreamy Room Level 923 comes from identifying the intended position of every object rather than simply making the village look attractive. Use the completed image to compare relative positions, especially where branches, fruits, and leaves overlap.
Tips and Tricks from top player
The most effective strategy for Dreamy Room Level 923 is to complete the room in layers, starting with the structural pieces and finishing with the smallest decorative elements.
- Use the tree trunk as your central landmark. The orange cottage and red cottage belong mainly to its left, while the golden pumpkin and open reading nook occupy its right. The strawberry café sits near the bottom.
- Work from large to small. Complete the fruit shells and their floors before adding interior furniture. This reduces confusion when multiple objects appear together.
- Organize decorations by location. Treat the upper-left balcony, middle-right reading nook, lower-left cottage, and strawberry café as separate sections.
- Match each creature to its platform. Rather than guessing, look for a balcony or leaf with enough clear space to accommodate the creature's body and wings.
- Use distinctive objects as visual anchors. The turquoise telescope, blue globe, two golden stools, and yellow-flowered plant are particularly useful for identifying different areas.
- Inspect the final scene from top to bottom. Check the top canopy first, then the pumpkin houses, reading nook, red cottage, and strawberry café.
In Dreamy Room Level 923, patience with small adjustments is more useful than repeatedly moving entire structures. Once the major buildings are positioned correctly, the surrounding decorations become much easier to organize.
Final Scene: A Magical Fruit Treehouse Village
The completed Dreamy Room Level 923 reveals an enchanting floating village filled with colorful fruit-shaped homes and playful woodland creatures.
At the top, an orange pumpkin cottage features a wooden balcony with a turquoise telescope, while a golden pumpkin house sits nearby beneath oversized tropical leaves. A twisting central trunk connects the structures and supports the charming decorations throughout the scene.
On the middle-right side, an open orange fruit houses a comfortable reading nook with a yellow armchair, pink blanket, blue flower cushion, colorful books, globe, and potted flowers. Beneath the leafy platforms, a large red fruit cottage adds another cozy residence.
At the bottom, a strawberry café with dripping pink icing, two golden stools, and tiny accessories completes the village.
Four pink winged creatures, two yellow birds, colorful ladybugs, and delicate mushroom decorations bring the entire setting to life. Dreamy Room Level 923 transforms a simple empty platform into a cheerful fantasy retreat, rewarding players for finding the perfect place for every object.