
Dreamy Room Level 917
Dreamy Room Level 917 guide - Dreamy Room 917 Walkthrough & Solution.
Important Notice Regarding Level Numbering
Due to frequent changes in Dreamy Room's level numbering and differences between platforms (Android/iOS) – for example, level 917 on Android might not be the same as level 917 on iOS – the text guide below may not always match the images and video above. Please prioritize the image and video guides. If you find that the guide content doesn't match your current level, please visit the All Level Walkthroughs page to find the correct guide based on level images. Thank you for your understanding.
Dreamy Room Level 917 Walkthroughs & Guide
Step 1. Build the Concrete Columns and Steel Reinforcement Structures
Begin Dreamy Room Level 917 by establishing the construction site's structural foundation. The empty scene already includes an irregularly shaped gray-purple concrete floor and a short upright wall at the back-left. Use this existing wall as your reference point for positioning the remaining architectural elements.
Place the tall concrete columns along the left and rear edges of the construction area. These columns should form a staggered arrangement, with the taller structures toward the back and shorter sections closer to the viewer.
Next, position the narrow vertical steel reinforcement rods emerging from the concrete. Add the blue-gray lattice reinforcement cages on top of several columns, including the structures along the far-left side and rear wall.
In Dreamy Room Level 917, these exposed steel frameworks create the appearance of a building under construction. Make sure the reinforcement cages stand upright and follow the arrangement shown in the completed image.
Correctly positioning these foundational objects is important because the larger construction machinery will partially obscure them later.
Step 2. Arrange the Bricks and Construct the Rear Scaffolding
The next task in Dreamy Room Level 917 is furnishing the elevated rear construction area with building supplies and scaffolding.
Place two distinct stacks of orange construction bricks along the upper rear wall. The left stack belongs between the vertical reinforcement structures, while the second stack sits farther to the right. Each pile should have a stepped appearance, with more bricks along the bottom and fewer at the top.
Next, install the tall scaffolding structure immediately in front of these bricks. It features a pale turquoise metal framework with diagonal cross-bracing and a long cream-yellow platform across the top.
Behind and to the right of the scaffolding, position the rectangular purple package with yellow bands. Then place the small turquoise equipment box on its elevated wooden stand near the rear-right portion of the wall.
This arrangement gives Dreamy Room Level 917 its recognizable construction backdrop. Check that the scaffolding does not conceal the brick piles completely and that the small equipment box remains visible above the main working area.
Step 3. Install the Tall Crane Tower and Elevated Operator Cabin
One of the most important structures in Dreamy Room Level 917 is the large industrial crane occupying the right side of the construction site.
Start by placing the tall blue-gray lattice tower near the right-center edge of the concrete foundation. Its vertical framework extends from the ground through the elevated working area and supports the machinery above.
Next, position the large enclosed crane cabin high on the tower. This structure has wide, blue-tinted windows and thick lavender framing. A broad roof extends beyond the cabin walls, giving it a distinct rectangular shape.
Place the rounded golden mounting base on top of the cabin and attach the small upper support framework with its cream-colored square cap.
Below the cabin, arrange the rectangular maintenance platform surrounded by dark green safety railings. This balcony wraps around the crane's vertical tower.
In Dreamy Room Level 917, the crane cabin should sit toward the upper-right side of the scene. The maintenance platform must appear below it, not beside it. Proper alignment here makes the next step much easier.
Step 4. Attach the Long Crane Boom, Pulley, and Hanging Chains
Continue Dreamy Room Level 917 by assembling the crane's most prominent feature: its enormous diagonal boom.
Place the long blue-gray truss beam so that it extends from the middle-left portion of the construction site toward the upper-right corner of the image. The beam should pass above the rear scaffolding and in front of the elevated crane cabin's upper area.
Its structure contains repeating triangular metal supports, making it noticeably different from the solid concrete columns.
Attach the large blue pulley assembly near the left end of the boom, above the front-left corner of the raised work platform. The yellow rope and hanging hook should descend near the wooden ladder.
Next, position the heavy gray chains beneath the beam. Several chains hang in curved loops over the middle platform, while another section drapes toward the crane's right-side maintenance balcony.
In Dreamy Room Level 917, these chains overlap several background objects. Follow their curved arrangement rather than placing them in straight vertical lines. Their correct positions help reproduce the industrial appearance of the completed scene.
Step 5. Assemble the Raised Work Platform and Organize Its Materials
The middle section of Dreamy Room Level 917 contains a large lavender-gray work platform that supports construction supplies and machinery.
Position this elevated platform across the center of the scene, with its left edge beneath the crane pulley and its right side extending toward the crane tower. A substantial orange-brown brick support column stands underneath the platform near its front-right portion.
Add the construction supplies to the top surface. Toward the front-right area, place a wooden pallet holding three blue cylindrical pipes secured together by yellow straps.
On the left side, arrange the two yellow-and-purple equipment boxes on another wooden pallet. Behind them, add the brown construction materials and several orange bricks.
Position the smaller wooden boards and additional supplies around these larger objects, keeping the platform organized but visibly busy.
Finally, place the tall cream-colored ladder against the front-left edge of the platform, just beneath the crane pulley.
The key to Dreamy Room Level 917 is maintaining the correct depth. The ladder belongs in front, while the rear materials remain partly concealed by the diagonal crane boom.
Step 6. Position the Workbenches, Tools, and Electrical Control Equipment
With the raised construction platform established, Dreamy Room Level 917 requires several smaller industrial objects beneath and beside it.
Start with the beige electrical control cabinet on the ground near the central brick support column. Its upper front panel features blue and red circular buttons alongside a row of narrow blue indicators. A darker ventilation panel occupies its lower section.
Behind and slightly to the left, place the small light-blue workbench containing tools and construction supplies. Add the horizontal brown machinery components and metal equipment beneath the raised platform.
On the right, place the longer pale-blue workbench beneath the crane balcony. A purple rectangular tool, a gray metal implement, and a small brown board rest on its surface.
Position the stacked purple barrels farther back near the right-hand edge of the site. Add the turquoise crate-like equipment container closer to the foreground.
These pieces make the lower section of Dreamy Room Level 917 feel like a functional workshop. Since several objects occupy tight spaces, place the workbenches before adding the surrounding foreground equipment.
Step 7. Place the Large Wooden Barrel and Suspended Purple Cargo Bundle
The left-center area of Dreamy Room Level 917 features two particularly recognizable objects: a large wooden storage barrel and a suspended purple construction bundle.
Place the oversized wooden barrel along the far-left side of the concrete foundation. It has vertical tan wooden panels, two blue-gray reinforcing bands, and a rounded top with a raised circular lid. The entire barrel rests on a short green-gray support stand.
Immediately to its right, arrange the small orange metal drum with a pale gray top and the short stack of loose orange bricks.
Next, position the large lavender rectangular cargo bundle near the front-left area underneath the raised platform. Two wide yellow straps cross over its top and descend along its sides.
Attach the curved brown lifting hooks and connecting equipment above this bundle, making it appear prepared for movement by the crane.
In Dreamy Room Level 917, the purple cargo must sit in front of the barrel and beneath the ladder. Keep the yellow straps facing the viewer, since they are important visual details for matching the completed arrangement.
Step 8. Park the Delivery Truck and Stack Its Shipping Containers
Now move to the lower-left section of Dreamy Room Level 917, where a delivery truck occupies the edge of the construction site.
Place the compact truck so that its light blue-white driver's cabin faces toward the right side of the image. Its open cargo bed should extend toward the left, remaining parallel to the front-left edge of the concrete foundation.
Next, arrange the rectangular cargo containers on the truck bed. The lower layer consists of orange and brown containers, while the upper cargo includes purple containers toward the left and an orange container toward the right.
The containers have visible vertical ridges and should form a compact, layered arrangement without extending too far beyond the truck bed.
Make sure the truck's pale-blue windshield, red rear lights, and small wheels remain visible.
Dreamy Room Level 917 requires careful positioning here because the truck sits behind the foreground fence and near the yellow road roller.
A correctly placed delivery truck completes the transportation area of Dreamy Room Level 917 while leaving enough room for the safety barriers and rocks in front.
Step 9. Set Up the Safety Barriers, Fence, Pipes, and Fire Hydrant
Construction safety equipment forms an important part of Dreamy Room Level 917. Begin by placing the yellow-and-black striped safety barriers across the lower-middle section of the site.
Arrange several short barrier sections between the delivery truck and the central machinery. Their stripes should face toward the viewer, creating a clear division between the work area and the access route.
Place another longer striped barrier along the right-hand edge of the foundation, directly in front of the crane tower.
Next, install the slanted metal mesh fence in the lower-left foreground. This fence has reddish-brown posts and a dark wire-mesh center with coils of barbed wire across its upper edge.
Add the orange-and-white traffic cones near the central work area.
Beside the crane tower, position the upright lavender pipes, turquoise container, and small orange-yellow equipment box. The red-orange fire hydrant belongs near the front-right edge.
These safety and utility objects give Dreamy Room Level 917 its detailed construction-site atmosphere. Keep the fence in front of the truck but behind the foreground vehicle.
Step 10. Park the Yellow Road Roller and Finish the Ground Decorations
Finish Dreamy Room Level 917 by placing the large yellow road roller in the front-center area of the construction site.
This vehicle occupies the most prominent foreground position. Its broad metal compaction drum faces toward the lower-left corner, while its large rear wheel sits farther right.
Position the open operator compartment behind the front drum. The compartment contains an orange driver's seat, a steering wheel, vertical metal supports, and a rectangular white-and-orange canopy above.
Check that the yellow body panels, lavender wheel centers, and gray front bumper are visible.
After parking the vehicle, arrange the decorative rocks around the front edge. Add the cluster of large purple stones beside the wire fence, along with smaller lavender pebbles and a small green leafy plant.
Place the scattered tan rocks near the road roller's front and along the lower-right side. A few small gray-purple stones should remain isolated on the green ground.
These finishing touches complete Dreamy Room Level 917. Verify that the roller does not cover the fire hydrant or the nearby construction supplies.
Notes and Precautions
Dreamy Room Level 917 contains many overlapping objects, so several placement details deserve special attention.
- Build from the back toward the front. Start with the concrete supports, rear scaffolding, and crane before adding ground-level machinery.
- Watch the crane boom's angle. The long truss must travel diagonally from the middle-left toward the upper-right corner.
- Check the crane's vertical alignment. Its glass cabin, upper mounting structure, maintenance balcony, and lattice tower must appear as a connected assembly.
- Keep the work platform elevated. The strapped pipes and yellow equipment boxes belong on top, while the control cabinet and workbenches belong underneath.
- Do not confuse the cargo bundles. The large purple bundle with yellow straps sits on the ground, while the smaller strapped package is near the rear scaffolding.
- Leave space for the foreground vehicles. The delivery truck occupies the left, and the yellow road roller dominates the center.
- Pay attention to tiny finishing objects. Rocks, small tools, traffic cones, barrels, and the fire hydrant are all part of the completed arrangement.
The challenge in Dreamy Room Level 917 is not moving objects quickly but recognizing their intended locations. When an item seems difficult to position, compare it against nearby structures in the completed scene.
Tips and Tricks from top player
The most effective way to complete Dreamy Room Level 917 is to use its large architectural elements as visual anchors.
- Use the rear wall as your starting reference. Its position helps determine where the concrete columns, reinforcement cages, and scaffolding belong.
- Complete the crane in logical sections. Install the tower, cabin, boom, pulley, and chains in that order to understand their spatial relationships.
- Match items using color and shape. Purple cargo bundles, turquoise equipment, yellow safety markings, and orange bricks are easy to distinguish.
- Use the raised platform to separate objects. Items with pallets and bundled blue pipes belong above; control cabinets and workbenches belong below.
- Place the largest foreground objects before the smallest decorations. The road roller and truck provide useful reference points for positioning rocks, fences, and barriers.
- Inspect partially hidden objects. Some materials disappear behind the crane boom or under the work platform, so their visible edges are important clues.
- Avoid unnecessary rearrangement. Once a major structure matches the reference, concentrate on completing the surrounding area.
In Dreamy Room Level 917, working systematically is more reliable than placing objects randomly. Focus on one construction zone at a time, moving from the rear-left to the upper-right and finally toward the foreground.
Final Scene of Dreamy Room Level 917
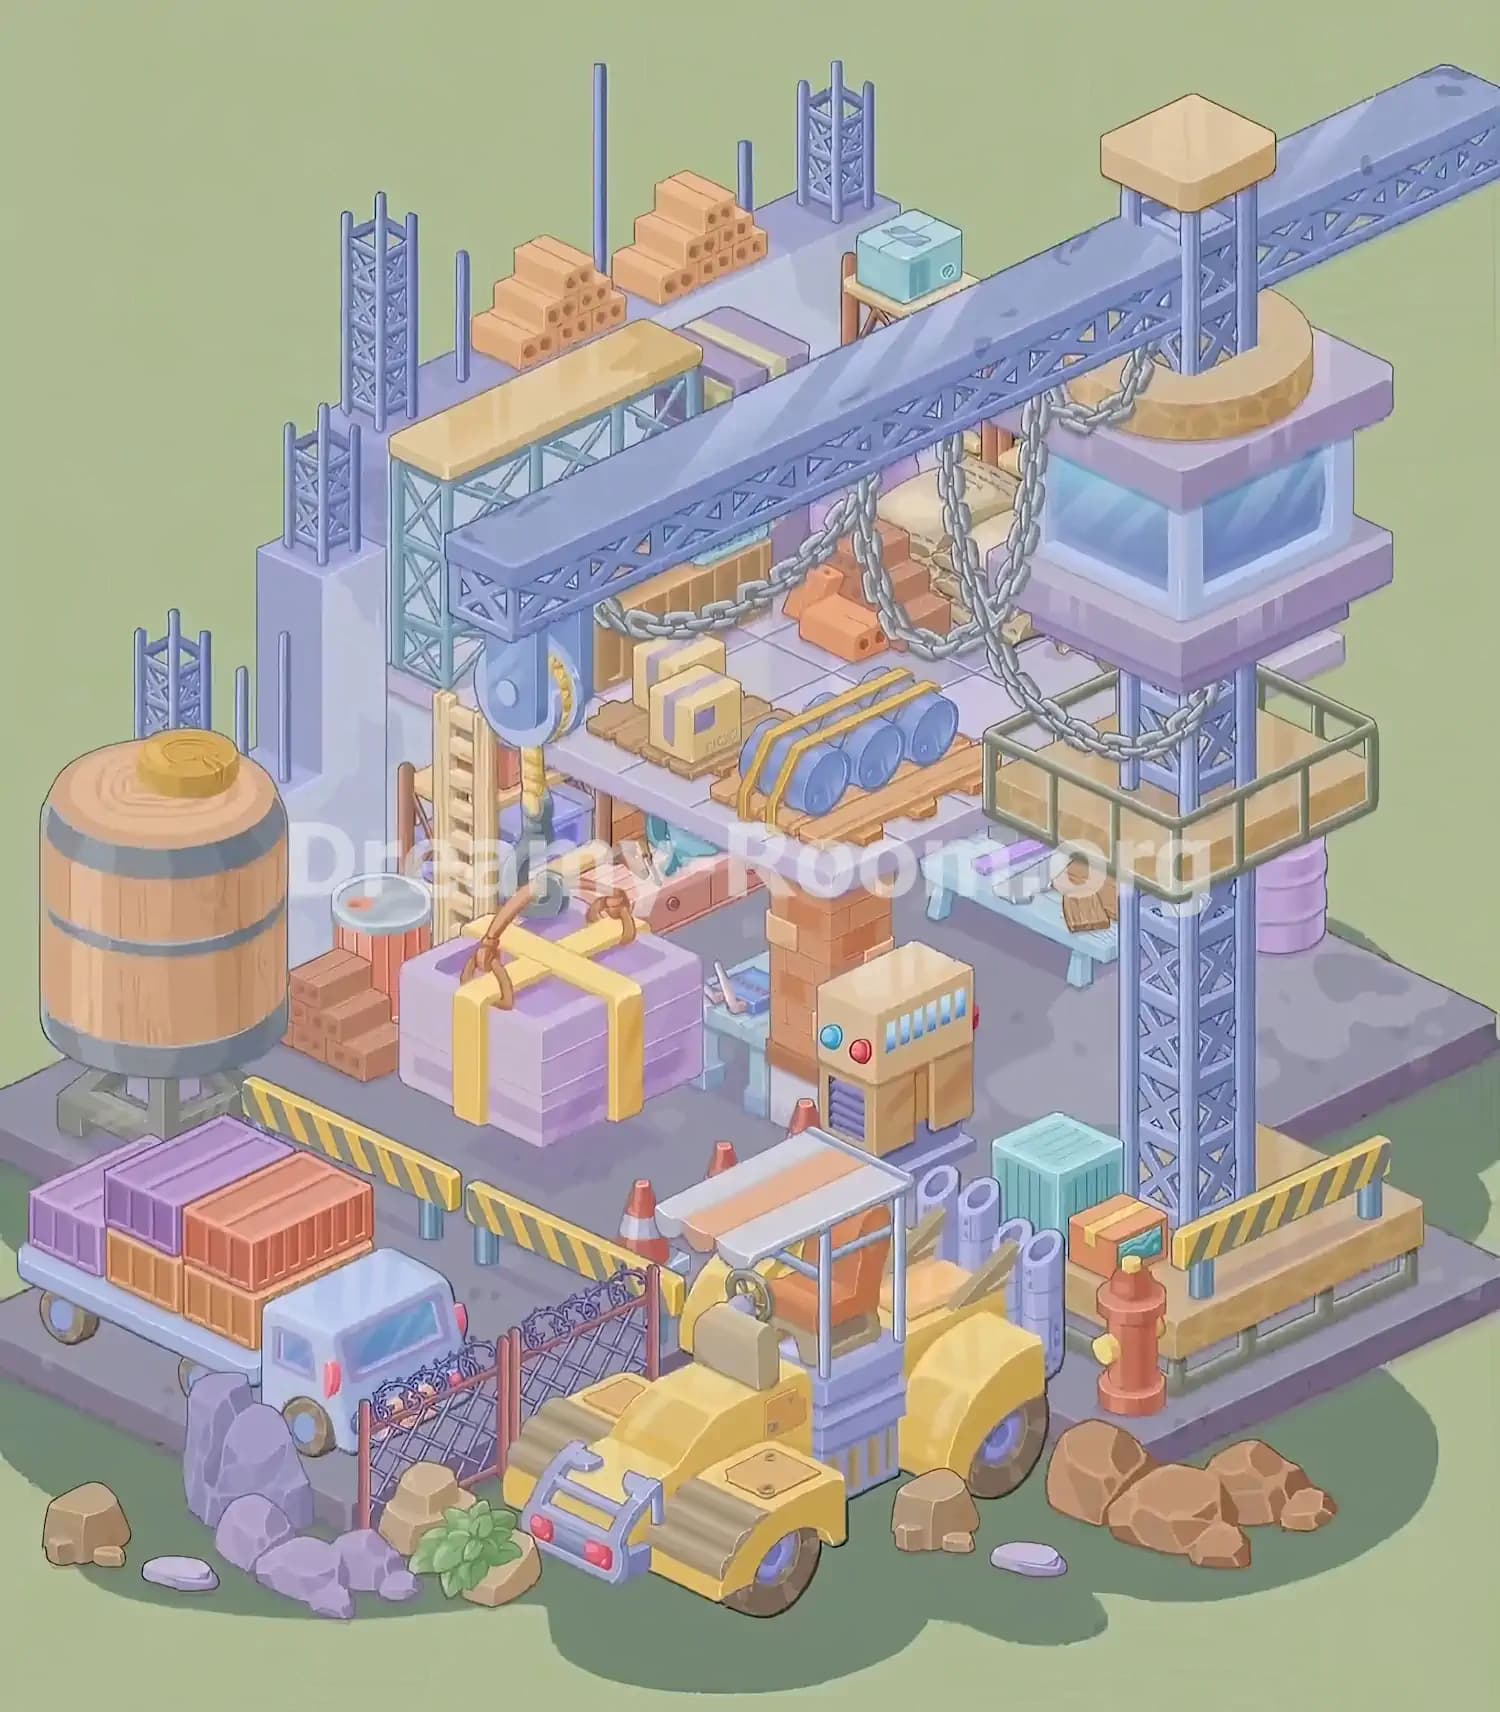
The completed Dreamy Room Level 917 reveals a charming miniature construction site filled with industrial activity and carefully organized equipment.
A towering blue-gray crane dominates the upper portion of the scene, extending diagonally across the building site. Its suspended chains hang over an elevated platform covered with strapped pipes, construction bricks, wooden pallets, and machinery. Behind it, reinforced concrete columns, steel frameworks, and scaffolding suggest a building still under construction.
On the left, a large wooden barrel stands beside stacked bricks and a purple cargo bundle secured with yellow straps. Below the raised platform, workbenches, electrical equipment, and storage containers create a busy working environment.
At ground level, a delivery truck carries colorful shipping containers, while a bright yellow road roller occupies the foreground. Safety barriers, traffic cones, a wire fence, a fire hydrant, scattered rocks, and a small green plant complete the scene.
Dreamy Room Level 917 turns a simple concrete foundation into a detailed, colorful construction project where every object has its correct place.