Dreamy Room Level 934
Dreamy Room Level 934 guide - Dreamy Room 934 Walkthrough & Solution.
Share this Guide with your friends:
Important Notice Regarding Level Numbering
Due to frequent changes in Dreamy Room's level numbering and differences between platforms (Android/iOS) – for example, level 934 on Android might not be the same as level 934 on iOS – the text guide below may not always match the images and video above. Please prioritize the image and video guides. If you find that the guide content doesn't match your current level, please visit the All Level Walkthroughs page to find the correct guide based on level images. Thank you for your understanding.
Dreamy Room Level 934 Walkthroughs & Guide
Step 1. Place the Brick Walls and Raised Platforms in Dreamy Room Level 934.
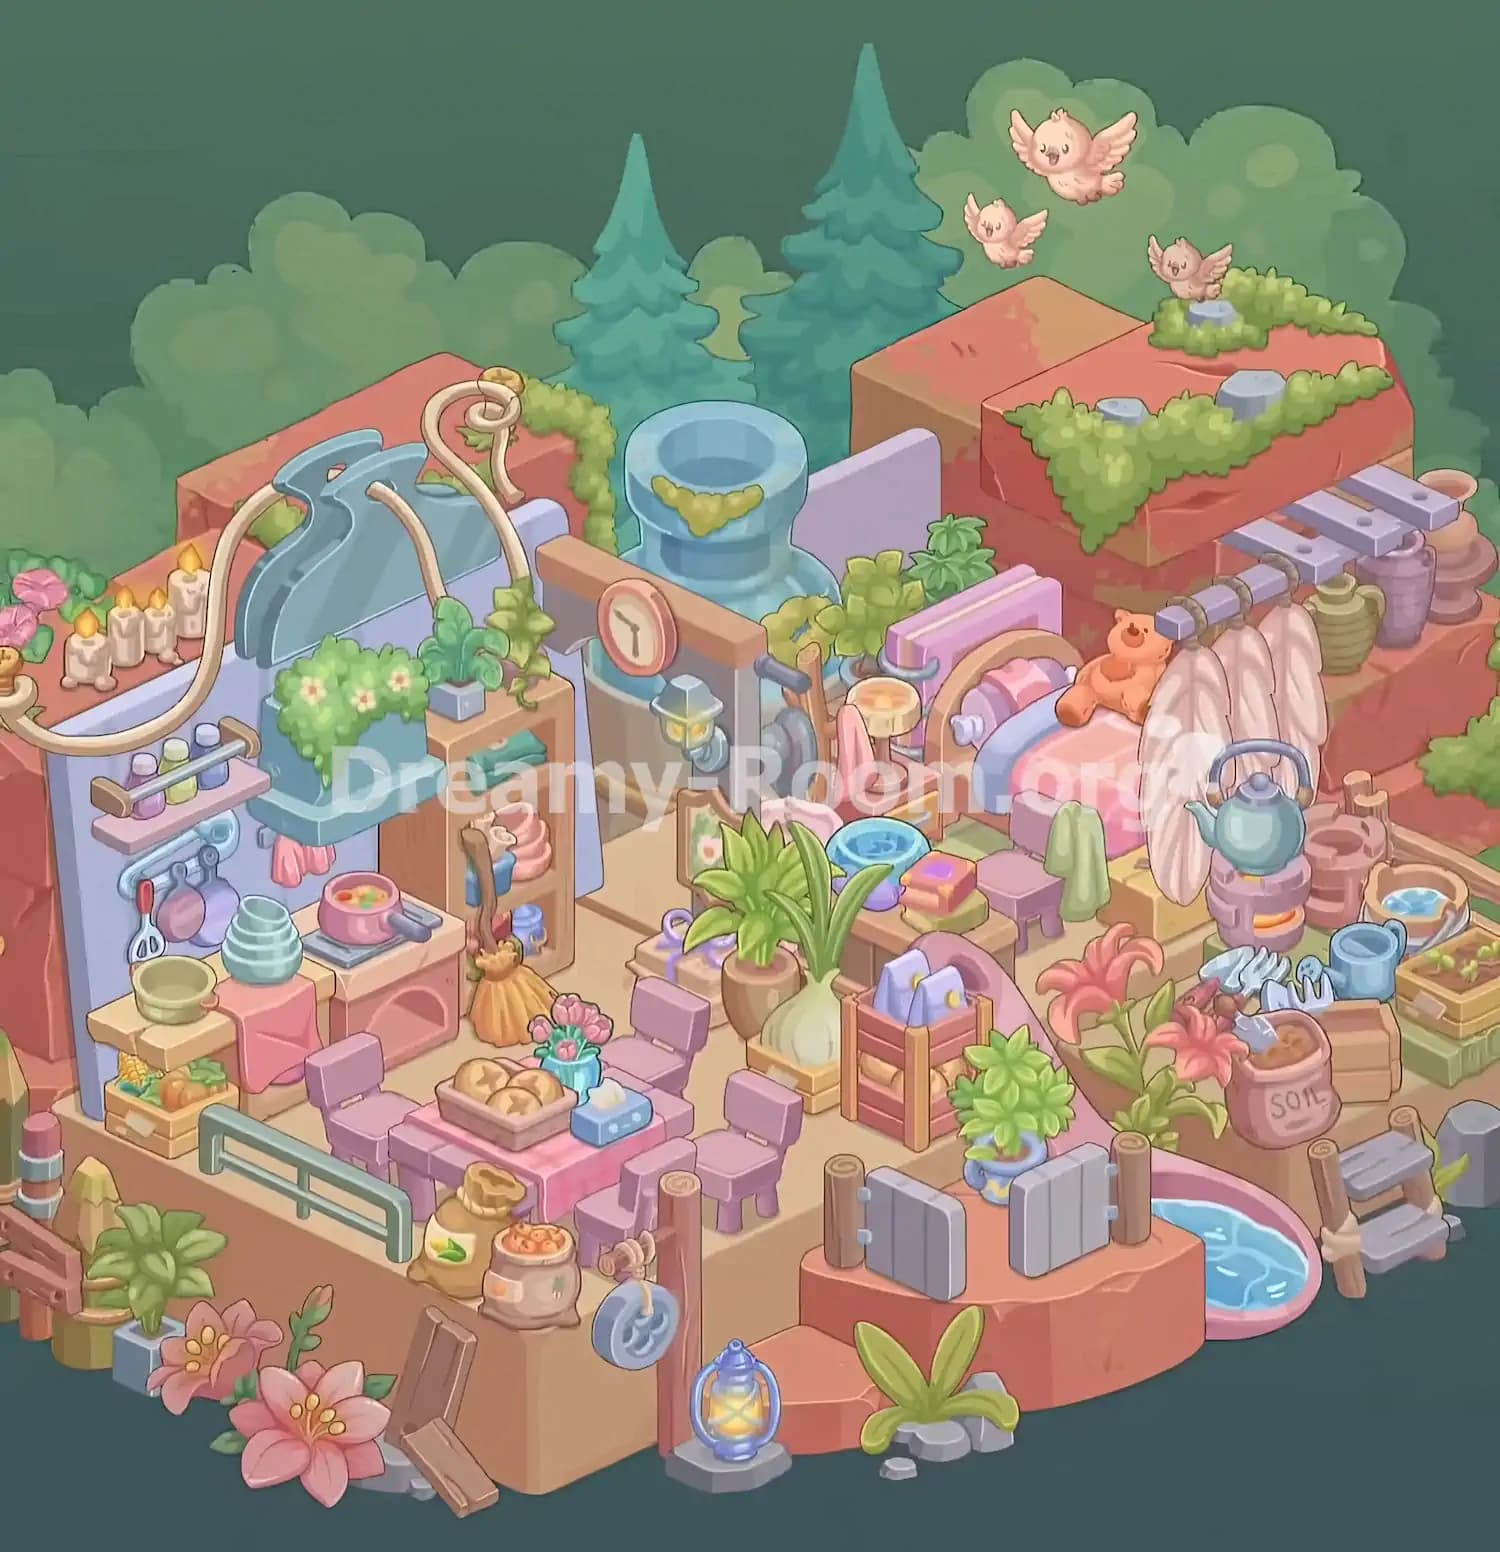
Begin Dreamy Room Level 934 by establishing the architectural foundation of the woodland cottage. The empty scene contains two rectangular beige platforms, with the larger section positioned toward the front-left and the smaller section extending toward the back-right.
Start by positioning the reddish-brown brick walls along the rear edges of the platforms. The leftmost wall should rise behind the cooking area, creating a sheltered corner for the kitchen. Additional reddish-brown structures belong on the elevated back-right platform, where they form a layered garden terrace.
Next, establish the central living area between the kitchen and bedroom. Leave an open space in the middle for furniture and decorations.
In Dreamy Room Level 934, these large structures are important because they define the positions of nearly every smaller object. Check that the raised right-hand section sits behind the main living space rather than overlapping it.
The foundation should now resemble an open-air cottage with a sheltered left side, an elevated rear terrace, and accessible outdoor space along the front.
Step 2. Decorate the Elevated Garden Terrace with Greenery and Birds.
The upper-right terrace is one of the most distinctive areas in Dreamy Room Level 934. Begin by positioning the large reddish-orange raised garden structure on the back-right platform. Its upper surface should extend horizontally, with its front edge visible above the bedroom area.
Arrange the bright green moss and leafy vegetation along the edges of this elevated structure. The greenery forms an irregular border across the front and right sides, with additional plants surrounding the rear section. Place the small gray stones among these patches of moss to recreate the natural garden appearance.
Next, position the three adorable pale-pink birds above the terrace. The largest bird flies near the upper center, while a smaller bird appears to its lower-left. The third bird hovers above the greenery on the right.
Dreamy Room Level 934 also includes two tall blue-green evergreen trees behind the cottage. Place these toward the upper-left and upper-center background, allowing their pointed tops to rise above the walls.
The completed arrangement gives Dreamy Room Level 934 a playful woodland atmosphere, with the birds appearing to enjoy the peaceful garden.
Step 3. Install the Blue Fountain and Decorative Water Basin.
Continue Dreamy Room Level 934 by adding the beautiful blue stone fountain near the back-center of the cottage. This water feature stands behind the central living area, slightly to the left of the bedroom and to the right of the kitchen's decorative wall.
Position the fountain so its wide circular opening faces upward. The upper basin is turquoise-blue, with a darker blue interior that suggests water inside. Its thick cylindrical support extends toward the floor, and small patches of yellow-green moss decorate the front and lower portions.
Place the pale-lavender partition behind and beside the fountain. This divider separates the rear garden from the furniture-filled interior without blocking the fountain's top.
Next, arrange the small leafy shrubs around the fountain's base. Some foliage should appear between the fountain and bedroom, while additional greenery fills the gaps near the wall.
In Dreamy Room Level 934, the fountain provides an important visual landmark. It should remain visible above the surrounding objects instead of being hidden behind the dining furniture.
Once correctly placed, this feature creates a refreshing connection between the indoor cottage and the outdoor garden.
Step 4. Build the Left Kitchen Wall with the Decorative Hood, Candles, and Hanging Utensils.
The kitchen occupies the back-left corner of Dreamy Room Level 934. Begin by placing the tall pale-blue and lavender kitchen wall against the reddish-brown boundary.
Install the large curved blue cooking hood near the top of the wall. Its overlapping blue panels create a distinctive decorative shape. Arrange the long cream-colored looping ornament across the upper portion, allowing it to curl upward toward a small golden accent near the rear wall.
Along the upper-left ledge, place the row of small white candles with glowing yellow flames. These candles should sit beside the decorative hood, adding warmth to the kitchen corner.
Next, attach the narrow wall shelf holding several small pastel-colored bottles. Below this shelf, arrange the horizontal hanging rail with the cooking utensils, including the ladle, spatula, and rounded pink and purple pans.
Dreamy Room Level 934 requires close attention to the height of these accessories. The bottles belong above the hanging cookware, while the utensils should remain below the shelf.
Finish this section by ensuring the decorative blue hood and candle arrangement remain visible behind the kitchen furniture.
Step 5. Arrange the Cooking Stove, Sink, Shelves, and Food Supplies.
With the kitchen wall complete, Dreamy Room Level 934 moves to the lower cooking area. Place the pink stove and kitchen counter directly beneath the hanging utensils.
Position the small pink cooking pot on the stovetop, with its handle extending toward the right. The colorful soup inside should remain visible. Place the stacked turquoise bowls on the adjacent counter and the pale-green bowl closer to the front-left edge.
Next, position the blue sink or washbasin beneath the decorative hood. A cascading arrangement of small white and yellow flowers should spill over its upper front edge.
On the right side of the sink, install the narrow wooden storage shelf. Its upper compartment contains folded green towels, while the lower compartments hold pink dishes and small cleaning supplies.
Lean the straw broom beside the shelf, with its bristles resting near the floor.
At the front-left of Dreamy Room Level 934, place the wooden produce crate containing orange vegetables, green leaves, and other fresh ingredients beneath the counter.
These objects complete the kitchen's functional arrangement. In Dreamy Room Level 934, the placement challenge is keeping the small bowls, utensils, food supplies, and cleaning accessories organized without covering one another.
Step 6. Set Up the Central Wooden Structure, Clock, and Lantern.
The central architectural details bring another layer of personality to Dreamy Room Level 934. Begin by placing the upright wooden support structure between the kitchen and the bedroom area.
Attach the round pink-rimmed clock near the top of the horizontal wooden beam. Its pale face should point toward the front of the scene, making it easily visible from the dining area.
Below and slightly to the right of the clock, position the small hanging lantern with its metallic gray frame and yellow glowing windows. It should hang from the central support rather than resting on the floor.
Behind this structure, arrange the mechanical-looking gray circular fixture and its supporting elements. The curved wooden parts and metallic attachments should fit close to the partition without blocking the walkable center.
Dreamy Room Level 934 uses these fixtures to connect the kitchen and sleeping areas visually. The clock and lantern sit above the main furniture, while the darker mechanical components remain partly concealed behind them.
Take extra care when arranging this section of Dreamy Room Level 934, since several objects overlap when viewed from the front.
Step 7. Position the Dining Table, Purple Chairs, Bread Basket, and Flowers.
The central dining area is one of the coziest parts of Dreamy Room Level 934. Place the rectangular dining table in front of the kitchen, slightly toward the left side of the main platform.
Cover the table with its pink checkered tablecloth. The fabric should hang over the front and sides, giving the furniture a soft, welcoming appearance.
Arrange the small purple chairs around the table. The chairs sit on both sides, with their backs facing outward and their seats directed toward the tabletop. Keep the arrangement compact so it does not overlap the surrounding kitchen counter or garden furniture.
Next, place the shallow brown bread basket near the center-left of the tabletop. It contains several golden bread rolls with decorative markings.
Beside the basket, add the small blue flower vase containing pink blossoms and the blue rectangular tissue box with a white tissue protruding from the top.
Dreamy Room Level 934 uses these details to make the dining area feel lived-in. The table accessories should remain visible between the chairs.
Once finished, the dining area in Dreamy Room Level 934 becomes the visual center of the cottage, connecting the cooking space with the bedroom and surrounding garden.
Step 8. Install the Pink Bed, Teddy Bear, and Bedroom Furniture.
Move to the back-right portion of Dreamy Room Level 934 to assemble the comfortable sleeping area. Position the pink bed directly below the elevated garden terrace, with its rounded headboard toward the back-left and its foot extending toward the front-right.
The headboard features curved wooden details, lavender accents, and pink bedding. Make sure the pink-and-white striped blanket covers the mattress and remains visible from the front.
Place the small orange teddy bear on top of the bed near the upper section of the blanket. The bear should appear seated or reclining close to the headboard.
Next, arrange the pale cream curtains along the right side of the bed. These curtains hang from the gray horizontal rod attached beneath the elevated terrace and partially conceal the sleeping space.
Set the little bedside table to the left of the bed. Add the round lamp with its warm yellow center and place the pink hanging cloth beside it.
Dreamy Room Level 934 also includes small decorative items near the foot of the bed, including a low purple stool and a pale-green hanging towel.
Correct positioning makes this section of Dreamy Room Level 934 feel like a snug bedroom tucked beneath a leafy outdoor canopy.
Step 9. Decorate the Bedroom Terrace with Hanging Fabric, Wooden Beams, and Storage Jars.
The space above and behind the bedroom contains several easily overlooked details in Dreamy Room Level 934. Start with the short row of lavender wooden planks extending outward from beneath the raised garden terrace on the right.
Arrange these planks parallel to one another, creating a small pergola-like overhang. They should project toward the right edge of the scene while remaining attached to the reddish-brown rear structure.
Below the planks, place the gray horizontal rod that supports the cream-colored curtains. The fabric should hang down toward the side of the bed, partially covering the lower bedroom area.
Next, position the decorative storage jars on the small shelf along the back-right wall. These include a green rounded container, a tall purple jar, and pinkish stacked pottery pieces.
Dreamy Room Level 934 also features small supporting containers and wooden elements around this corner. Keep the larger storage jars behind the curtain rather than placing them on the bedroom floor.
In Dreamy Room Level 934, these overlapping objects create depth. The raised moss-covered garden remains at the top, the storage shelf occupies the middle, and the soft bedroom furnishings sit directly below.
Step 10. Arrange the Potted Plants, Wooden Storage Crates, and Small Household Accessories.
Plants and small storage objects fill the middle and lower sections of Dreamy Room Level 934. Begin by placing the large green leafy plant in its brown pot near the center of the room, between the dining table and bedroom.
Position the pale-green bulb-shaped plant arrangement beside it, supported by a low wooden base. The long leaves should rise upward, adding height to the center-right area.
Next, place the rectangular wooden storage crate toward the front-right of the central living space. It contains two pale-blue rolled or folded items and features a pinkish frame with wooden supports.
Arrange the smaller table near the bedroom, holding a blue basin and a stack of small pink-and-orange books or boxes. Keep this table close to the bed while leaving the central walkway clear.
Additional greenery belongs behind the fountain and around the bedroom partition. A small flowering picture or decorative panel should also sit near the central wooden support.
In Dreamy Room Level 934, these accessories are important for filling the gaps between larger furniture pieces.
Check the completed layout carefully, because Dreamy Room Level 934 often presents similar green plants that belong in different corners.
Step 11. Build the Right-Side Gardening and Tea-Making Corner.
The right-hand section of Dreamy Room Level 934 combines garden supplies with a charming outdoor tea-making setup. Begin by positioning the small purple stove near the right side of the bed, just in front of the hanging curtains.
Place the blue-green kettle on top of the stove, with its rounded handle arching above the lid. The orange glow inside the stove should remain visible beneath the kettle.
Behind and beside the stove, arrange the round earthen containers and small water bucket. These should sit close to the reddish-brown wall.
Next, place the gardening tools on the ground toward the front-right. The arrangement includes pale-blue hand tools, a small watering can, and other digging accessories.
Set the open pink sack labeled "SOIL" near these tools, with brown soil visible inside. Position the wooden box beside the sack and arrange the small seedling planter at the far-right edge of the garden.
Add the large pink lily flowers and green leaves near the front of this section.
Dreamy Room Level 934 uses these gardening objects to connect the cottage with its surrounding landscape. Their correct arrangement is essential because the tools, flowers, and containers occupy a fairly small space.
Step 12. Place the Front Pond, Wooden Gate, Water Crossing, and Lantern.
Now decorate the lower-right exterior of Dreamy Room Level 934. Begin by positioning the small curved pond beside the front-right edge of the cottage platform.
The pond has a rounded pink border and a bright-blue water surface decorated with pale ripple patterns. Its shape should curve around the outer edge rather than extend into the main interior.
In front of the pond, place the raised reddish-brown semicircular landing. Install the two short gray gate panels between their wooden posts. The panels should face toward the viewer and occupy the center of the landing.
Next, position the small wooden crossing or ladder to the right of the pond. Its gray planks are supported by brown logs and rope bindings, giving it a rustic appearance.
Place the glowing blue lantern on the small stone base toward the front-left of this outdoor landing. The lantern has a warm yellow interior that contrasts with its cool blue metal frame.
Finally, add the broad green leaves and gray stones in front of the landing.
In Dreamy Room Level 934, this waterside arrangement creates a beautiful transition between the cottage and the surrounding forest.
Step 13. Finish the Front Garden with Flowers, Railings, Sacks, and Rustic Decorations.
The final placement stage of Dreamy Room Level 934 focuses on the front-left boundary and the remaining decorations.
Begin by attaching the pale-green railing along the front edge of the kitchen and dining platform. It should stretch horizontally in front of the dining area without hiding the tabletop.
Place the two food sacks beside the front railing, near the right side of the dining table. One sack is open at the top, while the other contains small orange produce.
Next, arrange the vertical wooden post near the front corner. Attach the blue circular hanging ornament to its side, allowing it to dangle above the lower edge.
At the far-left corner, position the small wooden fence, striped post, and leafy potted plants. These details should form a natural border outside the kitchen.
Place the two large pink flowers along the lower-left exterior. Their yellow centers and broad petals should face outward toward the viewer.
Add the leaning wooden boards near the front edge, with their ends resting against the platform. Complete the surrounding decorations with the small gray rocks, low green plants, and any remaining wooden posts.
Dreamy Room Level 934 is nearly finished once these objects are in place. Compare each corner with the completed image to confirm that the smallest accessories are correctly positioned.
The final touches in Dreamy Room Level 934 turn the cottage from a functional living space into a colorful woodland home.
Notes and Precautions
Dreamy Room Level 934 contains numerous overlapping decorative objects, making precise placement more challenging than the relaxed atmosphere initially suggests.
- Place the largest structures first. The brick walls, elevated garden terrace, fountain, kitchen wall, and bed establish the layout. Installing smaller decorations before these pieces can make positioning more difficult.
- Watch the kitchen shelves carefully. The hanging utensils, small bottles, cooking bowls, and folded towels each have specific locations. Do not confuse the upper shelf with the lower storage compartments.
- Keep the bed and garden terrace separate. The moss-covered structure belongs above and behind the bed, while the curtains hang below it.
- Pay attention to the tiny plants. Dreamy Room Level 934 contains several similar green decorations, but they are intended for different locations.
- Do not mix the water features. The tall blue fountain belongs in the back-center, while the small pond sits outside the front-right corner.
- Check the right-side garden tools. The kettle, soil sack, watering can, gardening tools, and seedling boxes should remain grouped in their designated positions.
- Use the completed image as a reference. The main difficulty of Dreamy Room Level 934 is discovering the correct location for every object rather than decorating freely.
Before finishing Dreamy Room Level 934, inspect the front boundaries, elevated terrace, and spaces beneath the furniture for any overlooked items.
Tips and Tricks from top player
Players can approach Dreamy Room Level 934 more efficiently by organizing the placement process around visual landmarks.
- Work from back to front. Begin with the rear walls and terrace, continue with the kitchen and bedroom, and finish with the front garden. This reduces visual obstruction.
- Use the blue fountain as a landmark. The fountain sits behind the central room and helps you distinguish the kitchen area on the left from the bedroom on the right.
- Group related objects together. Organize kitchen accessories, bedroom furniture, dining decorations, and gardening supplies mentally before placing them. This makes Dreamy Room Level 934 easier to navigate.
- Complete one corner at a time. Finish the kitchen before moving to the dining table, then proceed to the bedroom and outdoor garden. Avoid switching randomly between distant objects.
- Inspect partially hidden spaces. Several objects sit behind curtains, under shelves, or beside larger furniture. Their outlines can be difficult to recognize after the main structures are placed.
- Compare silhouettes rather than colors alone. Many pieces in Dreamy Room Level 934 use similar pastel colors. Their shapes, sizes, and intended heights provide better placement clues.
- Save the smallest decorative items for last. Flowers, stones, lanterns, pots, and tiny garden accessories are easier to position after the main layout is established.
The most effective strategy for Dreamy Room Level 934 is to treat the scene as several connected zones rather than a single crowded arrangement.
Final Scene: A Peaceful Woodland Cottage in Dreamy Room Level 934
The completed Dreamy Room Level 934 reveals a beautiful woodland cottage filled with warmth, greenery, and charming everyday details.
On the left, a cozy kitchen features glowing candles, hanging cookware, colorful bowls, fresh vegetables, and a simmering pot of soup. A pink dining table surrounded by purple chairs creates an inviting gathering space, complete with bread, flowers, and a tissue box.
Toward the right, a comfortable pink bed rests beneath soft curtains and a moss-covered terrace. An adorable teddy bear sits on the blanket, while three small birds fly above the garden.
The surrounding landscape is equally delightful. A turquoise fountain, blooming pink lilies, leafy plants, gardening supplies, and a tiny pond bring the forest retreat to life. Warm lanterns illuminate the outdoor decorations.
Dreamy Room Level 934 transforms two simple platforms into a magical, peaceful home where every carefully positioned object contributes to the finished scene.