Dreamy Room Level 914
Dreamy Room Level 914 guide - Dreamy Room 914 Walkthrough & Solution.
Important Notice Regarding Level Numbering
Due to frequent changes in Dreamy Room's level numbering and differences between platforms (Android/iOS) – for example, level 914 on Android might not be the same as level 914 on iOS – the text guide below may not always match the images and video above. Please prioritize the image and video guides. If you find that the guide content doesn't match your current level, please visit the All Level Walkthroughs page to find the correct guide based on level images. Thank you for your understanding.
Dreamy Room Level 914 Walkthroughs & Guide
Step 1. Build the Castle Foundation and Position the Main Staircase
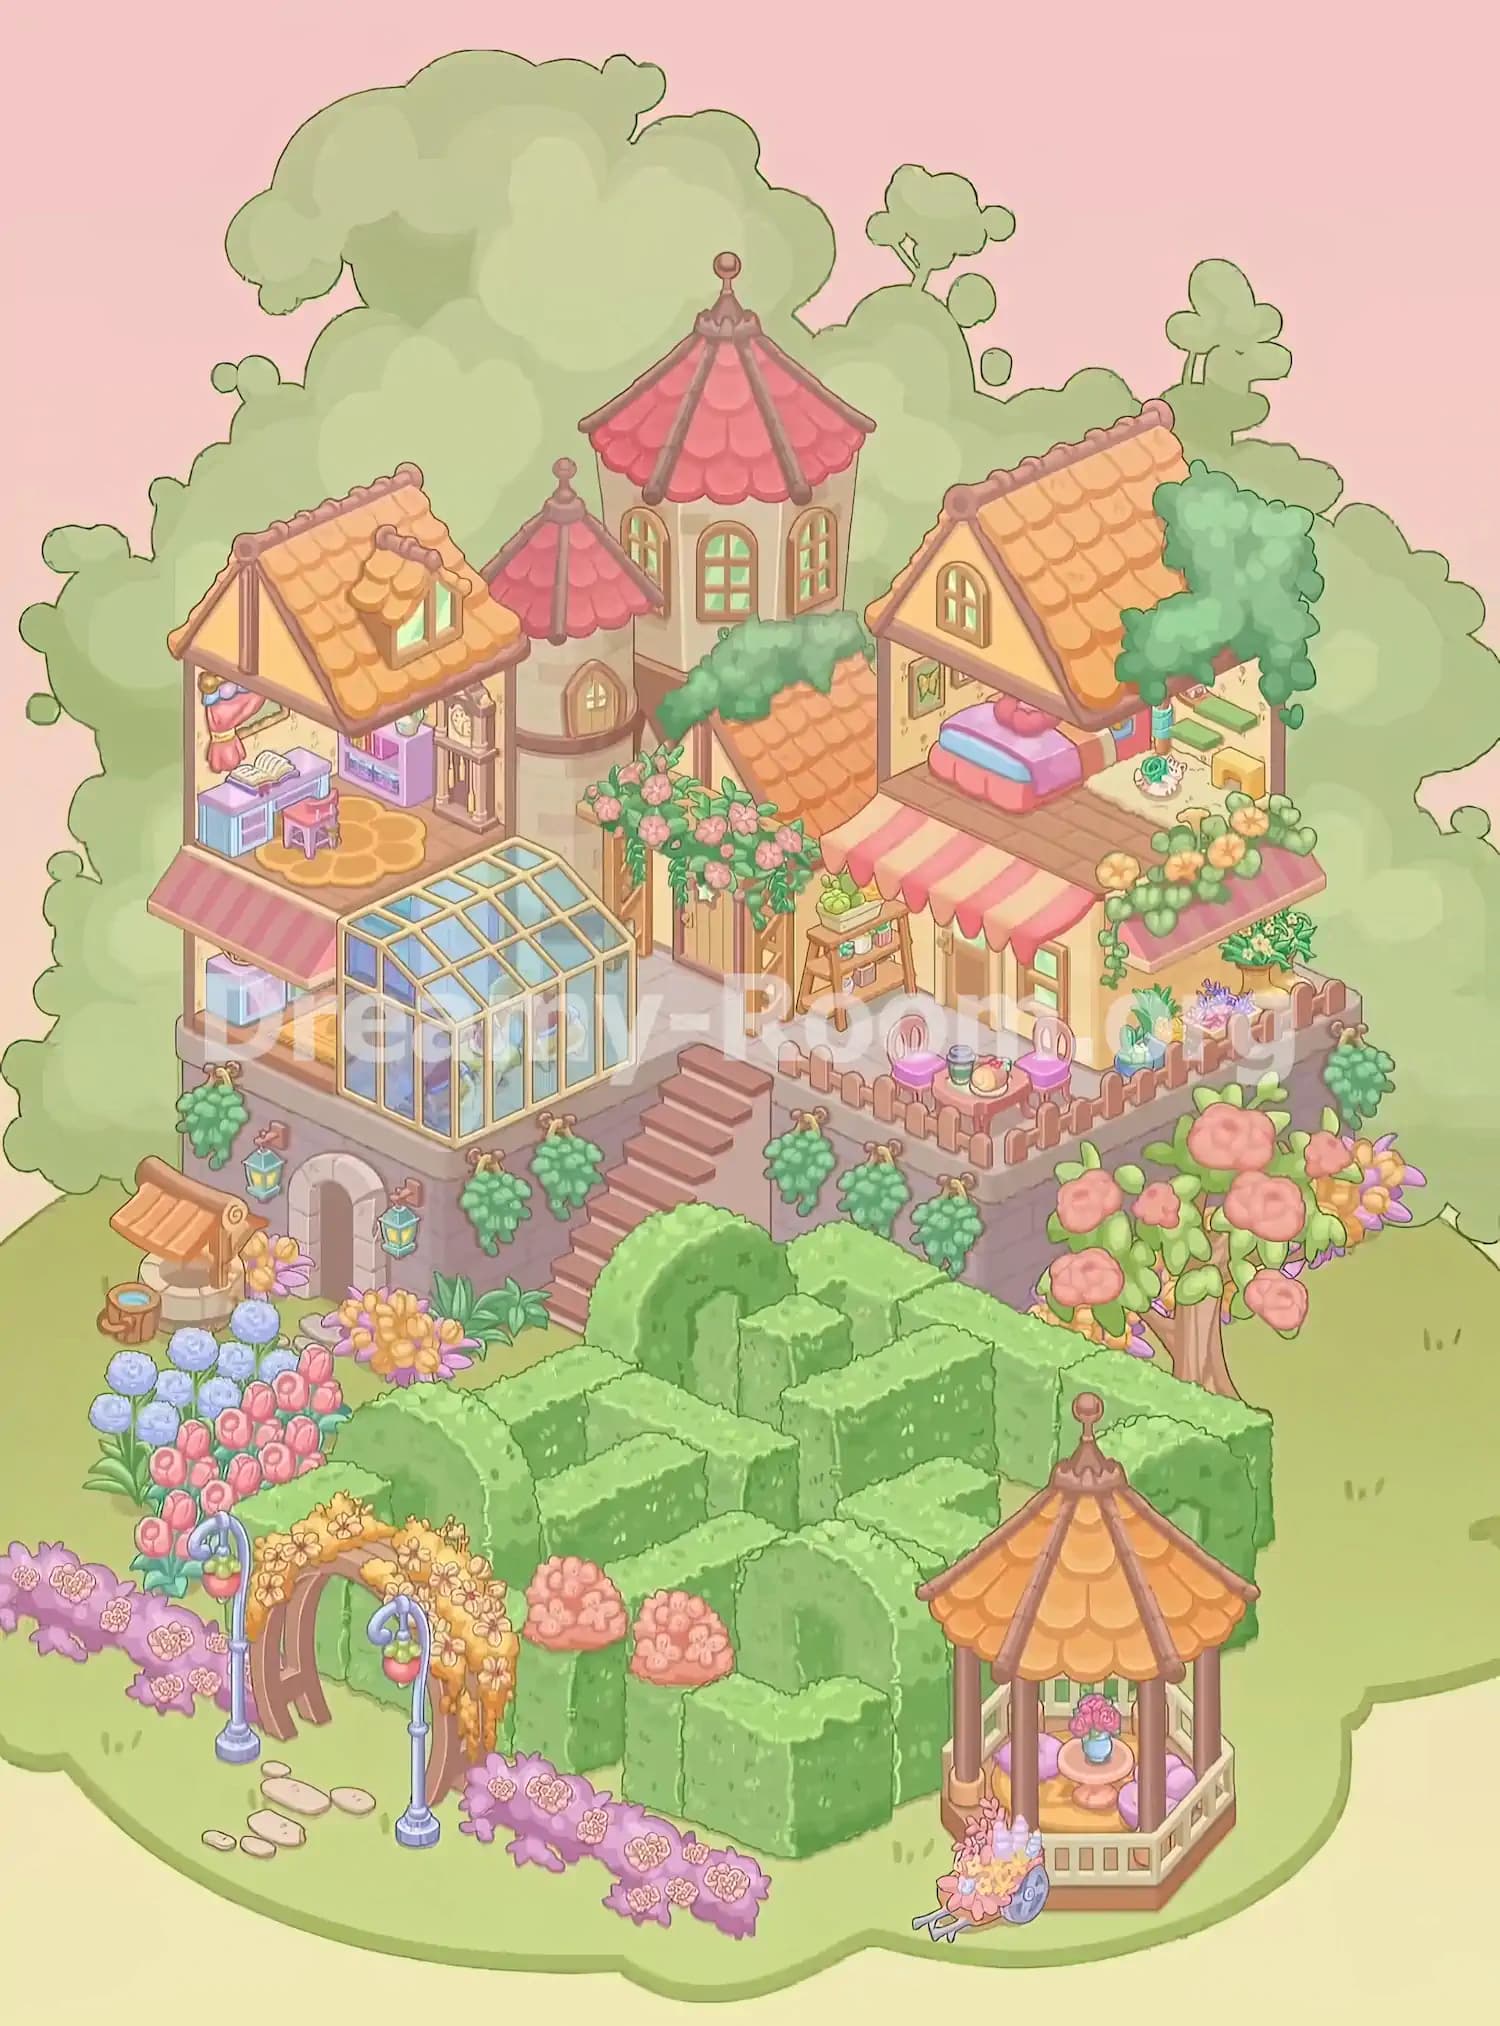
Begin Dreamy Room Level 914 by examining the empty L-shaped platform, which features pale square floor tiles and pinkish brick sides. This elevated foundation will support the entire castle complex, while the surrounding grassy area provides room for the garden and hedge maze.
The first priority in Dreamy Room Level 914 is establishing the major structural elements. Keep the tallest buildings toward the rear of the platform and reserve the front edge for the outdoor terrace and connecting staircase.
Position the broad staircase near the front-center portion of the raised structure, descending diagonally toward the lower-left foreground. The staircase should connect the upper courtyard to the garden below.
Along the exposed left foundation wall, identify the small arched doorway beneath the greenhouse area. Decorate this lower wall with blue-and-gold hanging lanterns and clusters of trailing green vines.
In Dreamy Room Level 914, these foundation details create the separation between the elevated castle courtyard and the landscaped garden, making the placement of later structures considerably easier.
Step 2. Construct the Central Castle Towers and Flower-Covered Entrance
The next stage of Dreamy Room Level 914 focuses on the central castle, which forms the tallest and most recognizable part of the completed scene.
Position the large cylindrical tower toward the back-center of the platform. Its cream-colored walls, narrow arched windows, and tall pink-red tiled roof make it stand out above the surrounding cottages. The roof should have a pointed decorative finial, with several vertical supports dividing the curved roof sections.
Next, place the smaller cylindrical turret slightly to the left and in front of the main tower. This secondary structure features a matching pink roof, a small round-topped window, and darker decorative bands around its walls.
Connect the central tower to the surrounding buildings using the lower orange-tiled roof section. This sloping roof sits in front of the main tower and behind the flowering entrance.
In Dreamy Room Level 914, the wooden entrance should sit below the connecting roof, just left of the center of the courtyard. Surround its upper frame with lush green vines and clusters of soft pink roses.
Make sure the floral decorations cascade naturally over the entrance without blocking the nearby buildings. This arrangement gives Dreamy Room Level 914 its signature romantic castle appearance.
Step 3. Assemble the Left Cottage and Decorate Its Two Interior Floors
Now move to the upper-left section of Dreamy Room Level 914, where a charming two-story cottage stands beside the castle towers.
Place the cottage against the rear-left portion of the raised platform. Its steep orange-gold tiled roof features a triangular gable, wooden supports, and a small projecting dormer window. The dormer should face toward the viewer, slightly right of the roof's center.
Inside the upper floor, arrange the small writing desk on the left side. Place the open book on its surface, with the pink stool directly in front. A purple shelving cabinet containing colorful books and small decorative objects belongs near the back wall. Additional wooden shelves occupy the right side of the room.
Add the hanging pink curtain or decorative fabric near the upper-left interior corner. Beneath the furniture, position the warm yellow floral-patterned floor rug.
The lower level in Dreamy Room Level 914 is partially visible behind a pink-and-cream striped awning. Place the small light-purple storage cabinet toward the left, while maintaining the open passage to the greenhouse.
Correctly completing this cottage is essential because its overlapping roof, interior furniture, and decorative awning establish the visual depth of the entire left side of Dreamy Room Level 914.
Step 4. Install the Glass Greenhouse and Decorate the Left Garden Corner
The greenhouse is one of the most distinctive structures in Dreamy Room Level 914. It occupies the front-left portion of the elevated courtyard, immediately below and in front of the two-story cottage.
Position the greenhouse so that its transparent glass walls face the foreground. Its framework consists of pale golden supports with blue-tinted glass panels arranged into a tall, angular structure with a pitched roof.
Align the greenhouse against the edge of the upper platform, directly above the lower arched doorway. The left edge should sit close to the cottage's striped awning, while the right side extends toward the central staircase.
Inside the greenhouse, place the visible green plants and small decorative containers. The blue-tinted glazing should still allow the interior greenery to be seen.
For Dreamy Room Level 914, the greenhouse needs to remain slightly forward of the cottage, creating a layered architectural arrangement.
Add clusters of hanging greenery along the exposed brick wall underneath. Small decorative lanterns and flowering accents should frame this part of the foundation.
The correct greenhouse placement in Dreamy Room Level 914 also leaves enough space for the flower garden and wishing well that will later occupy the ground immediately below it.
Step 5. Build the Right Cottage and Arrange the Cozy Upper Bedroom
Continue Dreamy Room Level 914 by working on the large cottage positioned at the upper-right side of the elevated platform.
This building features a golden-orange tiled gable roof, cream-colored walls, and a small arched window set into the front-facing triangular gable. Position the cottage to the right of the main castle tower, with its roof extending toward the right edge.
The upper floor contains a cozy bedroom that remains visible from the front. Place the pastel pink-and-blue bed toward the left side of the room, underneath the sloping roof. Arrange the pillows and bedding neatly, with a pink cushion at the head of the bed.
Against the right wall, add the small green shelf and other decorative pieces. A framed picture belongs on the interior wall near the back-left side, while a tiny potted decoration sits closer to the front-right floor area.
Outside, position the leafy green tree beside the right roofline. Its rounded foliage should partially overlap the roof and upper wall.
In Dreamy Room Level 914, this bedroom balances the study room inside the left cottage. Keep both interiors visible rather than allowing nearby decorations to obscure them.
Finishing the upper-right cottage gives Dreamy Room Level 914 its recognizable arrangement of two welcoming homes surrounding a taller central castle.
Step 6. Create the Outdoor Café Terrace and Decorative Plant Market
The right-front courtyard of Dreamy Room Level 914 becomes a delightful café terrace with colorful outdoor furniture, potted plants, and a small market-style display.
Start by placing the pink-and-cream striped canopy along the lower front of the right cottage. Its awning extends outward, covering the entrance and giving the building the appearance of a small garden café.
Underneath the canopy, position the cream-colored doors and windows. To the left of this entrance, place the small wooden display stand containing plants, containers, and other garden accessories. A green potted plant should sit on top.
Next, arrange the round outdoor table in front of the café, near the right side of the central staircase. Place two purple-pink chairs around it, one to the left and the other to the right. Add the small tabletop accessories, including cups and colorful decorative items.
Surround the outer edge of the terrace with the short brown picket fence. Along the far-right section, organize the raised flowerbeds and containers with orange, yellow, green, and purple plants.
In Dreamy Room Level 914, the upper-right garden also features a pink-striped canopy over the side planting area.
Complete this section by placing the flowering tree near the right edge of the platform, with large pink blossoms surrounded by green leaves.
The café, furniture, plants, and fencing make this corner of Dreamy Room Level 914 feel like a lively outdoor gathering place.
Step 7. Arrange the Lower Flower Garden and Small Wishing Well
With the castle complex established, move to the lower-left garden in Dreamy Room Level 914. This area sits beneath the greenhouse and to the left of the large hedge maze.
Begin by positioning the small wishing well against the left side of the castle foundation. Its golden-orange wooden roof, curved supports, and circular stone basin create a charming countryside decoration. Place the small wooden bucket or container nearby.
Above and around the well, add the clusters of flowering plants. The tallest flowers should sit closer to the foundation wall, while shorter flowers extend toward the foreground.
Arrange the blue hydrangea-like blossoms along the left side of the planting area. In front of these, place groups of pink tulips and rounded pink flowers.
The yellow-orange flowers belong nearer the middle, just in front of the well and beside the base of the staircase. Add pointed green leaves to fill the spaces between the flower clusters.
In Dreamy Room Level 914, the lower-left flower garden helps connect the built structures to the natural landscape.
Keep this planting area distinct from the hedge maze. Although the flowers and maze are close together, they should not overlap excessively.
Once completed, this corner adds the colorful garden atmosphere that makes Dreamy Room Level 914 particularly memorable.
Step 8. Construct the Large Green Hedge Maze Across the Foreground
The hedge maze is the largest landscaping feature in Dreamy Room Level 914 and occupies much of the lower-middle and lower-right foreground.
Begin by placing the tall rectangular hedge sections in front of the castle foundation. These green blocks form the outer boundaries and internal pathways of the maze.
Arrange the hedge walls in a compact geometric pattern, with several narrow openings and corridors running between them. The foliage has a bright green upper surface and darker shaded sides, helping distinguish each individual hedge section.
Near the upper-middle of the maze, position the taller rounded hedge formation. Its curved shape provides an important visual landmark and helps separate the rear maze passages from the front ones.
The central area of Dreamy Room Level 914 contains additional box-shaped hedge sections, arranged to form winding corridors. Keep their tops aligned so the maze looks like a connected garden structure rather than a collection of random bushes.
At the front, add the prominent rounded hedge archways. These green arches mark different passage openings and create the maze's storybook character.
Place the small pink flowering shrubs on top of or directly beside the front hedge sections, matching their positions in the completed image.
When arranging the maze in Dreamy Room Level 914, use the visible gaps between the hedges as a guide. The puzzle is not about creating a new maze design but reproducing the specific completed pattern.
Correct placement of these substantial green pieces is one of the most important challenges in Dreamy Room Level 914.
Step 9. Add the Floral Entrance Arch, Garden Lamps, and Stepping Stones
Once the hedge maze is complete, Dreamy Room Level 914 needs its decorative entrance.
Position the wooden garden arch in the lower-left foreground, directly in front of the maze's left entrance. The arch is covered with cascading yellow and cream flowers, forming a bright floral gateway.
Place the two tall blue-purple garden lamps on either side of the entrance. Each lamp has a curved upper arm and a hanging ornament with red and green accents. Their bases should rest on the grass just outside the floral arch.
Next, arrange the small pale stepping stones leading toward the gateway. These irregularly rounded stones create a short, winding path across the grass.
Along the front of the garden, place the low-growing purple-pink flowerbeds. One cluster belongs to the left of the entrance, while another stretches across the lower edge of the maze toward the right.
In Dreamy Room Level 914, the entrance decorations should feel connected to the hedge maze without blocking its arched opening.
The floral gateway creates an inviting transition from the open lawn into the carefully sculpted green corridors.
Completing this entrance gives Dreamy Room Level 914 a finished garden layout and helps establish the intended foreground arrangement.
Step 10. Finish the Right-Side Gazebo and Its Flower Decorations
The final major structure in Dreamy Room Level 914 is a beautiful open-sided gazebo occupying the bottom-right corner of the grassy area.
Place the gazebo in front of the hedge maze, slightly separated from its lower-right boundary. Its roof is covered with warm orange-gold scalloped tiles and rises to a decorative pointed finial.
Align the gazebo so its wooden posts and cream-colored railings are clearly visible. The open structure should face slightly toward the left foreground, allowing the interior furniture to be seen.
Inside, position the small round table at the center and place a vase of pink flowers on top. Arrange the pink and lavender cushioned seating around it.
The gazebo's raised floor should remain visible beneath the furniture, while its decorative railings frame the lower portion.
Add the small flower-filled wheelbarrow immediately outside the gazebo, near its front-left corner. Its blue wheel and colorful blooms create a delightful finishing detail.
In Dreamy Room Level 914, the gazebo must remain separate from the central maze rather than being placed within its paths.
Check that the wheelbarrow, flowerbeds, and gazebo do not overlap awkwardly. This final decorative area completes the countryside retreat and brings Dreamy Room Level 914 to its fully furnished appearance.
Notes and Precautions
During Dreamy Room Level 914, careful object placement is more important than speed. The completed environment contains many overlapping architectural and garden elements, making it easy to mistake one position for another.
- Watch the building layers. The central pink-roofed tower belongs behind the lower orange roof, while the two cottages frame the main castle.
- Keep the greenhouse in the correct position. It belongs in front of the left cottage, not beside the right building.
- Align the staircase carefully. The stairs descend from the upper courtyard toward the lower garden, between the greenhouse and café terrace.
- Separate the two striped awnings. The left awning belongs beneath the study cottage, while the larger right awning covers the café entrance.
- Check the maze openings. Incorrectly positioned hedge blocks can make the completed maze look significantly different from the reference.
- Do not overlook small decorations. Lanterns, flowerpots, vines, tabletop items, and the flower-filled wheelbarrow all contribute to the final scene.
For Dreamy Room Level 914, use the completed image as the primary reference. The suggested placement order helps organize the work, but the game's object availability may determine the order in which individual items can be placed.
Tips and Tricks from top player
An effective strategy for Dreamy Room Level 914 is to work from large structures to small decorative pieces. This reduces visual clutter and makes it easier to identify each object's intended location.
- Build from back to front. Position the tallest towers and major cottages first, followed by the greenhouse, terraces, and foreground landscaping.
- Use fixed landmarks. The central staircase, main castle tower, and large greenhouse provide convenient reference points for aligning nearby objects.
- Complete one area at a time. Finish the left cottage before moving to the right bedroom, then tackle the café and garden.
- Study the hedge shapes. Rounded arches, straight walls, and curved hedge sections have distinct positions within the maze.
- Save small accessories for later. Arrange flowers, lanterns, cups, cushions, and ornamental objects after their supporting furniture and structures are in place.
- Compare the silhouettes. The distinctive shapes of the orange roofs, pink castle towers, maze, and gazebo make it easier to identify incorrect placements.
The most useful shortcut in Dreamy Room Level 914 is to divide the finished picture into three visual zones: the upper castle complex, the middle courtyard and staircase, and the lower garden with its hedge maze.
This approach turns Dreamy Room Level 914 into a series of manageable placement challenges instead of one complicated decorative puzzle.
Final Scene: A Magical Castle Garden in Dreamy Room Level 914
The completed Dreamy Room Level 914 reveals an enchanting fairytale estate surrounded by lush greenery and colorful flowers. At the back, elegant pink-roofed castle towers rise between two cozy cottages, one containing a charming study and the other a peaceful pastel bedroom.
Below the left cottage, a glass greenhouse shelters delicate plants, while the right-side terrace features a welcoming café, outdoor seating, potted flowers, and a flourishing garden.
A staircase connects the elevated courtyard to the lower garden, where a small wishing well rests among vibrant tulips, hydrangeas, and golden blossoms.
The foreground is dominated by an elaborate green hedge maze, featuring curved entrances, geometric pathways, pink flowering shrubs, and a magnificent floral gateway. Nearby, a golden-roofed gazebo offers a peaceful retreat with comfortable seating and fresh flowers.
Dreamy Room Level 914 transforms a bare platform into a beautiful countryside paradise, rewarding players who carefully discover the correct location for every decorative object.