Dreamy Room Level 922
Dreamy Room Level 922 guide - Dreamy Room 922 Walkthrough & Solution.
Important Notice Regarding Level Numbering
Due to frequent changes in Dreamy Room's level numbering and differences between platforms (Android/iOS) – for example, level 922 on Android might not be the same as level 922 on iOS – the text guide below may not always match the images and video above. Please prioritize the image and video guides. If you find that the guide content doesn't match your current level, please visit the All Level Walkthroughs page to find the correct guide based on level images. Thank you for your understanding.
Dreamy Room Level 922 Walkthroughs & Guide
Step 1. Decorate the Upper Walls with Magical Windows and Picture Frames
Begin Dreamy Room Level 922 by focusing on the upper room's light-blue walls. These walls form the backdrop for the entire magical interior, so arranging the windows and artwork correctly will help you position the larger furniture later.
Start with the tall, narrow arched window on the left wall, close to the front corner. Then position the large arched window with pink stained-glass details on the right wall, behind the future moon centerpiece. Add the smaller matching arched window farther to the right, near the outer edge of the room.
Next, arrange the framed pictures along the upper-left wall. Position the largest pink-framed artwork toward the rear corner, with several smaller pictures in pink, purple, and pale blue frames clustered to its left.
In Dreamy Room Level 922, these decorative frames have different sizes and colors, making their arrangement especially important. Keep the lower wall area open for the moon centerpiece, side furniture, and other magical accessories that will complete the upper chamber.
Step 2. Position the Golden Crescent Moon and Royal Sleeping Pod
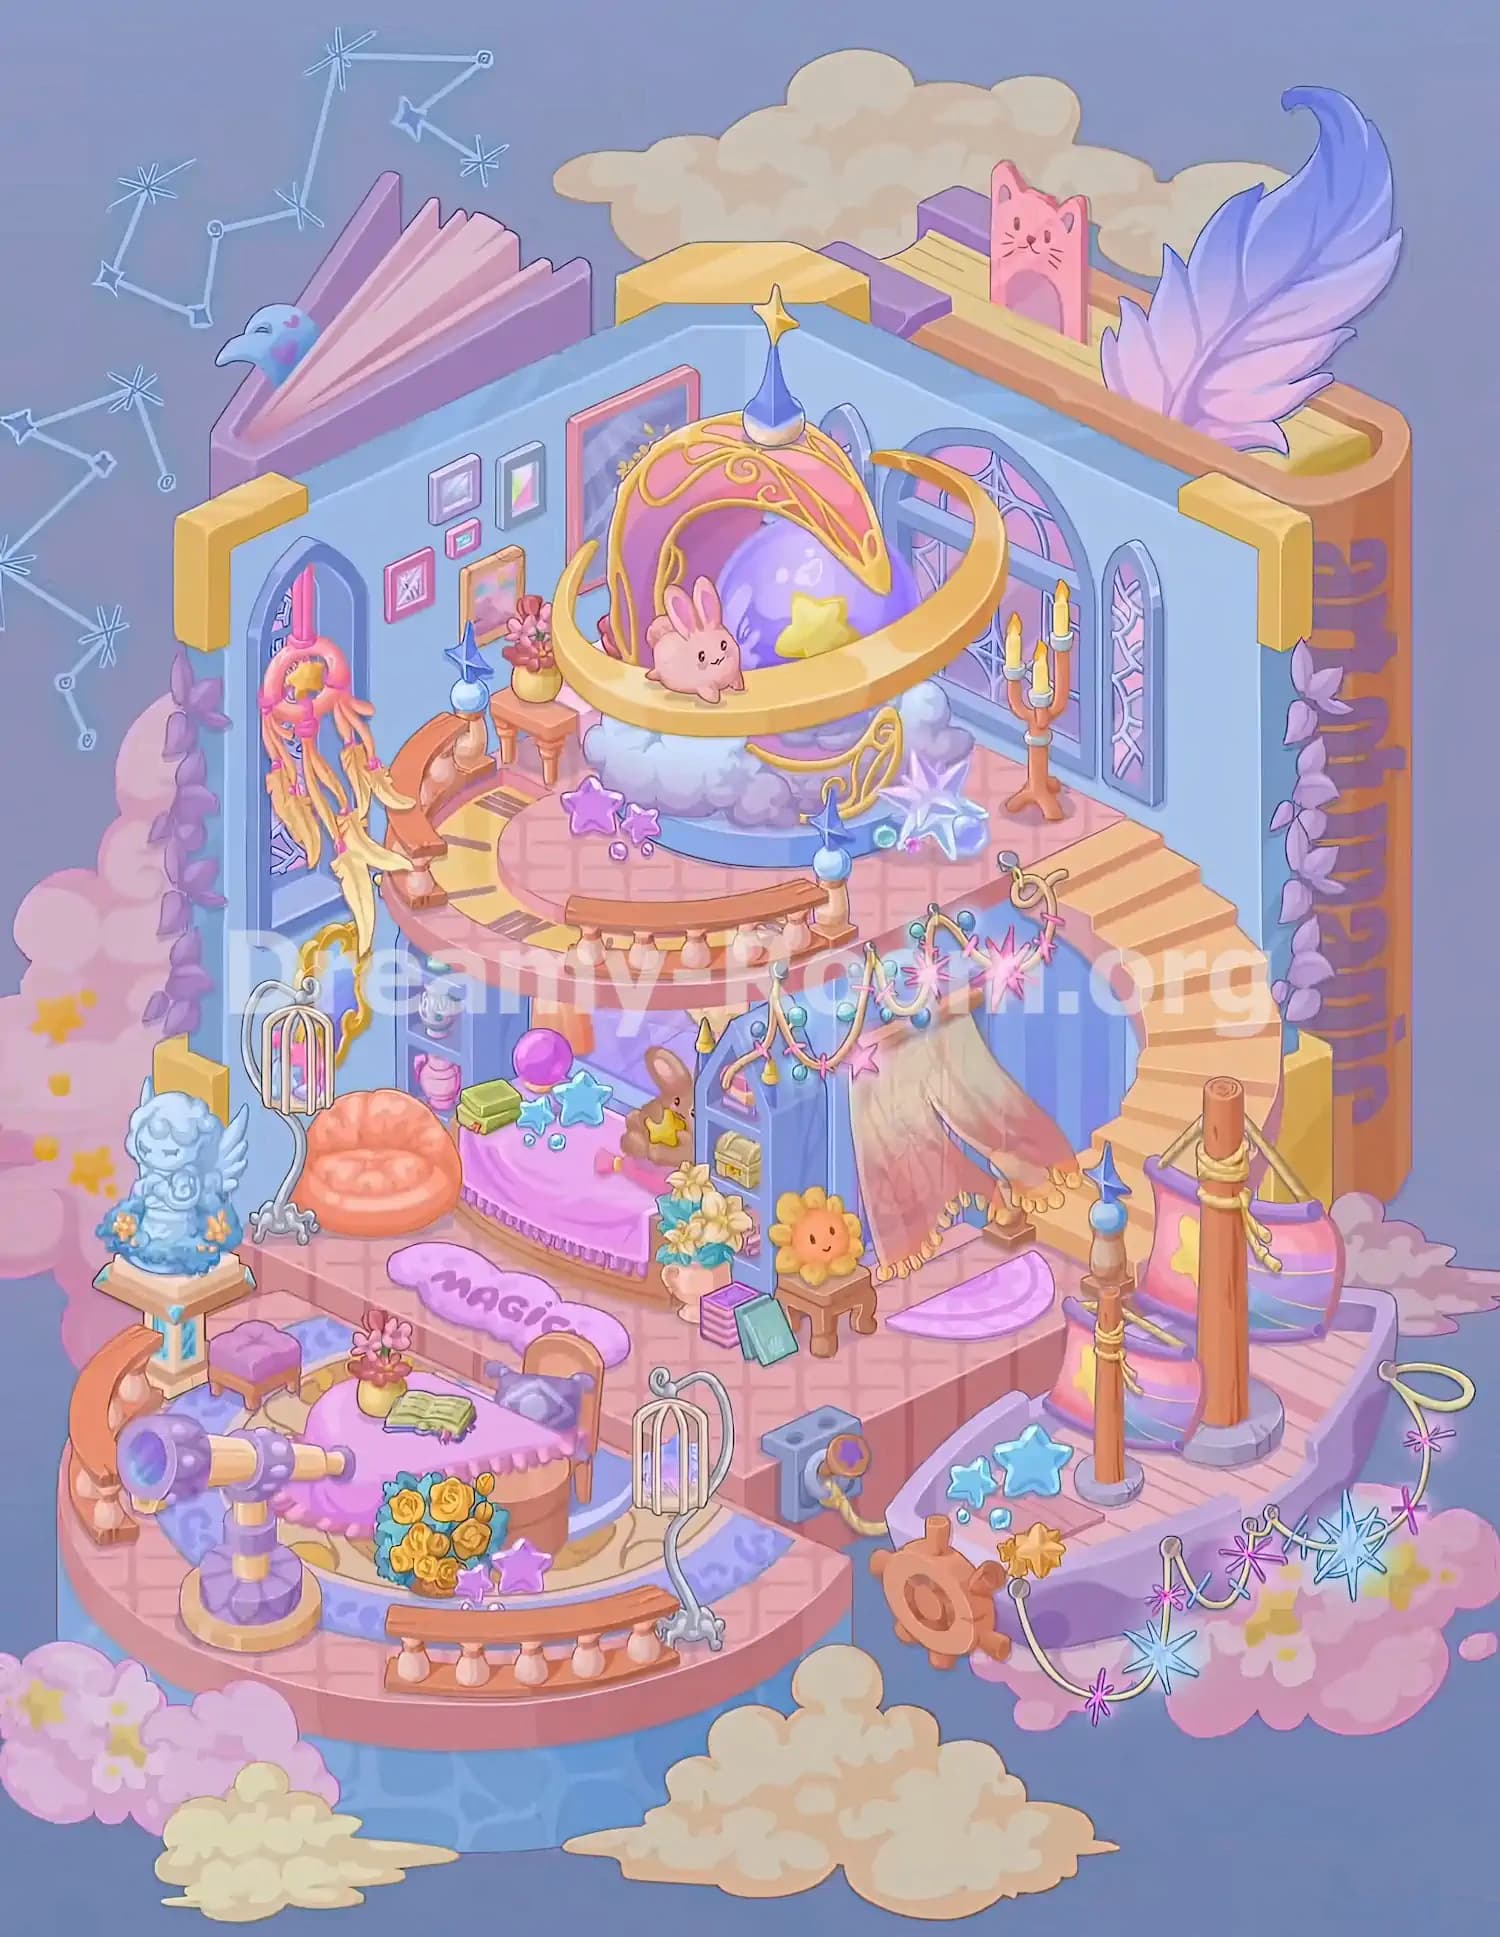
The most striking feature of Dreamy Room Level 922 is the enormous golden crescent moon surrounding a beautiful pink-and-purple sleeping pod. This elaborate decoration belongs near the center of the upper platform, slightly toward the back walls.
Begin by positioning the circular blue base and its fluffy white-and-lavender cloud foundation. Above this foundation, place the rounded sleeping pod with its deep-purple interior, pink outer canopy, and intricate golden scrollwork. The pod should face the open front of the room.
Add the pointed blue spire with its golden star at the highest point of the canopy. Next, arrange the broad golden crescent ring so it curves around the front of the pod, with its taller tip rising on the right side.
Inside the crescent, position the small pink rabbit near the left-front edge and the yellow star cushion toward the right side.
For Dreamy Room Level 922, check that the crescent does not hide the rabbit or the purple cushion. The finished centerpiece should resemble a magical royal bed floating above soft clouds, with its golden ornaments clearly visible.
Step 3. Complete the Upper Balcony with Flowers, Stars, Candles, and Railings
Once the large centerpiece is in place, Dreamy Room Level 922 requires several smaller objects to finish the upper floor.
On the left side of the moon pod, place a small wooden side table supporting a rounded yellow vase filled with pink flowers. Near the left-front section of the balcony, add a decorative post topped with a glowing blue orb and a pointed star-shaped ornament.
Along the front edge, position the curved wooden railing with pale rounded balusters. Keep it centered in front of the moon arrangement. Place another matching decorative post on the railing's right side.
Scatter the purple star ornaments and small sparkling beads on the floor immediately in front of the moon's cloud base. On the right side, position the silver-blue crystalline star decorations, close to the staircase entrance.
Finally, set the three-candle golden candelabrum against the right wall, beside the stained-glass windows.
In Dreamy Room Level 922, these small objects make the upper balcony feel complete. Pay particular attention to the gap between the crescent moon and the candleholder, since both must remain visible.
Step 4. Build the Curved Staircase and Hanging Celestial Decorations
The next task in Dreamy Room Level 922 is establishing the connection between the upper chamber and the middle platform. The large curved staircase belongs on the right side of the room, beginning beside the upper-floor candleholder.
Arrange the pale golden steps so they descend in a graceful curve toward the lower-right portion of the scene. The staircase should follow the outer edge of the room rather than cutting directly through its center.
Beneath the upper platform, hang the decorative celestial garlands. These ornaments combine curved golden cords, blue bead-like lights, and bright pink starbursts. They stretch from the underside of the upper balcony toward the staircase area.
Make sure the ornaments hang across the open space without covering the steps. The hanging decorations should form a gentle, downward series of curves.
Dreamy Room Level 922 uses this staircase to visually connect the royal moon chamber with the cozy living space below. Correct placement is important because an incorrectly positioned staircase or garland can make nearby decorations difficult to align.
Step 5. Arrange the Pink Lounge and Cozy Furniture on the Middle Floor
Move to the middle floor of Dreamy Room Level 922, directly below the crescent moon chamber. This section features a cozy pink-and-purple lounge surrounded by magical keepsakes.
Position the large curved lounge or cushioned bed against the rear portion of the middle platform. Its soft pink covering should drape over the front edge, finished with a delicate purple fringe. The sleeping area faces outward toward the viewer.
On the left side, place the rounded peach-colored armchair with its thick, tufted cushion. It should sit near the left wall, leaving a visible gap between the chair and the pink lounge.
Decorate the lounge with a purple crystal ball, a small stack of green books, blue star-shaped accessories, and tiny sparkling blue beads. Position the brown rabbit plush holding a yellow star on the right side of the lounge.
In Dreamy Room Level 922, this middle-floor arrangement provides a contrast to the elaborate golden moon above. Keep the larger furniture toward the back so there is space for flowers, books, shelving, and a small curtained area in front.
Step 6. Add the Magical Bookshelf, Flower Decorations, and Draped Canopy
Continue decorating the middle level of Dreamy Room Level 922 by placing the narrow blue arched bookshelf just to the right of the pink lounge. Its shelves contain colorful magical keepsakes, including a small golden chest and other miniature containers.
In front of the bookshelf, position a cream-colored vase filled with pale yellow flowers and turquoise leaves. Beside this vase, stack several small purple books, with a turquoise book leaning against them.
Next, place the smiling yellow-orange sunflower decoration on a small brown wooden stool to the right of the bookshelf. The flower should face toward the open front of the room.
On the right side, beneath the curved staircase, arrange the hanging pink-and-cream fabric canopy. Its draped panels should extend diagonally from the overhead support toward the lower floor, with golden tassels along the edges.
Add the small curved lavender floor cushion or decorative mat near the canopy's front-right side.
In Dreamy Room Level 922, these finishing touches make the middle room feel like a secret magical reading retreat. Ensure the canopy hangs behind the stool and books rather than covering the sunflower or bookshelf.
Step 7. Create the Lower Reading Area with a Table, Flowers, and Books
The rounded front platform is another important section of Dreamy Room Level 922. This space becomes a charming reading terrace with a small table, comfortable seating, and colorful flowers.
Start by placing the large oval purple-and-cream rug near the center of the rounded platform. Position the round table over the rug, slightly toward the back-right side, allowing enough space on the left for the telescope.
Cover the table with the pink tablecloth, which hangs over its edges with a delicate ruffled trim. Place a small yellow vase containing pink flowers toward the back-left of the tabletop. Add the open green book beside it, closer to the center.
Position the wooden chair behind the table, with its rounded back and blue-purple diamond-patterned cushion facing outward.
Arrange the large bouquet of yellow roses with turquoise leaves at the front edge of the table, and add the small purple star ornaments nearby.
In Dreamy Room Level 922, the reading table should remain fully visible from the front. Avoid placing the chair or flower bouquet too far forward, where they could overlap the terrace railing.
Step 8. Install the Telescope, Angel Statue, Birdcages, and Terrace Railings
Now complete the decorative accessories on the left and front areas of Dreamy Room Level 922.
Position the purple-and-gold telescope on the front-left side of the rounded platform. Its large purple viewing lens should face diagonally toward the lower-left, while the smaller end points toward the reading table. Set its sturdy circular base on the floor, separate from the rug's central area.
At the far-left rear edge of the lower terrace, place the small blue angel statue on its square cream-and-gold pedestal. The angel has delicate wings and a peaceful expression. Position a tiny purple cushioned stool nearby, slightly behind the reading table.
Install the tall silver birdcage stand beside the peach-colored armchair on the middle level. Add the second matching birdcage stand near the lower terrace's right-front edge.
Finally, place the curved wooden railing along the front of the reading terrace.
In Dreamy Room Level 922, these objects give the lower platform its distinctive observatory appearance. Check that the telescope, both birdcages, and the angel statue remain visible without overlapping one another.
Step 9. Assemble the Floating Star Ship on the Right Side
One of the most unusual features of Dreamy Room Level 922 is the miniature floating ship connected to the right side of the room. Its narrow lavender hull extends outward from the base of the curved staircase.
Begin by arranging the wooden deck and its raised purple border. The front portion should contain two blue star-shaped decorations and several small blue beads. Add the golden star ornament near the front edge.
Next, position the two vertical wooden masts. The shorter mast belongs near the front-left section of the deck, while the taller mast stands farther back on the right side. Both masts have rope bindings and gray circular supports at their bases.
Arrange the two pink-and-purple star-decorated sail-like bundles behind the masts, with the smaller bundle in front and the larger one farther back.
Attach the brown ship's wheel to the front-left exterior edge of the hull.
In Dreamy Room Level 922, finish the ship by hanging the golden string decorations along its outer side, with alternating pink sparkles and icy-blue stars. These ornaments should curve outward over the pink clouds.
Step 10. Finish the Storybook Exterior with Wings, Bookmarks, Vines, and Clouds
The final decorating stage of Dreamy Room Level 922 focuses on the fantasy-book exterior that surrounds the miniature room.
Begin at the top-left, where the open pink-and-lavender book pages rise behind the blue walls. A tiny blue bird with pink markings peeks out from the pages. On the opposite side, arrange the long yellow pages within the orange book spine, with the pink cat-shaped bookmark standing upright toward the back.
The large purple-and-lavender feathered wing decoration should rise from the top-right book section, curving upward above the room. Keep the cream-colored cloud backdrop visible behind these decorations.
Add the purple trailing vines along both outer wall edges. On the left, arrange the flowing pink-and-gold celestial hanging ornament in front of the tall arched window.
Complete the surroundings with fluffy pink and yellow clouds beneath the platforms, the decorative constellation patterns in the blue background, and the orange-and-purple book spine on the far right.
In Dreamy Room Level 922, these exterior details frame the entire scene. Their correct positions make the finished creation look like a magical storybook opening into a floating palace.
Notes and Precautions
Dreamy Room Level 922 contains many overlapping decorations, so careful positioning is essential. Keep the following points in mind when arranging the objects:
-
Place large structures first. The golden moon centerpiece, curved staircase, pink lounge, reading table, and floating ship establish the available space for smaller objects.
-
Watch the upper-floor layering. The crescent ring must sit in front of the sleeping pod, while the cloud foundation remains underneath. The pink rabbit and yellow star cushion should stay visible.
-
Keep the three levels distinct. The moon chamber occupies the upper platform, the pink lounge fills the middle area, and the reading terrace extends toward the lower-left foreground.
-
Check the decorative star pieces carefully. Dreamy Room Level 922 includes purple stars, blue crystals, golden stars, pink starbursts, and small sparkling beads. These pieces belong to different decorative groups.
-
Avoid covering the staircase. The hanging garlands and fabric canopy must not obscure the curved steps or the stairway's connection to the ship.
-
Pay attention to the exterior. The cat bookmark, feathered wing, purple wall vines, and pink clouds are just as important to the completed design as the furniture.
The main difficulty of Dreamy Room Level 922 is finding each object's intended position, rather than simply filling the available space.
Tips and Tricks from top player
To complete Dreamy Room Level 922 more efficiently, use a structured placement strategy instead of moving randomly between the different floors.
- Work from the back toward the front. Position the windows, picture frames, moon centerpiece, and upper furniture before adding balcony railings or hanging ornaments.
- Use the golden crescent as your main landmark. In Dreamy Room Level 922, nearly every upper-floor object can be positioned relative to the large central moon.
- Complete one floor before moving to another. Finish the upper chamber first, then the middle lounge, followed by the lower reading terrace and star ship.
- Group tiny items by appearance. Keep flowers, books, stars, crystals, and hanging decorations together mentally so that similarly colored objects do not get confused.
- Use the staircase to establish alignment. The upper landing, middle canopy, and lower ship all follow the curved staircase's position.
- Check foreground objects last. Telescope placement, birdcages, railings, and dangling star garlands are easier to verify once the large furniture is settled.
For Dreamy Room Level 922, a particularly useful trick is to compare the silhouettes of the largest objects first. Once the central moon, staircase, lounge, and ship match the completed image, the remaining pieces have much more obvious locations.
Final Scene of Dreamy Room Level 922
The finished Dreamy Room Level 922 reveals a spectacular floating fantasy sanctuary emerging from the pages of an enchanted book. At the top, a magnificent golden crescent embraces a pink-and-purple royal sleeping pod, where an adorable pink rabbit rests beside a yellow star cushion. Soft clouds, stained-glass windows, framed pictures, flowers, and glowing candles create a dreamy celestial atmosphere.
Below, a cozy lounge features a peach armchair, pink cushioned bed, magical books, a crystal ball, cheerful sunflower, and delicate fabric canopy. The rounded lower terrace provides a peaceful reading corner with an open book, fresh flowers, golden roses, and a purple telescope pointing toward the stars.
On the right, a miniature floating ship carries colorful star-marked decorations beneath sparkling garlands. Giant feathered wings, a cat bookmark, trailing vines, and fluffy pastel clouds frame the entire creation.
Completing Dreamy Room Level 922 transforms the empty structure into a magical storybook palace, rewarding every carefully placed detail with a beautiful, harmonious final scene.