Dreamy Room Level 836
Dreamy Room Level 836 guide - Dreamy Room 836 Walkthrough & Solution.
Important Notice Regarding Level Numbering
Due to frequent changes in Dreamy Room's level numbering and differences between platforms (Android/iOS) – for example, level 836 on Android might not be the same as level 836 on iOS – the text guide below may not always match the images and video above. Please prioritize the image and video guides. If you find that the guide content doesn't match your current level, please visit the All Level Walkthroughs page to find the correct guide based on level images. Thank you for your understanding.
Dreamy Room Level 836 Walkthroughs & Guide
Step 1. Build the Main Cottage Structure in Dreamy Room Level 836
Begin Dreamy Room Level 836 with the largest cream-colored stone wall sections because they establish nearly every later placement. The broad wooden part of the empty platform becomes the footprint of the main cottage, while the lower mauve extension at the front-left supports the entrance and garden area. Place the tall central portion toward the back-middle, leaving room for the lower wings on both sides. The walls use pale rectangular masonry with mauve-purple foundation and trim, so match those edges before adding anything decorative. In Dreamy Room Level 836, the left side should remain lower than the central structure, while the right side forms another projecting section for the outdoor lounge. Keep the open central floor visible because the ladder will eventually rise through this area. Correctly positioning this shell makes Dreamy Room Level 836 much simpler, since windows, roofs, balconies, and railings all depend on these walls. If an upper wall seems slightly misaligned, fix it now rather than trying to compensate later in Dreamy Room Level 836.
Step 2. Add the Terracotta Roofs, Purple Trim, and Chimney in Dreamy Room Level 836
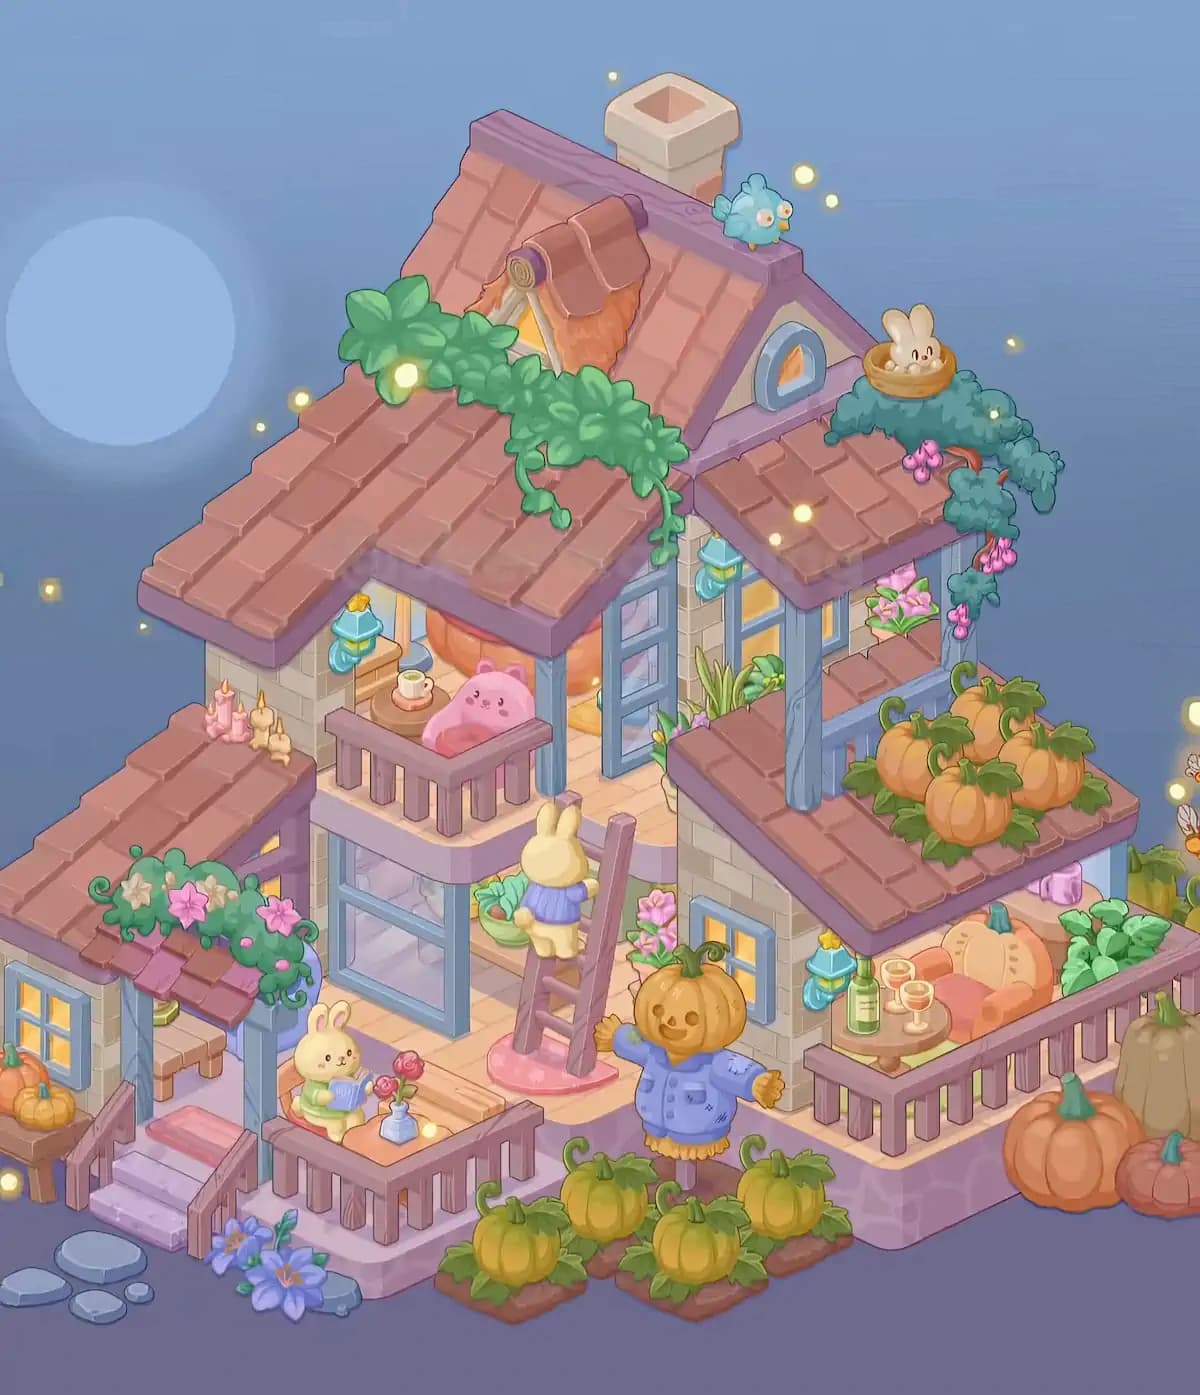
Next, cover the cottage with the dusty terracotta roofing seen in the completed Dreamy Room Level 836 scene. The largest sloping roof occupies the upper-left portion of the house and runs downward toward the left balcony. A taller triangular roof rises behind it, creating the highest section of the cottage. On the right, add a smaller sloped roof over the upper room, followed by the broad lower-right roof above the lounge. Another low roof extends over the entrance on the far left. Each roof has thick mauve-purple edging, which is one of the easiest alignment clues in Dreamy Room Level 836. Place the square cream chimney near the rear of the tallest roof, slightly right of center. Its open top should remain clearly visible above the ridge. The roof shapes overlap heavily, so Dreamy Room Level 836 can feel confusing here; use the finished silhouette rather than individual shingles as your guide. Once these roofs lock into place, Dreamy Room Level 836 should already resemble the final cottage.
Step 3. Install the Blue Windows, Open Doors, Curtains, and Lanterns in Dreamy Room Level 836
With the structure complete, place the blue-gray window and door frames throughout Dreamy Room Level 836. The central upper opening uses tall blue doors or shutters that swing outward, creating the open passage between the left balcony and the middle landing. Warm orange curtains are visible inside the rooms behind these openings. Add the small blue-framed arched window to the triangular upper-right gable, where its warm orange interior makes it stand out against the cream wall. The lower-left annex gets a square blue window with yellow-lit panes, while another small blue window sits on the front-facing wall beside the scarecrow. In Dreamy Room Level 836, additional tall blue framing appears beneath the upper-left balcony and around the central lower room. Now attach the turquoise lanterns with yellow star-like tops: one near the upper-left sitting area, one between the central doors, and another beside the right lounge. These repeated lanterns are useful landmarks in Dreamy Room Level 836, and placing them early helps identify where later plants and furniture belong. Make sure none of the frames are accidentally swapped in Dreamy Room Level 836.
Step 4. Decorate the Highest Roof with the Dormer, Vines, Bird, and Nest Bunny in Dreamy Room Level 836
The top roof contains several of the most distinctive objects in Dreamy Room Level 836. First place the tiny roof dormer on the upper-left slope. It has a warm orange interior or fabric panel and a rolled brown awning across its top. A large leafy green vine then spreads horizontally across the roof beneath this feature, with part of the vine trailing downward toward the central doors. In Dreamy Room Level 836, the greenery must sit on top of the tiles rather than along the wall. Next, position the small turquoise-blue bird on the purple ridge immediately to the right of the chimney. On the upper-right edge, place the pale rabbit inside its round woven nest. Beneath the rabbit, add the blue-green trailing foliage that spills down the right side of the cottage, including the small pink flower clusters. These pieces make the roof crowded, which is exactly why Dreamy Room Level 836 requires careful placement. Check that the bird, chimney, dormer, rabbit, and vines remain individually visible; this arrangement matches the completed Dreamy Room Level 836 roofline.
Step 5. Create the Upper-Left Tea Balcony in Dreamy Room Level 836
Now furnish the small upper-left balcony in Dreamy Room Level 836. Place the mauve railing along the balcony’s exposed front edge, leaving the open doorway behind it unobstructed. The large pink bunny-shaped cushion or armchair goes against the right half of this balcony, facing outward. Immediately to its left, place the small round wooden table and set the cup and saucer on top. The nearby turquoise hanging lantern belongs against the wall toward the left. In Dreamy Room Level 836, this balcony should feel tiny and intentionally packed rather than spacious. On the adjacent low roof ledge to the far left, arrange the group of pastel candles: the pink and cream candles stand together along the purple roof border, their small flames facing upward. Warm curtains and the softly lit interior remain visible behind the furniture. This tea corner is an important reference point in Dreamy Room Level 836, because it separates the upper living area from the lower entrance. If the chair hides the cup or doorway, reposition it until Dreamy Room Level 836 matches the completed image.
Step 6. Arrange the Central Landing, Plants, Ladder, and Climbing Rabbit in Dreamy Room Level 836
The open middle section is one of the busiest areas in Dreamy Room Level 836. Start by placing the leafy houseplants around the central upper doorway: long narrow green leaves sit near the wall, while smaller green foliage and pink flowers fill the surrounding corners. On the floor just left of the ladder’s top, place the shallow basket filled with vegetables and leafy carrots. The tall mauve-brown ladder then leans diagonally from the lower center toward this upper landing. In Dreamy Room Level 836, its feet rest on a soft oval pink rug, while its upper end points toward the balcony level. Place the pale yellow rabbit partway up the ladder, facing the house and wearing its blue-purple sweater or skirt-like outfit. A pink flowering plant sits near the ladder’s right side. The exact ladder angle matters greatly in Dreamy Room Level 836, because placing it too far left interferes with the lower reading nook and too far right overlaps the scarecrow. Use the rabbit and vegetable basket to confirm the correct positioning in Dreamy Room Level 836.
Step 7. Finish the Left Entrance, Flowered Roof, Pumpkins, Steps, and Path in Dreamy Room Level 836
Move to the far-left side of Dreamy Room Level 836 and complete the little entrance annex. Its low terracotta roof sits beneath the main house roof and is edged with a lush garland of curling green leaves, pale flowers, and several large pink blossoms. The flowers drape across the front edge rather than sitting on the ground. Beneath the roof, keep the small interior bench or wooden surface visible through the opening. On the exterior shelf at the far left, place the pair of small orange pumpkins beside the blue-framed yellow window. In Dreamy Room Level 836, the front doorway leads down a short sequence of pale lavender steps with mauve railings on both sides and a pink mat at the top. Add the flat gray stepping stones in front of the staircase, then position the cluster of blue-purple flowers beside their right edge. This area establishes the cottage’s lowest elevation in Dreamy Room Level 836. Check the garland carefully, because placing it too high makes it collide visually with the main roof and changes the intended layered appearance of Dreamy Room Level 836.
Step 8. Furnish the Lower-Left Reading Patio in Dreamy Room Level 836
The small fenced patio just right of the entrance becomes the reading corner of Dreamy Room Level 836. Place the mauve railing around the front and side edges so the space remains open toward the house. Inside, seat the cream-colored rabbit on the soft green cushion. The rabbit faces outward while holding an open blue book, making it one of the easiest characters to identify in Dreamy Room Level 836. In front of the rabbit, place the low orange tabletop or cushion-like surface. Set the pale blue vase on it and insert the red-pink flowers so they rise between the rabbit and the railing. A small glowing decorative light sits near the table edge. The larger blue-framed window behind this patio belongs beneath the upper balcony and should remain unobstructed. In Dreamy Room Level 836, this reading nook should sit directly below and slightly left of the ladder rather than beneath it. Use the railing alignment to separate the two spaces. Once correct, the rabbit should look comfortably enclosed without any furniture clipping through the fence in Dreamy Room Level 836.
Step 9. Fill the Upper-Right Side with Flowers, Trailing Vines, and the Rooftop Pumpkin Patch in Dreamy Room Level 836
The upper-right portion of Dreamy Room Level 836 combines flowers with a rooftop harvest. First position the rectangular planter beneath the upper window and fill it with upright pink flowers and green leaves. The blue-green vine from the roof bunny should continue downward along the right support, with several pink blossom clusters hanging from it. Below this window, the broad terracotta roof becomes a pumpkin-growing area. Arrange the cluster of plump orange pumpkins tightly across the roof, surrounded by their dark green leaves and curling stems. In Dreamy Room Level 836, these pumpkins are grouped rather than spread evenly, creating a dense patch near the roof’s outer-right section. Keep them away from the flower box above so the two decorations remain visually separate. This is one of the placements in Dreamy Room Level 836 that can be mistaken for ground-level gardening, but the finished image clearly puts the orange pumpkin cluster on the roof. Once the vines, planter, and pumpkins align vertically, the right side of Dreamy Room Level 836 gains its characteristic autumn garden appearance.
Step 10. Build the Right Lounge with the Sofa, Drinks, Planter, and Railings in Dreamy Room Level 836
Under the rooftop pumpkins is the cozy lower-right terrace of Dreamy Room Level 836. Enclose the terrace with the same mauve railing used elsewhere, running it along the front and right edges. Set the peach-orange sofa against the rear wall beneath the roof. Its pale rounded cushions have a pumpkin-like appearance and should face the railing. Place the round side table to the sofa’s left and arrange the tall green bottle together with the small group of stemmed drinking glasses on top. In Dreamy Room Level 836, the turquoise star-topped wall lantern hangs just behind this table. A folded pink item rests on the rear ledge toward the sofa’s right, while a dense patch of broad green leaves fills the planter at the far-right end of the balcony. Do not confuse those leaves with the rooftop pumpkin foliage in Dreamy Room Level 836; the vegetable-like greenery belongs at terrace height. The combination of sofa, drinks, lantern, planter, and railing completes the relaxing outdoor corner that contrasts with the busier gardening areas of Dreamy Room Level 836.
Step 11. Place the Scarecrow, Front Pumpkin Patch, and Large Ground Pumpkins in Dreamy Room Level 836
Finish the main decoration of Dreamy Room Level 836 by arranging the harvest display across the foreground. The scarecrow stands almost in the center, directly below the ladder and in front of the small blue-framed window. Its head is a carved orange jack-o’-lantern with a smiling face, while its body wears a blue jacket and ends in straw around the sleeves and hem. In front of the scarecrow, place the four yellow-green pumpkins among broad leafy vines on the rectangular soil patches. Their irregular spacing is intentional in Dreamy Room Level 836, so do not form a perfectly straight row. On the far-right ground beside the lounge foundation, position the much larger pumpkin group: a bright orange pumpkin at the front-left of the cluster, a tall muted tan-brown gourd behind it, and a smaller reddish-orange pumpkin toward the front-right. These ground pumpkins are separate from the orange rooftop patch. Once the scarecrow and both pumpkin groups are correctly separated, Dreamy Room Level 836 gains the layered harvest composition shown in the solution. Check every foreground item before completing Dreamy Room Level 836.
Notes and Precautions
The biggest source of mistakes in Dreamy Room Level 836 is the number of repeated colors and materials. Several roofs use almost identical terracotta tiles, multiple railings share the same mauve finish, and three turquoise lanterns appear at different heights. When solving Dreamy Room Level 836, always use surrounding landmarks rather than color alone. For example, the upper lantern belongs beside the tea balcony, the central lantern sits by the tall open doors, and the lowest one hangs beside the drinks table.
Also distinguish the three pumpkin areas in Dreamy Room Level 836. The yellow-green pumpkins belong in the soil patch across the front, the bright orange cluster belongs on the right roof, and the oversized orange, tan, and reddish pumpkins sit on the ground at the far right. The trailing foliage can also be misleading: the broad green vine crosses the highest left roof, while the blue-green flowering vine hangs from the rabbit nest on the right. In Dreamy Room Level 836, do not cover windows or doorways with plants simply because a piece appears to fit there. The challenge is finding the single intended position for each object, so verify nearby edges before committing to a placement.
Tips and Tricks from top player
For Dreamy Room Level 836, solve from largest to smallest. Start with walls, roofs, and railings, then install windows and doors, and only afterward move to furniture, characters, plants, and tiny accessories. This prevents small pieces from obscuring the snap areas of larger pieces. Another useful Dreamy Room Level 836 strategy is to treat the cottage as five zones: highest roof, upper-left balcony, central ladder area, lower-left entrance, and right lounge. Finish one zone before moving to the next.
Characters are especially useful anchors in Dreamy Room Level 836. The reading bunny identifies the lower-left patio, the climbing bunny confirms the ladder position, the nest bunny fixes the upper-right roof decoration, and the pumpkin-headed scarecrow establishes the center of the garden. If an item refuses to settle, compare its scale with nearby objects instead of repeatedly dragging it around the entire Dreamy Room Level 836 scene. Large pumpkins belong outside, tiny flowers usually attach to planters or vines, and tabletop items are visibly much smaller. Finally, save the candles, drinks, flowers, and similar accessories until the end of Dreamy Room Level 836; these are easiest to place once their supporting furniture is already fixed.
Final Scene of Dreamy Room Level 836
The completed Dreamy Room Level 836 becomes a whimsical autumn cottage rising from the once-empty platform. Dusty terracotta roofs overlap cream stone walls, blue doors and windows glow with warm interiors, and mauve railings frame several tiny balconies. A chimney, turquoise bird, leafy roof vine, fabric-covered dormer, and rabbit in a woven nest decorate the highest level. Below, one rabbit relaxes beside tea in a pink chair, another climbs the ladder toward a basket of vegetables, and a third reads quietly beside a vase of flowers. The right side of Dreamy Room Level 836 features a rooftop pumpkin patch and a lounge with a peach sofa, bottle, glasses, lantern, and leafy planter. At ground level, the smiling pumpkin-headed scarecrow watches over yellow-green pumpkins, while giant gourds sit beside the house. Flowers, candles, stepping stones, vines, and glowing lanterns complete the cozy harvest atmosphere of Dreamy Room Level 836.