Dreamy Room Level 803
Dreamy Room Level 803 guide - Dreamy Room 803 Walkthrough & Solution.
Important Notice Regarding Level Numbering
Due to frequent changes in Dreamy Room's level numbering and differences between platforms (Android/iOS) – for example, level 803 on Android might not be the same as level 803 on iOS – the text guide below may not always match the images and video above. Please prioritize the image and video guides. If you find that the guide content doesn't match your current level, please visit the All Level Walkthroughs page to find the correct guide based on level images. Thank you for your understanding.
Dreamy Room Level 803 Walkthroughs & Guide
Step 1. Place the main pavilion on the left-center foundation in Dreamy Room Level 803
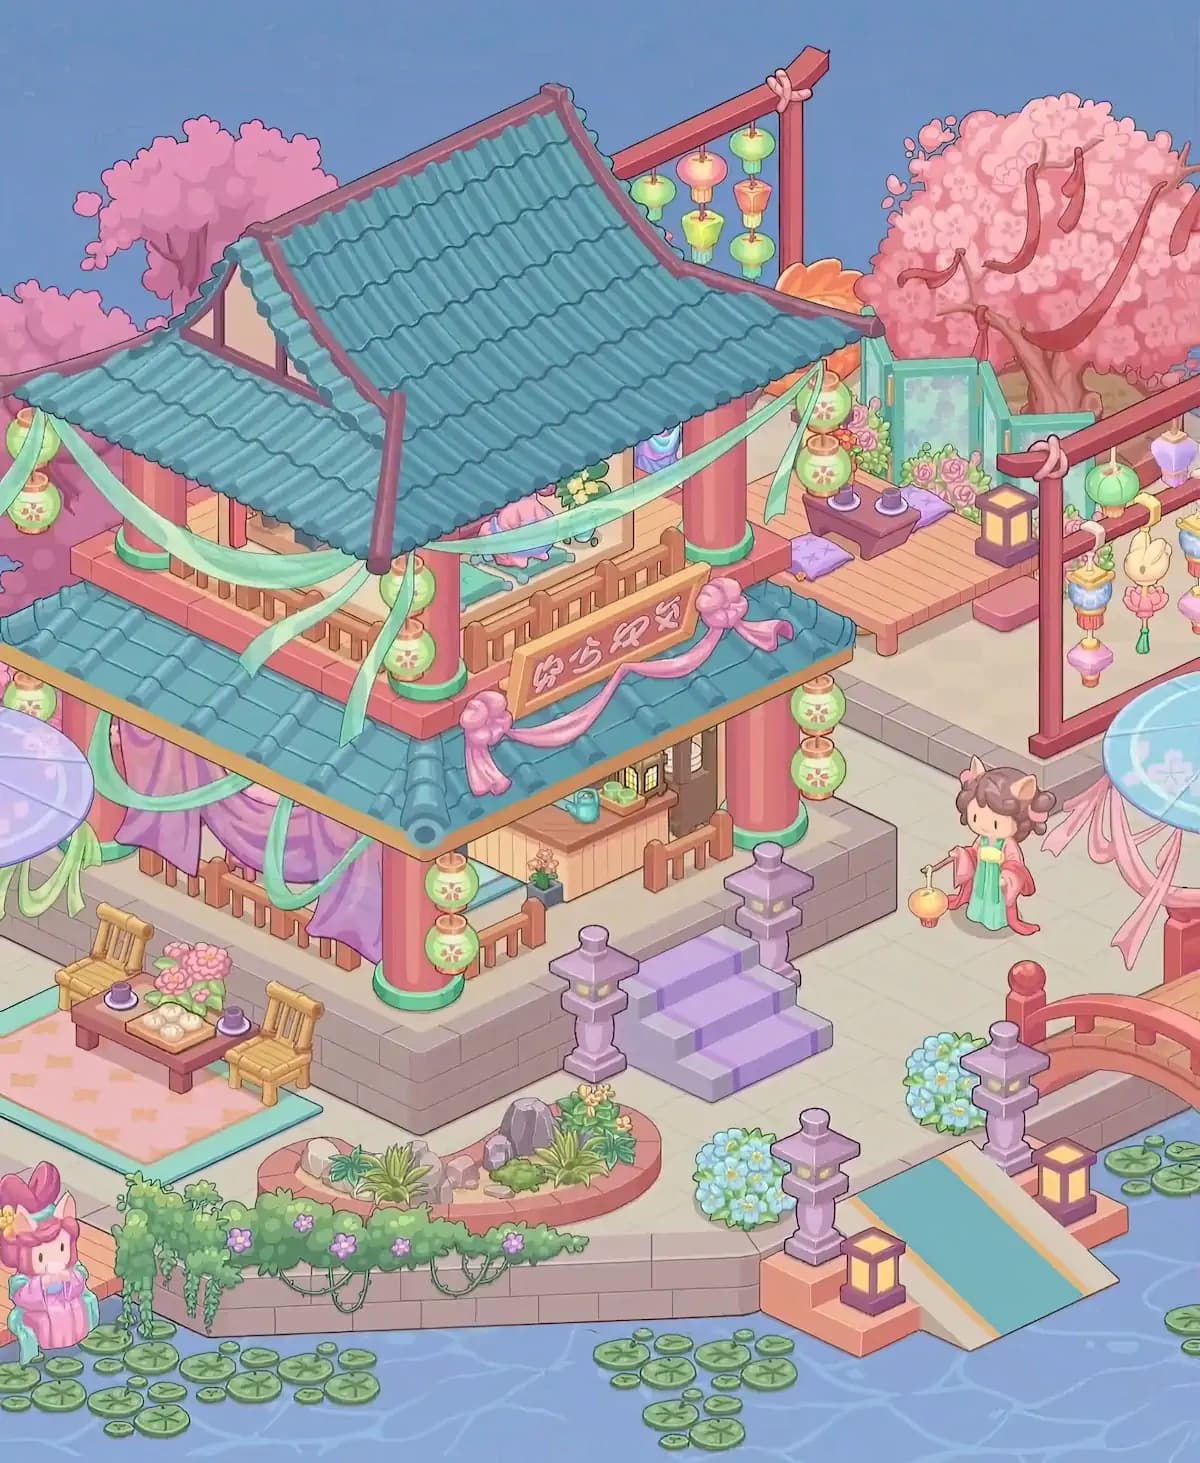
Begin Dreamy Room Level 803 with the enormous pavilion because almost every later item is positioned relative to it. Place the main building over the raised square foundation on the left-center of the island, leaving the open paved pathway visible on its right and the garden area exposed along the front. The pavilion uses large coral-pink cylindrical columns with mint-green bases, pale cream walls, brown wooden railings, and two levels. The lower level should occupy most of the square platform, while the upper level sits slightly farther back.
The most recognizable architectural feature in Dreamy Room Level 803 is the layered teal-tiled roof. Fit the broad lower roof over the front floor, then place the much larger sloping upper roof above it. A smaller left-side roof section extends toward the outdoor seating area. Make sure the roof ridges and corners overlap correctly before continuing. If the pavilion in Dreamy Room Level 803 appears shifted too far forward, the central stairs and front garden will no longer have enough space. Correct structural placement here makes the rest of Dreamy Room Level 803 considerably easier.
Step 2. Add the balcony, curtains, ribbons, signboard, and pavilion decorations
Once the shell is correct, fill in the decorative architecture of Dreamy Room Level 803. Install the wooden balcony rail across the exposed upper front edge. Behind it, place the pastel interior furnishings visible through the opening, including the soft pink-and-blue lounging area and the small floral decorations. Along the lower-left side of the building, hang the large purple curtains behind the wooden railing. These curtains should sit beneath the left roof rather than outside the structure.
Next, drape the long mint-green fabric ribbons around the pavilion in Dreamy Room Level 803. One ribbon sweeps from the left side across the upper façade, another descends near the front-left pillar, and additional fabric loops decorate the lower-left curtains. On the front roof, attach the brown signboard with pale Chinese characters. Pink bows and flowing pink ribbon tails frame the sign on both sides. These details are especially useful landmarks in Dreamy Room Level 803 because their snap positions are quite specific. Add the green floral globe lanterns to the pavilion columns as well, including the paired lanterns hanging vertically from several front and right-side pillars. At this point, the central building of Dreamy Room Level 803 should closely match the finished pavilion.
Step 3. Furnish the lower pavilion and build the front-left tea area
The next part of Dreamy Room Level 803 focuses on the smaller furniture beneath and beside the pavilion. Inside the lower front opening, place the long wooden service shelf against the pale wall. Arrange the turquoise kettle or teapot, the green dishes and tray, and the small dark-and-gold containers along this shelf. Put the tiny potted flower on the lower ledge near the front opening, and keep the short brown railing running around the exposed edge. A blue-green cushion or bench is visible behind the railing on the left.
Move outside to the bottom-left corner of Dreamy Room Level 803. Spread the peach-pink rectangular rug with its turquoise border on the paved area directly beside the pavilion. Center the low dark-brown tea table on this rug. The tabletop holds a pale platter of round snacks or buns, a pink flower arrangement, and small purple tea cups. Position one bamboo chair on the left side of the table and another on the right. The partially visible lavender parasol belongs just beyond the left edge, with mint fabric hanging beneath it. This tea corner is one of the most detailed placement puzzles in Dreamy Room Level 803, so use the rug as the anchor before placing the smaller tableware.
Step 4. Build the rear-right terrace with the screen, table, flowers, and lanterns
The raised platform at the back-right is reserved for a separate open-air terrace in Dreamy Room Level 803. Cover its front-left portion with the warm wooden deck and leave the pale stone walkway accessible along the front. At the rear of the deck, position the mint-green folding screen. Its central panels have a soft floral pattern, and a bed of pink and green flowers sits directly along its base.
In front of the screen, place the low dark-purple-brown table used for the terrace tea setting. Two small purple vessels or cups sit on top. A purple floor cushion lies beside the table toward the front-left. The pavilion-side edge of this terrace in Dreamy Room Level 803 also receives additional green floral lanterns and a cluster of pink flowers.
Place the square purple lantern with its glowing yellow center near the right edge of the wooden deck. Behind this area stands the large pink flowering tree, which fills the upper-right background of Dreamy Room Level 803. A second pink flowering tree belongs behind the pavilion toward the upper-left. Correctly placing these large trees early prevents their canopies from being confused with the smaller flower beds and decorative plants later in Dreamy Room Level 803.
Step 5. Install the central stairs, stone lanterns, and front garden bed
Return to the central foreground of Dreamy Room Level 803 and construct the approach to the pavilion. Place the short three-step lavender staircase directly in front of the building, slightly right of center. The stairs descend from the gray raised foundation toward the main paved courtyard. A tall lavender stone lantern stands to the left of the stairs, while another matching stone lantern stands at the upper-right side of the staircase near the pavilion corner. Their small yellow windows should face outward.
Below the stairs, create the oval landscaped bed that serves as the visual centerpiece of the foreground in Dreamy Room Level 803. It has a coral-pink raised border and contains a large gray rock toward the back, several smaller pale stones, layered green plants, and small yellow-orange flowers. Keep the tallest rock and plants toward the rear so the lower succulents remain visible at the front.
Along the very front wall of Dreamy Room Level 803, place the thick green hedge. It stretches from the left toward the center, with purple flowers scattered through the foliage and long trailing vines hanging over the wall toward the water. This hedge should sit behind the lily pads rather than on them. These landscaping pieces make the formerly empty front edge of Dreamy Room Level 803 feel complete.
Step 6. Complete the right courtyard with hydrangeas, the red bridge, and the water ramp
The right side of Dreamy Room Level 803 contains several similarly sized structures, so place them using the shoreline as your reference. Start with the red arched bridge at the middle-right edge. Its curved walkway extends over the water, while the rounded red railings rise on both sides. A blue flower bush sits immediately to the left of the bridge entrance.
Add another blue hydrangea-like flower bush farther down and left, beside the lower stone lantern. In Dreamy Room Level 803, these two flower clusters help define the curved path from the pavilion stairs toward the water. Place the remaining lavender stone lanterns along this route, including one near the bridge and another near the front-right shoreline.
At the bottom-right edge of Dreamy Room Level 803, position the sloping turquoise ramp so that it descends from the courtyard toward the water. It has pale cream borders and a narrow warm-colored edge. Small square lanterns with purple frames and glowing yellow centers sit on coral bases around the ramp, including one on the lower-left corner and another near the water to the right. These small lights are easy to mix up with the terrace lantern, so check their bases carefully. Once this section is correct, the shoreline of Dreamy Room Level 803 should flow naturally from garden to bridge to ramp.
Step 7. Add the overhead lantern frames, hanging ornaments, and parasols
Lighting and fabric decorations give Dreamy Room Level 803 much of its festival atmosphere. Behind the main roof, erect the tall coral-red wooden frame that rises above the pavilion. Several multicolored lanterns hang from its crossbeam, including green, yellow, pink, and orange pieces in different rounded and pointed shapes. The frame should remain visible above the teal roof rather than disappearing behind it.
Another red frame belongs on the far-right side of Dreamy Room Level 803, running beside the terrace and courtyard. Hang the colorful ornamental lanterns from this beam, including the green round lantern, purple lantern, blue-and-gold ornament, and the pale lotus-shaped decoration with a tassel. A pink knot wraps the horizontal support near the corner.
Place the large pale-blue round parasol on the right side of Dreamy Room Level 803, where only part of its canopy is visible. Long pink fabric streamers descend beneath it toward the path. A second lavender parasol appears at the far-left edge beside the tea rug, decorated with mint fabric. These partially cropped objects still matter because Dreamy Room Level 803 expects their bases and canopies in fixed positions. Finish by checking every mint ribbon and pink bow against nearby pillars and beams.
Step 8. Place the two characters and finish the small decorative details
With the environment finished, place the characters into Dreamy Room Level 803. The larger character stands on the pale courtyard path to the right of the pavilion stairs. She wears a mint-green inner dress with a coral-pink outer robe, has brown hair arranged in rounded buns with decorative pieces, and holds a small glowing orange-yellow lantern from one hand. Keep her between the pavilion and red bridge, not on the wooden terrace.
The smaller character belongs at the extreme bottom-left edge of Dreamy Room Level 803, close to the water and lily pads. She wears a pink outfit with turquoise details and a large floral headpiece. Only a narrow strip of paved shoreline separates her from the pond.
Now inspect Dreamy Room Level 803 for tiny pieces that may remain unpacked: the pink flowers on the tea table, purple cups, service-counter pottery, terrace cushion, small potted plant, floral globe lanterns, ribbon knots, flower clusters around the screen, and the hanging tassels. Small accessories are often harder than large furniture because their correct spots are less obvious. The main challenge of Dreamy Room Level 803 is always discovering the game's predetermined placement rather than simply finding a visually plausible location.
Step 9. Finish the water, lily pads, blossom trees, and overall composition
The last placement pass in Dreamy Room Level 803 should concentrate on the scenery surrounding the island. Keep the clusters of green lily pads floating around the bottom-left, bottom-center, and right side of the water. They frame the pavilion without blocking the ramp or bridge. Some clusters sit directly below the trailing front hedge, while another large group occupies the water beneath the center-right foreground.
Check both large pink blossom trees again. The left tree rises behind the pavilion roof and fills the upper-left background, while the much larger right tree towers over the rear terrace. Smaller pink foliage is visible behind the left roof as well. The trees should visually surround the architecture rather than cover its main façade.
Finally, examine the spacing throughout Dreamy Room Level 803. The pavilion dominates the left-center, the terrace occupies the elevated rear-right platform, and the courtyard remains open between the stairs and bridge. The tea seating stays low in the front-left, while landscaping fills the lower edge. When these relationships match, Dreamy Room Level 803 gains the same balanced, layered look as the completed image. If one object still refuses to settle, compare it against these large landmarks rather than moving unrelated decorations.
Notes and Precautions
The biggest difficulty in Dreamy Room Level 803 is that several objects have similar colors and visual themes. The lavender stone lanterns, square purple lanterns, green floral hanging lanterns, and multicolored festival lanterns all belong to different structural areas. Do not assume that two similar-looking lights are interchangeable. In Dreamy Room Level 803, their bases, hanging points, and surrounding architecture reveal the intended location.
Large objects can also obscure valid placement spots. Finish the pavilion, terrace, blossom trees, and major furniture before dropping in tiny cups, plants, or ornaments. If a small item in Dreamy Room Level 803 seems impossible to place, zoom in around the service counter, tea table, terrace table, hanging beams, and pavilion columns.
Pay particular attention to the front-right corner of Dreamy Room Level 803. The bridge, ramp, blue flower bushes, stone lanterns, and square lamps are packed closely together, making incorrect placements look surprisingly convincing. Similarly, the mint ribbons around the pavilion can appear to fit several columns even though each has a specific anchor. Taking your time is useful here because Dreamy Room Level 803 rewards exact placement rather than speed.
Tips and Tricks from top player
For Dreamy Room Level 803, work from largest to smallest. The pavilion should be your first anchor, followed by the rear terrace, blossom trees, bridge, stairs, and parasols. Once those objects are fixed, the remaining space immediately reveals where medium-sized furniture belongs. This approach dramatically reduces trial-and-error in Dreamy Room Level 803.
Use color grouping as a secondary shortcut. Teal roofing, coral columns, mint ribbons, and green globe lanterns mainly belong to the pavilion. Purple furniture and the mint floral screen identify the rear terrace. Lavender stone lanterns mark the courtyard paths, while the red bridge and turquoise ramp define the shoreline. In Dreamy Room Level 803, recognizing these visual families helps narrow the possible placement area before you start dragging.
For very small objects, use nearby furniture as a coordinate system. Tea cups go with tables, the turquoise kettle and green dishes belong at the lower service counter, floor cushions stay on the rear deck, and floral clusters generally align with beds, tables, or screens. If Dreamy Room Level 803 rejects what appears to be the correct location, make tiny adjustments rather than moving the object to a completely different area. The correct placement boxes in Dreamy Room Level 803 can be more precise than the illustration initially suggests.
Final Scene of Dreamy Room Level 803
The completed Dreamy Room Level 803 becomes a pastel waterside festival garden centered on a magnificent coral-and-teal pavilion. Mint ribbons and pink bows sweep across the tiled roofs, green floral lanterns hang from the columns, and a decorated signboard crowns the lower façade. To the left, two bamboo chairs surround a tea table on a peach rug beneath a lavender parasol. The rear-right terrace combines a floral folding screen, cushions, flowers, lanterns, and a towering pink blossom tree. In front, lavender steps lead into a courtyard filled with stone lanterns, blue flowers, an oval rock garden, and cascading greenery. A red bridge and turquoise waterside ramp complete the right edge, while lily pads float around the island. Two traditionally dressed characters bring life to the setting. Altogether, Dreamy Room Level 803 transforms the empty foundations into an intricate, peaceful spring celebration where architecture, tea, flowers, fabric, and lantern light fit together perfectly.