Dreamy Room Level 879
Dreamy Room Level 879 guide - Dreamy Room 879 Walkthrough & Solution.
Important Notice Regarding Level Numbering
Due to frequent changes in Dreamy Room's level numbering and differences between platforms (Android/iOS) – for example, level 879 on Android might not be the same as level 879 on iOS – the text guide below may not always match the images and video above. Please prioritize the image and video guides. If you find that the guide content doesn't match your current level, please visit the All Level Walkthroughs page to find the correct guide based on level images. Thank you for your understanding.
Dreamy Room Level 879 Walkthroughs & Guide
Step 1. Establish the Room Layout and Identify the Main Decorating Areas
Begin Dreamy Room Level 879 by examining the empty room. The starting space features a pale blue-and-white checkered floor, a turquoise left wall decorated with a repeating leaf pattern, and a taller lavender-and-blue striped back wall. On the right, a shorter wall section extends outward beneath a recessed rectangular top.
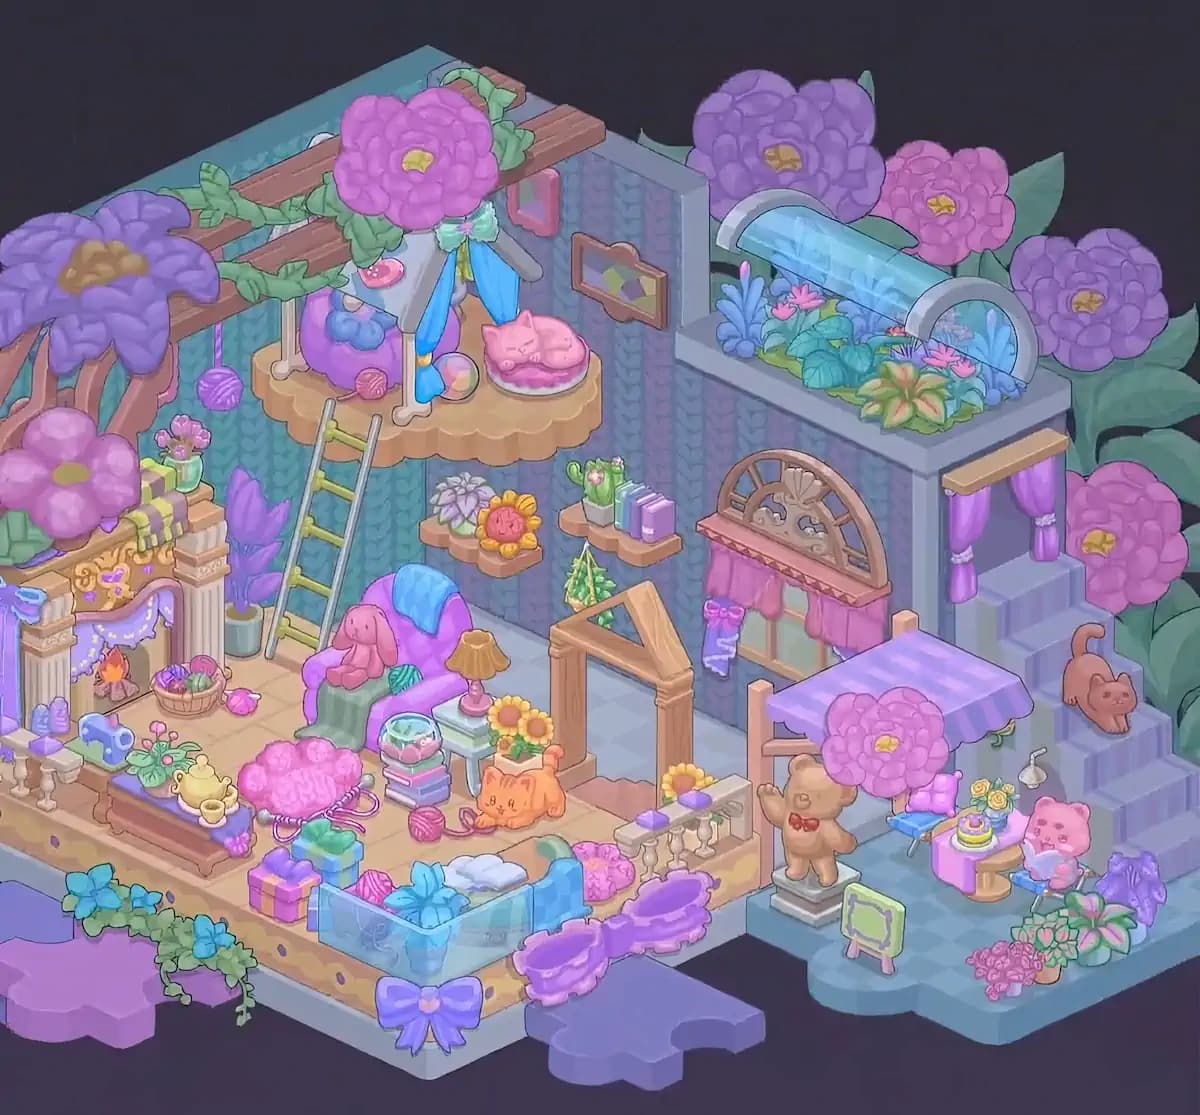
Before unpacking decorations, mentally divide Dreamy Room Level 879 into three main areas. The left side will become a cozy indoor lounge with a fireplace, furniture, flowers, and gifts. The upper center will hold an elevated platform with a ladder and playful accessories. The right side will develop into a charming outdoor-style tea corner connected to the interior by steps.
Pay attention to the room's isometric perspective. Items positioned against the back walls appear higher in the image, while objects near the front edge sit lower. This distinction is especially important because several decorations overlap visually.
The existing walls and flooring provide the foundation, so focus on understanding where large objects will fit before attempting to position smaller pieces.
Step 2. Decorate the Upper Walls with Giant Flowers and Wooden Beams
The most noticeable feature of Dreamy Room Level 879 is the collection of enormous flowers framing the upper portion of the room.
Begin by positioning the long brown wooden beam diagonally across the upper-left wall. It stretches from the far-left side toward the center, following the wall's isometric angle. Green climbing vines wrap around the beam, creating a natural support for the oversized blossoms.
Place the large purple flower with its golden center at the far-left end of the beam. Next, position the prominent pink flower with layered petals and a yellow center near the upper-middle section. Its petals should extend above and below the wooden support.
Continue decorating the upper-right area with several oversized purple and pink blossoms. These flowers rise behind the right wall and surround the top of the decorative aquarium feature. Add the large green leaves behind the blossoms to complete the floral backdrop.
In Dreamy Room Level 879, these flowers act as visual landmarks. Correctly placing them first helps establish the height and spacing of the remaining decorations.
Step 3. Install the Elevated Platform, Ladder, and Hanging Decorations
Next, build the elevated relaxation area near the upper-left center of Dreamy Room Level 879.
Position the large scalloped wooden platform against the back wall, beneath the floral beam. Its rounded front edge should extend outward into the room, creating the appearance of a suspended loft.
Place the narrow ladder against the platform's front-left edge. The ladder leans diagonally upward from the floor, with its upper end resting against the platform. Ensure the ladder does not extend too far toward the fireplace or the furniture below.
On the platform, arrange the purple rounded cushion or seat toward the left side. Add the small blue plush-like decoration and colorful round ball nearby. Place the pink cat-shaped cushion or sleeping cat decoration on the right, resting on a pale cushion.
Above the platform, hang the blue draped fabric panels beneath the floral support. Include the pale hanging ornaments and small colorful accessories surrounding them.
Finish by positioning the dangling purple and pink yarn-ball ornaments below the wooden beam. Dreamy Room Level 879 requires careful alignment here because the ladder, hanging decorations, and elevated furniture occupy closely overlapping spaces.
Step 4. Build the Fireplace and Decorate the Left Wall
Move to the lower-left corner of Dreamy Room Level 879 and assemble the ornate fireplace.
Place the cream-colored fireplace against the left wall, with its decorative mantel facing the center of the room. The fireplace has carved details, a purple ornamental panel, and a small glowing fire inside its opening.
Position the mantel decorations carefully. A small flower arrangement sits near the upper-left area, while wrapped fabric or striped decorative pieces drape across the upper section. The purple and golden ornamental details should remain visible around the fireplace opening.
Add the small decorative accessories near the hearth, including the blue object on the floor and the pale pedestal-like items toward the front-left corner.
Beside the fireplace, place the small basket containing colorful yarn balls. Additional pink and purple yarn decorations rest nearby.
Behind the furniture, position the tall purple leafy plant in its pale pot. It stands between the fireplace area and the room's central seating arrangement.
In Dreamy Room Level 879, the fireplace establishes the left side's cozy atmosphere, so make sure it sits flush against the wall rather than floating toward the middle of the floor.
Step 5. Arrange the Cozy Seating Area and Side Table
The next section of Dreamy Room Level 879 focuses on the comfortable seating arrangement near the center-left of the room.
Place the rounded purple-and-pink armchair beneath the elevated platform, slightly to the right of the fireplace. The chair features a soft blue covering across its upper back and a green fabric draped over its front.
Set the pink stuffed bunny on the chair, with its long ears hanging naturally over the cushion. Position the bunny toward the front-left portion of the seat so it remains clearly visible.
To the right of the armchair, place the small pale-blue side table. Set the warm yellow-orange table lamp on top, making sure its shade faces outward. The table should sit close enough to the chair to look like part of the same relaxation corner.
Arrange the short stack of colorful books or storage boxes in front of the table. A transparent round container with pink and green contents rests on top.
Finally, place the orange cat-shaped decoration near the table's lower-right side. Add the sunflower arrangement behind or beside it.
This section of Dreamy Room Level 879 works best when the chair, table, and books form a compact group without blocking the ladder.
Step 6. Position the Front Sofa, Gifts, Yarn, and Decorative Accessories
Continue decorating Dreamy Room Level 879 by filling the foreground with its colorful furniture and accessories.
Position the pale turquoise sofa or daybed across the front-center area, angled along the room's lower edge. Its front panel features a translucent blue appearance, while its cushions include white, blue, and pink fabrics.
Place the folded blue fabric and light-colored pillows inside the sofa. The pink patterned cushion belongs toward its right side.
To the left of the sofa, arrange the wrapped presents. The gifts include purple, pink, turquoise, and blue packages decorated with ribbons and bows. Keep them grouped near the front-left section rather than spreading them across the floor.
Place the large pink fluffy cushion or flower-shaped pouf behind the presents, close to the low wooden bench.
On the bench, arrange the small yellow teapot and matching cup, together with the other miniature decorations. Add the pale green floral ornament and nearby yarn accessories.
Complete the foreground by placing the oversized purple bow on the front edge of the room and the purple wing-shaped decoration near the right corner.
Dreamy Room Level 879 uses these accessories to create a layered, lived-in appearance. Avoid moving the larger furniture after adding the small objects.
Step 7. Add the Wall Shelves, Floral Arrangements, and Central Display Frame
The middle wall of Dreamy Room Level 879 contains several small decorations that are easy to overlook.
Start by positioning the small wooden floating shelf on the back wall, above the seating area. Arrange the purple flower arrangement on its left side and the bright yellow-orange flower decoration on the right.
Place the second floating shelf farther right, near the boundary between the central room and the exterior section. This shelf supports a pale green potted flower arrangement and two small purple books or decorative boxes.
Below the shelves, position the small green triangular tree-shaped ornament.
Next, install the tall wooden display frame near the center-right floor. Its structure resembles a small house outline, with a peaked wooden top and a pale rectangular interior. The frame stands in front of the back wall, between the seating area and the outdoor entrance.
Above this section, add the small framed geometric artwork to the wall. Position the pink hanging ornament near the upper corner.
In Dreamy Room Level 879, these smaller pieces connect the upper platform with the ground-floor furniture. Their exact positions matter because they fill otherwise narrow spaces between larger objects.
Step 8. Assemble the Decorative Aquarium and Upper-Right Garden
The upper-right section of Dreamy Room Level 879 features an eye-catching floral aquarium or terrarium.
Place the long, curved transparent blue structure on top of the short right wall. It resembles a glass tunnel with pale rounded end supports. The structure should stretch horizontally along the wall's top surface, with its curved front facing the viewer.
Inside and around the glass feature, arrange the dense collection of blue-green leaves, aquatic-looking plants, and colorful flowers. Pink blossoms appear among the foliage, while larger blue leaves fill the lower sections.
Add the cream-and-green variegated flower near the front-right side of the arrangement.
Behind the aquarium, position the oversized purple and pink flowers prepared earlier. Their broad leaves should extend outward behind the wall, making the upper-right section look like a lush garden.
Be careful not to confuse the large background flowers with the smaller blossoms inside the glass display.
Dreamy Room Level 879 relies heavily on overlapping layers in this section. The correct order is to establish the large floral background, align the glass structure, and then complete the arrangement with smaller plants.
Step 9. Install the Arched Window, Curtains, and Exterior Canopy
Now focus on the architectural details along the right wall of Dreamy Room Level 879.
Position the decorative arched window against the middle-right wall, directly below the aquarium. The upper part features a semicircular wooden frame with ornate internal patterns.
Below the arch, place the rectangular window section with its pale panes and pink curtains. The curtains hang on either side, while a decorative pink valance runs across the top. A small purple bow and hanging fabric detail appear on the left.
Move farther right and install the purple-and-pink striped canopy over the outdoor seating area. The canopy extends outward from the wall, supported by pale wooden posts.
Behind the canopy, arrange the smaller recessed window with its lavender curtains. The curtains are gathered at the sides, revealing a pale interior opening.
A narrow golden-brown trim sits above this window.
For Dreamy Room Level 879, the arched window and striped canopy must occupy different sections of the right wall. Keeping the canopy farther forward creates the proper depth for the outdoor tea corner.
Step 10. Build the Outdoor Tea Area and Place the Animal Characters
The right foreground of Dreamy Room Level 879 becomes a delightful miniature tea garden.
Begin by positioning the blue outdoor platform along the lower-right side of the room. This area extends beyond the main interior floor and includes several pale lavender steps rising toward the right wall.
Place the tan dog-like character near the left side of the outdoor platform, directly beneath the striped canopy. It stands on a small square pedestal and wears a red bow at its neck.
Next, position the small round pink-and-yellow tea table slightly to the right of the character. Place the miniature decorated cake or dessert on the tabletop, along with the tiny floral arrangement.
Set the pink bear-like character on the small chair at the table's right side. It should face slightly inward toward the tea setting while holding its blue accessory.
Add the purple cushioned chair behind the table, partially hidden by the oversized pink flower near the canopy.
On the right-side staircase, position the small brown rabbit-like animal with long ears. It rests on one of the upper steps.
Dreamy Room Level 879 requires these characters to be placed precisely because their positions define the miniature garden's story and seating arrangement.
Step 11. Finish the Flower Garden, Steps, and Front-Edge Decorations
The final decorating stage of Dreamy Room Level 879 involves the many plants and accessories surrounding the exterior platform.
Place the large pink blossom at the front edge of the striped canopy, allowing it to overlap the seating area. Its yellow center should face outward.
Near the lower-right edge of the platform, arrange the colorful flower clusters. These include pink blossoms, purple flowering plants, and green leaves with pale pink highlights.
Position the small decorative sign near the front-left portion of the outdoor platform. It has a pale green face and a short pink stand.
Along the left front edge of the main room, place the trailing green vines and blue flowers. They should hang over the platform border rather than occupy the center of the floor.
Add the large purple stepping-stone shapes outside the room's front boundary. One appears near the far-left corner, while another sits closer to the front-right side.
Finish by checking the pink wing-shaped decoration near the main room's right corner, the purple bow at the front, and the small flowers along the platform edges.
These finishing details make Dreamy Room Level 879 feel complete. They are also among the easiest objects to misplace because their placement zones are small and partially obscured.
Notes and Precautions
Dreamy Room Level 879 contains several overlapping decorative layers, so careful positioning is more important than placing items quickly.
- Watch the height differences. The elevated platform, aquarium, wall shelves, and ground-floor furniture belong to different levels.
- Use large objects as anchors. Position the fireplace, sofa, platform, and canopy before adding small decorations.
- Pay attention to overlapping flowers. The enormous background blossoms are separate from the smaller floral arrangements.
- Keep the ladder accessible. Avoid placing furniture directly across its lower end.
- Check the animal positions. The pink bunny belongs on the indoor chair, while the other animals occupy the outdoor tea area and stairs.
- Inspect the room edges. Several vines, bows, and purple stepping stones extend beyond the main floor.
- Avoid confusing similar decorations. Dreamy Room Level 879 contains multiple pink flowers, purple ornaments, and small pastel accessories.
If an object does not settle into place, compare its size, orientation, and surrounding decorations with the completed image before trying another location.
Tips and Tricks from top player
The most effective strategy for Dreamy Room Level 879 is to decorate from the back of the scene toward the foreground, while handling large structures before small accessories.
- Start with the upper structures. The floral beam, elevated platform, and aquarium define the room's vertical layout.
- Complete one section at a time. Finish the fireplace area before moving to the central furniture, then decorate the outdoor tea corner.
- Match object silhouettes. Large shapes such as the scalloped platform, house-shaped frame, and curved aquarium are easier to identify than tiny accessories.
- Use nearby objects as references. For example, the side table belongs immediately beside the bunny chair, while the cake table sits between the outdoor characters.
- Save tiny decorations for last. Yarn balls, flowers, books, and ribbons are easier to place after the larger furniture is settled.
- Check partially hidden objects. Some decorations are intentionally obscured by flowers, curtains, furniture, or other accessories.
- Compare the outer borders. The hanging vines, oversized bows, and stepping stones help reveal whether the main layout is aligned correctly.
For Dreamy Room Level 879, the biggest shortcut is recognizing that the puzzle consists of several connected decorative zones rather than one large open room. Solving each zone separately makes the overall arrangement much easier to manage.
Final Scene: A Magical Floral Retreat in Dreamy Room Level 879
The completed Dreamy Room Level 879 reveals a whimsical pastel retreat overflowing with flowers, soft furnishings, and adorable details.
On the left, an ornate fireplace warms a cozy lounge filled with a bunny armchair, a turquoise sofa, colorful presents, yarn baskets, books, and decorative flowers. Above the seating area, a suspended wooden platform creates a playful loft decorated with plush accessories, hanging ornaments, and a pink cat-shaped cushion.
Across the upper walls, enormous purple and pink flowers form a lush floral canopy. The right wall features a beautiful curved glass garden display, an ornate arched window, and flowing pink curtains.
Outside, a striped canopy shelters a miniature tea party with animal characters, a decorated cake, flowering plants, and charming steps. Trailing vines, purple stepping stones, and oversized bows complete the magical setting.
Dreamy Room Level 879 transforms a simple empty room into an enchanting floral hideaway, rewarding players for finding the correct place for every carefully designed object.