Dreamy Room Level 118
Dreamy Room Level 118 guide - Dreamy Room 118 Walkthrough & Solution.
Important Notice Regarding Level Numbering
Due to frequent changes in Dreamy Room's level numbering and differences between platforms (Android/iOS) – for example, level 118 on Android might not be the same as level 118 on iOS – the text guide below may not always match the images and video above. Please prioritize the image and video guides. If you find that the guide content doesn't match your current level, please visit the All Level Walkthroughs page to find the correct guide based on level images. Thank you for your understanding.
Dreamy Room Level 118 Walkthroughs & Guide
Below is a comprehensive walkthrough for transforming the empty shell into the fully decorated Dreamy Room Level 118 space, capturing the peaceful, nostalgic spirit of the game .
Step 1. Place the bathtub in the upper left corner.
In Dreamy Room Level 118, the first piece you need is the stylish white and aqua bathtub. Click on the bathtub asset in your item tray, then drag it into the upper-left corner of the room shell. Dreamy Room Level 118 will provide a subtle snap highlight when your tub is close enough to the back wall and side wall junction. As you move the tub, take care in Dreamy Room Level 118 not to overlap the drainage outlet, so that the faucet model will attach properly later. After the tub snaps into place, rotate it if needed by using the rotation handle until the flat back of the bathtub is flush against both walls. This precise placement in Dreamy Room Level 118 ensures a seamless bathroom setup for the upcoming fixtures.
Step 2. Install the curved shower rod and glass partition.
Begin by selecting the curved shower rod from your bathroom inventory. In Dreamy Room Level 118, proper alignment of the shower rod is critical, so place the rod above the bathtub, curving it gently along the back wall. Dreamy Room Level 118 will highlight snap-points in green when you hover over the tub edge. Slide the curved rod until it clicks flush with the corner brackets. Next, choose the semi-transparent glass partition. Position the glass panel immediately to the right of the tub, aligning the bottom edge with the floor and the side edge with the bathroom wall. In Dreamy Room Level 118, you must ensure the partition seals cleanly against the wall to prevent virtual splashes. Fine-tune the glass by nudging it with the arrow keys until it sits perfectly perpendicular to the tub. This step in Dreamy Room Level 118 completes the basic shower enclosure and sets up the bathroom aesthetics for the rest of the level.
Step 3. Hang the towel, mirror, and add the pet window.
Open the décor menu and select the fluffy yellow towel. In Dreamy Room Level 118, place the towel on the rack rail above the bathtub by clicking and dragging it until it hangs centered on the right side of the shower rod. Dreamy Room Level 118 will snap the towel to the rack, ensuring it drapes naturally. Next, choose the round wall mirror with a golden frame and attach it to the wall over the tub area, positioning it at eye level. In Dreamy Room Level 118, aligning the mirror’s bottom edge 2.5 grid units above the tub rim yields the most balanced look. Lastly, add the small square pet window decal to the left wall. Dreamy Room Level 118 features a cute animal peeking through to create a playful touch. Adjust these elements precisely to maintain symmetry and charm.
Step 4. Position the yellow utility cart with supplies.
Locate the yellow utility cart accessory in Dreamy Room Level 118’s storage tab. Click and drag the cart to the space directly beside the bathtub on the right-hand side of the upper floor. In Dreamy Room Level 118, ensure the cart sits flush against the side wall without overlapping the tub area. Once placed, expand the shelves by clicking the plus icon. Dreamy Room Level 118 allows you to fill the cart with two soda bottles on the top shelf and multiple jars of toiletries below. Drag each bottle and jar individually onto the cart shelves until they snap into place. Take care in Dreamy Room Level 118 to evenly space the bottles, ensuring a tidy appearance. After filling the shelves, rotate the cart model by ten degrees clockwise so that it aligns with the bathroom door opening. Use the arrow keys for fine adjustments to avoid any obstruction in your walk path.
Step 5. Place the pink mini fridge near the bed area.
Select the pastel pink mini fridge from Dreamy Room Level 118’s kitchen appliance collection. Drag the fridge onto the upper floor to the right of the yellow utility cart, aligning its back with the wall and its side with the platform edge. In Dreamy Room Level 118, you must leave exactly one grid unit of clearance between the fridge and the stairs for easy navigation. Once the fridge snaps into place, switch to the top view and gently rotate the fridge until it sits perfectly parallel to the back wall. Dreamy Room Level 118 supports stacking two bottles on the fridge top; add the bottles by dragging them from your inventory to the fridge surface. Use the arrow keys in Dreamy Room Level 118 to nudge the bottles so they sit squarely on the fridge lid.
Step 6. Assemble the double bed and arrange pillows and blanket.
Open the furniture menu and choose the double bed model in Dreamy Room Level 118. Drag the bed onto the upper floor platform, placing it against the right wall under the upcoming window. In Dreamy Room Level 118, the foot of the bed should align one grid unit from the platform edge for a balanced look. After snapping the bed to position, click the blanket asset and rotate it 180 degrees so that the white fish pattern faces upward. Dreamy Room Level 118 lets you then add two matching pillows; drag each pillow onto the headboard, spacing them evenly. Finally, use the move tool in Dreamy Room Level 118 to adjust the blanket’s drape over the mattress so the decorative fish motif is perfectly centered.
Step 7. Add the window with curtains above the bed.
Navigate to the décor section and select the arched window frame. In Dreamy Room Level 118, place the window directly above the bed, centering it horizontally on the wall panel. Dreamy Room Level 118 will snap the frame into place when the top edge sits one grid unit below the ceiling. After securing the frame, choose the blue and yellow curtain set. Drag the curtains onto the window rails and ensure they extend evenly on both sides. In Dreamy Room Level 118, you can click and hold the corner handles to widen or narrow the curtain folds. Finally, adjust the ruffled yellow valance so it rests neatly atop the blue drapes, creating a charming contrast in Dreamy Room Level 118.
Step 8. Build the staircase connecting floors.
Select the staircase object from Dreamy Room Level 118’s architecture toolkit. Drag the stairs into the front-left section of the room, aligning the bottom step with the lower floor and the top step flush against the upper platform edge. In Dreamy Room Level 118, make sure the stair width does not block the bathroom doorway or the fridge corner. Once in place, rotate the staircase model 45 degrees if needed, verifying in Dreamy Room Level 118’s 3D view that the steps line up squarely. Then attach the teal handrail by selecting it from the rail accents and snapping it to the outer side of the steps. This careful setup in Dreamy Room Level 118 ensures smooth passage between your two vibrant levels.
Step 9. Install kitchen cabinets and countertop.
Open the cabinetry panel and select the teal base cabinets with gold handles. Drag three cabinet units to the lower back wall in Dreamy Room Level 118, placing them side by side with no gaps. In Dreamy Room Level 118, you may need to use the alignment guide to ensure the cabinet tops are level with the platform height. Once the cabinets snap into position, click the elongated countertop piece and drop it on top of the cabinets. Dreamy Room Level 118 will automatically cut out holes for sink and stove appliances later. Use the tilt tool in Dreamy Room Level 118 to adjust the countertop slight front tilt, recreating the ergonomic slope from the reference image. This lays the foundation for your fully functional kitchen.
Step 10. Set the stove, oven, frying pan, and cutting board.
Locate the stainless-steel stove and oven combo in Dreamy Room Level 118’s appliance drawer. Drag and snap the unit into the central gap cut into your countertop. In Dreamy Room Level 118, ensure the oven door faces forward toward the living area. Next, select the frying pan asset and place it on the stove burner, listening for the click sound that indicates a secure placement. Dreamy Room Level 118 supports interactive items, so hover over the pan to preview cooking effects. Finally, drag the wooden cutting board from the utensil shelf and situate it on the left side of the countertop. In Dreamy Room Level 118, rotate the board 15 degrees to mimic the playful angles seen in the completed design, tying together your cozy kitchen vignette.
Step 11. Position the TV, stand, and speaker.
From the electronics category, pick the flat-screen TV and the matching mid-century modern stand. Drag the stand to the lower right back wall of Dreamy Room Level 118, centering it between the kitchen and the adjacent wall. In Dreamy Room Level 118, the stand should sit flush against the wall without overlapping the countertop corner. Once the stand is secure, click the TV and drop it onto the top surface. Dreamy Room Level 118 will snap the screen into the bracket mount. Lastly, choose the tall silver speaker and place it to the right of the stand. Use the nudge tool in Dreamy Room Level 118 to move the speaker 0.2 grid units away from the stand for balanced acoustics in your virtual home theater.
Step 12. Arrange the living area sofa, coffee table, plants, and rugs.
Head to the décor collection to pick the mint-green sofa and matching rectangular coffee table for Dreamy Room Level 118’s lower floor. Place the sofa so it faces the TV stand, leaving one grid unit of walking space. In Dreamy Room Level 118, click and drag the coffee table in front of the sofa until it snaps into the center of the seating area. Next, select the semi-circular green rug and lay it at the base of the staircase, aligning its curved edge with the step edge. Dreamy Room Level 118 also includes a second beige rug under the sofa—drag it from the textures tab and position it so it extends evenly beneath the table and couch legs. Finally, add a small potted plant to the windowsill by dragging it onto the left-side lower window and place the larger floor plant next to the sofa. These finishing touches complete the cozy living vignette in Dreamy Room Level 118.
Notes and Precautions
- Always rotate and snap elements gently in Dreamy Room Level 118 to avoid misalignment that can block future placements.
- Ensure you leave proper clearance around each object in Dreamy Room Level 118 so movement between areas remains fluid.
- Use the grid guide when installing cabinetry and furniture to maintain level lines and avoid collision glitches.
- Be cautious when stacking small items like bottles or jars; overlapping can cause objects to disappear or become unselectable.
- Save your progress before making major adjustments, as accidental resets may remove multiple pieces at once.
Tips and Tricks from top player
- Use the quick-snap feature by holding the CTRL key while dragging items in Dreamy Room Level 118 to bypass grid constraints when making micro-adjustments.
- Press the spacebar to rotate the camera view slowly in Dreamy Room Level 118, which helps identify perfect snap points from different angles.
- Save custom object arrangements as ‘Favorites’ so you can reuse your half-built bathroom or kitchen setups, speeding up your workflow.
- Apply the item finder search by typing keywords like “bathtub,” “stove,” or “sofa” in the inventory search to locate pieces instantly.
- When fine-tuning placement, turn on the shadow overlay to preview light and ensure no furniture casts odd silhouettes on walls.
Final Scene
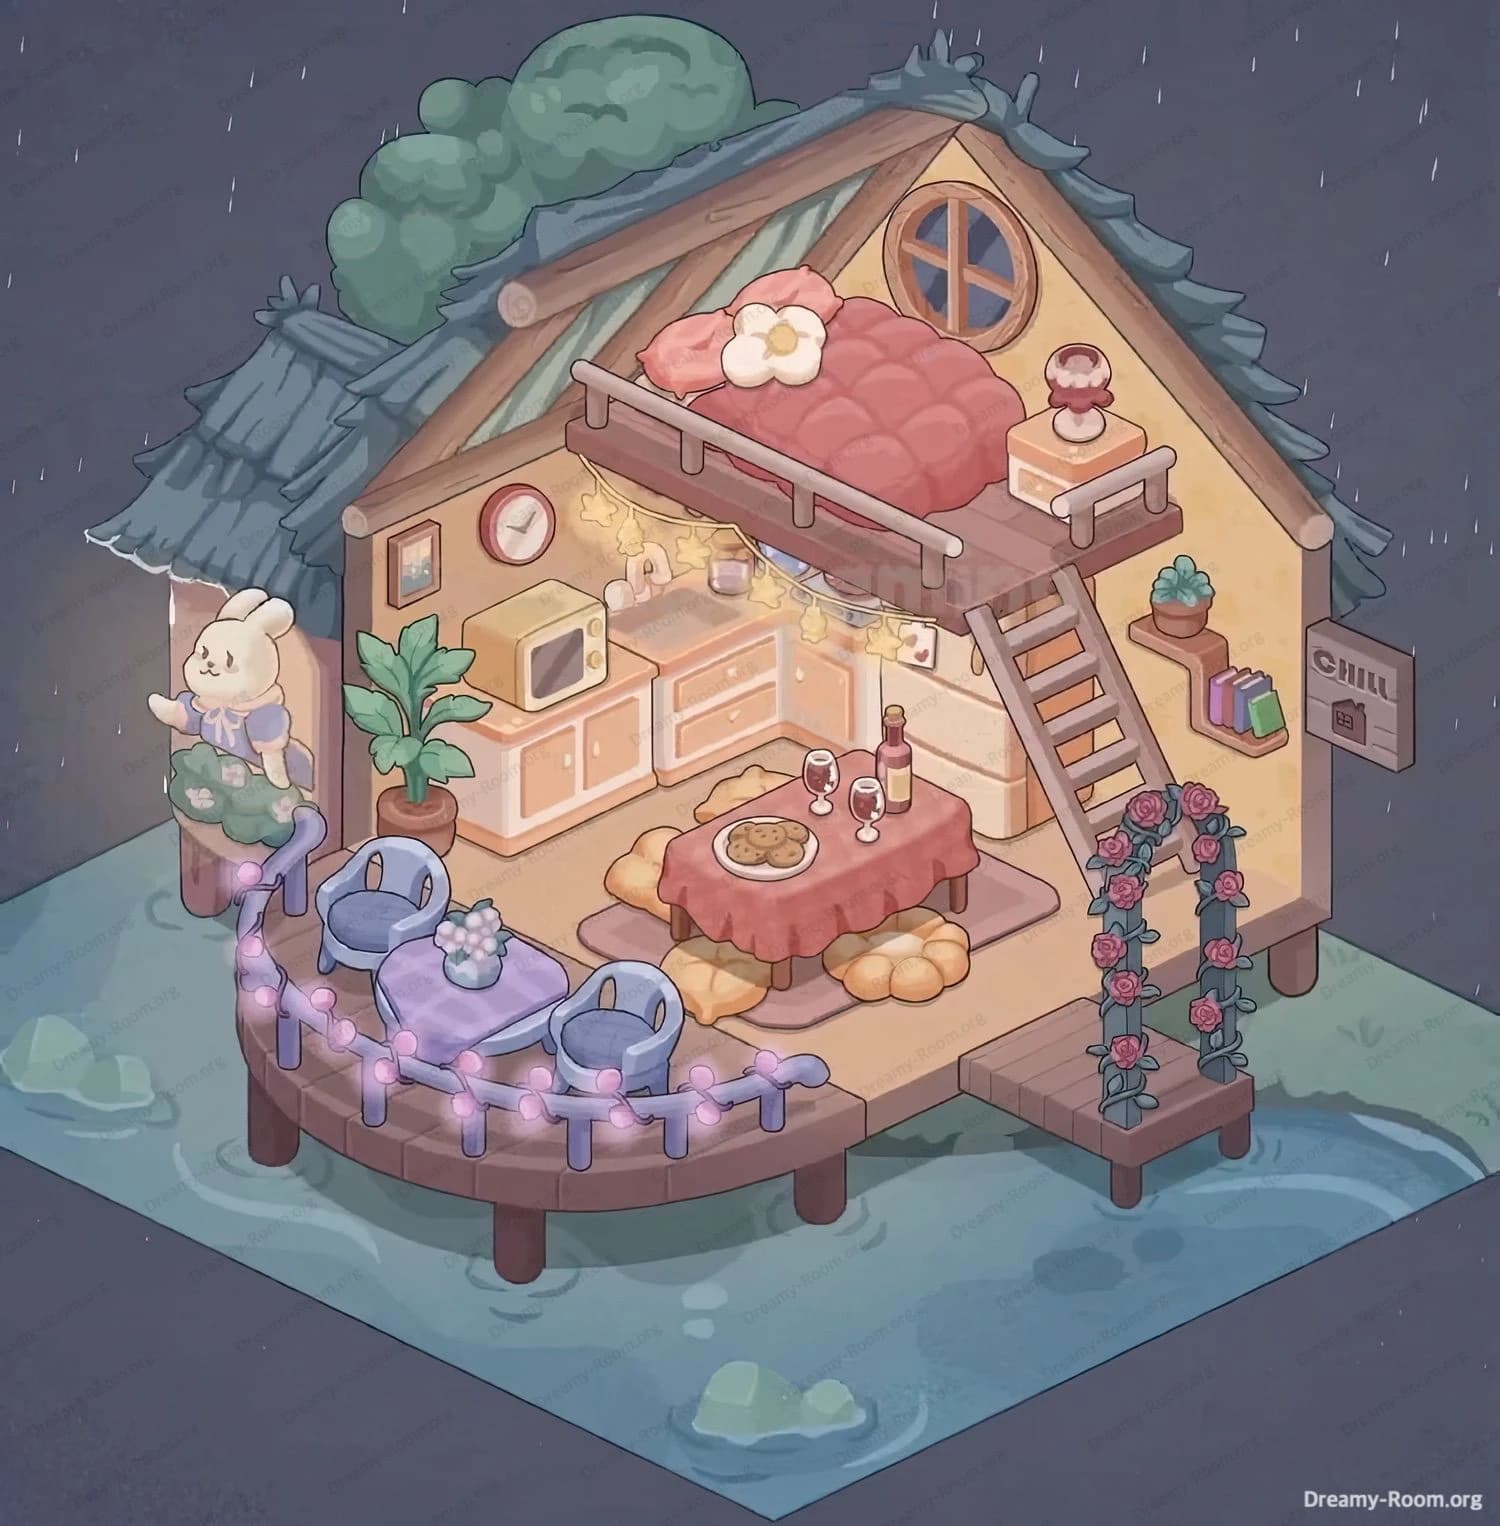
The completed scene of Dreamy Room Level 118 reveals a cozy two-level retreat bathed in pastel hues. Upstairs, a white-and-aqua bathtub shines against mint walls, flanked by a curved glass partition and a draped yellow towel. A golden round mirror and a pet window decal add character to the compact bathroom. To the right, a pink mini fridge stands beside a double bed adorned with a white-fish blanket and matching pillows under a yellow-and-blue curtained window. Below, a teal kitchen with gold-handled cabinets, a stainless-steel stove, and a wooden cutting board invites cooking play. The lower lounge features a mint-green sofa facing a flat-screen TV on a mid-century stand, with a tall speaker and a chic coffee table atop two coordinating rugs. Strategic potted plants and thoughtful placement throughout underscore the challenge of choosing the perfect spot in Dreamy Room Level 118. Every color and texture tells a personal story.