Dreamy Room Level 467
Dreamy Room Level 467 guide - Dreamy Room 467 Walkthrough & Solution.
Important Notice Regarding Level Numbering
Due to frequent changes in Dreamy Room's level numbering and differences between platforms (Android/iOS) – for example, level 467 on Android might not be the same as level 467 on iOS – the text guide below may not always match the images and video above. Please prioritize the image and video guides. If you find that the guide content doesn't match your current level, please visit the All Level Walkthroughs page to find the correct guide based on level images. Thank you for your understanding.
Dreamy Room Level 467 Walkthroughs & Guide
Step 1. Place the vanity and mirror in the back-left corner of Dreamy Room Level 467.
Start Dreamy Room Level 467 by building the vanity zone along the back-left wall on the upper platform. The tall mirror with the bear portrait, lace curtain, and pink roses goes exactly in the corner, flush with both walls. Directly under it, snap the long cream-and-brown vanity shelf so it runs horizontally along the left wall. Arrange the objects on this shelf from left to right: the purple crystal ball on its gold stand, the pink flower bouquet, the small round teal-framed mirror, and the rectangular photo frame. Under the shelf, attach the short lower board and line up the three colorful bottles beneath it. In front of this area, on the bedroom floor against the railing, place the pale oval rug and the pot of red roses, making sure they sit just inside the golden swirly railing that marks the platform edge in Dreamy Room Level 467.
Step 2. Place the paintings, suitcases, and nightstand around the bed area in Dreamy Room Level 467.
Next in Dreamy Room Level 467, decorate the wall space leading toward the bed. On the back wall to the right of the vanity mirror, hang the four picture frames in a tight cluster: two larger frames stacked vertically, then two smaller frames aligned just below them, matching the finished image’s arrangement. On the floor below that cluster, slightly left of the bed’s head, position the two stacked suitcases—purple on top of a darker trunk—angled so they run parallel to the wall. Now place the wooden nightstand directly to the left of where the bed will go, touching both wall and floor edge. The nightstand’s two drawers should face the room. Put the purple table lamp on top, centered. This whole ensemble must sit on the upper platform, leaving enough space for the bed and rug that will soon fill the heart of Dreamy Room Level 467.
Step 3. Place the bed, rug, columns, and candelabra at the center of Dreamy Room Level 467.
The sleeping area is the emotional core of Dreamy Room Level 467. Drop the single bed on the upper platform so its headboard touches the back wall, slightly offset left of center. Ensure the teal pillow with the golden antler motif faces right, and the layered blue and green checkered blankets drape toward the front. Slide the pink circular rug partly under the bed, with its brighter pattern visible at the foot and under the nearby chaise. Behind the bed, attach the three tall golden fan-shaped panels so they form a glowing backdrop following the wall’s angle. To the right of the bed, line up the three cream columns along the platform’s edge, creating a partial room divider. At the front-right corner of the bed platform, place the gold candelabra with five candles and the small wooden treasure chest beside it, both sitting just behind the step down in Dreamy Room Level 467.
Step 4. Place the chaise, stairs, gramophone, and lounge set on the lower platform of Dreamy Room Level 467.
Now shift focus downwards in Dreamy Room Level 467. On the upper platform, in front of the bed and rug, park the green shell-shaped chaise lounge so it faces right, its curved back toward the golden railing. The long ornate gold railing should already run along the platform’s front edge; make sure the chaise’s front legs line up just behind it. Attach the red-and-pink staircase at the right end of this railing so it descends to the lower floor at a diagonal. At the base of the stairs on the lower level, place the small table draped with a purple cloth; the big golden gramophone sits at its back-right corner, while three colored bottles and a square box occupy the remaining space. On the large green rug in front, center the blue coffee table. Arrange the pink teapot and cups on top, fruit stand on the small round pedestal at the rug’s front edge, potted plant on the left outside the rug, and the red double sofa along the rug’s right edge. Seat the bear with the smaller bear on the ornate couch at the rug’s top-left in Dreamy Room Level 467.
Step 5. Place the hydrangeas, banner, and railings between bedroom and office in Dreamy Room Level 467.
The transition zone is crucial in Dreamy Room Level 467 because its rail pieces can be misaligned. On the right side of the bed platform, directly behind the front-most column, add the tall golden vase filled with purple and blue hydrangeas so it hugs the back edge. In front of that, snap in the cream pillar with the blue hanging banner; its base sits on the office-side floor, while the cloth faces the center of the room. Above the banner, attach the brown canopy shelf and rest the small pink flower pot on it. Now create the rail system: connect the cream railing from the front of the bed platform to the short step up to the office area, and continue it around the right side of the desk zone. The angles must follow the edges of the purple office floor exactly; if any railing floats, you’ve misplaced something. This mid-level framing is what visually separates bedroom, lounge, and office in Dreamy Room Level 467.
Step 6. Place the grand window, clock wall, and twin banner pillars on the right wall of Dreamy Room Level 467.
Turn to the green right wall of Dreamy Room Level 467. Center the tall arched window so its bottom touches the office floor behind where the desk will stand. Above it, install the grand cream pediment with purple curtains and gold crest; the columns hug the window’s sides. To the right of the window, place the rectangular starry panel with the round clock at its top and the ornately carved lower frame, ensuring it sits behind the future armchair. On the far right, set the narrower arched window or inset panel. Now position the second banner pillar at the very front-right corner of the room; like its twin near the hydrangeas, it has a cream base, blue banner, and pink flowers on top. Both banners should face inward, framing the office area and adding symmetry to Dreamy Room Level 467.
Step 7. Place the desk, bookshelves, side tables, and characters to complete Dreamy Room Level 467.
To finish the furnishing of Dreamy Room Level 467, start with the office. On the raised purple floor, center the large desk facing slightly left, leaving a one-tile gap behind it for the armchair. Put the stack of books on the back-left corner of the desk, scatter the white and blue papers across the middle, and set the green rotary telephone on the front-right corner. Behind the desk, align the plush red high-back chair directly in front of the starry clock panel, then seat the older bear with the moustache and purple robe in it. To the right, against the wall, add the low bookshelf stacked with colorful books, photo frames, an hourglass, and a small jar or lantern. At the front-right of the rails, place the small side table with the red rose bouquet; at the inner corner of the railing near the stairs, set the table holding the gold pitcher. Finally, ensure the sleeping bear is tucked into the bed and the mirror reflection appears in the back-left mirror, bringing all the characters of Dreamy Room Level 467 into place.
Notes and Precautions
In Dreamy Room Level 467, many pieces share similar colors and heights, so it’s easy to mistakenly swap them. The twin banner pillars, the two rose vases, and the several small tables can all be confused if you rush. Always match each object to its height relative to nearby rails or steps: for example, lounge tables belong on the lowest floor, while the candelabra and treasure chest belong on the bed platform. Be careful with the railings; if any railing floats over a step instead of following its edge, the adjoining furniture is probably one tile off. Characters in Dreamy Room Level 467 usually snap only when their furniture is already correctly placed, so don’t force them early. Finally, avoid crowding the vanity area by misplacing the roses and rug from the bedroom floor—those stay just inside the golden railing, not on the lower level.
Tips and Tricks from top player
Top players treat Dreamy Room Level 467 as three smaller puzzles: vanity-bedroom, tea lounge, and office. Solving one zone at a time reduces confusion and helps you notice how each item visually “locks” into the wall panels and floor borders. Use color matching as a guide: green objects such as the chaise, plant, rug, and wall belong in a rough diagonal from front-left to back-right, while the purple accents concentrate around the vanity and desk. If you ever get stuck, clear only the problematic area instead of resetting the entire room; most of Dreamy Room Level 467 is very forgiving once big structures like stairs and rails are placed. Finally, treat characters as confirmation: when the seated bears and the sleeping figure snap neatly into place, you know the surrounding couches, bed, and pillows are perfectly aligned.
Final Scene Description – Dreamy Room Level 467
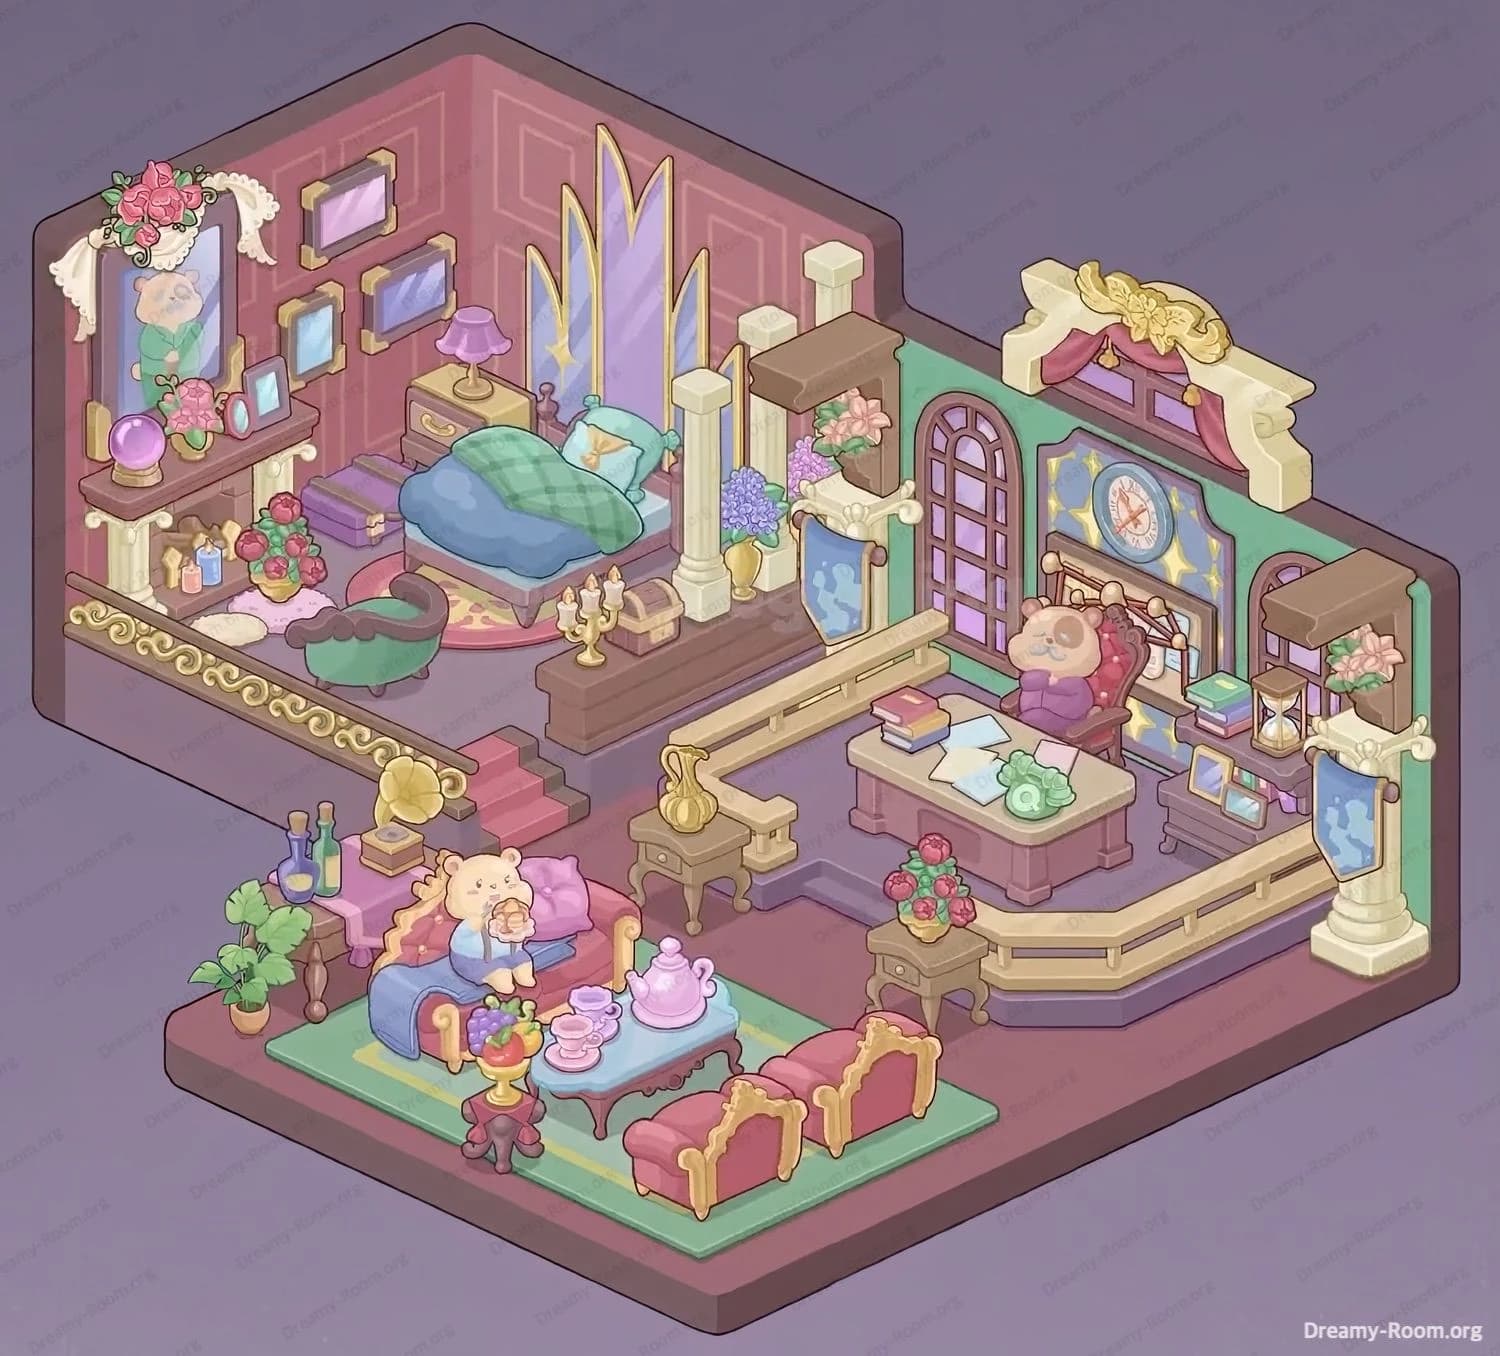
When Dreamy Room Level 467 is complete, the once-empty space becomes a luxurious multi-room suite. The back-left corner glows with a romantic vanity: roses, lace, and a crystal ball beneath the tall mirror reflecting its stylish owner. Beside it, framed pictures, stacked suitcases, and a neatly made bed framed by golden fan panels create a cozy sleeping nook guarded by columns, hydrangeas, candelabra, and a treasure chest. A green chaise and ornate railing overlook the steps down to the tea lounge, where a plush rug, fruit stand, pink tea set, and facing sofas host a cuddly bear cradling a smaller bear. To the right, the green wall supports towering windows, banners, and a stately clock. On the raised office floor, the robed bear relaxes behind a paper-strewn desk, telephone, books, and shelves, framed by flowers and railings—an elegant, story-rich finale to Dreamy Room Level 467.