Dreamy Room Level 832
Dreamy Room Level 832 guide - Dreamy Room 832 Walkthrough & Solution.
Important Notice Regarding Level Numbering
Due to frequent changes in Dreamy Room's level numbering and differences between platforms (Android/iOS) – for example, level 832 on Android might not be the same as level 832 on iOS – the text guide below may not always match the images and video above. Please prioritize the image and video guides. If you find that the guide content doesn't match your current level, please visit the All Level Walkthroughs page to find the correct guide based on level images. Thank you for your understanding.
Dreamy Room Level 832 Walkthroughs & Guide
Step 1. Build the Dreamy Room Level 832 boutique structure and rooftop
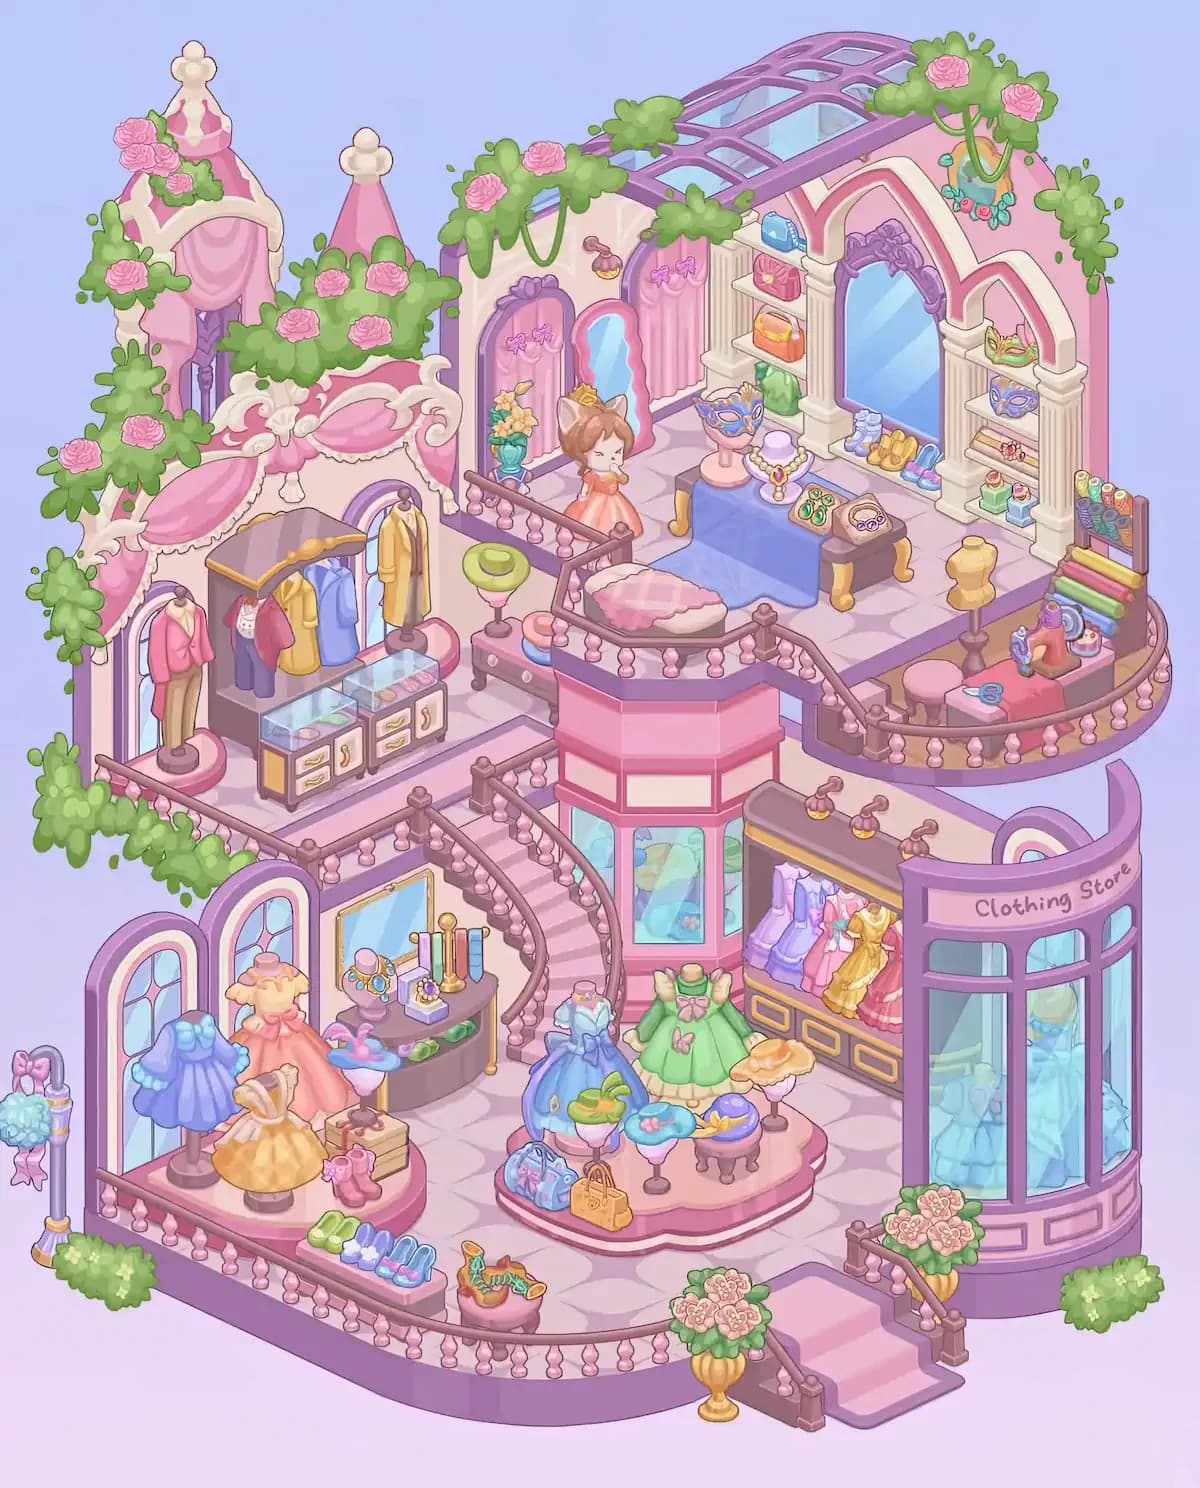
Start Dreamy Room Level 832 by expanding the original pink platform into the full boutique rather than immediately placing small clothing accessories. The tall existing tower belongs at the upper-left corner, while the smaller pointed tower remains just to its right and slightly behind it. Add the cream-and-pink walls around the upper floor, then install the large purple-framed glass skylight across the roof at the upper-right. The completed roof should slope visually toward the rear and contain several pale blue glass panels. Add the ornate cream arches around the walls and the curved balcony edges before decorating them. The central part of the building eventually extends downward into a pink polygonal bay-window structure, while the lower-right side becomes the rounded storefront. Correctly assembling these large pieces is especially important because practically every later object in Dreamy Room Level 832 aligns with one of these architectural landmarks.
Step 2. Cover the upper exterior with vines, roses, and decorative greenery
Next, decorate the outside of the upper structure with the abundant climbing plants visible in the finished Dreamy Room Level 832 scene. Cover the tall left tower with leafy green vines and clusters of pink roses, particularly around its crown, sides, and lower canopy. Continue a thick band of greenery horizontally from that tower toward the smaller pointed turret and across the rear wall. More vines should hang from the roofline above the upper room, with another large rose-covered cluster around the top-right corner of the skylight. Place additional leafy growth along the far-right wall and underneath the decorative hanging ornament near the top-right arch. The plants should look deliberately irregular rather than symmetrical. A few leaves project outward beyond the walls, while several vines hang downward in loose loops. These floral pieces are easy to misplace in Dreamy Room Level 832 because several rose clusters are extremely similar, so compare their shapes and hanging lengths carefully.
Step 3. Create the upper-left changing and dressing area
On the upper floor, begin with the dressing area against the back-left wall. Install two tall pink curtains with purple bow decorations. Between and beside them, place the tall freestanding mirror with its bright pink frame and pale blue reflective surface. Put the turquoise flower vase containing yellow-orange flowers near the left curtain. In front of this area stands the small figure or mannequin wearing the coral-orange gown, positioned close to the balcony railing and facing slightly toward the center of the boutique. The large cushioned chaise belongs farther forward: place its dark oval frame parallel to the curved railing and add the fluffy pale-pink cushion on top. To the chaise's left, position the small pedestal stand with the green hat-like top, while several round pastel hat boxes sit nearby. This section of Dreamy Room Level 832 should feel like a private fitting lounge overlooking the lower shop.
Step 4. Arrange the Dreamy Room Level 832 jewelry and accessory showroom
The upper-center area becomes an elegant jewelry display. Place the rectangular table slightly right of center and cover it with the long blue cloth; its decorative golden legs should remain visible underneath. Set the pink display head wearing the elaborate blue-and-purple masquerade-style accessory on the rear-left portion of the table. The white jewelry bust displaying the pearl-like necklace belongs beside it. On the front-right side, place the green jeweled earrings and the oval purple-and-gold bracelet or necklace display. Behind the table, construct the tall central arch containing the large blue mirror with its ornate purple crest. The shelving immediately to the left of that mirror holds several small handbags in blue, pink, orange, and green. The narrow shelving on the right holds a decorative shoe at the top, another purple accessory beneath it, smaller jewelry or purses on lower shelves, and a small blue container near the bottom. These compact objects make Dreamy Room Level 832 particularly placement-sensitive.
Step 5. Place the shoes and complete the upper-right fashion display
Finish the rear-right showroom by arranging the footwear along the base of the central mirror and adjoining shelving. Place the small lavender boots toward the left side of the mirror base, followed by the yellow shoes, then the blue-and-pink shoes farther right. The exact order matters because the shelf is narrow and similarly sized footwear may appear to fit in several positions. The upper-right wall should retain the cream decorative arches surrounding the large mirror and the smaller pointed display niche. Keep the accessory shelves neatly contained within these arches rather than moving them toward the center table. At the extreme right edge of this floor, add the vertical rack containing many colorful thread spools. Directly below it, stack the folded fabric bolts horizontally in multiple bright shades. This transition from finished fashion accessories to sewing supplies helps establish the intended layout of Dreamy Room Level 832.
Step 6. Build the upper-right sewing and tailoring station
The far-right curved balcony is the tailoring corner of Dreamy Room Level 832. Place the tan dress form on its dark pedestal toward the inside of the area, close to the central showroom but still clearly separated from the jewelry table. Against the curved right wall, install the work surface beneath the thread and fabric storage. Put the sewing machine on this counter together with the small thread cones, rolls, and other sewing notions. The blue scissors belong on the front portion of the worktable. Add the round pink stool immediately in front of the workstation so it faces the sewing machine. Keep the colorful spool rack upright against the rear wall and the folded fabric stack directly underneath or beside it. Finally, surround the platform with the brown-and-pink balustrade. These tiny workshop objects are among the easiest pieces to confuse with decorative accessories elsewhere in Dreamy Room Level 832, so use the sewing machine as the anchor.
Step 7. Furnish the middle-left wardrobe and clothing section
Move to the elevated section on the left side of the staircase. Place the mannequin in the arched left niche and dress it in the pink-red jacket with light beige trousers. Immediately to its right, install the large dark-framed wardrobe. Hang the burgundy, yellow, light-blue, and additional pastel garments across its rail, keeping the longer pieces toward the sides. The separate yellow outerwear piece hangs at the wardrobe's right edge. Underneath the hanging clothes, place the glass-topped storage cabinet. Its transparent compartments contain folded colorful items, while the cream drawers with gold trim occupy the lower portion. Add the decorative pink-and-cream canopy above this section and connect it visually to the ornate tower wall. The staircase railing begins just in front of this wardrobe and curves down toward the lower level. In Dreamy Room Level 832, getting this wardrobe aligned correctly helps prevent confusion with the larger dress cabinet on the opposite side.
Step 8. Complete the staircase, central bay window, and lower-left displays
Install the broad staircase descending from the middle-left balcony into the main shop floor, with pink steps and the brown railing filled with small pink balusters. Beneath and beside it, complete the central pink polygonal bay structure with pale blue windows. On the lower-left wall, add the two tall arched stained-glass-style windows. Place three major dress displays nearby: the blue dress mannequin belongs toward the front-left, the peach-pink gown stands farther back near the wall, and the golden-yellow dress occupies the front portion of the round display platform. A small pink boot or accessory sits close to this platform. Against the rear wall, position the dark accessory console beneath the square mirror and fill its surface with the jewelry head display, small boxes, bottles, rolled pieces, and standing accessories. This densely decorated corner is one of the busiest sections in Dreamy Room Level 832, so place the furniture before its tiny objects.
Step 9. Assemble the main lower-floor dress and hat island
The centerpiece of the ground floor is the large oval pink display island. Place the blue formal dress mannequin on the left side and the bright green dress mannequin with the pink bow near the center-right. Around them, arrange the smaller hat stands: the green hat sits toward the left-front side, a turquoise-blue hat with pink detailing occupies the middle, and the yellow-and-purple hats belong toward the right. Add the large blue patterned handbag and the smaller mustard-yellow handbag along the front edge of the island. Behind this display, install the large wall wardrobe containing a row of formal dresses in lavender, blue, pink, white-red, yellow, and additional pink tones. Its dark lower cabinet includes several gold-trimmed drawers. Dreamy Room Level 832 uses this island as the visual center of the entire boutique, so make sure the mannequins, bags, and hats form a compact oval arrangement rather than spreading into the surrounding walkway.
Step 10. Finish the storefront, entrance, shoes, flowers, and exterior details
Complete Dreamy Room Level 832 with the curved storefront on the lower-right. Its purple frame wraps around large pale-blue glass windows, with the words “Clothing Store” across the upper sign. A pale blue gown is visible inside the display window. Add the front staircase beneath it, using pink steps and matching brown-and-pink railings. Place the golden flower urn packed with pink blossoms beside the front steps and another matching flower arrangement closer to the center-front railing. Add green shrubs near both lower corners and additional foliage along the left exterior edge. On the front railing, arrange the row of small green, lavender, blue, and pink shoes. Nearby, place the small round display containing colorful accessories. At the far-left outside edge, add the narrow decorative stand with its pastel hanging ornaments and floral details. Finish every railing segment, post, flower cluster, and shop-floor accessory before checking completion.
Notes and Precautions
The most important thing to remember in Dreamy Room Level 832 is that many pieces belong to very specific display zones. Shoes appear on both upper and lower levels, clothing is divided between several wardrobes, and small bags or jewelry can easily be mistaken for objects intended for the central display island. Build from large to small: walls, floors, stairs, railings, furniture, mannequins, clothing, and finally miniature accessories.
Pay special attention to the upper-right sewing station and the central jewelry table because both contain numerous tiny items. Likewise, do not confuse the middle-left wardrobe with the lower-right dress cabinet. The completed picture uses nearly every available surface.
There is no need to rush. Dreamy Room's intended gameplay emphasizes taking time to organize and find the proper place for each belonging rather than working against a timer. dreamy room instruction
Tips and Tricks from top player
For Dreamy Room Level 832, use visual landmarks rather than trying to remember every object independently. The skylight identifies the upper-right section, the ornate blue mirror identifies the jewelry showroom, the sewing machine identifies the tailoring balcony, the staircase separates the two major clothing zones, and the rounded Clothing Store façade identifies the lower-right corner.
Another useful strategy is to finish one region completely before moving to another. For example, place the upper jewelry furniture and then immediately fill its shelves, shoes, necklace bust, earrings, and mask display. This prevents tiny pieces from accumulating without an obvious destination. Save flowers, shoes, handbags, thread spools, and small jewelry for late in the process.
If an item refuses to settle into place, compare its orientation with nearby furniture rather than repeatedly moving it around. In Dreamy Room Level 832, many objects fit only when positioned against the correct shelf, table edge, mannequin, or wall section.
Final Dreamy Room Level 832 Scene
The completed Dreamy Room Level 832 becomes a lavish pastel clothing boutique surrounded by roses and greenery. The upper floor combines a curtained fitting area, ornate mirrors, handbags, shoes, jewelry displays, a blue-covered accessory table, a cushioned lounge seat, and a complete sewing station. Below, the curved staircase leads into a larger showroom where blue, peach, yellow, and green dresses fill mannequins and display islands. Hats and handbags decorate the central platform, while additional formal dresses line the rear wardrobe. The rounded purple Clothing Store storefront showcases another blue gown behind glass. Rows of shoes, decorative accessories, flower urns, shrubs, pink railings, and the rose-covered towers frame the entire building. What begins as a nearly empty platform in Dreamy Room Level 832 ultimately becomes a dense, elegant fashion shop where virtually every wall, shelf, table, balcony, and display stand has a carefully chosen object.