Dreamy Room Level 827
Dreamy Room Level 827 guide - Dreamy Room 827 Walkthrough & Solution.
Important Notice Regarding Level Numbering
Due to frequent changes in Dreamy Room's level numbering and differences between platforms (Android/iOS) – for example, level 827 on Android might not be the same as level 827 on iOS – the text guide below may not always match the images and video above. Please prioritize the image and video guides. If you find that the guide content doesn't match your current level, please visit the All Level Walkthroughs page to find the correct guide based on level images. Thank you for your understanding.
Dreamy Room Level 827 Walkthroughs & Guide
Step 1. Build the three-story boutique structure and exterior entrance
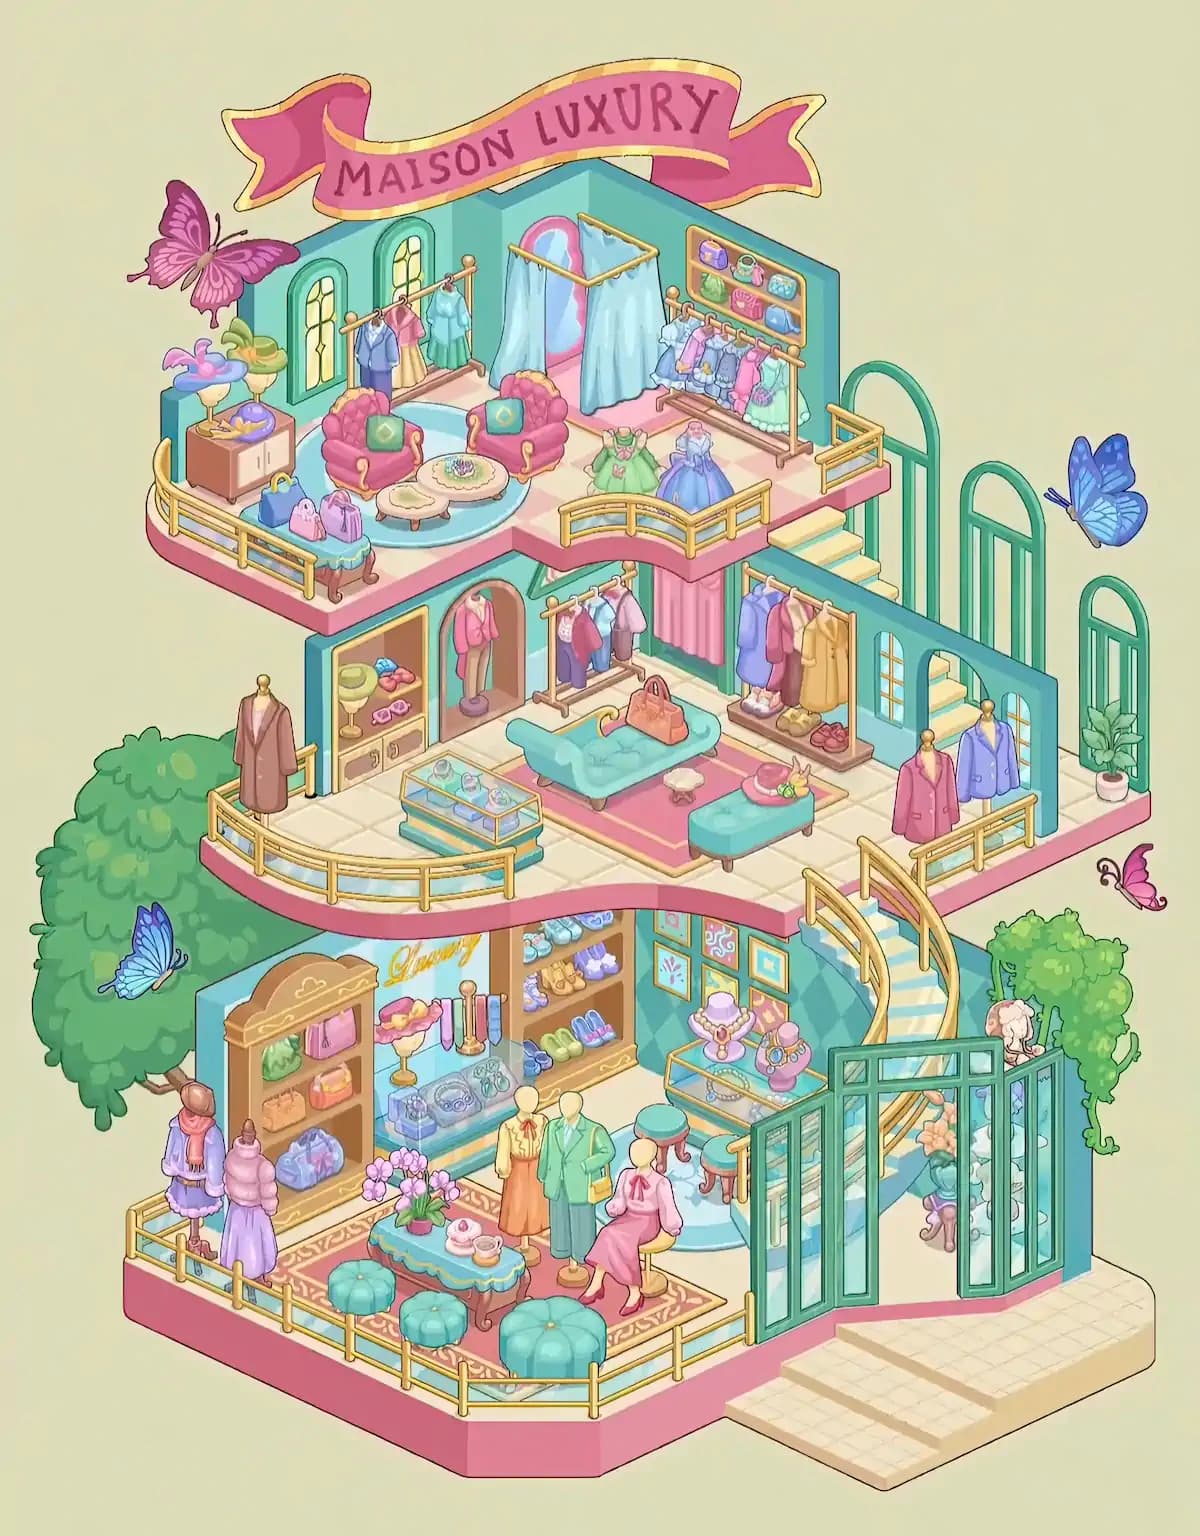
Begin Dreamy Room Level 827 by establishing the large architectural pieces before attempting any of the merchandise. The empty starting room becomes the bottom level of a tall, open-front fashion boutique, with two additional floors extending upward. Keep the original turquoise striped wall on the left and diamond-pattern wall on the right as your orientation points. The main public entrance belongs at the front-right corner of the ground floor, where the large green-framed folding glass doors open toward the cream-colored exterior steps. Position the broad staircase directly outside these doors.
Add the gold safety railing around the exposed front and left edges of the ground-floor platform. The middle floor also receives a gold railing along its front-left edge, while the upper floor uses another gold barrier around the exposed front edge. In Dreamy Room Level 827, these railings are particularly useful landmarks because many later mannequins and display fixtures sit directly behind them. Add the tall green arched window frames along the outer right side of the building. When the structure is correct, Dreamy Room Level 827 should already resemble a three-level boutique rather than the simple empty shell shown at the beginning.
Step 2. Arrange the ground-floor walls, shelves, and handbag displays
Next, concentrate on the back-left half of the ground floor in Dreamy Room Level 827. Place the tall brown wooden merchandise cabinet against the far-left rear wall. Its shelves hold a collection of handbags in several pastel shades, including pink, green, tan, and purple pieces, with additional bags displayed lower down. This cabinet should stand immediately behind the two dress mannequins that will eventually occupy the left-front corner.
Closer to the center of the rear wall, install the glass-fronted accessory display beneath the gold cursive “Luxury” wall decoration. The case contains small fashion accessories arranged in neat rows. Immediately to its right, position the second tall wooden shelving unit. Fill this shelf with carefully stacked or displayed shoes, bags, and colorful accessories. Dreamy Room Level 827 uses these tall fixtures to define the shopping area, so getting them into place early makes the remaining objects much easier to identify. Make sure neither shelf floats forward into the seating area; both belong firmly against the rear walls of Dreamy Room Level 827.
Step 3. Complete the ground-floor jewelry and café-style seating area
The front-center portion of Dreamy Room Level 827 becomes a luxurious customer lounge. Lay the large patterned red-and-gold rug across the front-left and center of the ground floor. On this rug, place the ornate turquoise table with scalloped gold trim. A vase filled with pink-purple flowers sits on the tabletop, accompanied by small pastries or refreshments. Arrange the round turquoise cushioned stools around the table: two sit toward the front, with additional seating tucked around its sides.
At the rear-right portion of the ground floor, beside the staircase, place the gold-framed glass jewelry display. Inside and on top are necklace busts and colorful jewelry pieces, including a prominent purple necklace display. Nearby, add the small turquoise round stool and the darker narrow side table. Another seated display figure belongs near this part of Dreamy Room Level 827, underneath or beside the staircase zone. Keep the jewelry cabinet clear of the entrance path. Correct spacing matters because Dreamy Room Level 827 expects each decorative piece to align with the furniture rather than merely occupy an approximate area.
Step 4. Position all ground-floor mannequins and fashion figures
Now add the mannequin displays that give the lower floor of Dreamy Room Level 827 its showroom appearance. At the far-left front corner, directly behind the gold railing, position two feminine mannequins wearing layered pastel outfits. One faces slightly inward near the tall handbag cabinet, while the second stands just to its right. Slightly farther back, against the left edge of the middle-floor overhang, place the tall mannequin wearing a long brown coat.
In the central ground-floor area, place two standing figures near the lounge and rear showcases. One wears a cream-and-orange outfit, while the other wears a mint-green suit and holds a small yellow handbag. To their right, arrange the seated pink-dressed mannequin on the stool or chair facing diagonally toward the center. At the far-right side, immediately inside the entrance, place the two torso mannequins wearing pink and blue jackets. These stand beside the right-side wall and gold railing. Dreamy Room Level 827 becomes visually much easier once these large figures are positioned, because smaller shoes, bags, and accessories can then be matched to the surrounding displays.
Step 5. Install the curved staircase and finish the right side of the ground floor
One of the most recognizable structures in Dreamy Room Level 827 is the sweeping staircase connecting the ground and middle floors. Position it along the right side of the building, curving upward from the ground-floor interior toward the front-right edge of the middle level. Its steps alternate pale cream and turquoise, and its outer edge is bordered by elegant gold rails. The bottom of the staircase begins just beyond the green entrance doors, while the upper end reaches the middle-floor landing.
Place the green framed wall and window sections behind the staircase so the stairway appears integrated into the boutique rather than floating outside it. Add the decorative plant in the small white pot at the far-right rear corner near the tall arched window. A flower arrangement also appears close to the lower stair area. In Dreamy Room Level 827, be especially careful not to confuse the external cream entrance stairs with this internal curved staircase: they are separate pieces with completely different destinations. Once both are correctly placed, the right edge of Dreamy Room Level 827 should form a continuous route from outside to the ground floor and then upward.
Step 6. Create the middle-floor central sofa lounge
Move to the second story of Dreamy Room Level 827 and start with its largest furniture piece: the turquoise tufted sofa. Position this sofa almost exactly in the center of the middle floor, running horizontally across the room. Place the coral-pink handbag prominently on top of the sofa. Beneath and around it, lay the rectangular pink rug with a contrasting border.
To the sofa’s right, place the matching turquoise upholstered bench. The bench holds a decorative pink crescent-shaped cushion or accessory together with a small colorful accent. Between these pieces and around the rug, add the small pale footstool. This middle-floor lounge is deliberately more spacious than the crowded merchandise areas around it. In Dreamy Room Level 827, resist the temptation to push the sofa against a wall; its correct position is freestanding in the middle. The open space around the sofa helps define the circulation path between the left merchandise displays, right clothing rack, staircase, and front railing. This central arrangement is one of the strongest placement anchors in Dreamy Room Level 827.
Step 7. Fill the middle-floor left wall with clothing and accessory displays
The left side of the second floor in Dreamy Room Level 827 contains several distinct fashion displays. Against the rear-left wall, place the built-in shelving unit containing hats, shoes, and folded accessories. Immediately beside it is an arched dressing niche containing a mannequin wearing a pink suit. This figure should stand inside the niche rather than in the open room.
Near the center-left wall, install a gold clothing rail and hang the collection of garments from it. The rack includes coordinated purple, pink, blue, and neutral clothing pieces. At the front-left portion of the floor, position the low glass-topped accessory case with turquoise trim. Its interior contains several neatly separated small items, such as handbags, jewelry, or folded accessories. The brown-coated mannequin stands farther left near the outer railing rather than beside this case. Correctly separating these displays is important in Dreamy Room Level 827, because many objects use similar pastel colors. Use the walls, railing, and central sofa as fixed reference points instead of judging placement only by color.
Step 8. Complete the middle-floor right clothing section
The back-right wall of the second floor becomes another clothing section in Dreamy Room Level 827. Position the long gold rail against this wall and hang the larger garments in sequence. The finished display contains several coats and dresses in blue, purple, pink, tan, and yellow. Shoes are arranged along the bottom of the display beneath the hanging clothes, so do not place these loose footwear pieces elsewhere in the room.
To the right of the rack, leave the narrow window section visible. The two jacket mannequins should remain toward the front-right edge, one wearing a deep pink jacket and the other a blue jacket. Behind them are the green wall panels and tall arched exterior windows. At the back-center of the room, add the pink curtain panel beneath the upper floor. Dreamy Room Level 827 relies heavily on layered placement, and objects that appear visually close together may actually belong on different depth planes. Confirm that the clothing rail touches the back wall while the mannequins remain closer to the front railing before moving on.
Step 9. Build the upper-floor fitting room and rear clothing racks
The third story contains the most delicate arrangement in Dreamy Room Level 827. Begin at the rear center with the fitting room. Install the gold overhead frame and hang the pale blue curtains so they form an open changing booth. Inside is the tall pink oval mirror or fitting-room backdrop. The curtains should flank this central pink element instead of covering it completely.
On the upper-left rear wall, position the gold garment rail beneath the two narrow arched windows. Hang the coordinated outfits there: a blue jacket ensemble, a pink top with yellow skirt, and a mint-green dress are among the prominent pieces. On the upper-right rear wall, install the longer clothing rail holding the collection of smaller pastel dresses and outfits. Directly above this rack, place the rectangular wall shelf filled with colorful handbags. The bags appear in purple, green, pink, blue, and other pastel shades. This stacked handbag-and-clothing arrangement is an important landmark in Dreamy Room Level 827. If the upper floor seems overcrowded, check these wall displays first because they should remain tight against the walls.
Step 10. Arrange the upper-floor armchairs, tables, rug, and decorative furniture
The center-left of the top floor becomes an elegant sitting area in Dreamy Room Level 827. Place the oval turquoise rug across the center, then position the two plush pink armchairs toward its rear edge. The chairs face slightly inward toward the central tables. Each chair carries a turquoise decorative cushion with a gold motif.
Set the ornate round coffee table near the middle of the rug, with the small floral or jewelry arrangement centered on top. A smaller scalloped side table sits slightly forward-left of the main table. At the far-left wall, add the compact cabinet or sideboard beneath the hat display. Several colorful hats sit above it on stands, creating a millinery display beside the upper-floor windows. At the front-left edge, add the small turquoise bench supporting three handbags in blue, pink, and purple tones. Dreamy Room Level 827 requires these furnishings to fit closely together without overlapping. Use the pink armchairs as the main anchor, then position the smaller pieces around them.
Step 11. Place the upper-floor dresses, mannequins, railing, and banner
Finish the usable space on the top floor of Dreamy Room Level 827 by adding the two formal dresses at the front-center. The left mannequin wears a light green dress decorated with pink details, while the right mannequin wears a pale blue formal gown. They stand side by side just behind the curved gold front railing.
Complete the railing across the front edge and extend it toward the right-side landing. A short gold barrier also borders the upper staircase opening. Above the entire building, place the large curved pink ribbon reading “MAISON LUXURY.” This banner sits centered over the upper floor and is one of the final scene’s most obvious visual landmarks. Its gold-edged ribbon stretches across the roofline without covering the fitting-room curtains. In Dreamy Room Level 827, placing this banner too low can make the top story look compressed, so use the completed screenshot as your height reference. Once the banner, dresses, railing, and wall displays are aligned, the upper boutique portion of Dreamy Room Level 827 should be essentially complete.
Step 12. Add the butterflies, greenery, and final small decorations
Finish Dreamy Room Level 827 with the exterior decoration and any remaining tiny objects. Large leafy green trees frame the building on the lower-left exterior and along the lower-right side, softening the edges of the boutique. A large pink butterfly flies to the upper-left of the top floor, while a large blue butterfly appears high on the right side. Another blue butterfly sits near the lower-left tree, and a smaller pink butterfly appears farther to the right of the middle-floor area.
Check all remaining handbags, hats, footwear, flowers, necklace busts, cushions, pastries, stools, and shelf accessories. Small items are where Dreamy Room Level 827 can become frustrating because several displays use nearly identical pastel palettes. Do not place an item simply because it visually matches another piece; the challenge of Dreamy Room Level 827 is discovering the exact intended location. Scan each floor from left to right and compare the silhouette of every shelf, table, rail, and mannequin with the completed scene before assuming you have finished.
Notes and Precautions
The main difficulty of Dreamy Room Level 827 is precise object placement rather than speed. The level contains many fashion items that resemble one another, particularly pastel handbags, dresses, shoes, and jewelry. Work from the largest pieces toward the smallest ones. Large shelves, sofas, staircases, rails, display cases, and clothing racks establish clear boundaries that make later placement much easier.
Be especially careful with the three vertical levels in Dreamy Room Level 827. A small accessory may appear close to another object in the finished image while actually belonging on the floor above or below it. Also distinguish the outside entrance stairs at the bottom-right from the curved interior staircase connecting the first and second stories.
The wall-mounted handbag shelf belongs above the clothing rail on the upper-right floor, while the larger wooden handbag cabinet belongs on the ground-floor left. Similarly, the turquoise sofa belongs on the middle floor, whereas the two pink armchairs belong on the upper floor. Keeping these major landmarks straight prevents most mistakes in Dreamy Room Level 827.
Tips and Tricks from top player
A reliable strategy for Dreamy Room Level 827 is to solve it in layers. First place architecture, stairs, railings, walls, and large display units. Next place furniture and mannequins. Then handle clothing, and finish with tiny accessories. This avoids repeatedly moving small objects when a larger fixture later reveals their actual position.
Another useful trick is to divide Dreamy Room Level 827 into six visual zones: ground-left, ground-right, middle-left, middle-right, upper-left, and upper-right. Complete one zone before moving to the next. If an object does not seem to fit anywhere in your current zone, leave it temporarily rather than forcing it into a plausible-looking location.
Use distinctive pieces as anchors. The turquoise middle-floor sofa, pink upper armchairs, central fitting-room curtains, MAISON LUXURY banner, ground-floor café table, and curved staircase are all excellent reference points. Once these are correct, most neighboring objects in Dreamy Room Level 827 have only one logical remaining position.
Dreamy Room Level 827 Final Scene
The completed Dreamy Room Level 827 is a whimsical three-story luxury fashion boutique overflowing with pastel detail. The ground floor welcomes shoppers through green folding doors into a showroom filled with handbag cabinets, jewelry cases, mannequins, flowers, pastries, turquoise stools, and elegant displays. Above it, the middle level centers on a plush turquoise sofa surrounded by clothing racks, suits, dresses, shoes, accessory cases, and fashion mannequins. The top floor feels more intimate, with two pink armchairs, a turquoise rug, delicate tables, formal gowns, a curtained fitting room, handbags, hats, and neatly arranged clothing rails.
Gold railings unify all three floors, while turquoise walls, arched windows, trees, and colorful butterflies frame the building. Crowning Dreamy Room Level 827 is the sweeping pink MAISON LUXURY banner. Once every object reaches its exact intended location, the empty shell has been transformed into a richly detailed pastel fashion house.