Dreamy Room Level 841
Dreamy Room Level 841 guide - Dreamy Room 841 Walkthrough & Solution.
Important Notice Regarding Level Numbering
Due to frequent changes in Dreamy Room's level numbering and differences between platforms (Android/iOS) – for example, level 841 on Android might not be the same as level 841 on iOS – the text guide below may not always match the images and video above. Please prioritize the image and video guides. If you find that the guide content doesn't match your current level, please visit the All Level Walkthroughs page to find the correct guide based on level images. Thank you for your understanding.
Dreamy Room Level 841 Walkthroughs & Guide
Step 1. Build the classroom area on the right side in Dreamy Room Level 841
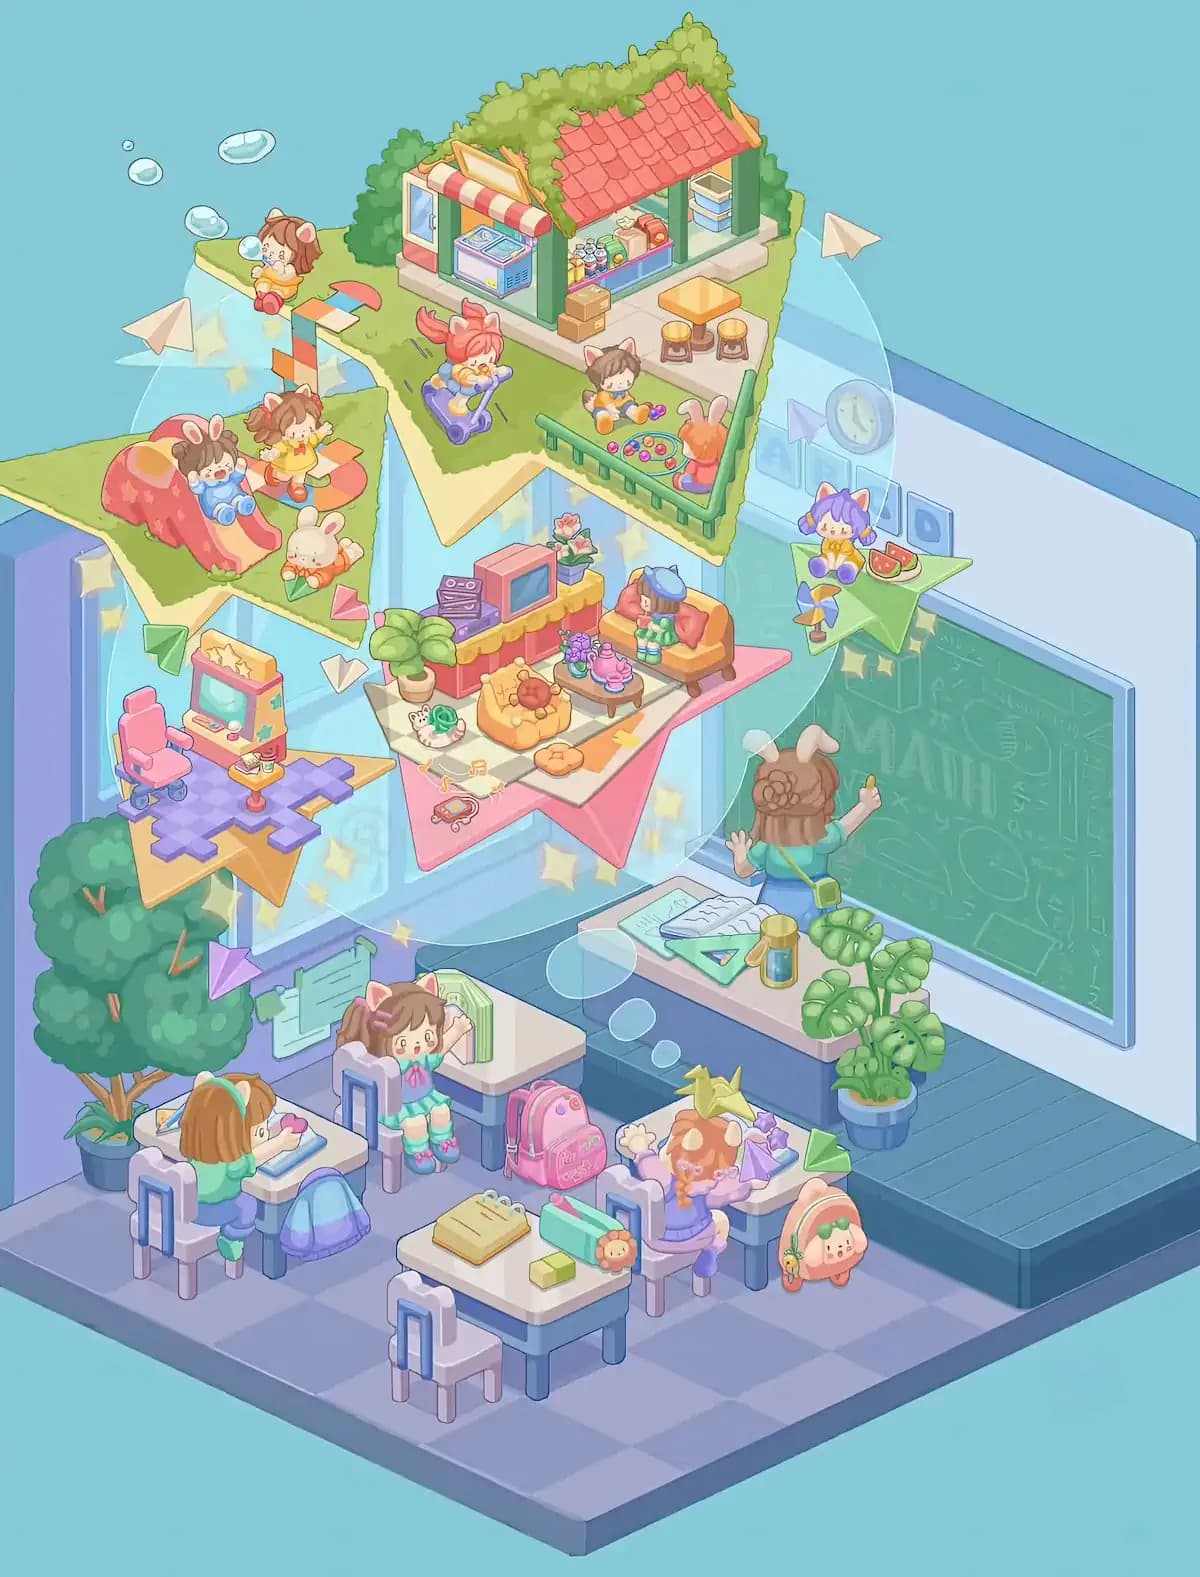
Begin Dreamy Room Level 841 by establishing the main classroom structure on the right half of the room. Place the large dark green chalkboard against the right wall, starting slightly above floor level and extending across most of that wall. Its pale blue frame should be clearly visible around every edge. The board contains chalk drawings, mathematical symbols, stars, diagrams, and the large word “MATH,” so it is one of the easiest anchor objects to recognize.
Directly beneath the chalkboard, install the raised dark blue teaching platform. It should run along the lower-right wall and form a shallow stage beneath the board. In Dreamy Room Level 841, this platform is important because it determines where the teacher’s desk, teacher, and nearby plant will eventually sit. Make sure the stage stays against the right wall rather than drifting toward the center of the checkerboard floor.
Step 2. Place the teacher, teaching desk, and classroom supplies in Dreamy Room Level 841
Next, furnish the teaching area of Dreamy Room Level 841. Put the rectangular teacher’s desk on the raised platform, positioned diagonally in front of the left half of the chalkboard. The desk has a light-colored top and darker blue base. Place the open workbook or textbook on the left side of the desktop, with the green triangular set square beside it. The tall yellow-and-blue cylindrical container belongs closer to the right side of the open book.
Position the teacher behind the desk and directly in front of the chalkboard. She faces away from the classroom while writing on the board with a small piece of yellow chalk. Her brown hair, long rabbit-like ears, teal top, blue lower clothing, and green crossbody bag make her easy to identify. In Dreamy Room Level 841, do not accidentally put her in front of the desk; she belongs between the desk and chalkboard, with one arm raised toward the writing.
Step 3. Add the large classroom plants and left-side wall details
The greenery provides several important visual anchors in Dreamy Room Level 841. First, place the large leafy indoor tree in the back-left corner of the classroom floor. Its blue-gray flowerpot sits close to the left wall, while its broad rounded canopy rises above the nearest student desk. The trunk and small orange-brown branches should remain visible beneath the dense green leaves.
Then place the smaller potted monstera-style plant at the right end of the teacher’s platform, immediately in front of the chalkboard. Its blue pot rests on the platform while several large split green leaves spread upward and partly overlap the teaching area. Behind the large left tree, attach the pale blue paper notices to the window/wall area and add the purple paper-airplane decoration pointing across them. These background details are easy to overlook, but Dreamy Room Level 841 expects even small decorative items to occupy their designated places.
Step 4. Arrange the front student desk, chair, pencil case, book, and eraser
Now fill the foreground of Dreamy Room Level 841 with the empty student workstation. Put the small rectangular desk near the bottom-center of the room, slightly left of the middle. Its pale cream tabletop should face toward the chalkboard, with the blue legs pointing toward the lower part of the image. Place the matching pale chair directly in front of the desk so that a student sitting there would face the teacher.
Several small objects belong on this desk. Put the yellow notebook or book toward the left-back portion of the tabletop. The small light-green rectangular eraser sits slightly to its right. Place the long mint-green and pink pencil case across the right side of the desk, with its tiny lion-shaped charm hanging over the front edge. Dreamy Room Level 841 contains many similarly colored school supplies, so keeping this group together prevents you from confusing them with objects from the floating memory scenes.
Step 5. Complete the left student workstation and seated girl in Dreamy Room Level 841
Move to the back-left portion of the classroom in Dreamy Room Level 841. Position another cream-topped school desk directly in front of the large potted tree. Place the matching chair behind it, and seat the orange-brown-haired girl there so she faces toward the tabletop and slightly toward the center of the room. She wears a green outfit and is shown working on a sheet of paper rather than looking at the chalkboard.
Put her paper or drawing sheet flat on the desktop and add the small writing accessory beside it. A purple-blue backpack belongs immediately behind and slightly to the right of her chair, tucked between this desk and the neighboring workstation. The large tree should rise behind both the student and desk without completely covering them. Correct layering matters in Dreamy Room Level 841: the desk sits in front, the girl occupies the chair, the backpack remains low, and the tree provides the tall background element.
Step 6. Place the cat-ear student, book, desk, and pink backpack
The middle student arrangement is one of the most distinctive groups in Dreamy Room Level 841. Put the next school desk behind the foreground desk and slightly left of center. Place the brown-haired girl with pink cat-ear accessories immediately in front of this workstation. She wears a turquoise-green school outfit with a pink bow and colorful fluffy socks or leg warmers.
Set the tall open book upright on the desk so the girl appears to be reading or presenting from it. The book should stand near the right-hand side of the tabletop rather than lying flat. Then place the bright pink backpack on the floor immediately to the girl’s right, between her desk and the student seated farther right. The backpack faces forward so its front pocket is visible. In Dreamy Room Level 841, this character should remain near the middle of the room; placing her too far left interferes with the seated student and large tree.
Step 7. Finish the right student desk with the braided girl and peach backpack
The final occupied student station in Dreamy Room Level 841 belongs near the lower-right-center of the floor, just below the teacher’s platform. Place the school desk here with its chair behind it. Seat the orange-haired girl with braided pigtails at this desk, facing diagonally toward the chalkboard. Her large yellow star hair decoration should appear above her head, while her lavender and purple clothing makes her stand apart from the other students.
Arrange the small purple school items on top of her desk. Immediately to the right of this workstation, place the rounded peach-orange character backpack on the floor. It has a pale face, green decoration across the top, and a small dangling carrot-like charm, so it should remain fully visible rather than hiding underneath the desk. This cluster completes the classroom seating in Dreamy Room Level 841 and should leave a narrow open aisle between the student desks and the raised teaching platform.
Step 8. Create the central floating living-room memory scene
Once the classroom floor is complete, begin the magical upper display of Dreamy Room Level 841. The largest central memory sits inside a pink star-shaped platform suspended in front of the middle window panes. Place the red-and-yellow storage cabinet across the back of the star, then put the retro pink television on top. Add the small dark stereo or stacked electronic unit to the television’s left and the small flower arrangement near the television.
Set the orange sofa on the right side of the star and place the small seated girl on it. In front of the sofa, position the dark coffee table with the purple flowers, pink teapot and cups, and the small bottles or containers. The large orange cushion or rug with decorative fruit-like pieces belongs on the left-center of the star, with the tiny white character nearby. Finish the lower edge with the little toy car. Because the scene contains many miniatures, Dreamy Room Level 841 is especially strict about keeping these objects within the central star.
Step 9. Assemble the floating arcade setup on the lower-left star
The next floating vignette in Dreamy Room Level 841 occupies the lower-left section of the window, above the large classroom tree. Start with the orange star-shaped base and place the purple checkerboard platform across its center. The pink wheeled gaming chair belongs on the far-left portion of this platform and faces toward the arcade machine.
Install the colorful arcade cabinet slightly to the right of the chair. It has a turquoise screen, pink body, decorative yellow stars, and a crown-like star topper. Add the tiny snack or drink accessories on the small ledge beside the machine. Purple platform pieces extend toward the right edge of the star, giving the entire setup an irregular game-board appearance. Keep the whole arcade memory suspended above the classroom furniture; it should never touch the student desks. In Dreamy Room Level 841, floating scenes are visually close to the classroom objects, so checking their relative height helps prevent misplacement.
Step 10. Build the upper-left grassy play scene in Dreamy Room Level 841
Above the arcade star, place the smaller grassy island occupying the upper-left section of Dreamy Room Level 841. The island has an irregular green lawn with a pale underside and contains several children and toys. Put the large red-orange rounded cushion or play structure toward the left side. The brown-haired child wearing bunny-like ears sits against this red object near the center-left.
Place the second brown-haired child in a bright yellow outfit just to the right, standing on the colorful curved stepping-stone path. The white rabbit character holding an orange carrot belongs closer to the lower-right edge of the grassy island. Arrange the red, yellow, and green curved path pieces across the lawn so they lead through the children’s play area. Small triangular decorations and nearby paper-airplane shapes point toward the floating scene. The exact character spacing matters in Dreamy Room Level 841, particularly because the island is compact and several pieces can appear to fit in multiple positions.
Step 11. Add the green star snack and music scene on the upper-right
The right side of the window receives another suspended vignette in Dreamy Room Level 841. Place the large green star-shaped platform to the right of the central living-room star and above the chalkboard. Seat the purple-haired or purple-hooded child on the upper-left portion of the star. The character wears oversized cat-ear headphones and sits with legs hanging near the star’s lower edge.
Put the watermelon slices on the right side of the green star. Directly below the seated character, attach the small colorful pinwheel so its blades point outward toward the classroom. Behind this scene, the pale translucent wall graphics should remain visible: rectangular icon shapes, a paper-airplane symbol, and the circular clock-like emblem near the upper-right. These background decorations belong behind the green star rather than on its surface. In Dreamy Room Level 841, maintaining the layers—wall graphics first, floating star second, character and snacks last—makes this cluster much easier to organize correctly.
Step 12. Construct the large upper café and park island
The biggest floating scene sits at the very top of Dreamy Room Level 841, centered across the upper window area. Begin with the irregular grassy island. Place the small café or kiosk along its back edge. The building uses green posts, a red tiled roof, and thick green vines growing over the roofline. On the left side, install the red-and-white striped awning above the blue display freezer or refrigerated case.
Fill the kiosk counter with the tiny colorful drink bottles, containers, and food items. Add the stacked cardboard boxes on the ground in front of the counter, while the stacked blue-and-white containers belong inside the right side of the kiosk. Place the low yellow-orange rectangular table or bench outside, followed by the two small round wooden stools. These small café furnishings are some of the easiest pieces to swap accidentally in Dreamy Room Level 841, so use the roof and counter as fixed landmarks before positioning them.
Step 13. Place the children, toys, railing, and activities around the upper island
Continue working on the top island of Dreamy Room Level 841 by adding its characters and activity pieces. At the far upper-left edge of the grass, place the small brown-haired character sitting near the ledge, surrounded by several floating bubbles. Near the center-left, position the reddish-haired child on the purple rocking or ride-on toy. The toy should sit on the lawn below the kiosk rather than immediately beside the counter.
Place the brown-haired child sitting on the grass near the middle-right and arrange the small colorful toys near the child’s feet. Along the front-right edge, install the short green railing. The orange rabbit-like character belongs immediately behind this railing, next to the round tray or shallow dish filled with colorful balls. These details give Dreamy Room Level 841 its playful school-memory theme. Keep enough open grass between each activity so none of the figures overlap incorrectly.
Step 14. Finish Dreamy Room Level 841 with bubbles, paper airplanes, sparkles, and floating connections
The final placement stage of Dreamy Room Level 841 is mostly decorative, but these small effects complete the finished composition. Arrange the translucent bubbles around the floating islands, especially above the upper-left child, between the central star and classroom, and near the right side of the window. Several bubbles should overlap the window panes without covering the major characters.
Place the cream and colored paper airplanes around the memory scenes: one points inward from the far left, another appears near the upper-right café island, and smaller purple, green, pink, and white triangular paper-plane shapes float between the stars. Add the tiny yellow sparkles around the window and between the suspended platforms. Finally, preserve the pale translucent curved boundary that visually wraps around the floating memories. Dreamy Room Level 841 uses these effects to connect all five miniature scenes into one dreamlike collage, so they should surround the memories instead of being placed on the classroom floor.
Notes and Precautions
The greatest difficulty in Dreamy Room Level 841 is distinguishing normal classroom furniture from objects belonging to the floating memories. Several pieces use similar pastel pink, green, blue, and yellow colors, so an item may look convincing in the wrong scene even though the game will reject its placement.
Pay particular attention to depth. The chalkboard, teaching platform, classroom tree, teacher’s desk, and student furniture belong at floor level. The arcade star, grassy play area, central living-room star, green snack star, and large café island all float above them in front of the window. In Dreamy Room Level 841, putting a miniature object into the main classroom is a common source of confusion.
Also watch the backpacks. The purple backpack belongs behind the left student, the pink backpack belongs beside the cat-ear student, and the peach character backpack belongs beside the braided student on the right. Similarly, the café boxes, stools, bottles, watermelon, tea set, toy car, pencil case, eraser, books, and classroom geometry tools each belong to very specific groups.
Because Dreamy Room Level 841 has no need for rushed placement, use the large objects as anchors before dealing with tiny accessories.
Tips and Tricks from top player
A reliable way to solve Dreamy Room Level 841 faster is to divide the room into six zones: the classroom floor, teacher area, central pink star, left arcade star, upper-left grassy island, right green star, and upper café island. Sort every object mentally into one of those zones before attempting precise placement.
Another useful strategy is to work from biggest to smallest. In Dreamy Room Level 841, place the chalkboard, platform, large tree, desks, floating stars, grassy islands, and café first. Once those anchors are correct, the available positions for characters and accessories become much more obvious.
For tiny pieces, compare nearby colors and functions rather than their size. A green triangular ruler belongs with the teacher’s open book, while a green paper airplane belongs in the floating window display. The watermelon belongs on the green star, while the tea set belongs on the central pink star.
If Dreamy Room Level 841 refuses an object that seems correctly placed, check the object directly behind or beneath it. The correct spot may already be partially covered by another item, especially around the café counter, classroom desks, and central living-room memory.
Final Scene of Dreamy Room Level 841
The completed Dreamy Room Level 841 becomes a lively pastel classroom surrounded by dreamlike memories. On the floor, four student desks fill the lavender checkerboard room while three children study beside colorful backpacks. A large indoor tree softens the left corner, and the teacher stands on the raised right-hand platform writing mathematics across a huge green chalkboard. Above them, the window transforms into a magical timeline of playful scenes. A pink star holds a cozy living room with a television, sofa, tea set, flowers, and toys; an orange star displays a tiny arcade; a grassy island shows children and a rabbit playing; and a green star carries a headphone-wearing child with watermelon. Crowning Dreamy Room Level 841 is a vine-covered café kiosk surrounded by children, stools, snacks, toys, and colorful activities. Bubbles, sparkles, and paper airplanes connect everything into one cheerful floating memory collage.