Dreamy Room Level 710
Dreamy Room Level 710 guide - Dreamy Room 710 Walkthrough & Solution.
Important Notice Regarding Level Numbering
Due to frequent changes in Dreamy Room's level numbering and differences between platforms (Android/iOS) – for example, level 710 on Android might not be the same as level 710 on iOS – the text guide below may not always match the images and video above. Please prioritize the image and video guides. If you find that the guide content doesn't match your current level, please visit the All Level Walkthroughs page to find the correct guide based on level images. Thank you for your understanding.
Dreamy Room Level 710 Walkthroughs & Guide
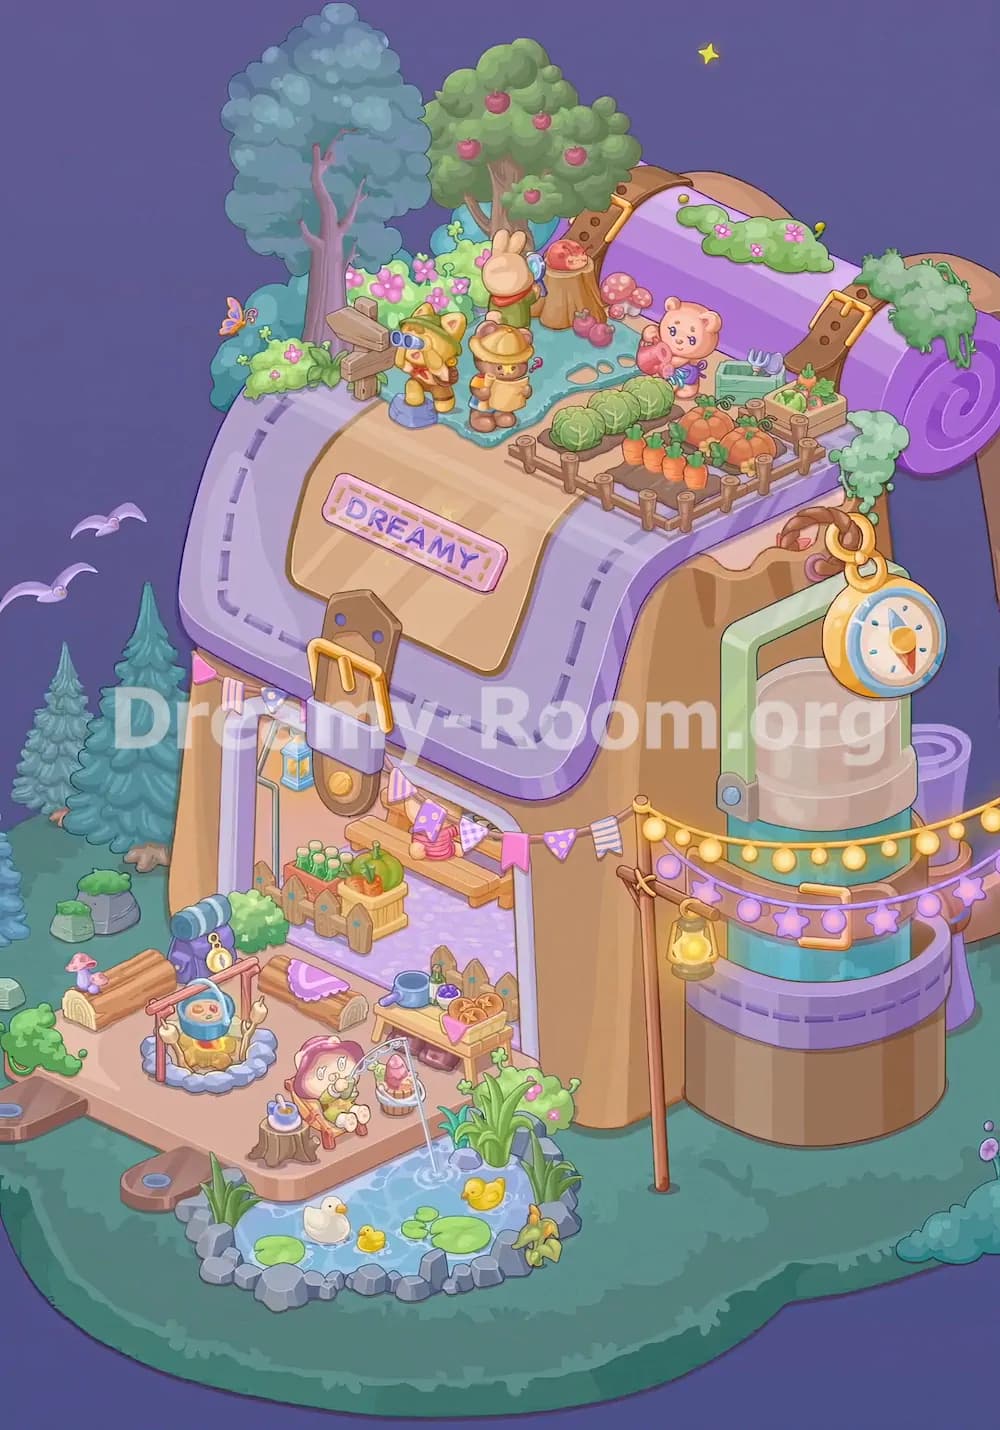
Step 1. Place the giant backpack-room shell on the purple floor base.
Begin Dreamy Room Level 710 by turning the empty peach corner into the main camping-room structure. The completed room is shaped like a large open backpack or rolled camping bag, so the first object to position is the tall tan shell that rises from the back and right side of the purple speckled floor. Align the rounded top against the rear wall, with the lavender floor remaining visible as the central platform. In Dreamy Room Level 710, the main challenge is determining the correct placement for each object, and this shell is the anchor for everything else. Make sure the left and right tan walls curve naturally around the room, because later decorations, the roof blanket, the door area, and the side balcony all depend on this exact foundation.
Step 2. Add the lavender roof flap and front “DREAMY” blanket panel.
Next in Dreamy Room Level 710, place the large lavender fabric roof across the top of the backpack structure. It should drape from the upper left side toward the upper right, with dark stitched lines tracing a rectangular path along the fabric. The tan wooden-looking center panel sits on top of this lavender area, slightly lower than the roof garden and directly above the entrance. Place the pink-bordered “DREAMY!” label in the middle of that tan panel. This sign is one of the clearest landmarks in Dreamy Room Level 710, so use it to check your alignment. The lavender roof should look soft and padded, while the tan patch should appear like a sewn-on flap. Do not push it too far upward, or the rooftop characters and garden will lose their proper spacing.
Step 3. Build the lower entrance, doorway, flags, and indoor storage area.
For the lower section of Dreamy Room Level 710, create the open front doorway beneath the lavender roof flap. Place the tall rectangular entrance slightly left of center, framed by tan walls and a pale interior floor. Add the small hanging pennant flags across the top of the doorway: pastel triangles, striped pieces, and purple banners should stretch from left to right. Inside the entrance, place the wooden shelves, small crates, cushions, baskets, watering can, and food tray along the back and right interior walls. A green vegetable basket belongs near the upper-left part of the doorway interior, while a small fence-like divider and a tray of bread or pastries sit lower on the right. In Dreamy Room Level 710, this area can become crowded quickly, so keep each tiny object inside the doorway rather than letting it spill onto the outdoor patio.
Step 4. Place the front handle, strap, lock plate, and backpack hardware.
Now add the backpack details that make Dreamy Room Level 710 look like a cozy bag-house rather than a normal room. Attach the brown vertical strap and metal-looking plate to the front center of the lavender roof, just below the “DREAMY!” patch. The yellow handle arches over the strap, while a round golden button hangs underneath. A small darker plate with blue dots sits above the handle area. These objects should line up vertically, almost like the closure of a backpack flap. In Dreamy Room Level 710, the exact placement matters because the hardware overlaps the lavender roof and partly covers the upper doorway. If the strap is too high, it blocks the sign; if it is too low, it interferes with the string flags and entrance decorations.
Step 5. Arrange the left outdoor campsite with logs, fire pit, kettle, and path stones.
Move to the lower-left outdoor space in Dreamy Room Level 710 and place the campsite objects. Lay the small wooden log pile along the left edge of the patio, with the tiny mushroom sitting on or near the log. In front of it, set the circular stone fire pit. The red cooking frame should stand over the fire, holding a blue pot or kettle in the center. Place the small path stones at the far left edge of the island, leading toward the entrance. A rolled blue item, possibly a sleeping mat or telescope-like camping object, rests near the left side of the doorway. Dreamy Room Level 710 uses these outdoor pieces to create a lived-in camping scene, so keep them low and left, outside the door, without covering the pond or the main entrance.
Step 6. Add the pond, waterfall pipe, ducks, plants, and stone border.
The pond belongs at the bottom center of Dreamy Room Level 710. Place the rounded blue water pool slightly in front of the entrance, bordered by gray stones. Add lily pads on the left and center of the water, then place the white duck near the lower-left side, the tiny yellow duckling near the front center, and another yellow duck near the right side. The arched pipe or small fountain should pour water into the pond from the upper-right edge, near the basket and sitting bunny area. Add tall green reeds and plants around the right and upper edges of the pond. In Dreamy Room Level 710, this section is easy to misread because several plants overlap the water’s edge, but the ducks must remain clearly visible inside the pond.
Step 7. Place the cozy bunny seating area, stump table, basket, and patio details.
In Dreamy Room Level 710, the lower patio becomes a tiny rest spot. Place the pink armchair or hammock-like seat just above the pond, slightly left of the waterfall stream. The small bunny character sits in this cozy chair, facing forward. To the left of the chair, set the short tree-stump table with a cup or small item on top. Nearby, place the basket with a pink cloth and small supplies close to the water pipe. A watering can and small stones should sit around the interior patio, while a few green plants fill the lower-right corner. The challenge in Dreamy Room Level 710 is recognizing that this is not random clutter: every item belongs in a tight semicircle around the pond and doorway, making the lower scene feel like a comfortable campsite lounge.
Step 8. Decorate the rooftop garden with vegetables, fence, tools, and crates.
The rooftop garden is one of the busiest parts of Dreamy Room Level 710. Place the fenced garden bed on the upper-right side of the lavender roof. The wooden fence surrounds the soil patch, with carrots and pumpkins or round orange vegetables filling the front and right sections. Larger green cabbages sit in a row along the left side of the garden bed. Add the small green crate and gardening tools near the back-right corner, including the little fork-like tool. Tiny posts, buckets, and plant details should stay inside or just beside the fenced area. In Dreamy Room Level 710, the rooftop garden must sit above the side balcony and to the right of the characters. Keep it level with the roof surface so it looks planted on top of the backpack, not floating over the room.
Step 9. Place the rooftop characters, signpost, flowers, mushrooms, and apple tree.
The upper-left roof area of Dreamy Room Level 710 contains a lively explorer scene. Place the large blue-green tree at the far upper-left edge, with its trunk rising behind the small characters. Add the leafy apple tree near the upper center, with red apples visible in the foliage. Beneath the trees, place the wooden signpost on the left, then add the small yellow cat explorer with binoculars just right of the sign. The tan explorer character in a round hat stands nearby, holding a small item. A bunny-like figure and a red-haired character sit or stand closer to the middle, near mushrooms and fallen fruit. Pink flowers and green bushes fill the background. In Dreamy Room Level 710, these small figures must be arranged carefully so none of them cover the apple tree trunk or garden bed.
Step 10. Add the rolled sleeping mat, straps, greenery, and right-side rooftop plants.
Now complete the top-right roof details in Dreamy Room Level 710. Place the large rolled purple sleeping mat along the far right edge, with its spiral end facing outward on the right. Two brown straps with yellow buckles secure it across the roof, one near the upper-middle section and another near the far-right side. Add soft green mossy patches with pink flowers on top of the roll and roof, especially near the upper-right and center-right areas. A small leafy bush hangs over the right edge. These details are important because Dreamy Room Level 710 uses the roll to explain the backpack-camping theme. If the roll sits too low, it interferes with the side balcony; if it sits too high, it no longer connects naturally with the roof straps and garden.
Step 11. Build the right cylindrical side room, balcony, clock charm, lantern, and lights.
On the right side of Dreamy Room Level 710, place the cylindrical side room attached to the backpack wall. It has a tan lower base, a mint-green vertical frame, and a rounded window or door panel facing forward. Around it, add the lavender balcony ring. The golden pocket-watch charm hangs near the upper-right side, attached by a loop to the structure. String lights stretch across the right front area, with yellow bulbs along the upper strand and purple star lights along the lower strand. A hanging lantern should be placed on the brown pole below the lights, near the right side of the entrance. Dreamy Room Level 710 depends on layered placement here: the balcony sits behind the lights, the lantern hangs in front, and the clock charm floats near the upper side wall.
Step 12. Finish the background with trees, birds, bushes, flowers, butterflies, and stars.
Finally, finish the outer scenery of Dreamy Room Level 710. Keep the existing evergreen trees on the far left background, then add the completed room so the trees remain partly visible behind the structure. The two pale purple birds fly on the left side of the sky, while a small yellow star appears near the top-right sky. A butterfly belongs near the left rooftop flowers beside the large tree. Add small bushes and pink flowers around the left roof edge, and place the curved green bush at the lower-right island edge with tiny purple buds. Dreamy Room Level 710 is not only about indoor decorating; it also asks you to read the full silhouette of the island. The correct solution feels balanced because the heavy backpack-room sits in the center while small natural details frame it from every side.
Notes and Precautions
Dreamy Room Level 710 is mainly a placement puzzle, not a speed challenge. The most important precaution is to use the backpack shell, lavender roof, rooftop garden, pond, and right cylindrical side room as anchor zones before arranging tiny objects. Many small decorations overlap visually: the string lights cross in front of the right balcony, the hardware overlaps the doorway, and the pond plants overlap the stone border. In Dreamy Room Level 710, avoid placing character items too close together on the rooftop, because the explorer figures, mushrooms, apples, and signpost can easily cover one another. The lower interior also has several baskets and shelves, so keep food trays and cushions inside the doorway. Always check object depth: roof items should sit on the roof, patio items should stay on the lower platform, and background trees should remain behind the room.
Tips and Tricks from top player
A top-player approach to Dreamy Room Level 710 is to solve from large to small. First place the backpack body, lavender roof, rolled mat, side cylinder, pond, and rooftop garden. These big pieces define the map. Then add medium objects such as trees, balcony lights, doorway shelves, fire pit, and garden fences. Save the smallest items—ducks, apples, flowers, tools, lanterns, flags, and character accessories—for the final pass. Another useful Dreamy Room Level 710 trick is to match each object to its “story zone”: explorers belong on the roof, cooking gear belongs on the left patio, ducks belong in the pond, vegetables belong in the fenced garden, and travel hardware belongs on the backpack front. This reduces guessing and helps you solve the main challenge: determining the correct placement for each object.
Final Scene of Dreamy Room Level 710
The completed Dreamy Room Level 710 scene becomes a magical camping backpack transformed into a miniature home. A lavender roof wraps over the tan bag-like structure, marked with stitched lines, a “DREAMY!” patch, a front handle, and hanging flags above the open doorway. On the rooftop, explorers gather beneath blue and apple trees beside flowers, mushrooms, a signpost, and a fenced vegetable garden full of cabbages, carrots, and pumpkins. The right side features a cylindrical balcony room with glowing strings of yellow bulbs and purple stars, plus a golden clock charm and lantern. Below, the patio holds a fire pit, logs, baskets, shelves, a seated bunny, and a pond with ducks, lily pads, reeds, stones, and a tiny waterfall. Dreamy Room Level 710 ends as a peaceful woodland campsite, where every object feels carefully unpacked into its perfect place.